
Add Table
- Go to Dashboard > Ninja Tables.
- Click the “Add Table” button located on the top right of your screen.
- “Add New Table” form will appear with the title and description. Fill up the form and then click the “Add” button to add a new table.
- Clicking on the “Add” button will send you to the “Table Rows” tab.
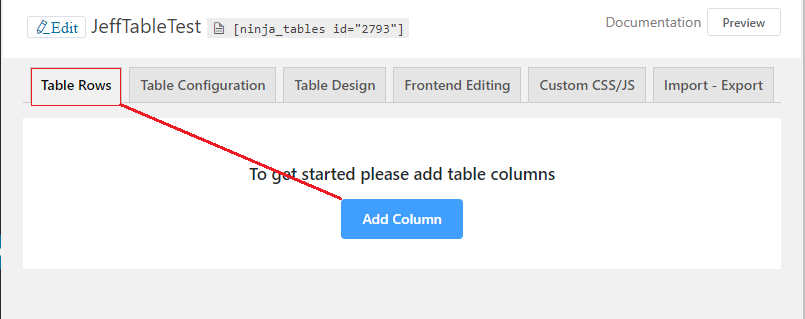
Table Row Tab
- Initially, in the“Table Rows” tab, you will find only a button to create columns. After creating a column you will get two buttons in the top right corner of the page. One is for creating columns and another is for inputting data into the created columns.
2. You also can have an option for inputting data in the created columns.

This Table Rows section is used for creating columns and putting data onto the created columns.
Let’s have a visual look at the video demonstration of the basic table setup using the Ninja Tables plugin.
Table Configuration Tab
- In this tab, you will be able to add a column and configure your desired column name, column key (Column key will automatically generate based on your given column name ), column data type, responsive breakpoint, and so on.
- After setting up click the “Add Column” button to add a column. You will also find multiple for configuring your table columns.
- To configure each column, you need to click on the edit icon, so that you will get four different options. They are Basic Settings, Advanced Settings, Conditional Formatting, Transform Values, etc.
- Using Basic Settings you can do basic configuration including responsive breakpoints of your table configuration.
- In Advanced Settings, you can have multiple options for configuring your columns.
- Conditional Formatting will allow you to give a condition for formatting your columns in very different ways.
- Using Transform Values you can transform values from one to another.
Table Design Tab
In this section, you will find three design options for configuring your tables. They are Styling, Table Colors, Others, etc.
- Pagination:- Under the “Others” option you will find the pagination section. In this section, you can select how many items you want to show per page. You can also disable pagination here.
- Table Features:- Use this part to show the table title, and table description in the front end and check the box if you want to enable search and sorting for visitors. You can also select the default sorting option here.
- Styling Library:- In the Styling part of this section, you can select styling libraries like Bootstrap 3, Bootstrap 4 or Semantic UI.
- Table Styles:- Based on your styling library some table styles will appear in this table styles section. you may check one or more boxes as per your styling need.
- Table Color Schema:- You can style your table in 13 different color schemes. feel free to check all those color-scheme to find the best color scheme for your table. There is a Custom Color Scheme that extends the styling option of the table. You will find a bunch of custom color options for your table design.
- CSS Class:- If you want to have a custom class in your table, you can enter the desired class name here. You will find the option named Extra CSS Class for the table in the Others section.
Note: Please Click the “Update Configuration” button after finishing up your table configuration.
Add Rows in Table & Duplicate Table
In this tab, you will be able to insert data into your table.
- After you click the “Add Data” button it will let you add data for one row and then another and so on.
- In this Table Row tab, you can also manage your data by deleting or updating the option under the Action column on the right side of every row.
- you will find two icons for editing or updating row data and delete options.
Note: You can use the Bulk Action if you need to delete more than one entry. You also can duplicate each table using the Duplicate icon located in the table dashboard.
[ninja_table_banner]