


If you have any experience with Ninja Tables, you already know about creating tables with form entries. The integration with Fluent Forms makes it happen super smooth! But what about filling up a form with table data directly from a table? You’re lucky because Ninja Tables can help you fill up forms in a table just as well!
When a user connects Fluent Forms with Ninja Tables, it’s mostly to create a table with form entries. You only need to build a form and then a table with it by connecting Fluent Forms. After that, any changes made in the form will appear in a tabular structure.
However, there’s another trick to fill up and submit forms. Users might want to pass the table data to a form and connect that specific form to a column in the table.
Wanna know how it works? Let’s get to it!
Fill up forms in a table: Using Ninja Tables & Fluent Forms
It’s easy to import WordPress form entries to a table. But when it comes to using only WordPress tables to open a form related to a certain person, Ninja Tables Fluent Forms integration seems like a blessing!
Suppose you have a table and a form with ID, First Name, Last Name, and Email. There’s another column in the table, “Submit Form.”
The “Submit Form” column is where the form is connected, and each form is for a specific user with their ID, name, and email. Right after they click on the form link, they will be directed to the form.
Here’s how to fill up forms in a table with Fluent Forms and Ninja Tables.
- Step 1: Create a table and a form with the same input areas
- Step 2: Add a button link on the table connected to the form
- Step 3: Transfer the table columns’ value to the form for each user
- Result
If you know how to create forms or tables, skip the first jump link and go straight to the second one.
This process might come off as a bit challenging at first. We’ll walk you through all of it.
Step 1: Create a table and a form with the same input areas

a) First of all, here’s a table made in Ninja Tables with ID, First Name, Last Name, Email, and a Submit Button column for 10 individuals.
The Submit column is empty for now because we haven’t added any buttons yet. If ID number 1, Butch, wants to fill up his form, he only has to click the button on this column.
Each form link will have each individual’s data. As a result, they don’t have to type their ID, names, or email address on the form.
Skim through Ninja Tables documentation if you’re a novice at creating data tables with this table plugin.
b) Secondly, we have created a form in Fluent Forms with the same table columns. There’s a text area where users can put any additional information and submit the form.
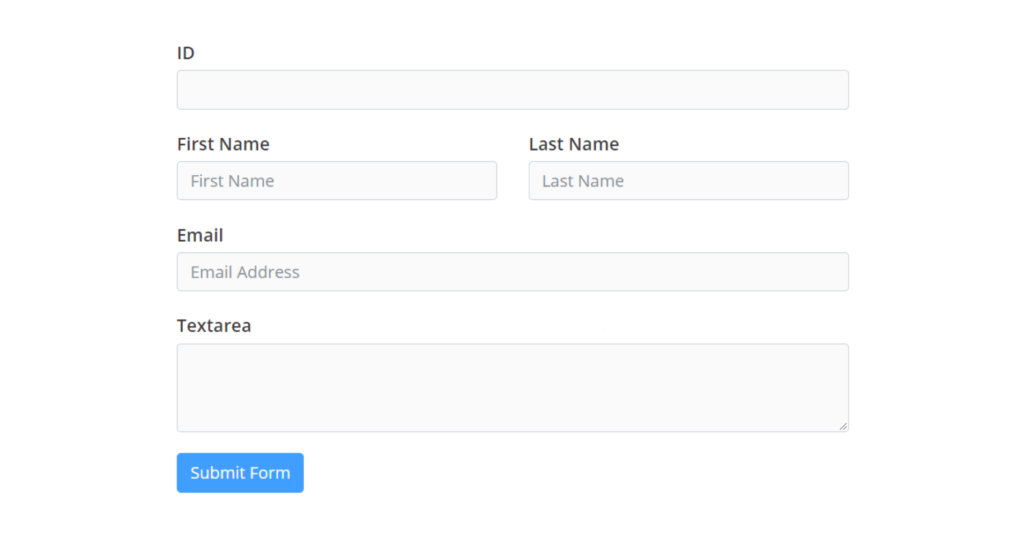
Have a look at Fluent Forms documentation to learn how to create a form.
Step 2: Add a button link on the table connected to the form
The first entry in the table, Butch, wants his personal details ready on the form to just proceed with submission.
The form is the receiver, and the table is the sender.
So, we need to create the button link that takes the user to the form.
- The first thing to do here is to copy the form’s shortcode and publish it on a WordPress Page
- Copy the published page’s URL and paste it on the Ninja Tables Transform Value box for the column “Submit button”
- An HTML code (< a href= ……….) is used here
- We also named the button “Fill-up form”
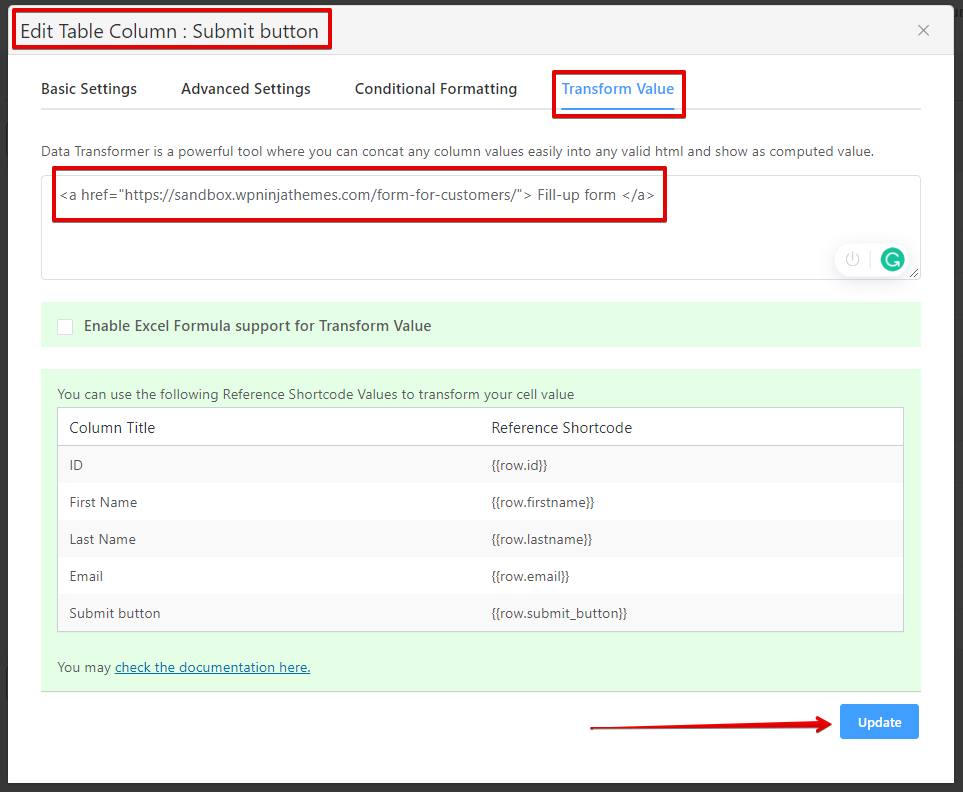
- <a href=”Form page’s URL“> Fill-up form </a>
- After updating, open the table in a preview window
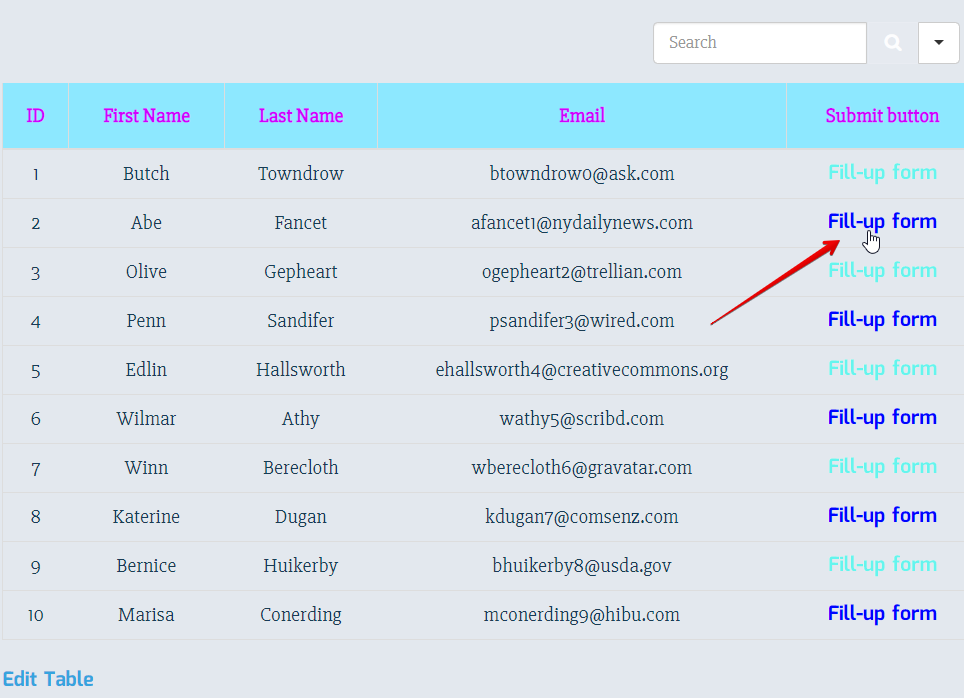
- The last column now has a “Fill-up form” button link, and all are clickable. Users can open it in a new window and fill it up
But this form is still empty since we haven’t added any command to fetch users’ data. If the 8th user, Marisa, wants her information on the form and avoids typing, her form needs to be connected to the table.
Step 3: Transfer the table columns’ value to the form for each user
The sender table is ready, and now it’s time to connect the receiver form.
- Open the form to edit the “Advanced Options” for each input field
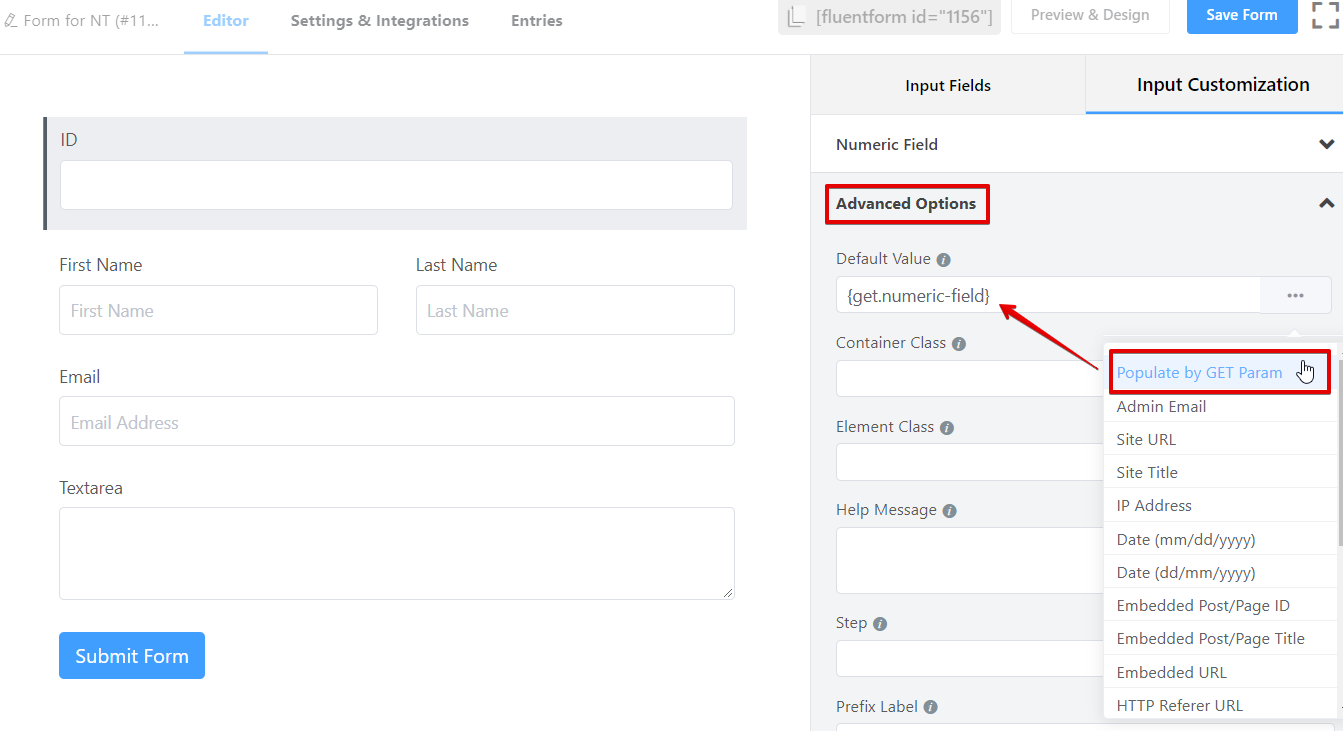
- Change the default value from the dropdown and pick “Populate by GET Param” for all the fields
- The auto-generated shortcodes {get.numeric-field}, {get.first_name}, {get.last_name}, and {get.email} will fetch table data
- Copy the parameter name and paste it on the form’s URL
- For instance, we took numeric-field. Added it on the URL with a question mark and equal sign and pressed enter

What “GET Parameter” does is to bring the data from the table and display it on the form
- Since we added value 5 for the ID field, the form’s ID field will show 5. You can test with anything else from the form
- After repeating the process for all fields, the URL looks like this
-https://sandbox.wpninjathemes.com/4243-2/?numeric-field=5&first_name=Abe&last_name=Burton&[email protected]
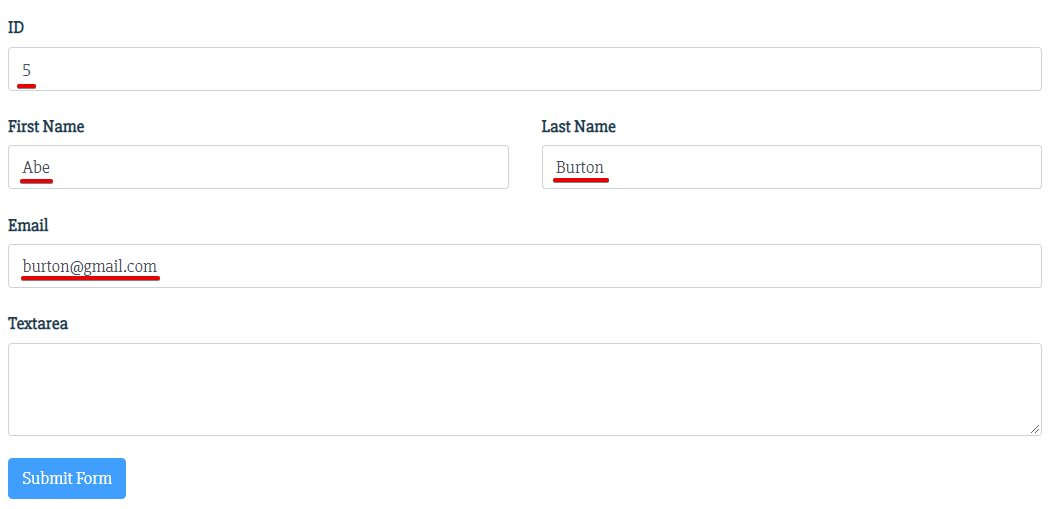
This is what the form will be after pressing the enter button-
1. ID=5
2. First Name=Abe
3. Last Name=Burton
4. [email protected]
- We have copied the new URL and pasted it in Transform Value, replacing the previous URL
Then clicked “Update.”

- But this link only has static data, regardless of the users. So, all the forms for each user will have the same ID, names, and email we have used with GET Parameter
Simply put, everyone will see the same form
- To turn it dynamic, we will use the Ninja Tables reference shortcodes. These codes will pass the value accurately for each row
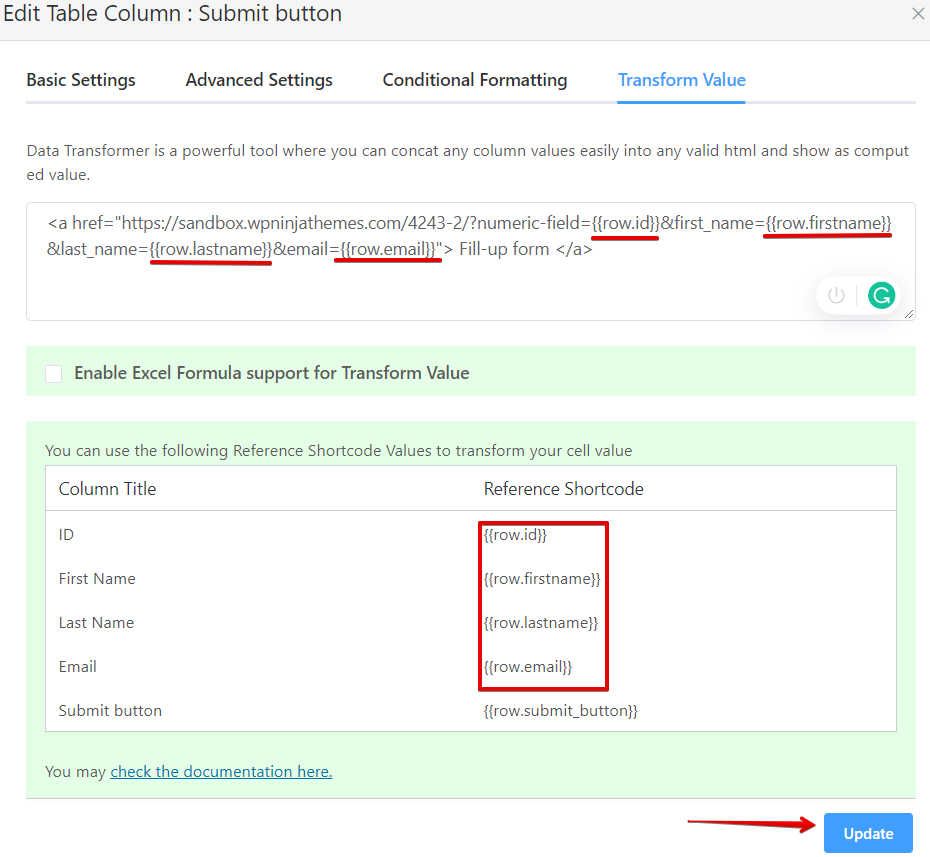
We have changed the following-
1. numeric-field=5 into numeric-field={{row.id}}
2. first_name=Abe into first_name={{row.firstname}}
3. last_name=Burton into last_name={{row.lastname}}
4. [email protected] into email={{row.email}}
That’s all there is to do!
Now the forms will bring data from each user and show distinct user information. Update it and check the preview.
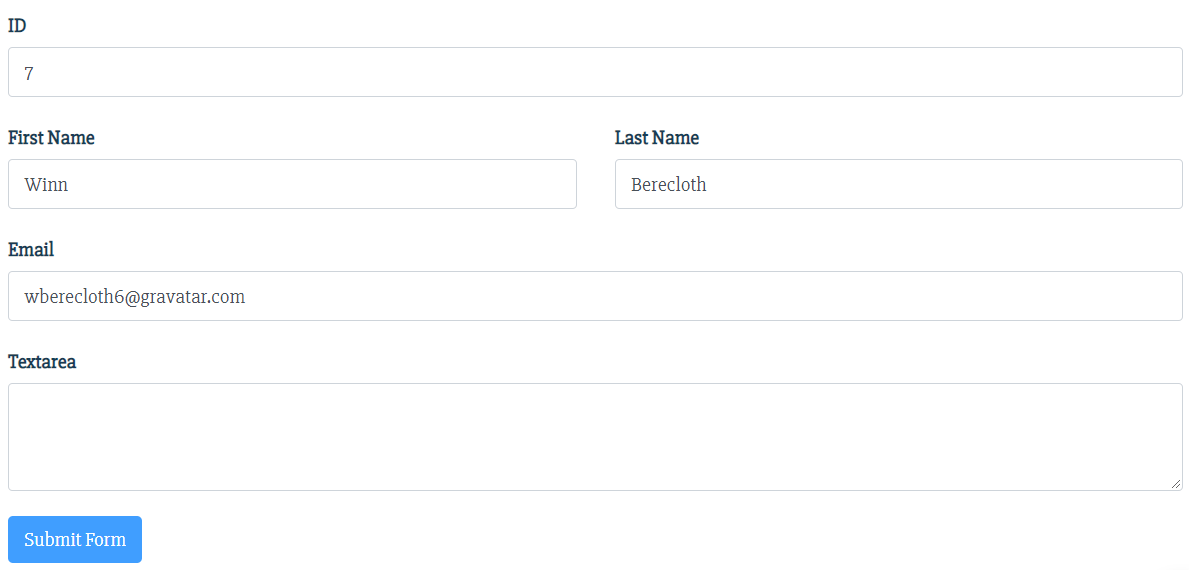
Result
Here’s the user ID 7’s form that we opened from the table. This user now only has to put something in the text area and submit the form.
It all might seem a bit tricky when you try it for the first time. Also, there’s no documentation on this functionality. But it’s very simple if you follow these steps.
Try clicking the demo forms yourself.
| ID | First Name | Last Name | Submit button | |
|---|---|---|---|---|
| 1 | Butch | Towndrow | [email protected] | |
| 2 | Abe | Fancet | [email protected] | |
| 3 | Olive | Gepheart | [email protected] | |
| 4 | Penn | Sandifer | [email protected] | |
| 6 | Wilmar | Athy | [email protected] | |
| 7 | Winn | Berecloth | [email protected] | |
| 8 | Katerine | Dugan | [email protected] | |
| 9 | Bernice | Huikerby | [email protected] | |
| 10 | Marisa | Conerding | [email protected] |
Endnote
As a user of both WordPress table plugin and form builder plugin, there must be times when you wanted to merge these two for your audience’s comfort. Fortunately, Ninja Tables and Fluent Forms’ correlation is way past creating forms and tables. It’s also possible to fill up a form connected to the table data!
Ninja Tables features are indeed smart and useful. Going beyond its key features is mostly for advanced-level users. So, we hope this article can guide you right.
With every update, there will be more secrets to unveil. Keep up with us, and let us know if there’s something else you would like to learn.
-
10 Best TablePress Alternatives in 2026 (For Every Use Case)
TablePress works for simple tables. When you need a more -

Designing Big Data Tables: UI/UX Principles and Best Practices
Designing big data tables requires more than clean layouts. Insights -

Charts vs Tables in WordPress: When to Use Each (with Examples)
If your website handles lots of dynamic data, it’s best…
Leave a Reply
You must be logged in to post a comment.