

How to Create a Conversational Survey in WordPress
People get bored answering multiple survey questions on a single page. A conversational survey shows one question at a time, so the survey feels short even when it isn’t. You can build it in WordPress with Fluent Forms, using multiple choice, star rating, NPS (Net Promoter Score), grid-style rating scales, and more.
Key Takeaways
- A conversational survey shows one question per screen, with keyboard shortcuts and a progress counter. It works best for 5 to 10 questions.
- In Fluent Forms, go to Forms → Add New Form → Create Conversational Form to start one.
- Building conversational forms, the welcome screen, layouts, Radio, Checkbox, Text Area, Email, and field-level Conditional Logic are all free.
- Ratings, Net Promoter Score, Checkable Grid, the built-in “Other” option, and design customization need Fluent Forms Pro.
- Conditional Logic lets you ask “what went wrong?” only to customers who give a low score.
- Responses land in your WordPress database. The Visual Report turns each question into a chart and a percentage table.
- The same steps work for product feedback, event feedback, employee pulse surveys, market research, and course evaluations.
What a Conversational Survey Is
A conversational survey asks one question at a time, waits for the answer, then moves to the next. Respondents can click, tap, or use the keyboard: press Enter to continue, or press a letter (A, B, C) to pick an option. A counter (progress indicator) at the bottom shows how far along they are.
That format suits surveys well. Each screen asks one question, so people don’t skim past questions, and a survey that would look long on one page feels quick. It also works well on phones, where a long form means a lot of scrolling.
It isn’t the right format for everything. For 5 to 10 questions, conversational works well. For a 30 or 40 question application, a multi-step form usually works better, because people can see and review a whole section at once.
What You Need Before You Start
You need a WordPress site and the free Fluent Forms plugin. The free version covers the conversational builder itself, the welcome screen, layouts, choice questions, text questions, field-level conditional logic, notifications, and sharing.
The customer satisfaction survey in this tutorial also uses three Pro fields (Ratings, Net Promoter Score, and Checkable Grid) and the Pro design options. I’ll mark each Pro step as we go. If you’re on the free version, there’s a section further down that shows how to build the same survey without those fields.
Compare the full Free vs. Pro breakdown.
What to Ask in Your Customer Satisfaction Survey
Write your questions before you open the builder. The order matters more in a conversational survey than on a regular form, because people answer one question at a time and drop off when a question feels intimidating or time-consuming.
Start with something easy, like a one-click rating. Put the open-ended question in the middle, once people are already invested. Leave personal details such as an email address for last, and only ask when you need them.
Here’s the survey we’ll build:
| # | Question | Field | Required | Why it’s there |
|---|---|---|---|---|
| 1 | Overall, how satisfied are you with our service? | Ratings (Pro) | Yes | One-click CSAT score to open with |
| 2 | How long have you been a customer? | Radio | Yes | Lets you compare new and long-time customers |
| 3 | How would you rate us on each of these? | Checkable Grid (Pro) | No | Shows which part of the experience is weakest |
| 4 | How likely are you to recommend us to a friend or colleague? | Net Promoter Score (Pro) | Yes | Standard loyalty measure |
| 5 | What’s the one thing we could do better? | Text Area | No | Shown only to customers who score 0 to 6 |
| 6 | What do you value most about us? | Checkbox | No | Tells you what to protect |
| 7 | Can we follow up with you about your answers? | Radio | Yes | Asks for consent before asking for contact details |
| 8 | What’s the best email to reach you? | Yes, when shown | Shown only if they said yes |
Most respondents will see seven questions. Unhappy customers see one extra, and people who agree to a follow-up see the email question.
How to Create a Conversational Survey in Fluent Forms
With the questions planned, the build itself takes only a few minutes. Follow the steps in order, since the conditional questions in steps 8 and 10 depend on fields you create earlier.
Step 1: Install Fluent Forms
If Fluent Forms isn’t on your site yet, install it first:
- In your WordPress dashboard, go to Plugins → Add New Plugin.
- Search for Fluent Forms.
- Click Install Now, then Activate.
If you have a Pro license, upload and activate the Fluent Forms Pro add-on as well. Pro runs alongside the free core, so keep both active.
Step 2: Create a Conversational Form
Fluent Forms has a dedicated starting point for conversational forms:
- Go to Fluent Forms → Forms and click Add New Form.
- In the popup, choose Create Conversational Form.
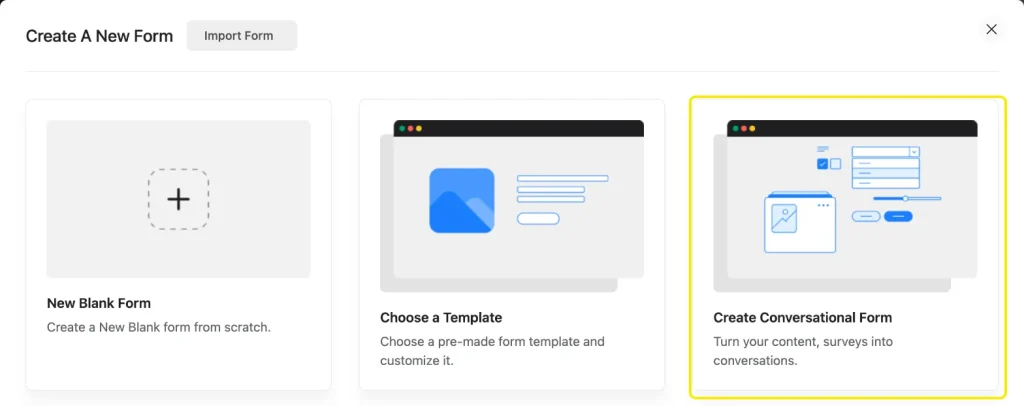
The editor opens with four placeholder fields: Your Name, Email, Subject, and Your Query. Hover over each one and click the trash icon to delete it, since the survey starts from a clean slate.
Next, click the pencil icon next to the form name in the top left corner. Give it a relevant name, such as Customer Satisfaction Survey, and click Rename.
![Renaming a conversational survey form in Fluent Forms"]](https://wpmanageninja.com/wp-content/uploads/2026/10/fluent-forms-conversational-survey-rename-form-1024x363.webp)
To add a field, type its name in the search box under Input Fields and click it. The field drops into the form. To edit it, hover over the field and click the pencil icon, which opens its settings in the Input Customization tab.
Step 3: Add a welcome screen
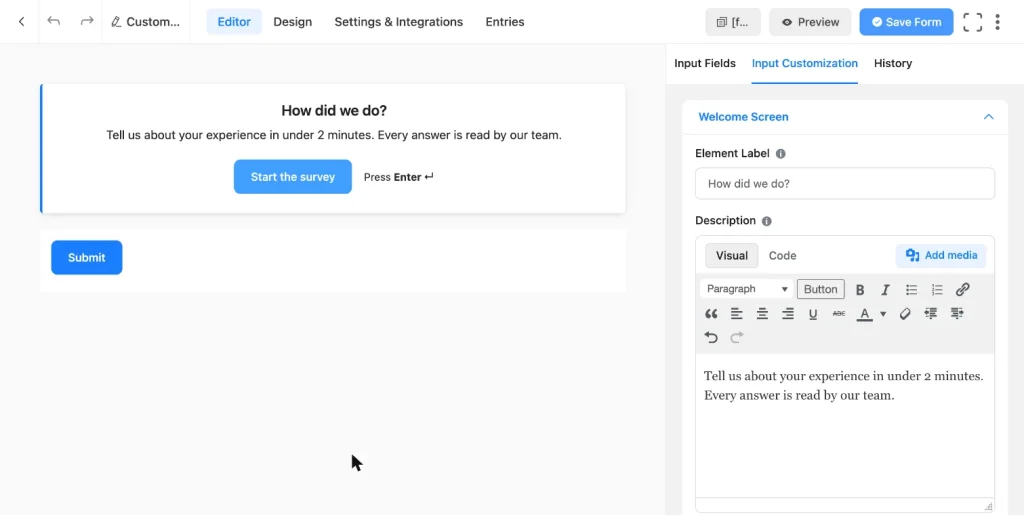
A welcome screen tells people what the survey is about and how long it takes before they commit. Search for Welcome Screen and add it. Then open its settings:
- Element Label: the heading people see first. This survey uses “How did we do?”
- Description: one or two lines of context. Mention the time it takes. Mine says, “Tell us about your experience in under 2 minutes. Every answer is read by our team.”
- Content Alignment: left, center, or right.
- Button Text: the start button. “Start the survey” is clearer than the default “Start Here.”
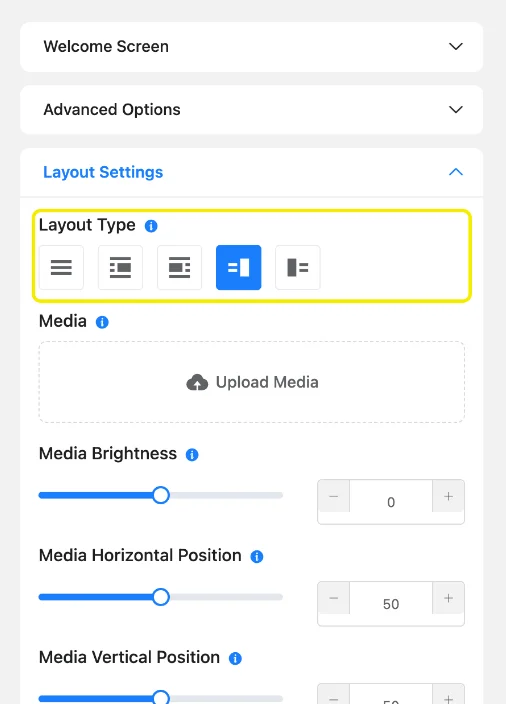
Under Layout Settings, you can pick one of five layout types. The first keeps the content centered. The others place an image beside or behind the text, with controls for brightness, position, and alt text. A photo of your team or product makes the survey feel less anonymous. Every question has the same Layout Settings, so you can add images further into the survey too.
Step 4: Ask for an overall satisfaction rating
Start with a question that takes one click. Add a Ratings field (Pro) and set it up:
- Element Label: “Overall, how satisfied are you with our service?”
- Options: each star has a label. Replace the defaults with a satisfaction scale: Very dissatisfied, Dissatisfied, Neutral, Satisfied, Very satisfied.
- Show Text: set to Yes so the label appears as people hover over each star. People see what three stars means before they click.
- Required: Yes.
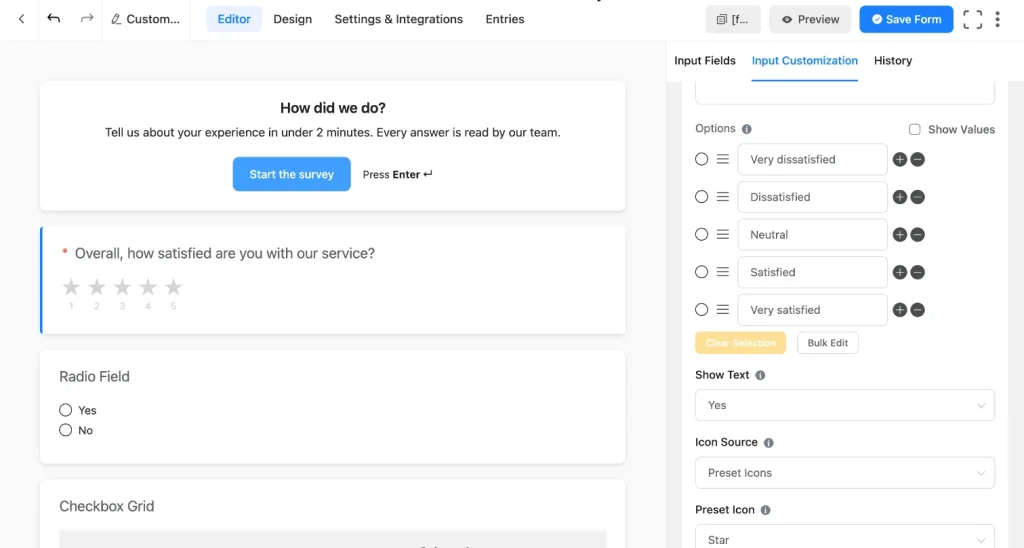
You can also change the icon under Preset Icon or upload your own SVG, and set active and inactive colors.
Step 5: Add a quick context question
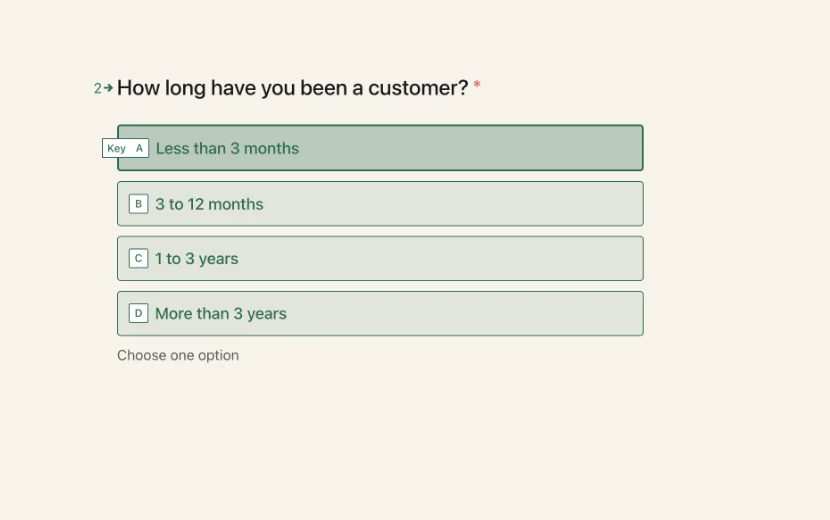
One background question helps you segment answers later. Add a Radio Field with the label “How long have you been a customer?” and four options: Less than 3 months, 3 to 12 months, 1 to 3 years, More than 3 years. Use the plus icon next to an option to add more rows. Set Required to Yes.
On the live survey, each option gets a letter key, so respondents can press A, B, C, or D instead of clicking. Fluent Forms adds this automatically.
Step 6: Rate specific areas with a Checkable Grid
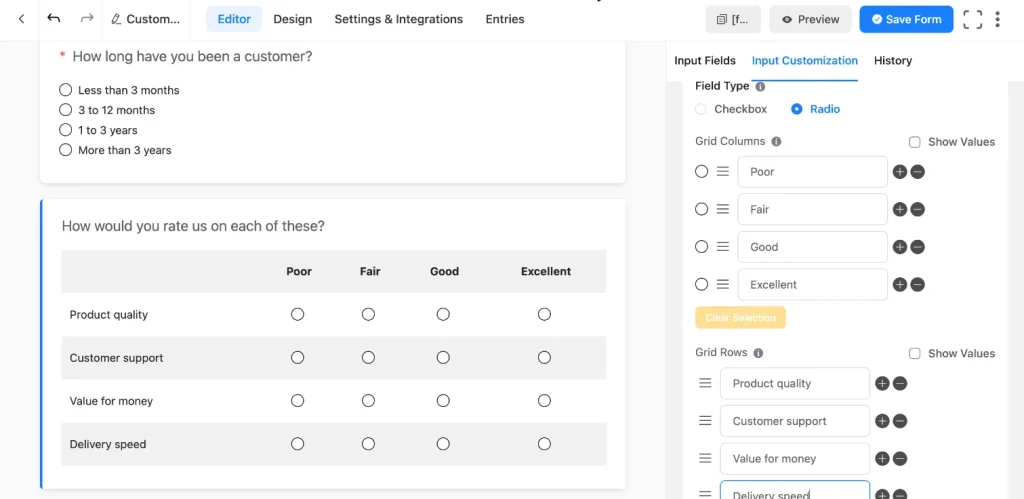
An overall score tells you how people feel. A grid tells you why (the breakdown). Add a Checkable Grid field (Pro) and configure it:
- Element Label: “How would you rate us on each of these?”
- Field Type: Radio, so each row gets one answer. Checkbox would let people tick several values per row, which isn’t ideal for a rating scale.
- Grid Columns: your scale. This one uses Poor, Fair, Good, Excellent.
- Grid Rows: the parts of the experience you want rated. Keep the grid to four or five rows, for example, Product quality, Customer support, Value for money, Delivery speed.
- Required: leave it at No. A grid takes the most effort in the survey, and you’d rather get a partial answer than lose the respondent.
Step 7: Add a Net Promoter Score question
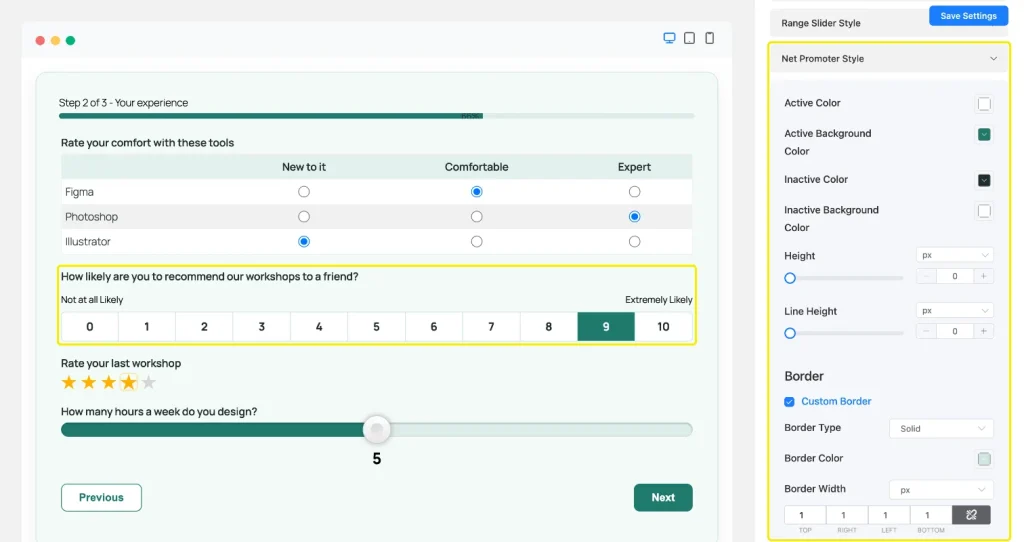
Net Promoter Score (NPS) asks how likely someone is to recommend you, on a scale from 0 to 10. Add a Net Promoter Score field (Pro):
- Element Label: “How likely are you to recommend us to a friend or colleague?” or a similar question.
- Required: Yes.
- Promoter Start Text and Promoter End Text: the labels at each end of the scale. The defaults, “Not at all Likely” and “Extremely Likely,” work fine.
Step 8: Ask unhappy customers what went wrong
Customers who score 0 to 6 are detractors in NPS terms. They’re the ones whose feedback you need most, so this step adds a question only they see.
Add a Text Area with the label “Sorry to hear that. What’s the one thing we could do better?” and a placeholder such as “Be as specific as you like.” Leave it optional.
Then set the condition:
- Open Advanced Options in the Text Area settings.
- Set Conditional Logic to Yes.
- Set Condition Match to All.
- Add four rules, each using the NPS question with the not equal operator: not equal 7, not equal 8, not equal 9, not equal 10.
The NPS field’s conditions only offer equal and not equal, so you can’t write “less than 7.” Excluding 7 through 10 with All takes four rules instead of seven and gives the same result: the question appears for any score from 0 to 6. Field-level Conditional Logic is free.
Step 9: Find out what customers value most
Knowing what people like is as useful as knowing what they don’t. Add a Checkbox field with the label “What do you value most about us? Pick all that apply.” and options that match your business.
Two settings matter for surveys:
- Shuffle the available options: shows the options in a random order for each respondent. People tend to pick options near the top of a list, and shuffling spreads that bias out.
- Enable “Other” Option (Pro): adds an Other choice with its own text box, so people can enter something you didn’t list.
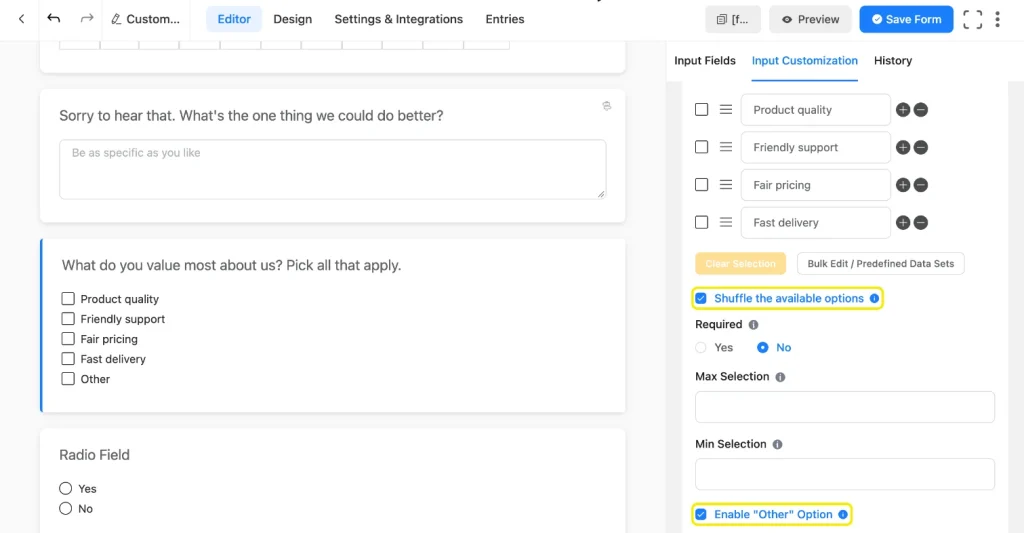
The Checkbox field also has Max Selection and Min Selection. Set a maximum of two if you want people to choose what matters most instead of ticking everything.
Step 10: Ask permission to follow up
If you want to contact people about their feedback, ask first. Add another Radio Field with the label “Can we follow up with you about your answers?” and two options: “Yes, you can contact me” and “No, thanks.” Make it required.
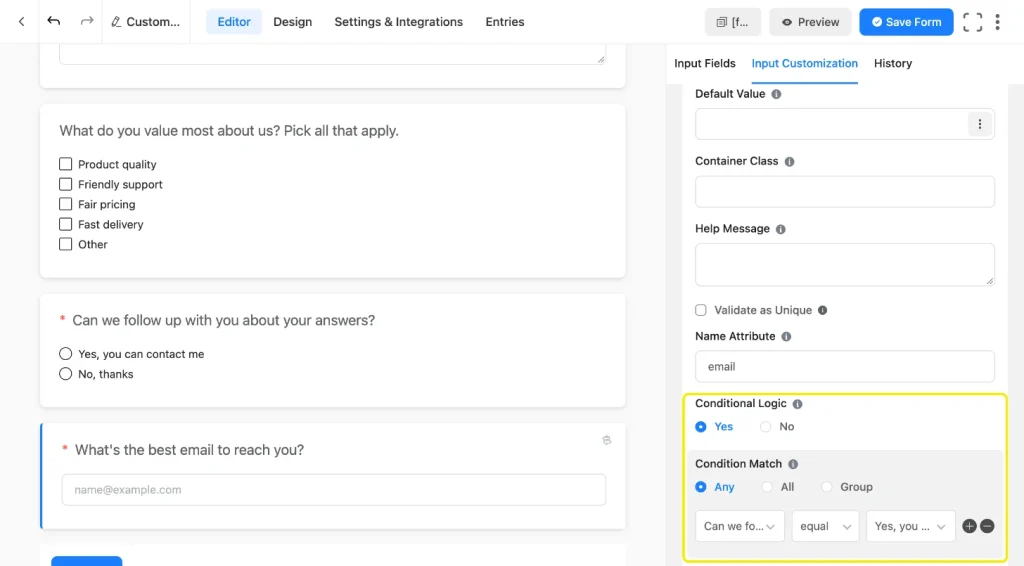
Then add an Email field with the label “What’s the best email to reach you?” and set it up so it only appears after a yes:
- Set Required to Yes and leave Validate Email on.
- In Advanced Options, set Conditional Logic to Yes.
- Add one rule: the follow-up question equal “Yes, you can contact me.”
A required field hidden by Conditional Logic isn’t enforced when it’s hidden, so people who say no can still submit. Click Save Form once all the fields are in place.
Step 11: Style the survey to match your brand
Open the Design tab at the top of the editor. The Design sub-tab (Pro) controls how the survey looks, with a live preview on the right:
- Font
- Questions, Answers, Button, and Button Text colors
- Background color or Background Image
- Disable Branding: hides the “Powered by Fluent Forms” badge
- Key Hint: shows the letter shortcuts next to options
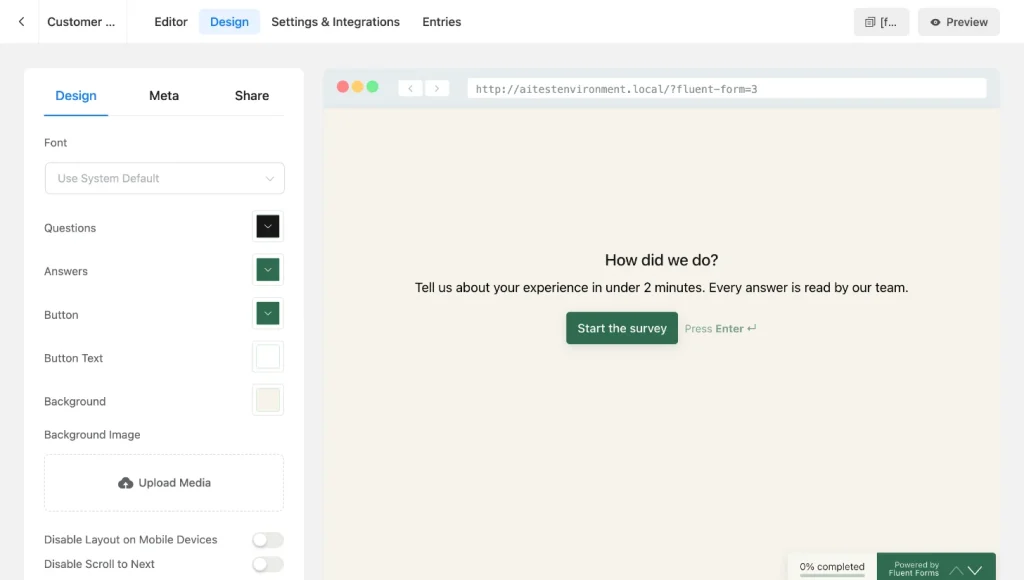
I set the buttons and answers to a dark green and the background to an off-white. Two or three colors taken from your logo are usually enough. Click Save Settings when you’re done.
Step 12: Rewrite the form messages
Switch to the Meta sub-tab. The top half sets the Meta Title, Meta Description, and Featured Image that appear when someone shares your survey link on social media or in a chat app.
The bottom half, Form Messages, controls every text the survey shows apart from your questions: button labels, hints, error prompts, and the progress counter. This section is free.
The change I’d make first is Progress Text. The default shows a percentage. Change it to “Question {step} of {total}” so people know exactly how many questions are left.
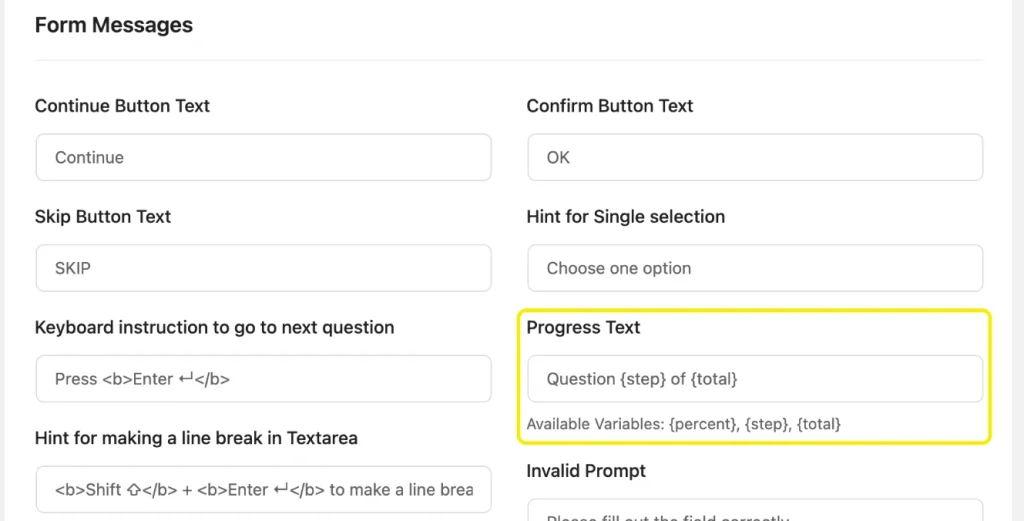
Click Save Settings.
Step 13: Write a confirmation message
The confirmation message is the last thing respondents see, so use it to say what happens next. Go to Settings & Integrations → Confirmation Settings, keep Confirmation Type on Same Page, and replace the default message.
Mine reads: “Thanks for taking the survey! Your answers go straight to our team, and we read every one. If you consented to follow up, expect a note from us within 2 business days.”
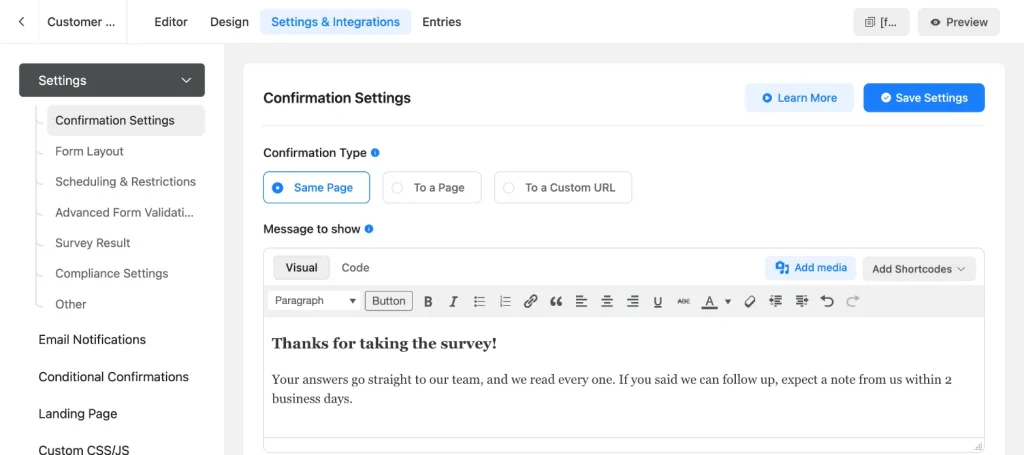
You can also send people to a thank-you page with To a Page or To a Custom URL, for example a page with a discount code as a thank-you. Click Save Settings.
Step 14: Get notified when a response comes in
Add an email notification if you want to know about responses as they arrive:
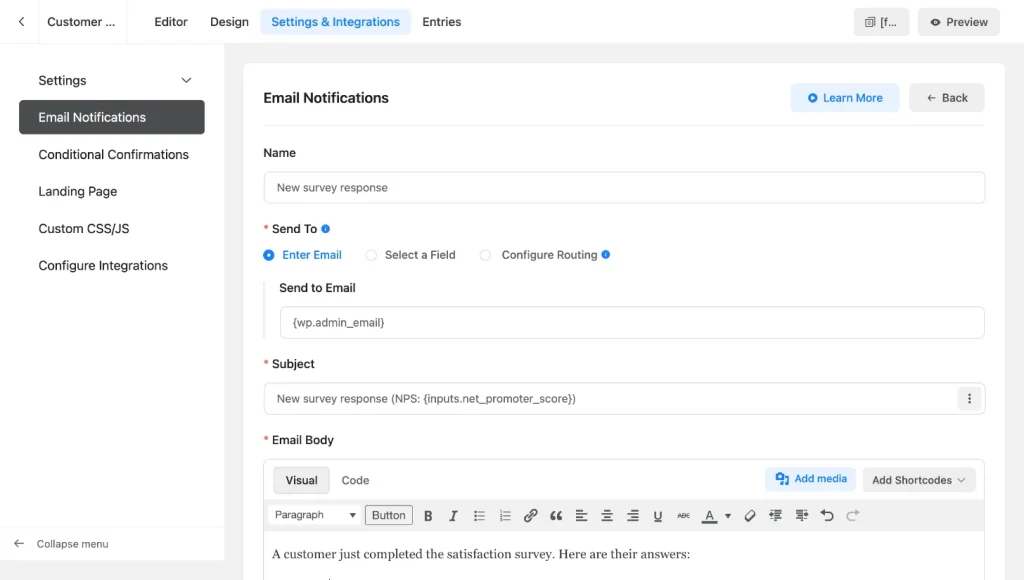
- Go to Settings & Integrations → Email Notifications and click Add Notification.
- Name it, for example “New survey response.”
- Under Send To, choose Enter Email and type an address, or use {wp.admin_email} to send it to the site admin.
- In Subject, include the NPS score so you can spot a low score from your inbox: “New survey response (NPS: {inputs.net_promoter_score})”.
- In Email Body, add a line of context and the {all_data} shortcode, which lists every answer.
- Click Save Notification.
If your notifications don’t arrive, the problem is usually your site’s mail setup, not the form. Set up FluentSMTP to send through a proper email service.
Step 15: Test the survey as a respondent
Click Preview in the top right of the editor and take the survey yourself:
- As an unhappy customer: give a low rating and an NPS score of 6 or below. The “what could we do better?” question should appear after the NPS question. Say yes to a follow-up and check that the email question appears.
- As a happy customer: score 9 or 10. The follow-up question should be skipped, and saying no to a follow-up should take you straight to Submit.
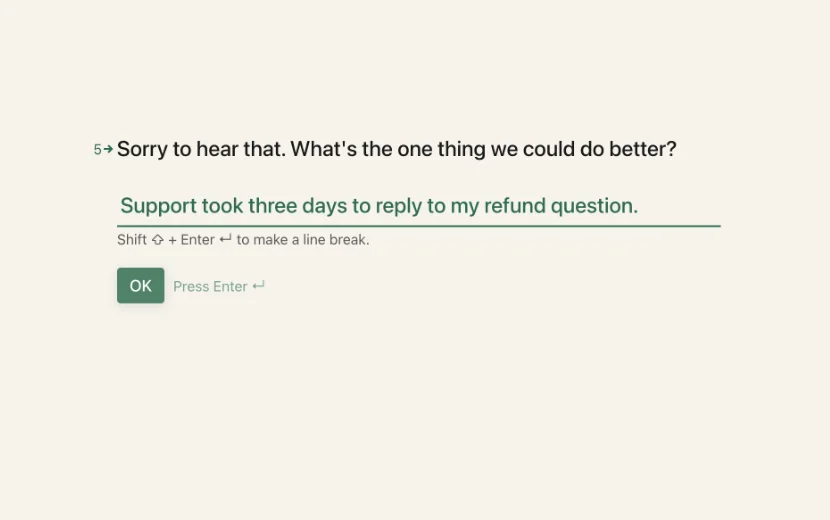
Check the progress counter, the confirmation message, and that the notification email arrived. Each test also creates a real entry, so delete them before you share the survey, or your first report will include your own test answers.
Step 16: Share or embed your survey
Go back to the Design tab and open the Share sub-tab. You have several ways to get the survey live:
- Share Via Direct URL: a standalone link to the survey, with social sharing buttons. This is the simplest option for emails and post-purchase messages.
- Email Share: ready-made text with the link, which you can copy into an email.
- Shortcode for Conversational Form: paste it into any page or post to show the survey full width.
- Shortcode for Classic Form: shows the same questions as a regular single-page form.
- Embed via HTML Code: an iframe embed so you can control the form height and width on your pages.
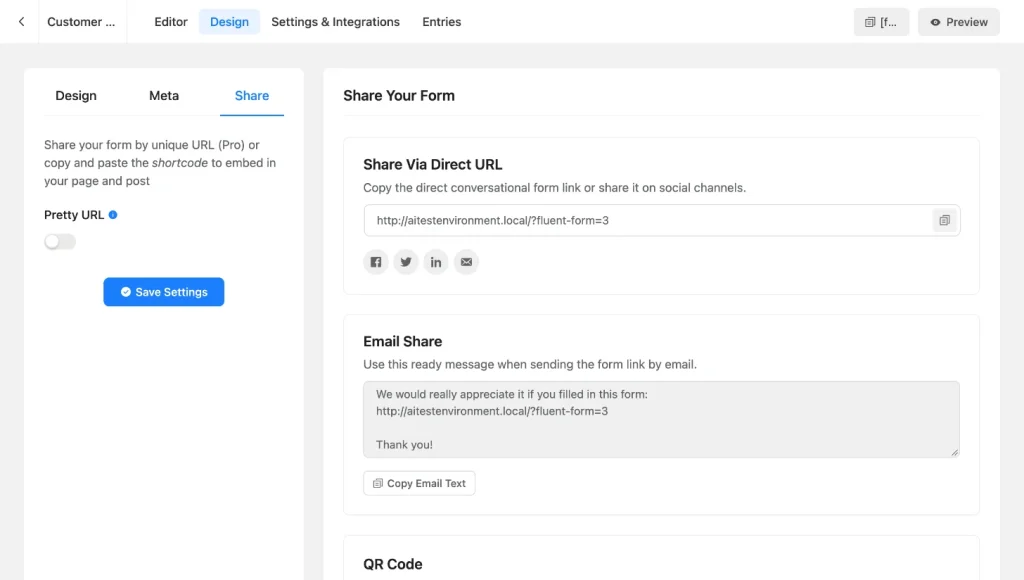
Pro adds a Pretty URL toggle for a cleaner link and a QR code you can download as an SVG, which is useful for printed receipts, packaging, or event signs.
How to Read Your Survey Results
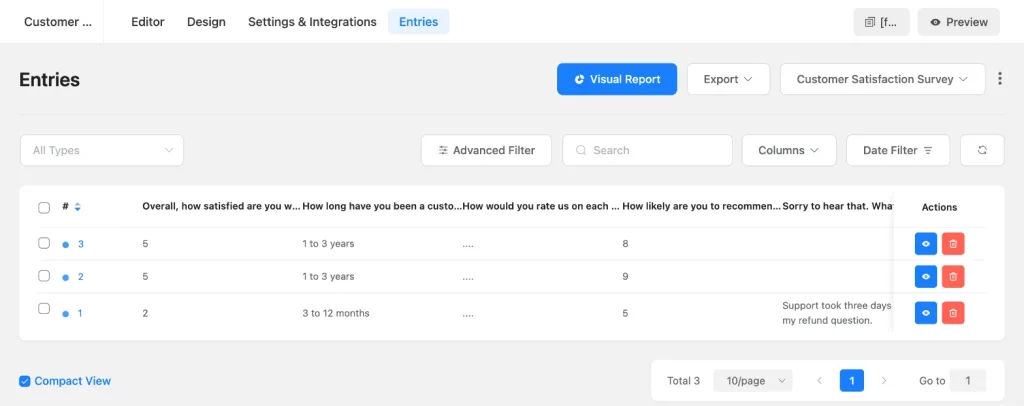
Every response is saved in your WordPress database. Open the form and click Entries to see them in a table, one row per respondent. From here you can open a single entry, filter by date, search, and export to CSV or Excel.
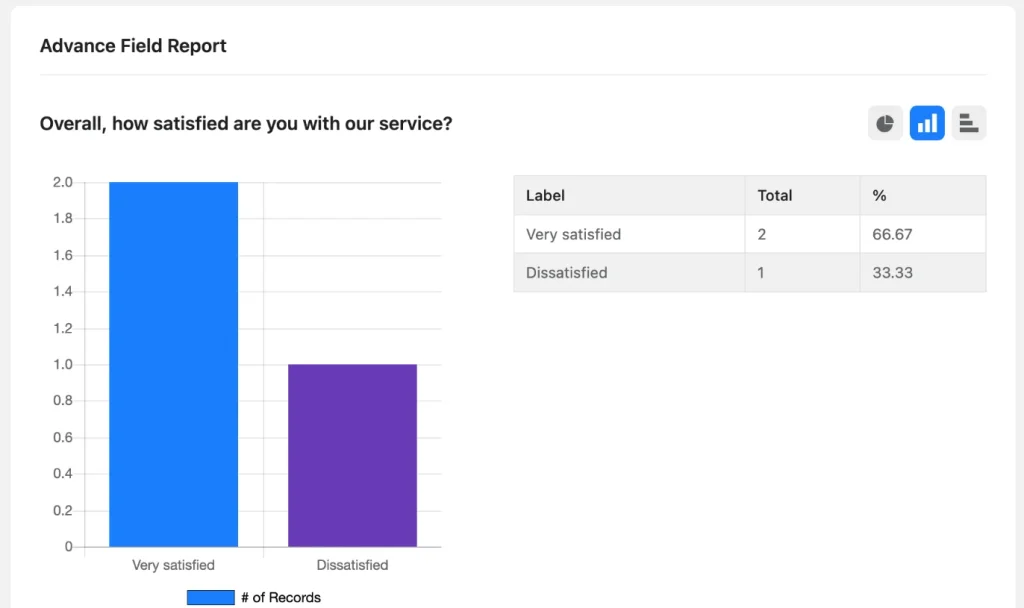
For the bigger picture, click Visual Report. You’ll see a submissions-over-time chart, then a chart and a table for each question, showing how many people chose each answer and the percentage. You can switch each chart between pie, vertical bar, and horizontal bar. Click Print report when you need a copy for a team meeting.
The report shows how many people picked each NPS score, but it doesn’t calculate the NPS for you. Do it from the NPS table:
- Add up the percentages for scores 9 and 10. Those are your promoters.
- Add up the percentages for scores 0 to 6. Those are your detractors.
- Subtract detractors from promoters. If 50% are promoters and 20% are detractors, your NPS is 30.
Read the open-ended answers next to the scores. A pattern in five detractor comments (“support was slow to reply”) is more useful than the score alone.
To act on answers automatically, connect the survey to other tools under Settings & Integrations → Configure Integrations. The Slack integration (free) can post each response to a team channel, and the Google Sheets integration (Pro) can add each response to a spreadsheet.
Build It on the Free Version
If you’re not on Pro yet, you can still run this survey. Ratings, Checkable Grid, and Net Promoter Score don’t appear in the free version, so replace them with Radio questions:
- Overall rating: a Radio field with five options from Very dissatisfied to Very satisfied. On the live survey, each option gets a letter key, so it’s still a one-press answer.
- Grid: split it into separate Radio questions, one per area. Pick the two or three areas you care about most to keep the survey short.
- NPS: a Radio field with options 0 to 10. It works and your data stays comparable, but you lose the numbered scale layout.
The follow-up logic in steps 8 and 10 works the same way on the free version, since field-level Conditional Logic is free. The survey will use the default design, and you won’t have the built-in Other option on the Checkbox question.
Other Surveys You Can Build in Conversational Style
Once you’ve built one conversational survey, the others are mostly a matter of changing the questions. Here are six that suit the format, with the fields I’d use for each.
Product feedback survey
Send a product feedback survey a week or two after someone buys, once they’ve used the product.
- A Ratings question for overall satisfaction with the product
- A Radio question about how often they use it
- A Checkbox question on which features they use, with shuffle turned on
- A Text Area for “What’s missing?”, shown only to people who rate it 3 stars or lower
Event or webinar feedback survey
Send an event feedback survey within a day of the event, while people still remember it.
- A Checkable Grid with each session or speaker as a row and a rating scale as columns
- A Radio question: “Would you attend our next event?”
- A Text Area for topic suggestions
- A Checkbox asking how they heard about the event
Employee pulse survey
A short survey every month or quarter shows how morale changes over time. Keep it anonymous by leaving out name and email fields, and say so on the welcome screen.
- A Checkable Grid with statements as rows (“I have what I need to do my job well”) and Strongly disagree to Strongly agree as columns
- A Net Promoter Score question adapted for employees: “How likely are you to recommend working here to a friend?”
- A Text Area: “What’s one thing we should change?”
Market research survey
Use it before a launch or a pricing change to learn about the people you’re selling to.
- A Radio question to segment people by role or company size
- A Ranking field (Pro) to have people put a set of features or problems in order of importance
- A Range Slider (Pro) for a budget question
- A Radio question asking whether you can contact them for an interview, with a conditional Email field
Course or training evaluation
Course creators and trainers can send this at the end of a course or after each module.
- A Ratings question for the course overall
- A Checkable Grid rating the content, pace, instructor, and materials
- A Radio question: “Did the course meet your expectations?”
- A Text Area for what they’d change, shown only to people who answer no
Website feedback survey
A two or three question survey linked from your footer, help center, or a post-checkout page catches problems people won’t email you about.
- A Radio question: “Did you find what you were looking for?”
- A Text Area: “What were you looking for?”, shown only to people who answer no
- A Ratings question on how easy the site was to use
Free vs Pro for Conversational Surveys
Fluent Forms is a free plugin with a Pro add-on. Pro license tiers differ by the number of sites, not by features.
| Field / Feature | Free | Pro |
|---|---|---|
| Conversational form builder | Yes | Yes |
| Welcome Screen | Yes | Yes |
| Question layouts (image beside content) | Yes | Yes |
| Radio, Checkbox, Dropdown, Text Area, Email fields | Yes | Yes |
| Shuffle options, Max and Min Selection | Yes | Yes |
| Field-level Conditional Logic | Yes | Yes |
| Form messages and Progress Text | Yes | Yes |
| Meta title, description, and featured image | Yes | Yes |
| Confirmation message and email notifications | Yes | Yes |
| Direct URL, shortcode, and HTML embed sharing | Yes | Yes |
| Entries, CSV and Excel export | Yes | Yes |
| Visual Report (charts per question) | Yes | Yes |
| Ratings field | No | Yes |
| Net Promoter Score field | No | Yes |
| Checkable Grid field | No | Yes |
| Range Slider and Ranking fields | No | Yes |
| Built-in “Other” option on Checkbox | No | Yes |
| Design customization (colors, fonts, background, branding) | No | Yes |
| Pretty URL and QR code | No | Yes |
| Survey Result (show results to respondents after they submit) | No | Yes |
| Save & Resume | No | Yes |
| Conditional confirmations and conditional email routing | No | Yes |
Tips for Higher Survey Completion Rates
A few practices make a noticeable difference in how many people finish:
- Say how long it takes. Put the time on the welcome screen, and make sure it’s true.
- Make most questions optional. Require only the answers you can’t do without. A skipped question is better than an abandoned survey.
- Open with one click. A rating or a multiple-choice question gets people to participate. Starting with a text box asks for effort before they’ve committed.
- Ask “why” only when it matters. Use Conditional Logic to show open-ended follow-ups to the people whose answer needs explaining.
- Send it at the right moment. A post-purchase survey works best after the order arrives. An event survey works best the next day.
- Write questions the way you’d say them. “What’s the one thing we could do better?” gets more answers than “Please provide suggestions for improvement.”
- Tell people what you changed. When you fix something based on survey feedback, mention it in your next email. People are more willing to answer the next survey when they’ve seen you accept suggestions.
Frequently Asked Questions
Can I create a conversational survey with the free version of Fluent Forms?
Yes. The conversational builder, welcome screen, layouts, Radio, Checkbox, Text Area, Email, and field-level Conditional Logic are free. Rating stars, Net Promoter Score, and Checkable Grid need Pro.
Can I turn an existing form into a conversational survey?
Yes. Fluent Forms can convert a regular form to the conversational format with one click. Some fields, such as container fields, aren’t supported in conversational forms, so check the form after converting.
How many questions should a conversational survey have?
Five to ten works well. For more than that, consider splitting it into two shorter surveys, or use a multi-step form so people can see a whole section at once.
Does Fluent Forms calculate my Net Promoter Score?
The Visual Report shows how many people picked each score from 0 to 10 and the percentage for each. To get the NPS, subtract the percentage of 0 to 6 scores from the percentage of 9 and 10 scores.
Can I make the survey anonymous?
Yes. Leave out name and email fields, and say on the welcome screen that responses are anonymous. Keep in mind that each entry still records technical details such as browser and device.
Can respondents use the keyboard instead of clicking?
Yes. People can press Enter to move to the next question and press a letter to choose an option. The Key Hint setting on the Design tab controls whether the letter hints are shown.
How do I put the survey on a page?
Copy the shortcode from Design → Share and paste it into a page or post. You can also share the direct link or embed it with the HTML code.
Can I stop accepting responses after a certain date?
Yes. Go to Settings & Integrations → Scheduling & Restrictions. You can set a start and end date or cap the total number of entries.
Can I show survey results to respondents after they submit?
Yes, with Pro. Turn on Append under Settings & Integrations → Survey Result. Showing results suits polls more than private feedback surveys, where people may not want to see others’ answers.
Send Your First Customer Satisfaction Survey
You now have a customer satisfaction survey that asks one question at a time, follows up only with the people who had a problem, and turns every answer into an insightful chart. Start with the free version of Fluent Forms and build it with Radio questions, then upgrade to Fluent Forms Pro when you want star ratings, NPS, grids, and other advanced features.

Sarika creates helpful content for Fluent Forms & FluentPlayer. Endlessly curious, she loves connecting over diverse interests & unique perspectives. Off the clock, she’s exploring art or relaxing with a binge-worthy show.
-

How to Master Customer Onboarding and Keep Customers Coming Back
Master customer onboarding with 5 simple stages, 9 proven best -

How to Create a Beautiful Online Course Website with WordPress
Creating online course has become easier with WordPress. Are you -
Styling Beautiful CSS Forms with Fluent Forms’ Advanced Form Styler
Learn styling Fluent Forms using built-in templates, Gutenberg, custom CSS,


Leave a Reply
You must be logged in to post a comment.