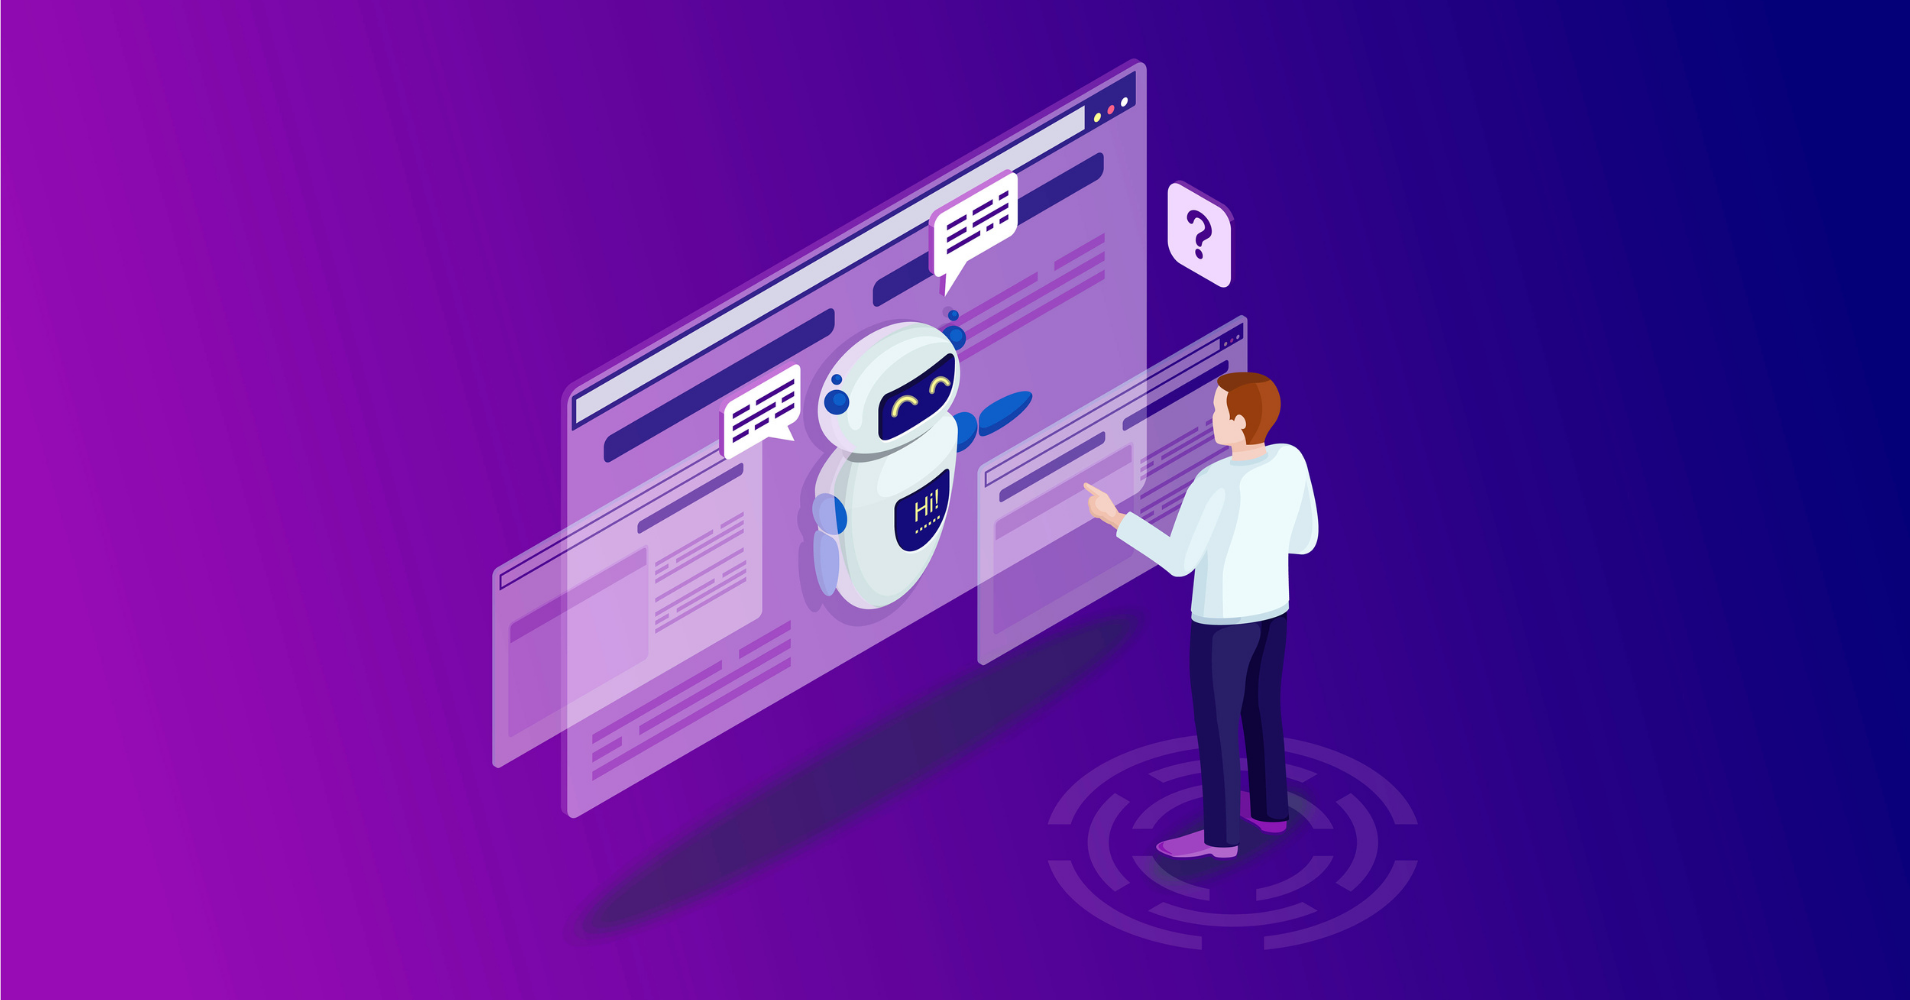
How to Embed Social Chat to Your Website Using WP Social Ninja
Have you been thinking about adding social chat software to your website? For a website, sound communication is a dominant factor to ensure you are on the right track. Moreover, effective communication will only lead you to thrive.
Well, let me first tell you what social chat exactly is. It is a service that enables users and businesses to communicate with each other. Embedding social chat applications on your websites allows the clients to chat with your team directly.
Social chat is an essential part of your website. Successful ventures say they have increased customer satisfaction rate by embedding chat support on their website. For example, when you buy something online or need help looking for something, live support helps resolve the situation immediately.
Not to mention, many companies have stated that not having online chat support is one of the few reasons to lose revenues. Surveys say about social chat-
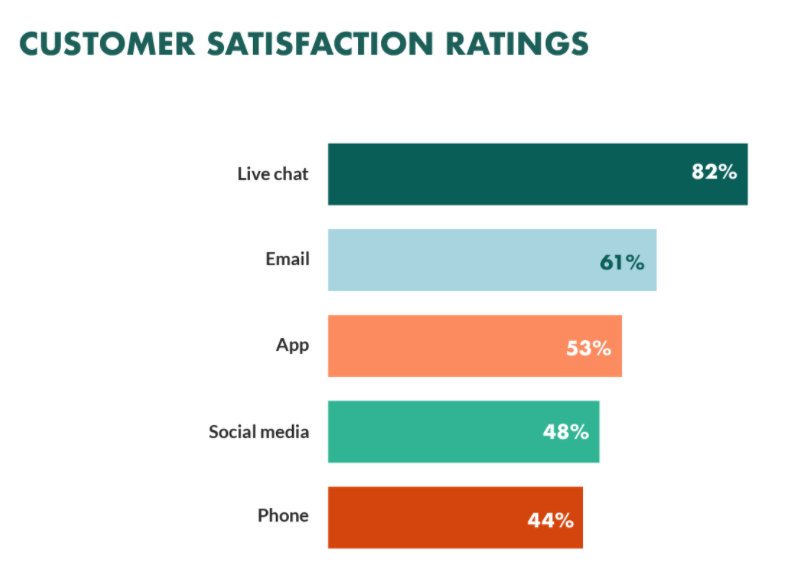
- Online chat support is in the top position in terms of customer satisfaction rate at 92%
- 79% of users like social chat support because of instant replies
- 63% of clients are likely to come back on the website again for the previous good experience
Businesses that have rendered a social chat website plugin on websites get 85% more potential customers compared to those who don’t have that service.
How does social chat work on a website?
You already know that social chat allows you to interact with your website visitors. Moreover, it will essentially convert the potentials into real customers. However, you may be wondering that most WordPress websites have email options or contact numbers, so why use online chat on your website?

- Social chat is the most cost-effective communication process on a website. Traditional approaches, like phone calls and emails, take time and are quite expensive as well.
- It provides a quality service because online chat support will not make the visitors wait. And most of the services are 24/7 available.
- Cost reduction and better quality service will lead to excellent customer satisfaction, and this will have an impact on sales growth.
How chat support plays a crucial role in your website, is not a secret anymore. Furthermore, most WordPress websites are now adding WordPress social chat plugins to come up with real-time support. Currently, there are multiple amazing tools that can increase your website conversion rate.
In this post, I will discuss a particular plugin and how to embed it on your site. I advise you to take a moment and choose the best plugin for your business because nothing beats having social chat support on your website.
How do I add social chat to my website?
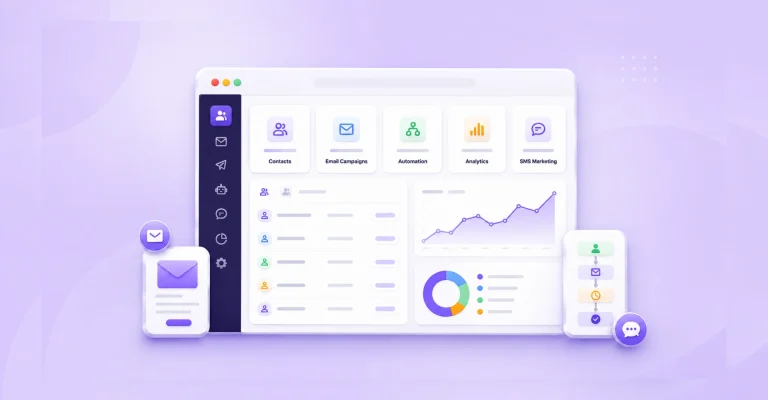
If you pick the best social chat software for your website, the rest of the journey will become quite comfortable. Why should you select a plugin that comes with limited platforms and features? An all in one plugin like WP Social Ninja managed by WPManageNinja has not only just a Social Chat option but also comes with Social Reviews, and Social Feeds that can boost your business.
Let’s take a look at how you can embed WP Social Ninja Social Chat on your website.
Installation and activation of Social Chat
WP Social Ninja is a light-weight and user-friendly plugin. Hence we are going to learn about this fantastic all-in-one plugin. First of all, we have to install and activate. Installing and activating will take only a few steps.
Even if you are not an IT specialist, you can run this plugin without any background knowledge.
Ready to install and activate the plugin on your website? Follow the steps below-
Step 1
You can install it in two ways.
- Navigate to the WordPress Admin panel. From the WordPress Dashboard go to Plugins > Add New >
- Next on the search input field, type WP Social Ninja, and wait for a few seconds for it to come up
- Now, search for WP Social Ninja, and Click on Install
- Now Activate
Step 2
- Download WP Social Ninja from the WordPress directory
- Go to Plugins > Add New > Upload Plugin > Choose the zip file > Install Now > Activate

Social Chat configuration
A few years ago, social chat options on websites were not a regular thing. However, so many things have changed now, and plugins like WP Social Ninja offer three most popular social chat applications right now.
- Messenger
- Telegram
Read more below to see how you can get started with the process.
Messenger configuration
Messenger is one of the most popular apps today. It is fast, and has 1.3 billion active users globally. So connecting Messenger brings high chances to get more potential audiences easily.
To connect Messenger on your website, click on the Messenger option on WP Social Ninja Dashboard. This will take you to the Messenger Configuration page. To begin the process, you need a Facebook Page ID/User ID/Group ID.
Let’s take a look at how you can obtain the ID’s.
Facebook Page ID
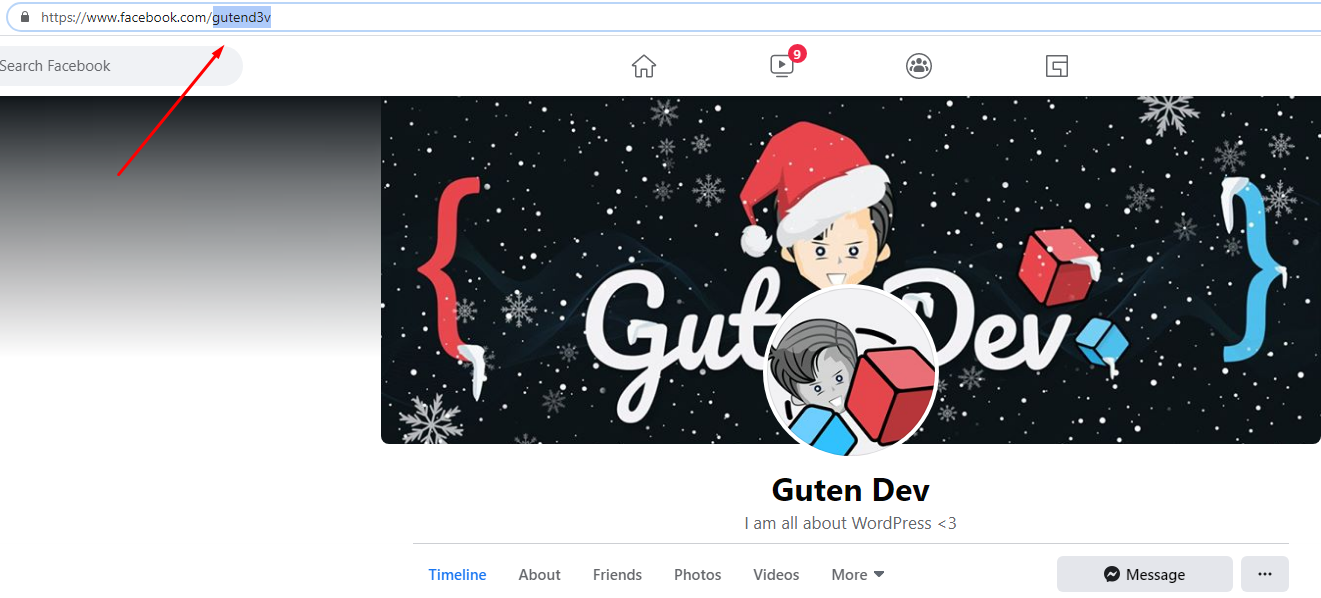
To get Facebook Page ID to configure messenger social chat on your website, you need to check the Page URL first.
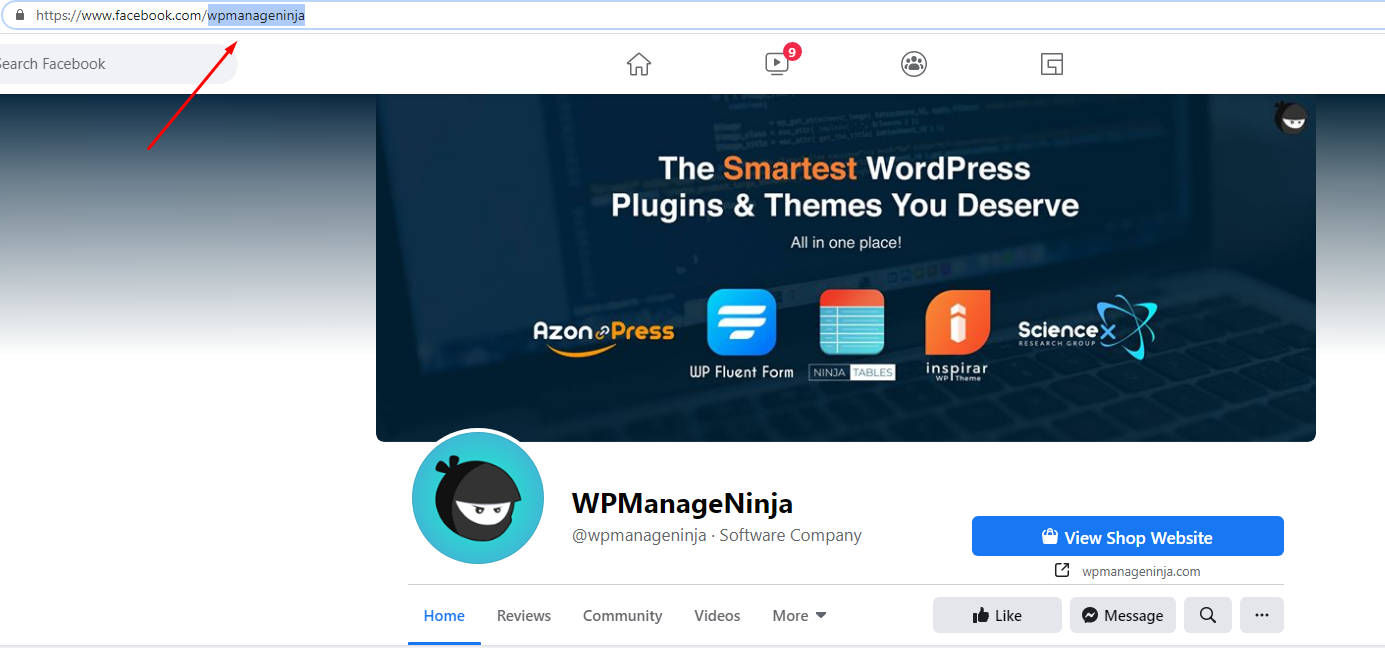
Now, click on the URL, and after the last slash, copy the ID. Then, you can paste it in the Messenger Configuration field on WP Social Ninja and click on the Save button.
However, some IDs may vary. For example, if you take the AuthLab page, then the ID looks different from WPManageNinja.
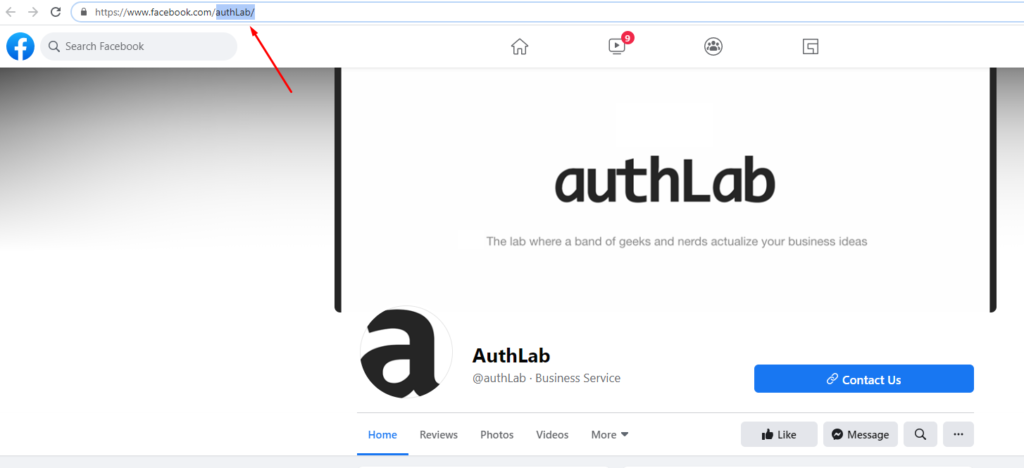
Here, your Page URL structure is https://www.facebook.com/authLab/, and your Page ID is authLab/.
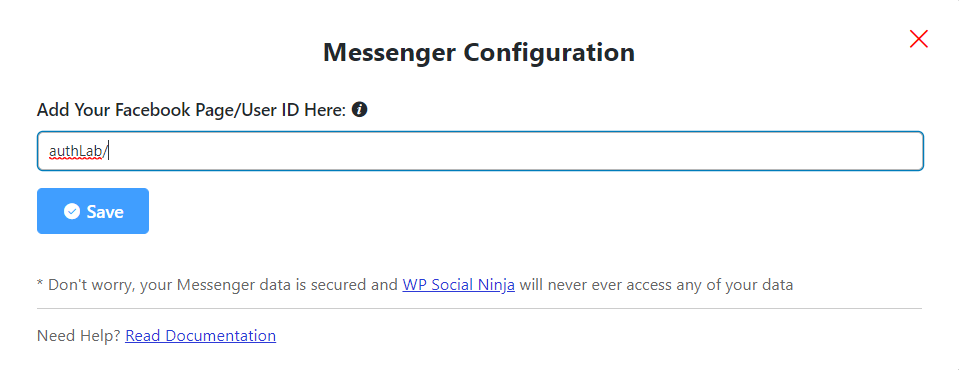
Don’t forget to click on the Save button, and you will be notified with a Success notification.
User ID
Similar to Facebook Page ID, you can also obtain the User ID. Click on the User ID URL after the last slash, and copy the ID.
Now, you can paste it in Messenger Configuration and click on the Save button.
Group ID
Along with User ID and Page ID, you may also need the Group ID sometimes. Now, you can copy the Page ID and insert it on the Messenger Configuration.

Copy the marked URL and paste it in the Messenger Configuration. Remember to click on the Save button after you are done.
WhatsApp Configuration
WhatsApp is the most popular and used the app for communication. Configuring WhatsApp using WP Social Ninja is a super easy process. Let’s find out how you can connect this app to your page.
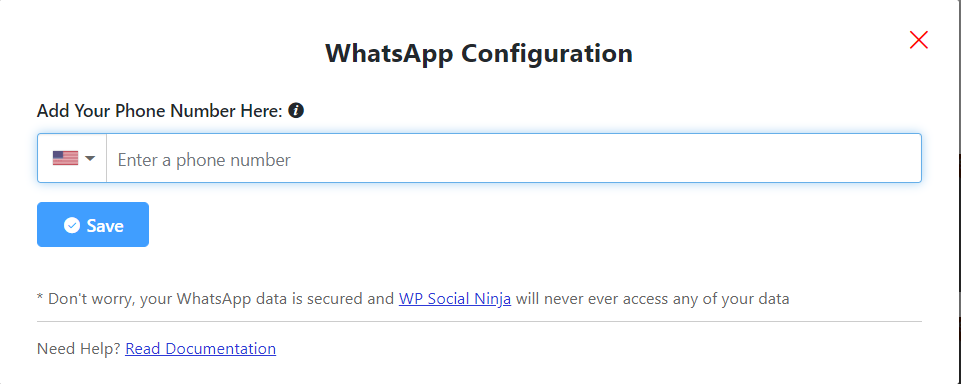
First of all, you need to provide your phone number and click on the Save button. This will take you to the WhatsApp Template, where you can change all the layouts.

However, you can Reset Configuration or Edit Template.

Click on the blue button to Reset Configuration. After this, your previous settings will be changed. Furthermore, you can add a new number if you want.
Telegram Configuration
Telegram is the fastest and a synced app from all the devices. Using Telegram is easy and secure. And that’s why along with Messenger and WhatsApp, Social Ninja has a Telegram integration to social chat with the audience immediately.

To configure Telegram, all you need to do is provide your User ID and Click on the Save button.
Once you are done with successfully saving the Telegram User ID, this will take you straight to the Dashboard. Then, continue to the next step.
Features and functionalities
WP Social Ninja is a box full of surprises. Once you are done with the configuration you get to play with the multiple layouts and settings according to your preferences.
And the best part is that all the Social Chat platforms have the same features and functionalities. WP Social Ninja, the most desired WordPress social chat plugin, will offer you a detailed customized settings panel to represent and decorate your website in a new way.
Moreover, this plugin has similar settings for all the Social Chat platforms. So users can enjoy a hassle-free configuration. Let’s get into how you can Create a Template and checkout various layouts to showcase the social chat service.
Social Chat Template Layout
WP Social Ninja renders a number of templates for the users to choose the appropriate option that enriches their website.
In this part, we will guide you through customizing your social chat Template Layout by using your Telegram account.
Step1: Template Types
To select your Templates, start by clicking on the right sidebar, then click on the Template button.
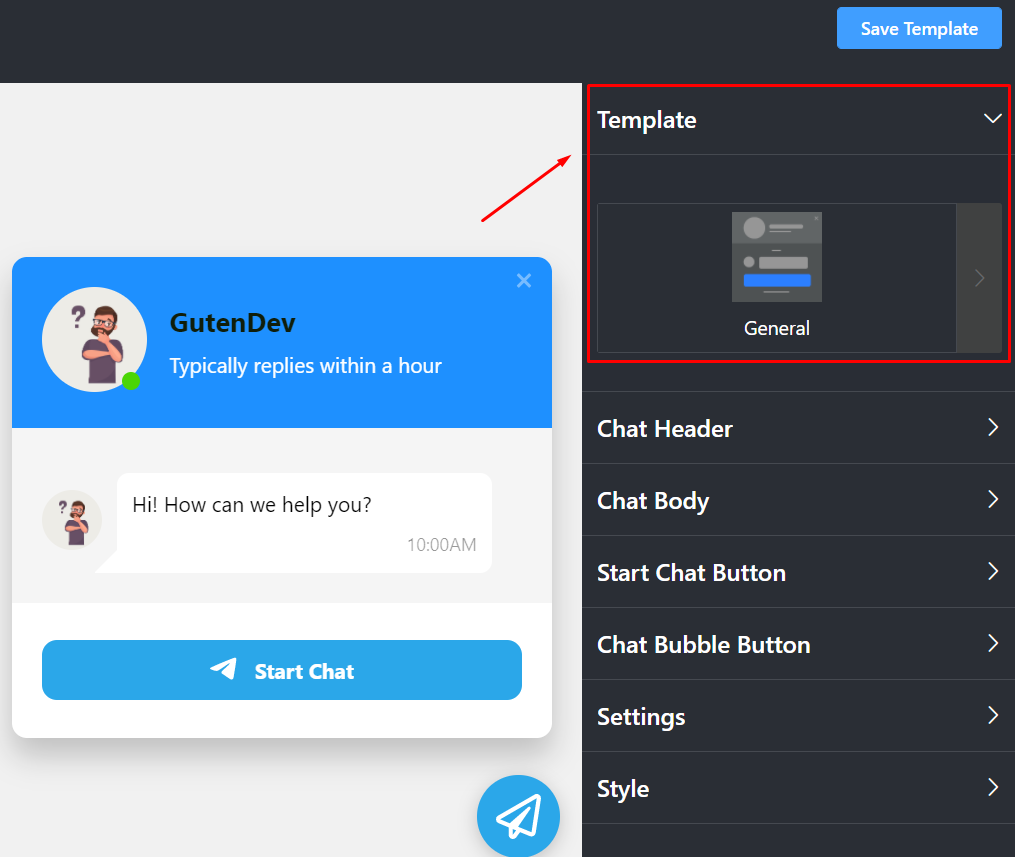
A drop-down menu will appear.
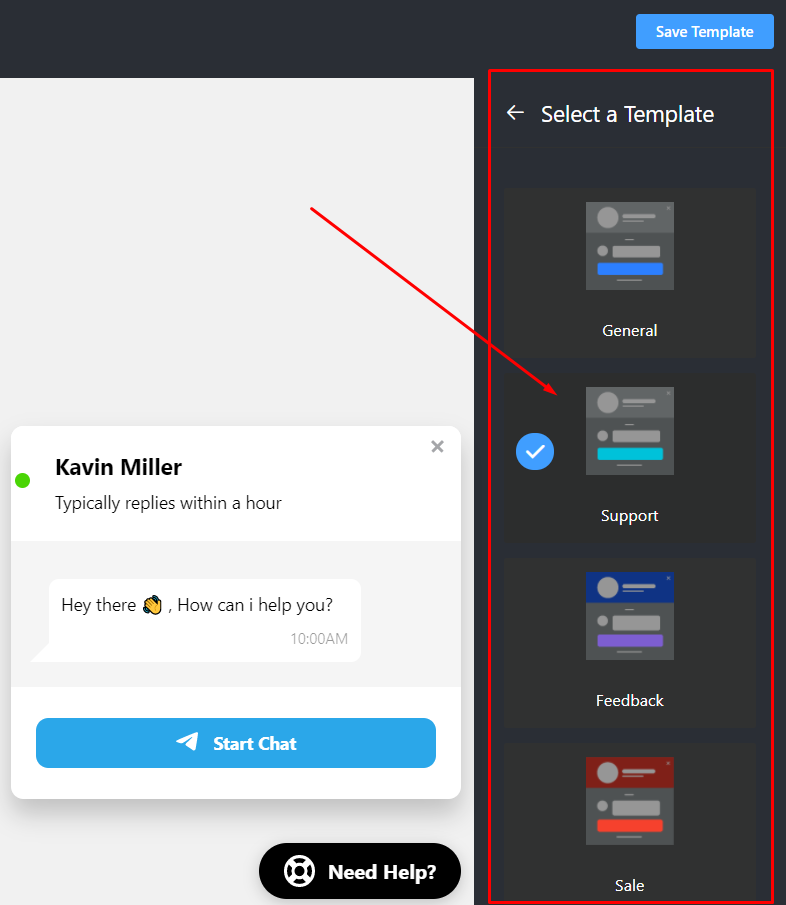
As you can see, it comes with some pre-built templates. Four types of Templates are available at the moment. General, Support, Booking, and Sale. Select any Template for your site!
Step 2: Chat Header
After Template, next comes the Chat Header. From the drop-down option, you can see three customizable items; two of them are input fields, and another is an image upload option.
After Template, next comes the Chat Header. From the drop-down option, you can see three customizable items; two of them are input fields, and another is an image upload option.
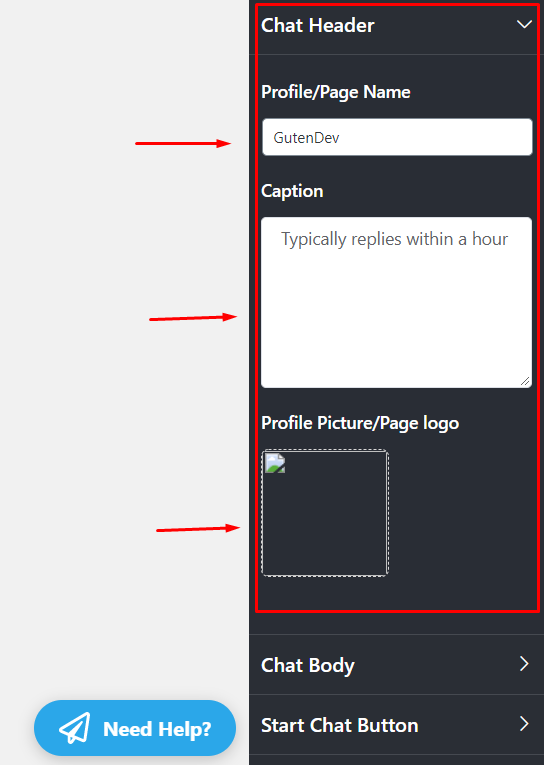
From the pointed Profile/Page Name, you can add the name, or you may change/edit.
The next is the Caption. From here, you can change the Caption, for example – instead of “Typically replies within an hour”, you can add something else.
In addition, your business definitely has a unique identity that can be placed in the placeholder of a Profile Picture/Page Logo.
So you can add a profile picture that suits your brand.
Step 3: Chat Body
Next Layout is Chat Body. Here, In the Chat Body, you have the option to change your Greeting Message.
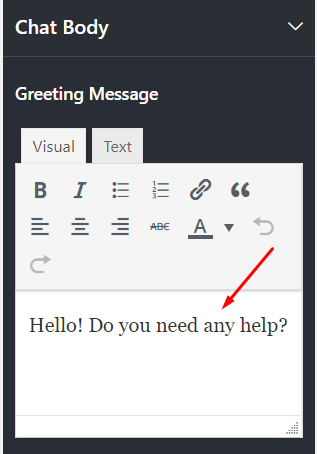
Instead of “Hi! How can we help you?” you can place your own custom Greeting Message.
Step 4: Start Chat Button
From the Start Chat Button, you can change two settings. Display Chat Icon and Chat Button Text.
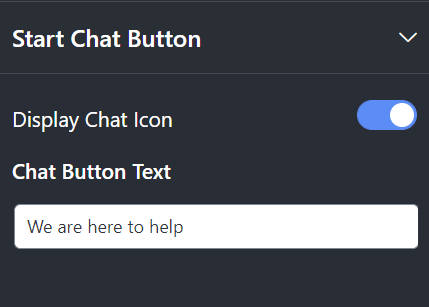
First of all, you can turn on/off the Display Chat Button. Secondly, in the Chat Button Text, you can replace the default text with a new customized text.
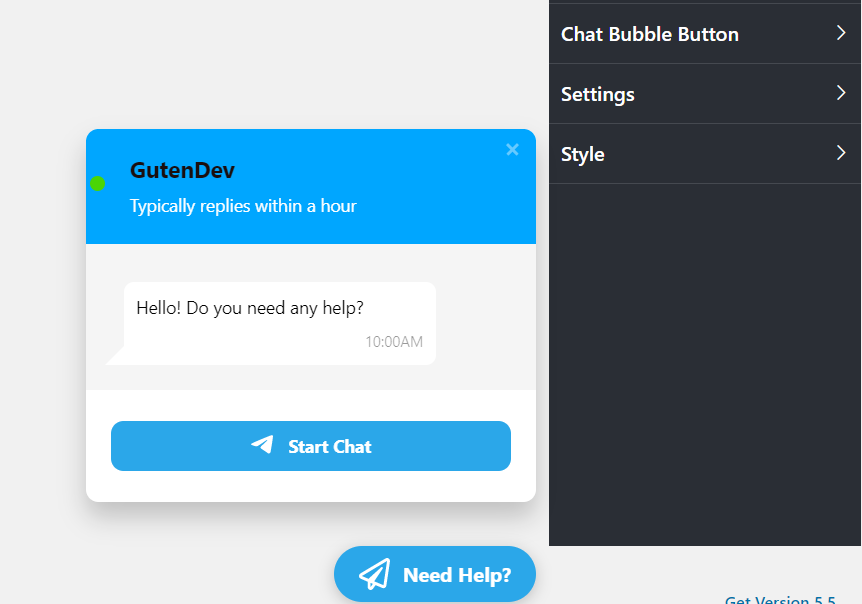
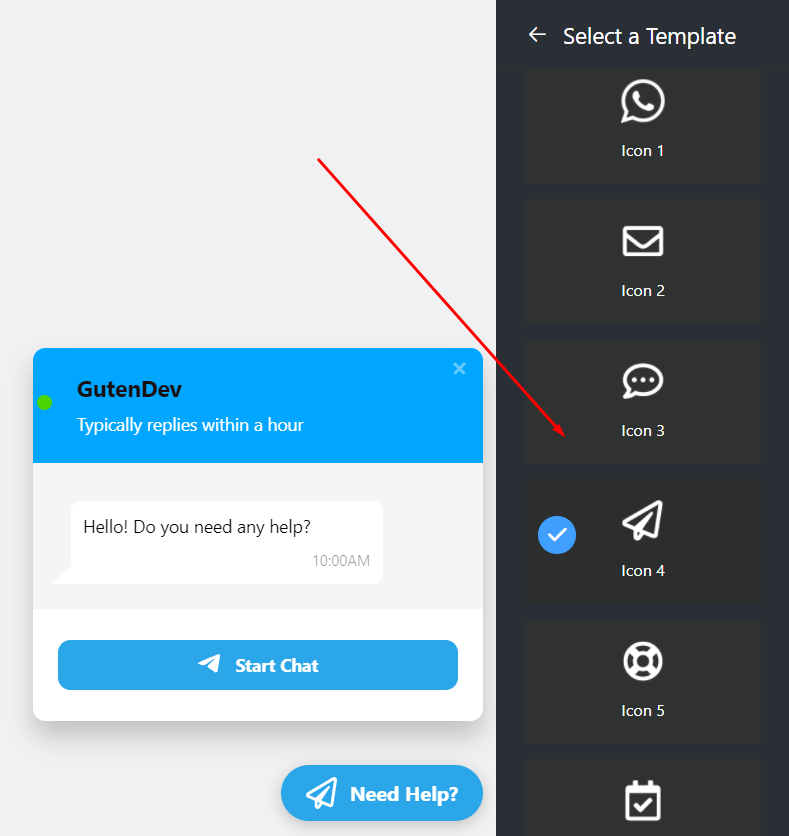
Step 5: Chat Bubble Button
Here, if you click the Chat Bubble Button, a drop-down list will appear.
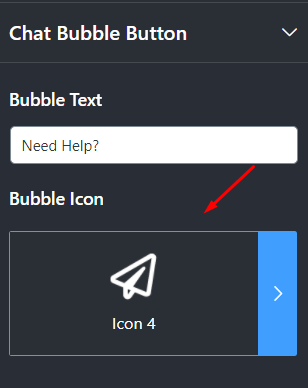
From this menu, you can write a Bubble Text, for instance, “Need Help?”
Next is the Bubble Icon. From the drop-down menu, you can change the Bubble Icon. We have seven Bubble Icons available at the moment.
You can pick any icon and click on the Save Template button.
Social Chat Settings
WP Social Ninja offers detailed settings for the users that have different positions and scheduling options to adjust. Let’s see how this works.
Here, if you click on Settings, a drop-down menu with multiple options will appear. Let’s find out more about them.
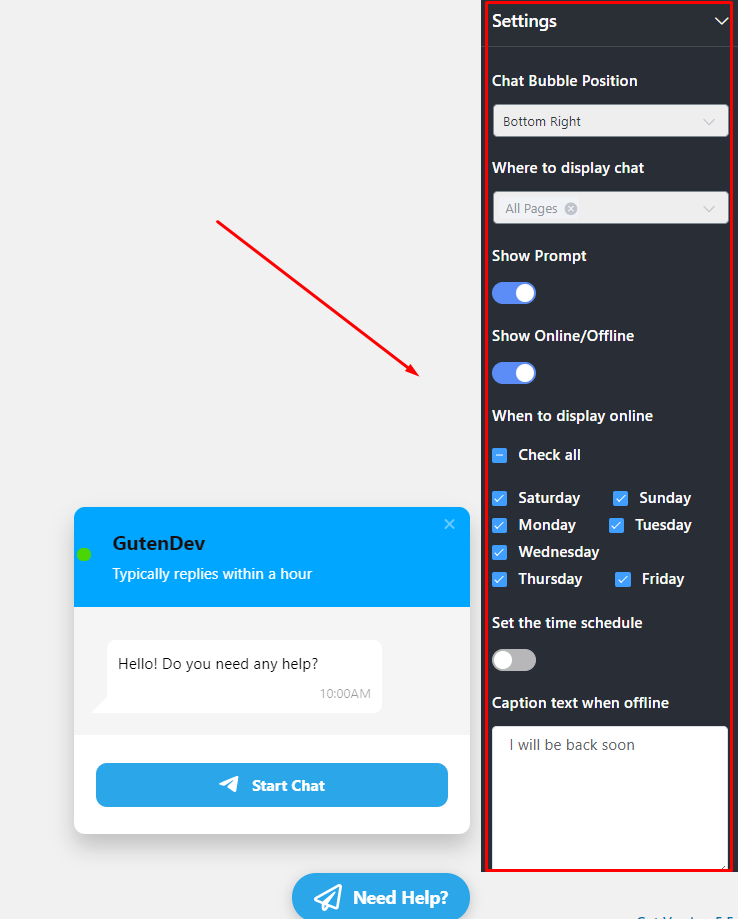
Step 1: Chat Bubble Position
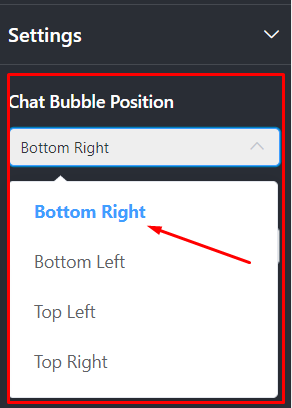
You can adjust your Chat Bubble Position in four different ways. From Bottom Right to Bottom Left and Top Left to Top Right.
Step 2: Where To Display Chat
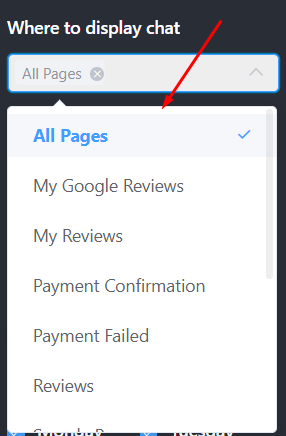
With this option, you will be able to select the pages where you would like to show your social chat option. If it helps your business, you can choose to hide your social chat options from specific pages.
From the drop-down menu, select a particular page, multiple pages, or All pages to add the Social Chat option.
Step 3: Show Prompt
After the display option, there are more customizing features like Show Prompt.
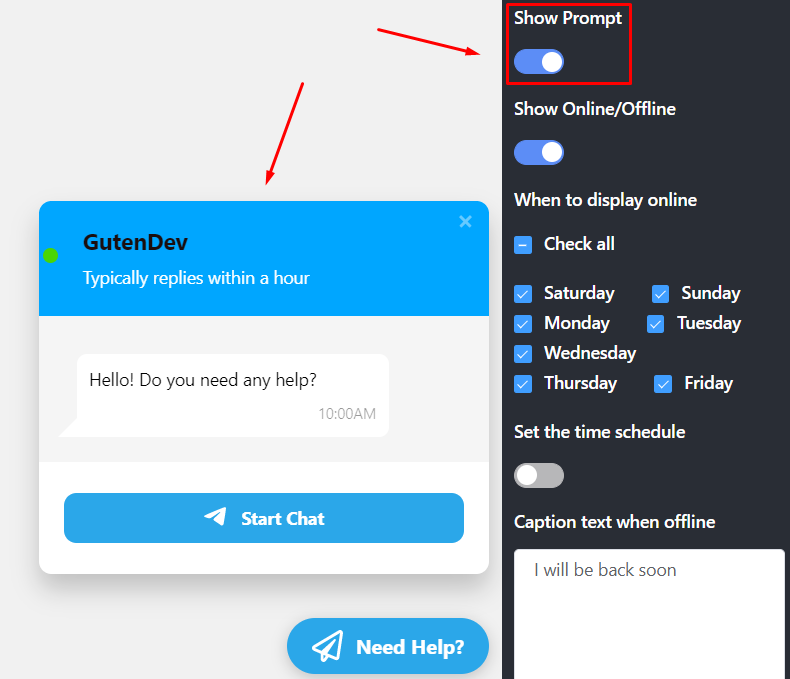
In this section, if you turn on the button, the chat window will automatically pop up. If you don’t want that, simply turn off the Show Prompt button.
Step 4: Show Online/Offline
The last Setting is Show online/offline. Here you can adjust two important settings: When to Display Online and Set the Time Schedule.
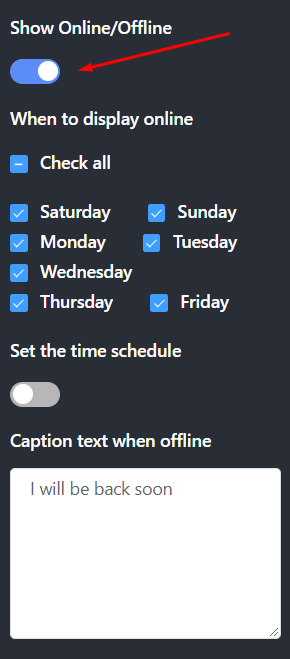
In When to Display Online, you can schedule the days you will be available. For this, you can tick the Check All option, or you can select the specific days that are applicable.
Next is Set the Time Schedule.
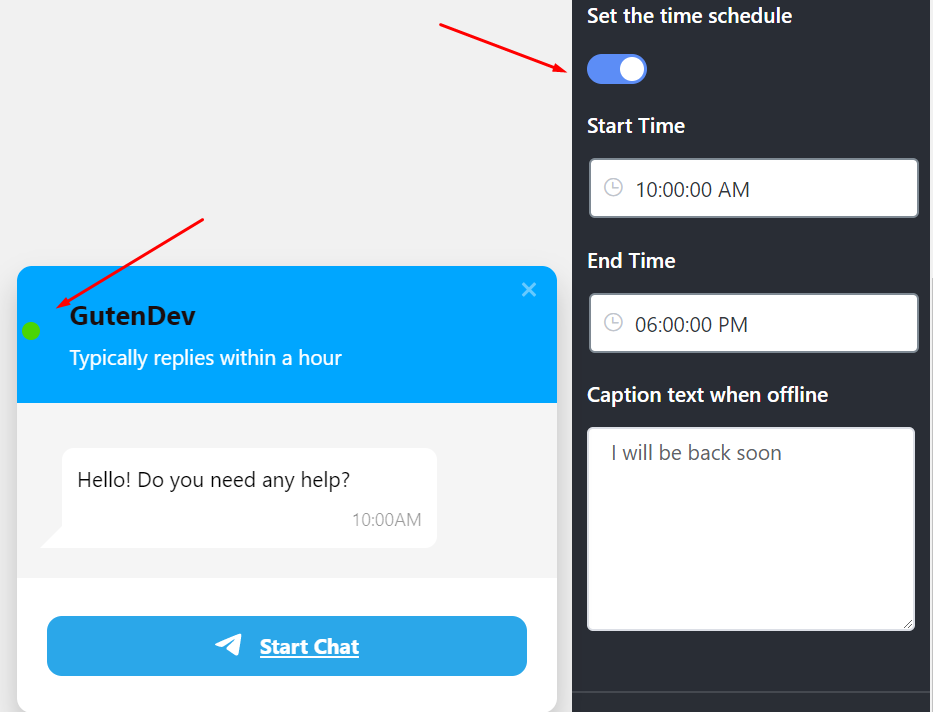
If you turn on the button, it will allow you to set a time that includes Start Time to End Time. This setting is for your users to understand the hours when you will be available to communicate.
Moreover, you have two more amazing caption-text options. So you can type your own Caption Text When Offline.
Social Chat Style
Changing styles of a Chat Body is a fun task for sure. As you have fixed the settings now, it’s time to customize how it will look on your website. WP Social Ninja has various Styles to offer, so let’s check it out.
Scroll down and start by clicking on the Style button, and a drop-down menu will appear.
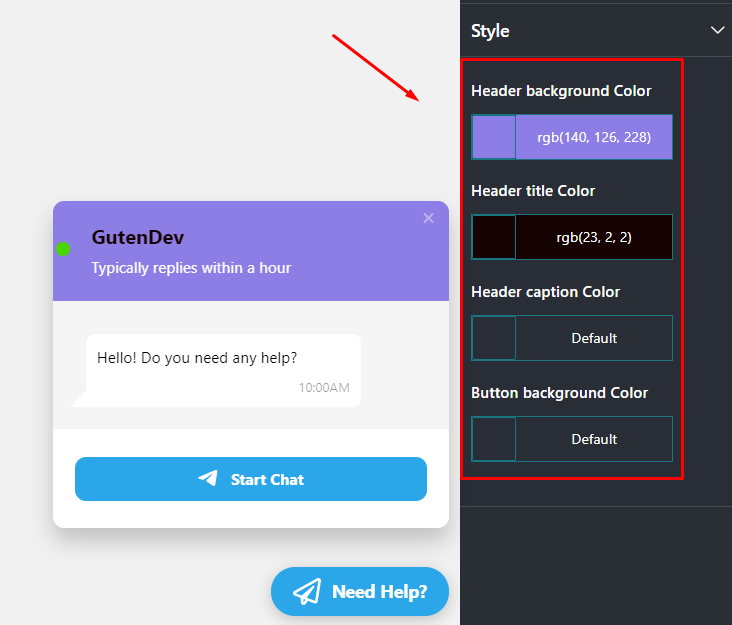
In this part, there are four color-changing sections; Header Background Color, Header Title Color, Header Caption Color, and Button Background Color.
Step 1: Header Background Color
First of all, if you want to change the Header Background Color, we have unlimited color options in the palette.

You can pick any color according to your brand.
Step 2: Header Title Color
Once you’re satisfied with your Header Background Color, you can scroll further down to the Header Title Color.
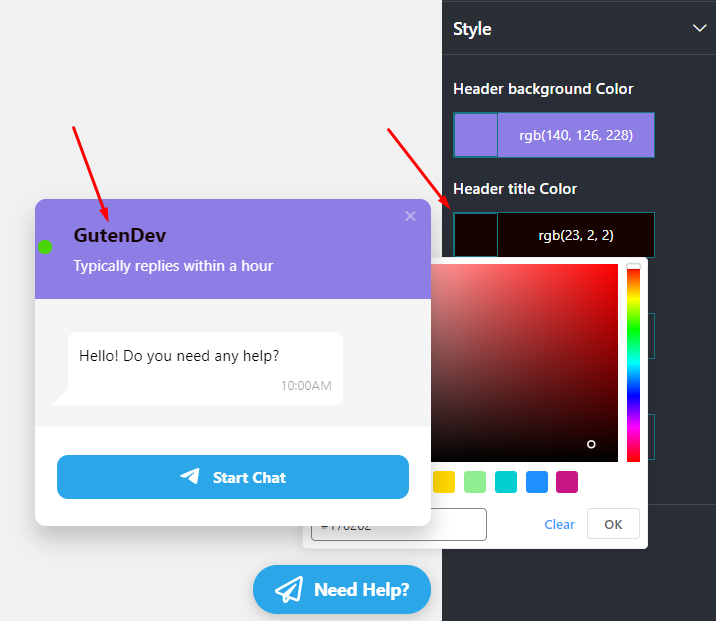
Similarly, you can change the Header Caption Color, and Button Background Color.
This way you can set up and customize your Social Chat on your website for social chat without even stopping once. Try our Pro Version for more exciting features coming up for you!
Moreover, this is a super-secure process. With WP Social Ninja, your personal credentials and privacy are absolutely safe.
Final thoughts
Let’s face it, Social Chats are now a robust medium of communication for any website. To be precise, if you have a diverse business, you need to interact with your clients on a day-to-day basis. And what better way to do that than a social chat? I am pretty sure there is no effective alternative to it.

Setting up a business and dealing with all the users from separate platforms is not an easy task. What if a plugin can embed all of your social chat accounts like Messenger, WhatsApp, and Telegram?
Yes, having WP Social Ninja is like having a magic wand. Moreover, it takes care of your whole communication ecosystem and offers more amazing features like Social Reviews and Social Feeds.
So grab the plugin and reach out to your audiences straightaway. For more information, check out our detailed user guidelines.
Check out our article on 2.7 Billion Reasons You Cannot Ignore Social Media Marketing: The Sprinklr Story
-

Best WordPress Shopping Cart Plugins to Get Your Store Up and Running
Looking for the best WordPress shopping cart plugin? Compare FluentCart, -
Best WordPress CRM and Email Marketing Plugin: What to Look for in 2026
Looking for the best WordPress CRM and email marketing plugin? -
WP Social Ninja vs Rich Showcase: Which Google Reviews Widget to Choose?
Compare WP Social Ninja and Rich Showcase to find the
Leave a Reply
You must be logged in to post a comment.