
9 Productive Ways to Create Online Data Tables

Who knew making a site more user-friendly and appealing was that easy? By simply adding a data table to your website, you can make data presentation easy right away. To dynamically create online data tables on a WordPress website, we will have to go beyond the default options this CMS provides. That’s why it leads us to a point where we can’t deny the usefulness of a WordPress table plugin.
Creating interactive and efficient tables in WordPress sites without a plugin could be tricky for newbies and, of course, for those who don’t have any coding knowledge. Thanks to WordPress table plugins as they allow you to create tables easily and get the most professional outcome.
- Why use a table plugin?
- Using a quality plugin to create online data tables
- 9 different ways to create WordPress data tables
- Table templates (Free)
Why use a table plugin?
A plugin that helps a website owner create and decorate data tables is a table plugin in WordPress. You can insert numerous types of tables in WordPress sites and use them in various ways. The tabular format is much easier to follow and using a quality table plugin, you can make it happen easily.
Users feel more comfortable if there is plenty of information in a tabular form rather than in a narrative form. As a result, users spend more time on your site, and it’s great for your business!
To clarify, table plugins are the swiftest way to grab the attention of your users, drive their focus to where you want, and convey the message in a precise and effective way.
There’s a long list of table plugins. You can try out the one you think suits best.
In this article, we’ll try to show the different intuitive ways to use a table plugin in WordPress.
Using a quality plugin to create online data tables

For obvious reasons, we will be using Ninja Tables for demonstration purposes. You’ll be amazed to see that the plugin has tons of features and functionalities. Literally, you will get more than merely a table creation facility in one place.
The free version of Ninja Tables is available in the WordPress plugin directory. You can also add it from your WordPress dashboard. Go to Plugins>Add New. Search for “Ninja Tables”, click “Install Now”, and then “Activate”!
Once you purchase Ninja Tables Pro, you can play with all the advanced functionalities this amazing widget has to offer!
Adding this table plugin means you have installed something amazing! Now, you do need to follow some swift steps to customize and edit your data tables according to your requirements. Here we’re going to show you the process from scratch.
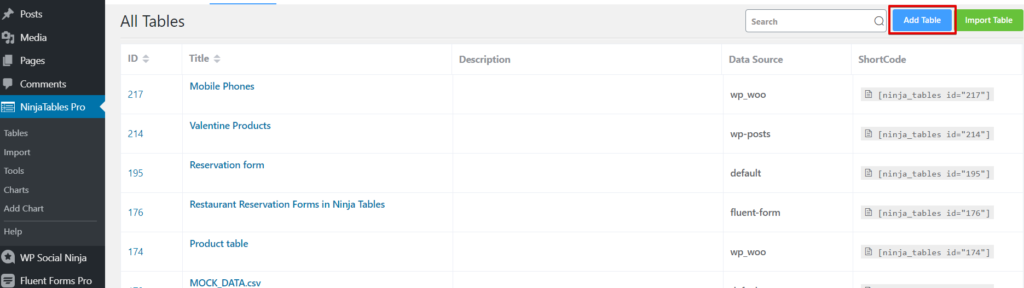
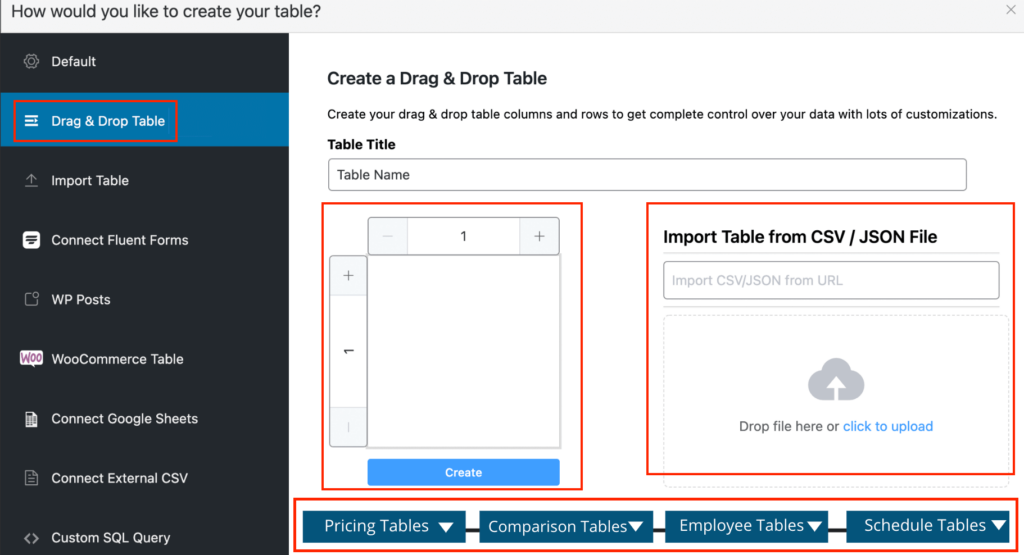
After installation, you will see a page like the image above. Then you need to click on the “Add Table” button from the top-right corner. You can also upload an already existing CSV file from your hard-drive and show it on your website using Ninja Tables’ “Import Table” option.
Here are the fundamental ways to use Ninja Tables. These 9 options will appear in the sidebar when you click on “Add Table”-
- Default table creation
- Drag and drop table
- Creating tables by importing data
- Creating tables with Fluent Forms
- Creating tables using WP Posts
- Creating WooCommerce product tables
- Creating tables connecting Google Sheets
- Creating tables with External CSV
- Creating tables with custom SQL query
All these are different ways to use Ninja Tables to create WordPress data tables, and most importantly, they serve specific purposes.
Recently, auto-integration with Ninja Charts seems to be another game-changer! This feature lets you create charts with table data.
Some more productive features are-
- Add media: Make your tables appear lively and captivating by adding vivid images and videos.
- Drag and Drop: Simply arrange your data and create a basic table without any coding.
- Row Hover Animation: This feature lets you add an animation so that you can highlight a row by hovering over it.
- Shortcode in Cells: With shortcodes, you can exhibit any item inside your table cells and make it even more dynamic
- Merging cells: Join multiple cells together and make a large one combining them.
- Compact and manually sort table: Compact the size and sort your rows/columns manually.
- Unlimited rows and columns: Go crazy with any amount of data because there’s no limit to numbers of rows and columns.
- Customized permission: Permit who you want and don’t want to edit or view your table.
- Easy configuration and enhanced styles: Configuring your table and using different table styles make your site easier to follow.
- ACF Field integration: This integration is for managing a user’s custom field information and displaying it to visitors.
The most intriguing fact about Ninja Tables is that you can create any kind of table you want! There is also no limit to row/column or color customization.
Similarly, you can work with a massive size of data as well. So, first of all, create a basic table using this WordPress table plugin and then move on to other options.
Top 7 examples of table data visualization.
9 different ways to create WordPress data tables
Ninja Tables provides you with numerous options for table creation that allows you to create online tables in various ways for different purposes. Let’s start with the default one.
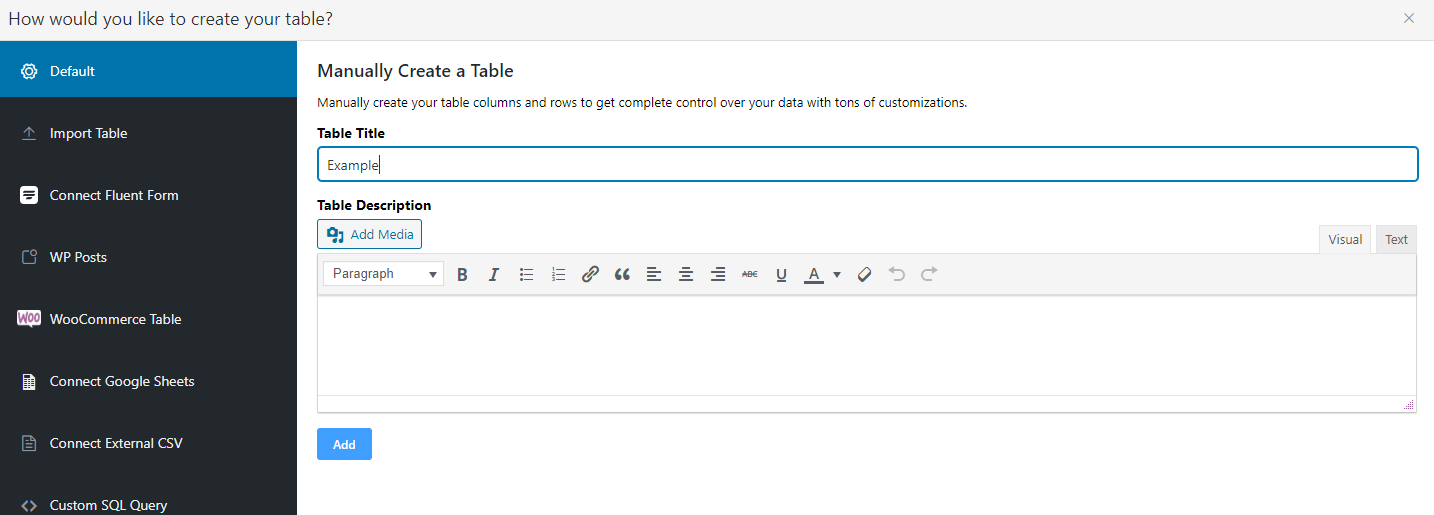
Default table creation
Let’s start with the “Default” table creation of Ninja Tables, where you only need to add a title and description (optional).
Once you hit the blue “Add” button after putting the necessary information, by default, you will be directed to a panel, where you get an option to add columns and, 6 more editing and configuring options will be available.

There are-
- Table Rows
- Table Configuration
- Table Design
- Frontend Editing
- Custom CSS/JS
- Import-Export
a)Adding table rows and columns
Adding rows and columns is the first step of table creation of Ninja Tables. Once you click on the Add button initially, it will create a default row into the table. Then you will get the option for adding columns. Click the “Add Column” button and add column name, data type, and responsive breakpoints (fit a specific or any device).
Setting the data type refers to whether you want your data to be a regular text, numeric input, image, date, or a link. You can add as many columns as you’d like.
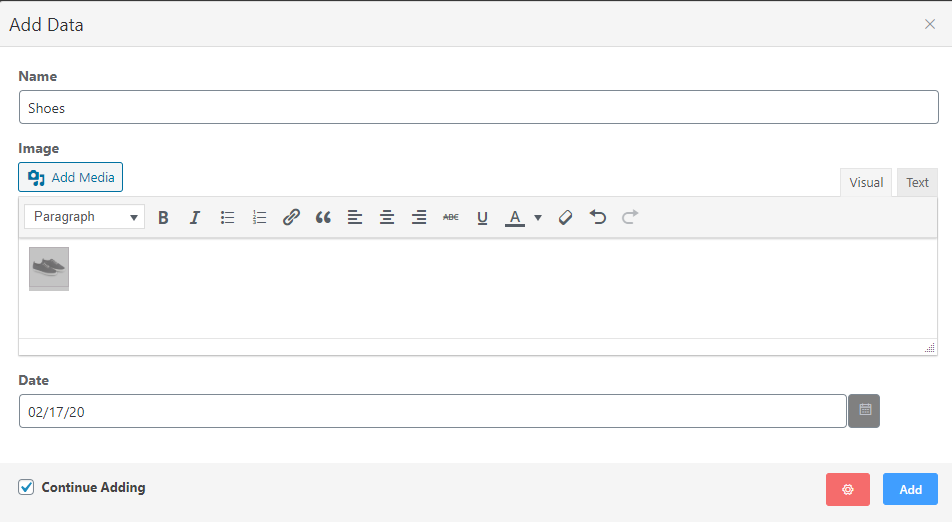
Once you add rows and columns, put data into the table. To do so, click ‘Add Data’ to input. We named the columns ‘Name’, ‘Image’, and ‘Date’. Moving on with adding data, you will see different types of input fields requiring different data types. The first bar is text only, the second one is for image/link, and the last one is for the date.
Since the data types are different, it looks something like this-
Note that you can keep going as long as you want until you turn off “Continue Adding”. This is how the outcome will look when you have added data for a few rows-
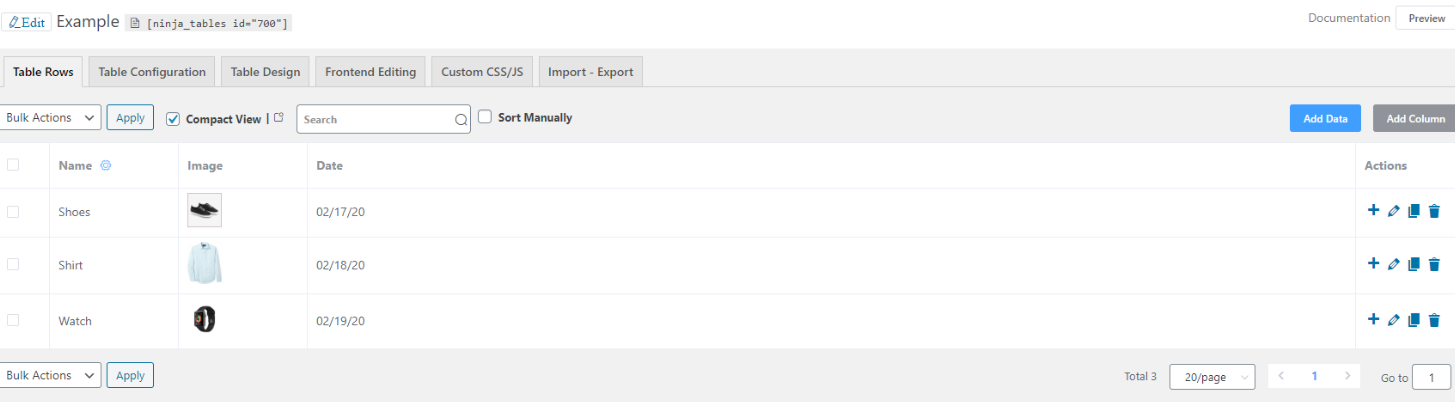
If you hover over the columns, you will notice a “settings” logo that lets you edit. You can preview how the initial table looks using the top-right “Preview” button.
b)Configuring table
One of the unique uses of Ninja Tables WordPress table plugin is the configuration part where you get features like-
- Basic settings: Choose what changes you want to make on your table.
- Advanced settings: Extra CSS classes, width, alignment, filter and sort, color customization, and so on.
- Conditional formatting: Enable cell values to use this attribute and customize the appearance of your table cells based on the conditions set for the specific columns.
- Transform value: Use a simple HTML coding (<a href=………….) to transform value.
At the same time, the dropdown bar shows-
- Columns
- Rendering settings
- Custom filters
- Buttons (CSV/print)
- Language
c)Designing table
Moving on to the most elegant feature of Ninja Tables, you’ll see a bunch of different options for library styles, color, and some more. This is how it looks-
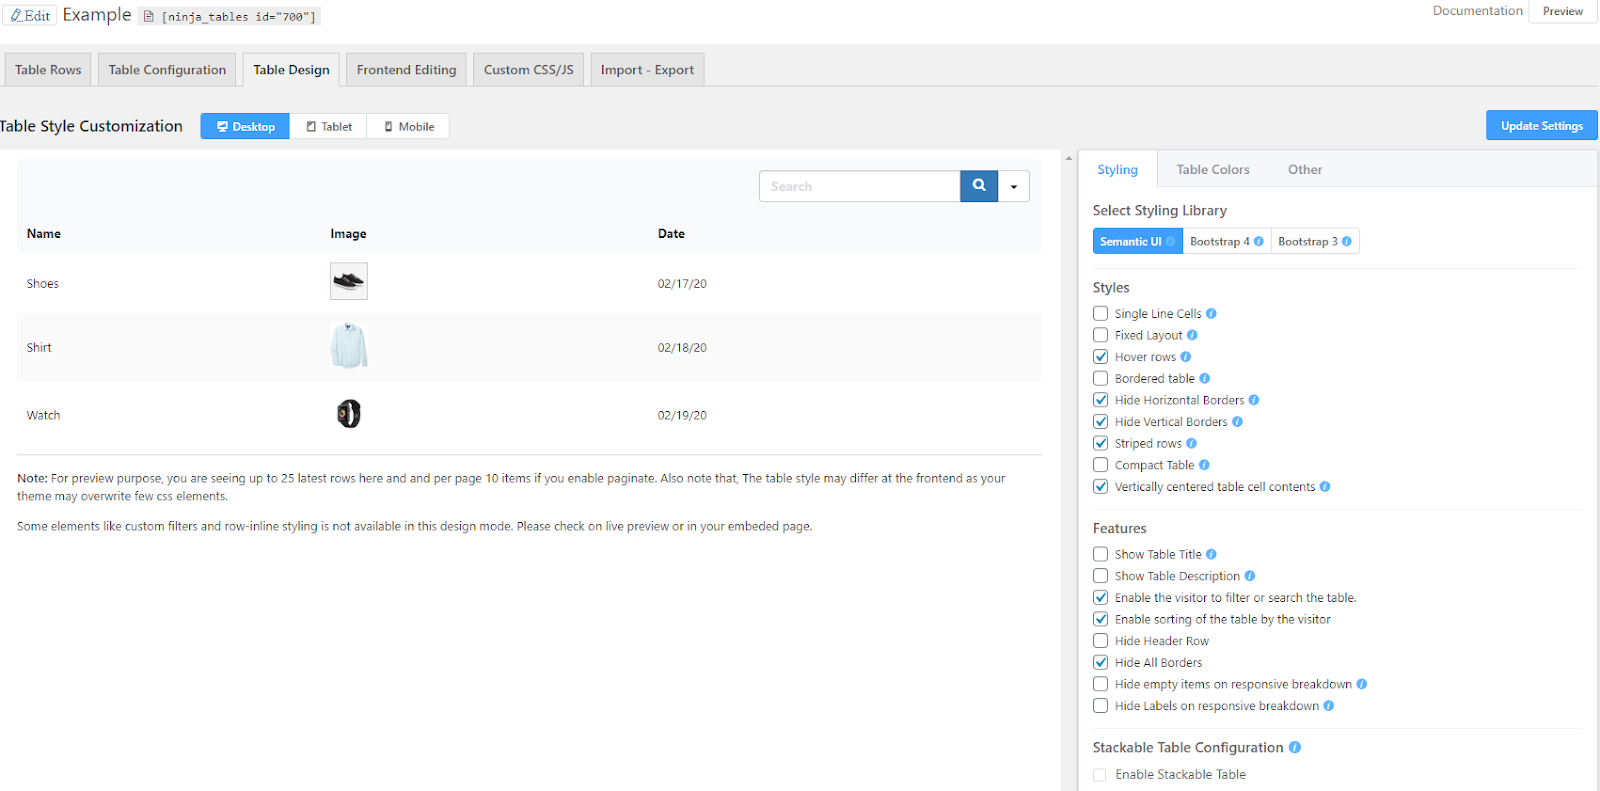
You can pick the preferred library styling among Semantic UI, Bootstrap 3, and Bootstrap 4. If you enable “Stackable Table Configuration”, you are setting different styles of presenting your table data. Select target devices by enabling it.
Also, the next button will let you customize the colors of your table by “Predefined” or “Custom Scheme”.

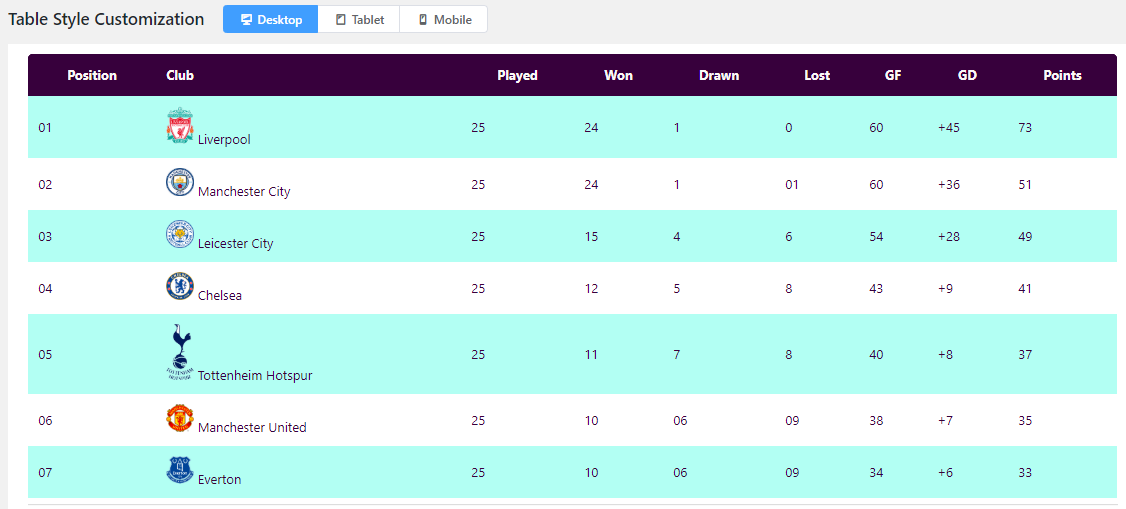
Go wild with the color options and give your tables more enticing appearances! For example, check out this colored table made with Ninja Tables.

Here’s another data table example for football league points. In short, you can change and update with any color from the schemes.
Other stuff includes pagination, search bar position, row details, sorting, toggle position, and sticky header. You have to click “Update Settings” to set the changes.
d)Customize frontend, use custom CSS/JS, and import-export
Ninja Tables plugin allows you to get data from the user and also modify existing table data without any backend access. Allow access and get data from logged-in users and make modifications if you need. You can specify the user role as well.
Customizing CSS is another useful service, which needs a little bit of coding. But the process is still easy. Similarly, you can import-export CSV and JSON files.
Drag and drop builder
Build tables with the simple drag-and-drop editor.
- Manual
- CSV/JSON import
- Premade tables
You can use the manual table creator and CSV/JSON file import option in the free version. But the Import from URL and some premade templates are locked for the pro version.
Choose any table creation option from the 3 and customize the table by dragging and dropping cell elements.

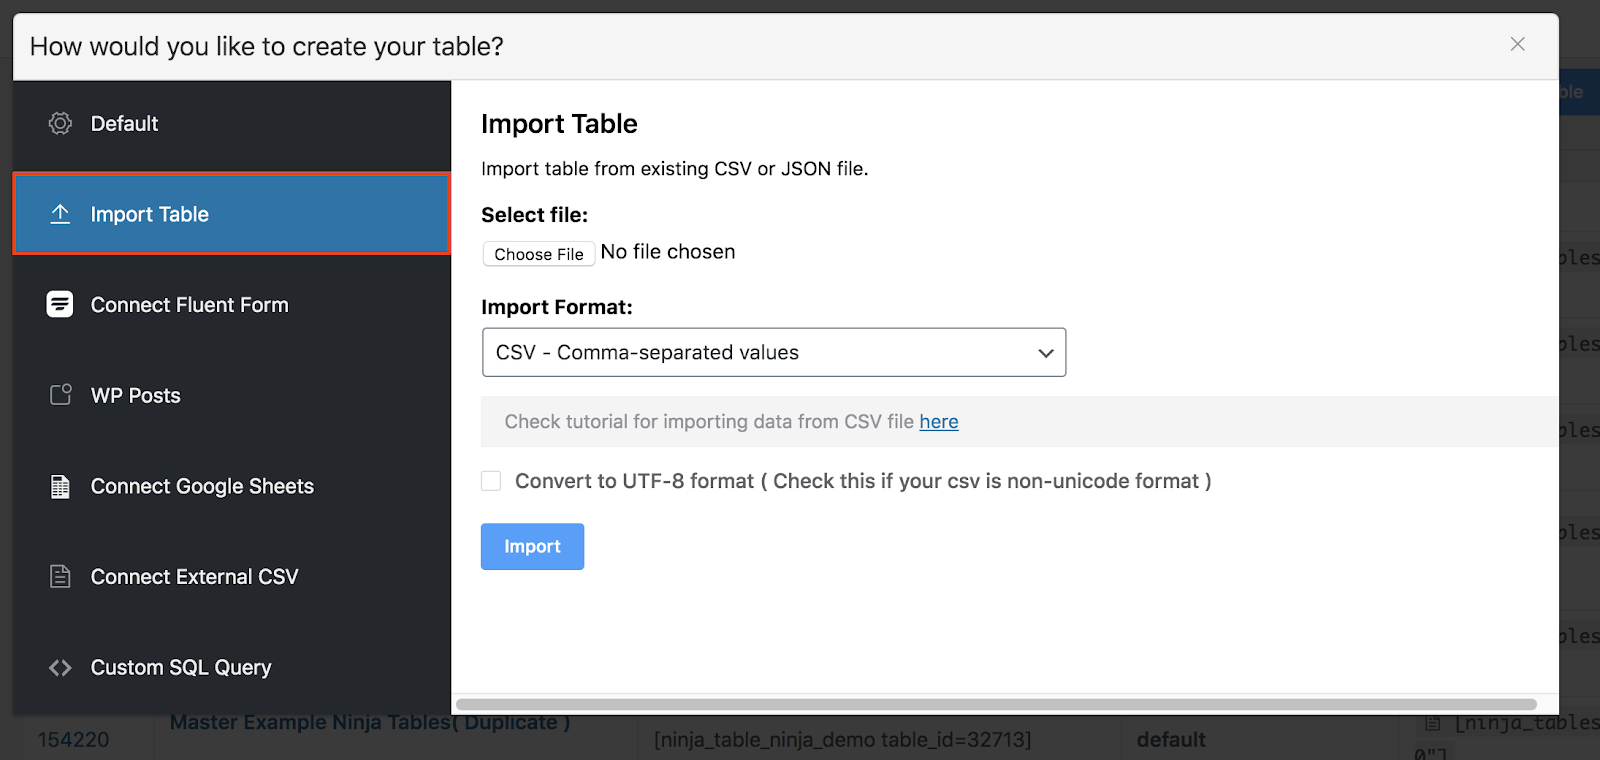
Creating tables by importing data
Suppose you have existing tables created by Ninja Tables on another website, and you want to add the same table into the website you are working on. This can be quickly done using Ninja Tables.
To make it possible, go to the Add Table menu, then click the “Import Table” button from the left sidebar of the pop-up you will get when you’re going to create a new table. Alternatively, you can go to “Tools” to import a table or its data. This feature needs an existing CSV or JSON file so that you can add it as a table in the Ninja Tables plugin. Ninja Tables will do the rest for you.
Here is the alternate way using Tools & Settings option.

There’s more…!
We just have demonstrated that you can make a table by importing from another Ninja Tables data. Furthermore, you can make more tables simply by importing data in bulk from TablePress, Ultimate Tables, and Data Tables Generator by Supsystic as well.

As you can see, this WordPress table plugin lets you import tables from these. Even the dropdown from the left also has some additional options like global appearance, permission, license, and settings.
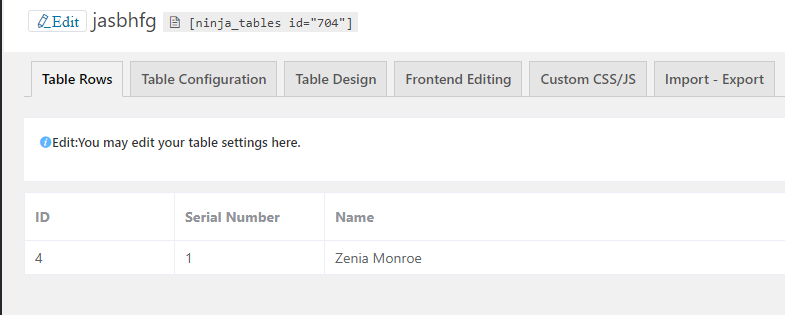
Creating tables with Fluent Forms
Integration with Fluent Forms has changed the way of table creation. This is one of the versatile ways to create online data tables on your website. From now on, using Ninja Tables, you can create tables using your form entries.
If you have installed Fluent Forms plugin and some entries, then you can make online tables using those. To make it happen, go to ‘Add Table’>>Connect Fluent Forms.
Once you click on the Connect Fluent Forms, a pop up will ask you to set the table title. Then you will get an option as a drop-down list, from where you can choose the expected form that will populate the table based on its entries.
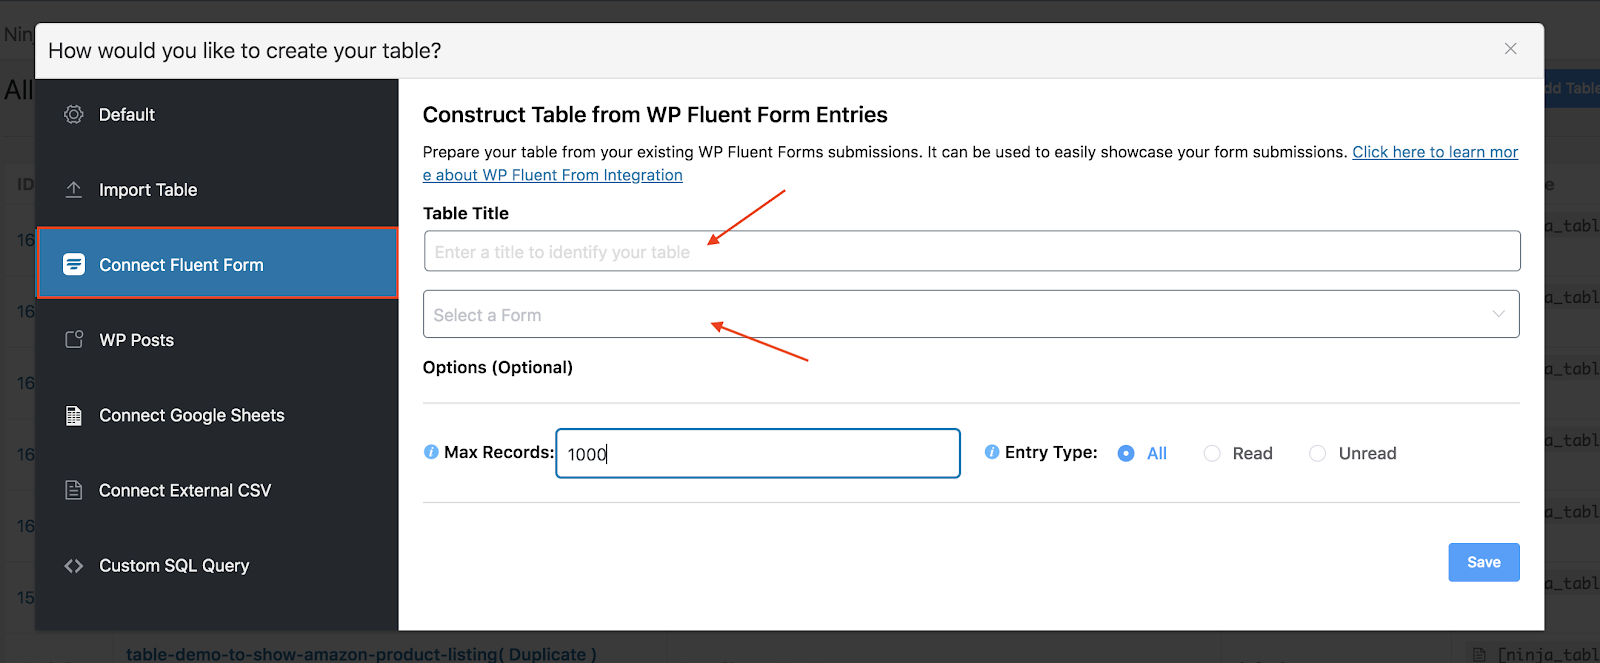
Optionally, you also can limit the number of records created by the respective form using the Max Records option. Once you’ve defined all that, click on the Save button located in the bottom right corner of the pop-up. You will see that a table is generated automatically based on the respective form you selected.
Ninja Tables features of editing and configuring will help you customize further. For instance, if you want to add another column to your table, go to table settings.
For further info and understanding, take a look at the documentation.
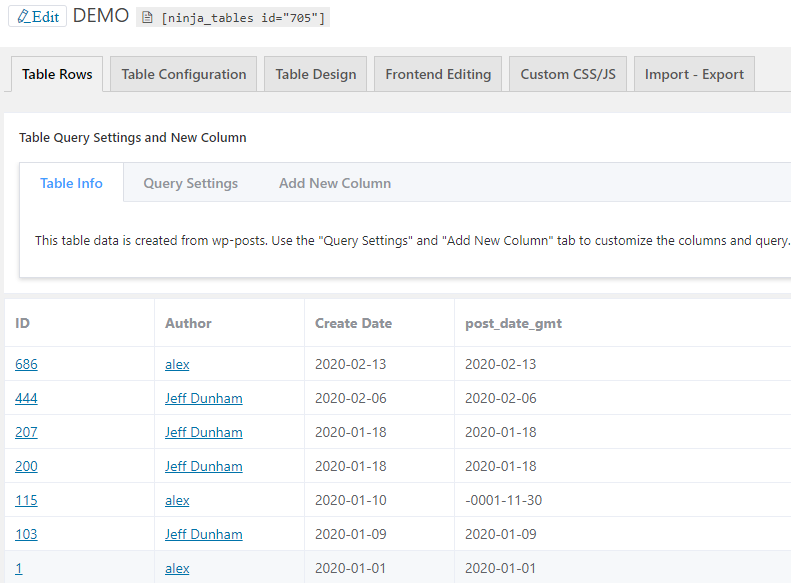
Creating tables using WP posts
This is one of the powerful features of the Ninja Tables plugin that allows you to create tables using your WP posts. You will get a dedicated plugin in the WordPress directory based on only this feature. This unique feature shows all your posts in a tabular form on your website. You can fold up your WordPress post, pages, into a table without any hassle, and you don’t need to install any additional plugin for that.
Again, to make it possible, simply pick a title, then define the types you want and shift them to the selected types box by clicking the “Next” arrow icon located in the middle of the two boxes. Check the selected types and click the next button, and it will open up with another section with properties of the selected types.
There will be an option for adding different conditions into the tables below the section. The “+” sign below here lets you add multiple conditions for the table properties.
Select and shift the expected properties and set the condition or leave it blank; then click on the Save button to generate the final tables based on your configuration.

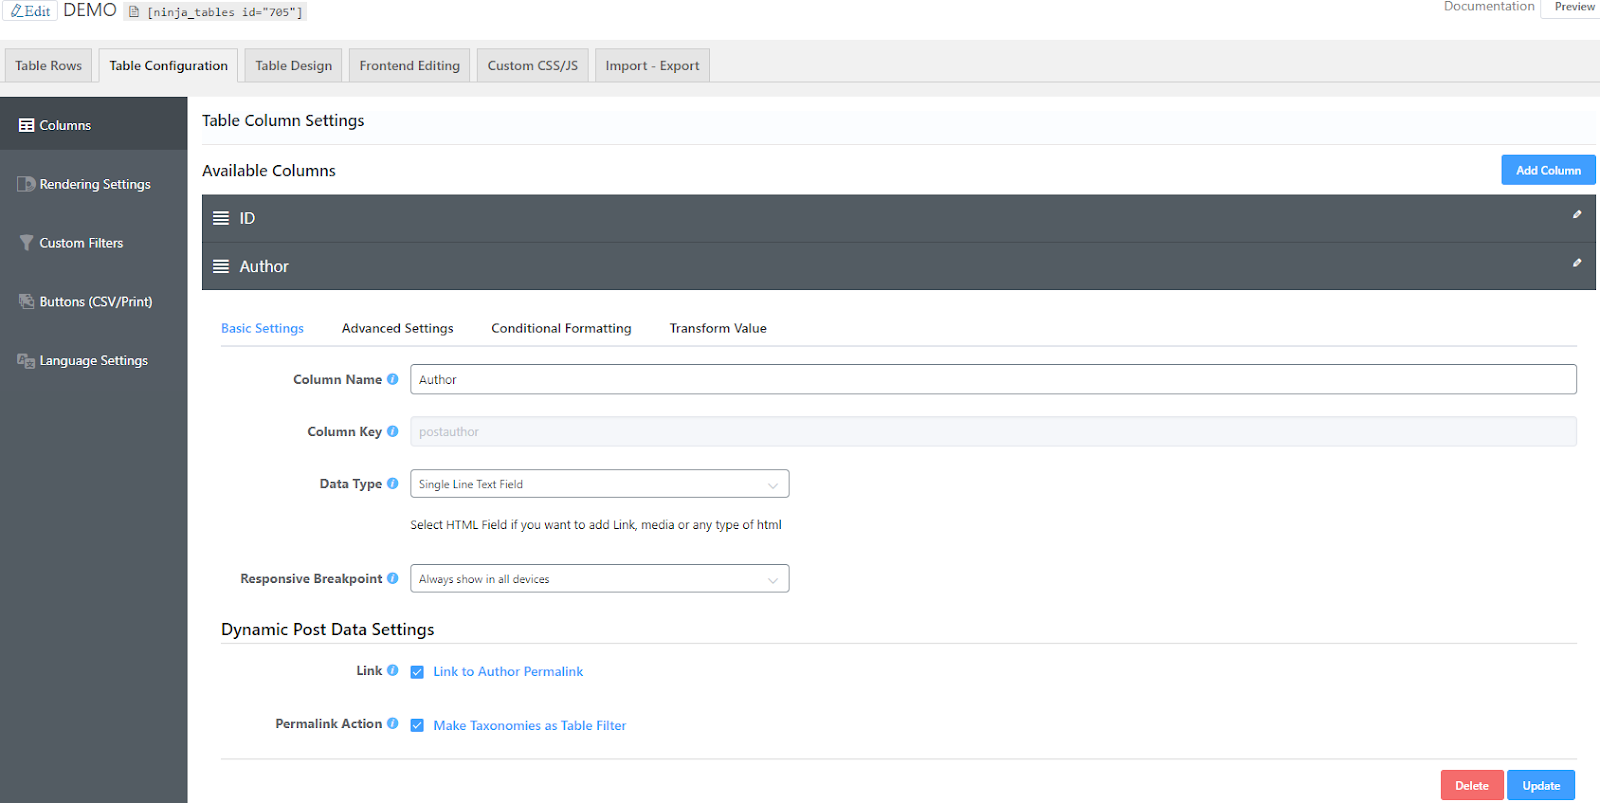
You can also edit further from the options above. You have just created tables from posts or pages list. Now, the control is in your hands. You can further customize each of the created tables using other advanced options of Ninja Tables.
For further customization, go to “Table Configuration” or just hover over the column to edit. You can customize everything as much as you want. Have a look at the documentation for a better understanding.
Creating WooCommerce product tables
Now comes one of the best uses of Ninja Tables! We picked this WordPress table plugin to show productive uses because most of the others don’t offer WooCommerce product table creation.
You’ll get dedicated plugins for it in the WordPress directory, here you get to explore tons of advanced functionalities. The basic thing is the same as any other table but with “WooCommerce Table” from the Ninja Tables dashboard. Also, you need to create a set of products beforehand. Don’t worry because it’s easy as a pie!
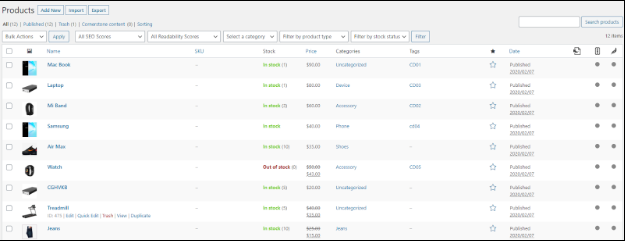
Since you’ll be creating simple WooCommerce products, you will be adding tags, category, out of stock/in stock, on sale or regular price, and even set a timeline for each. Here is the basic product list created by the default WooCommerce plugin.
Once you’re all set with primary product table, click on ‘WooCommerce Table’, next, you will get to a pop-up window like this-
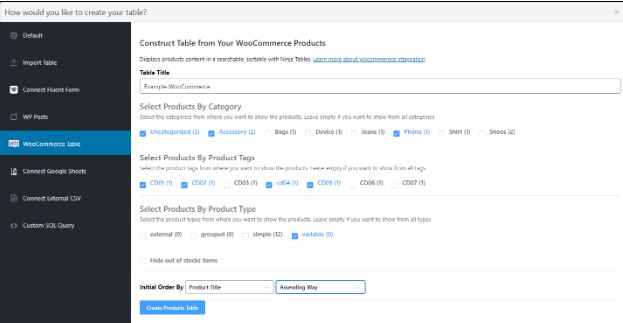
Here, you can sort the products according to category and tag, selecting type and order, and then hit on the “Create Product Table”.
The “Add to Cart”, “View Cart”, and “Checkout” buttons are built-in for Ninja Tables WooCommerce integration. In this case, you don’t need to install any other plugin for having a table cart on your website. This integration puts Ninja Tables at the top as a WordPress table plugin.
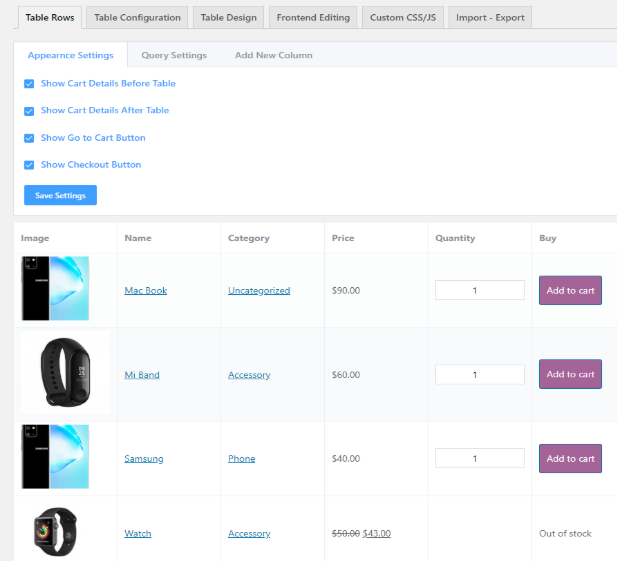
This is how the final table will look. You can also configure, design, add custom CSS/JS, and more once you’re done.
Auto-sync with Google sheets integration
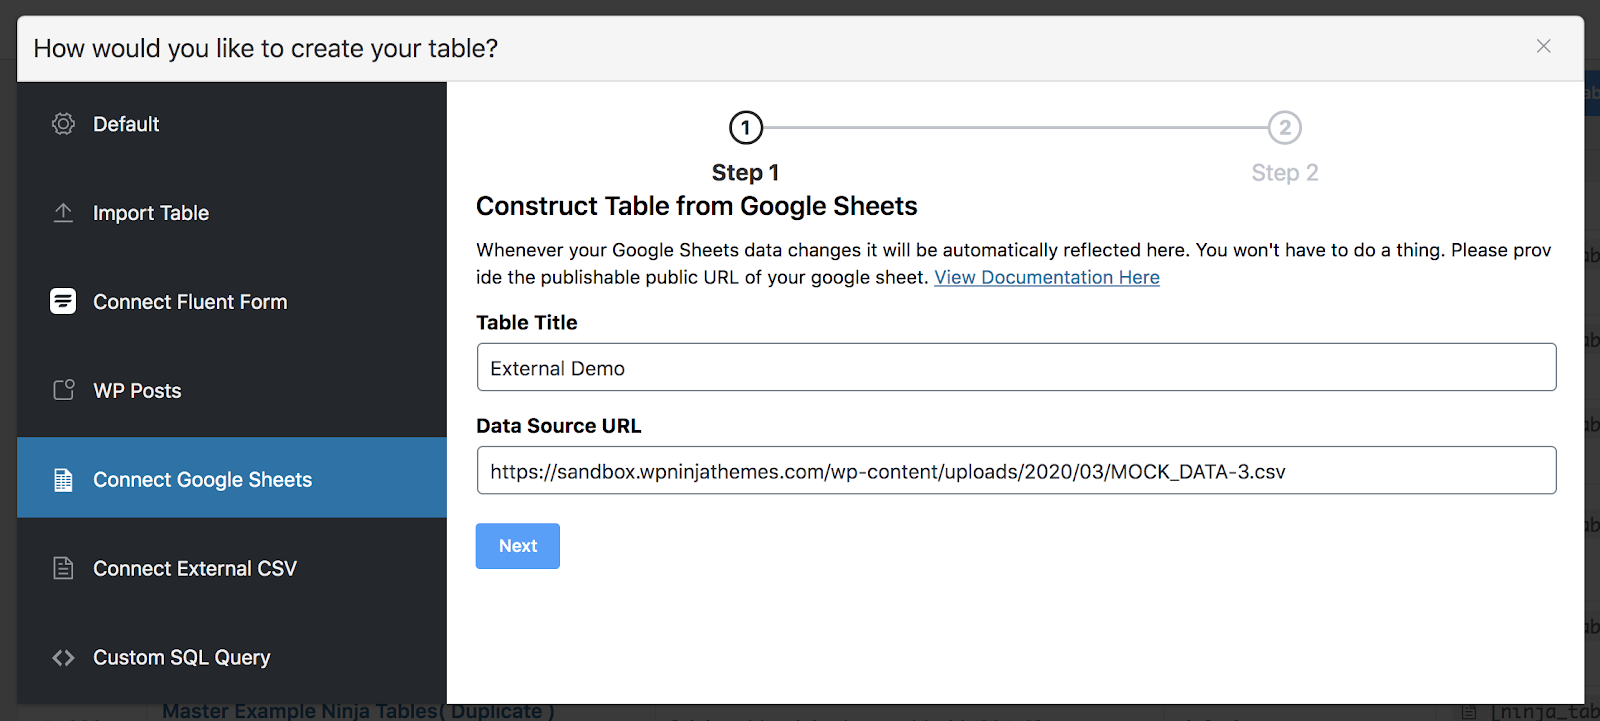
Do you have a Google Spreadsheet ready with data and want to show it on your website in a tabular format? Then this is how it will go using Ninja Tables plugin.
Click on the Connect Google Sheets, from the left sidebar of the pop up to connect. Set a title for your table first. Then go to Google Sheets and get the Data Source URL after republishing it from the respective sheet. Now, copy the link and go back to your Ninja Tables’ dashboard and paste it in ‘data source URL’ and proceed to the next. Remember, the external data source URL should be based on .CSV, and its privacy must be switched to “Public”.
Then, click on the Next button, and it will retrieve the data into your Ninja Tables dashboard. Now, Select the entry fields you want to add and save it.

That’s how all your Google sheet data will be automatically imported, and you can show them in a tabular form. Now the magic is that whenever you add a data or column to your Google Sheets, Ninja Tables will automatically fetch it every 5 minutes or the frequency you set.
For detailed clarification, you can take a look at “How to Embed Google Sheets.”
Creating tables with external CSV
Suppose you have some online data that are stored on your personal cloud storage, and you want them to show on your website in a tabular format. The good thing is, you can make it happen using the Ninja Tables WordPress table plugin. This feature is pretty much like connecting with Google sheets.
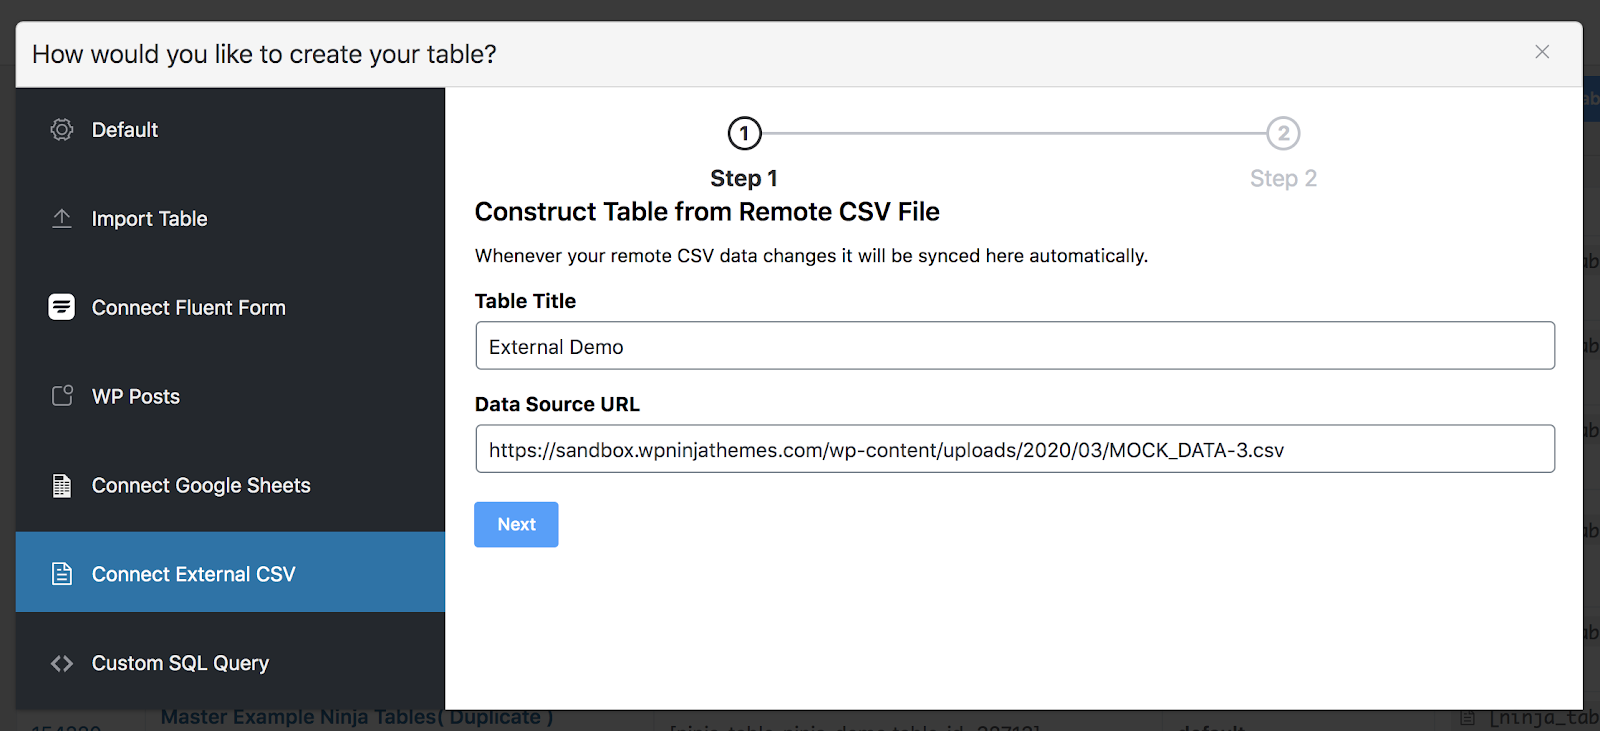
The only difference is, here, you can show data that are stored from any cloud storage. Remember, the external data source URL should be based on .CSV here also.
Creating tables with custom SQL Query
With Ninja Tables, you can create online tables using your website’s existing SQL database table. Any change in the database or in the plugin will appear in the frontend table made by Ninja Tables custom SQL.
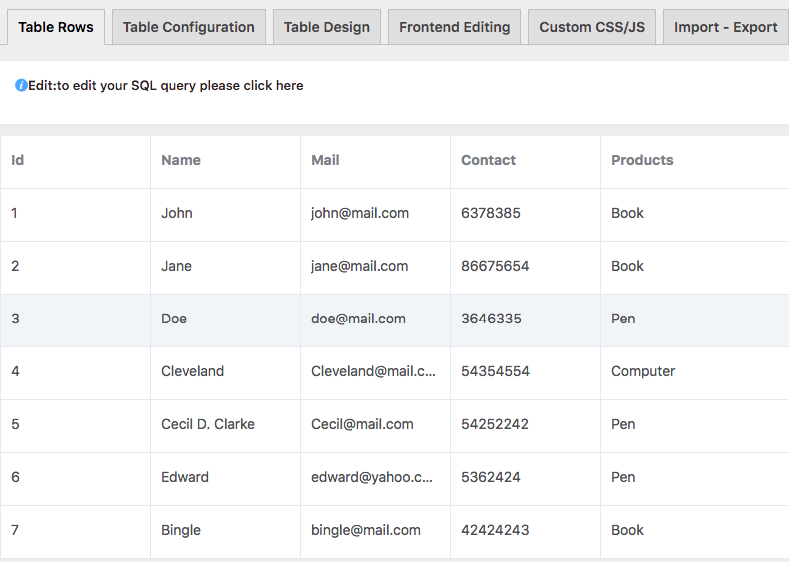
We are using the WP database “wp_buyers_table” as an example.
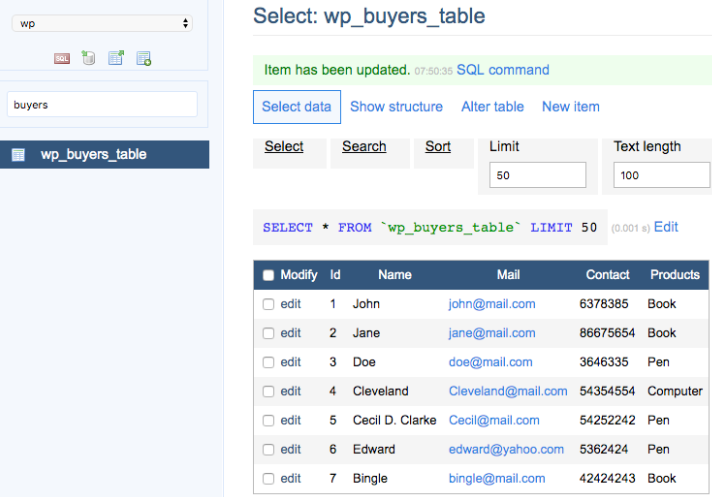
Provide the table name first then type the respective query in the Custom SQL Query box. In this case, our query will be SELECT * FROM “wp_database_table”
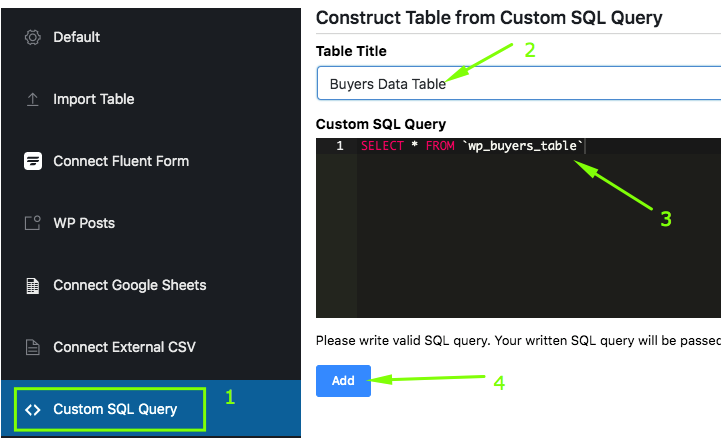
After writing the query, click on the Add button. There you go! You can preview your table and also edit as you want.
Now, if you want to create a table from wp_buyers_table and only to show book and computer buyers, then we should follow this structure. You also can enable it using another query.
Let’s say,
SELECT * FROM `wp_buyers_table` WHERE columnName = ‘filterData1’ OR columnName= ‘filterData2’.The above query will let you show only books and computers in a tabular format.
Advanced Custom Queries
There are amazing Powerful Placeholders available to write advanced queries. You can relate current user id, current date, current date-time, current post id, current post title, and prefix value dynamically using these shortcodes below on your queries.
Current user id: {current_user_id}
Current Date: {current_date}
Example Of some advanced queries:
If we want to create advanced tables from our wp-posts database, then we can write:
SELECT * FROM wp_posts WHERE post_author = {current_user_id}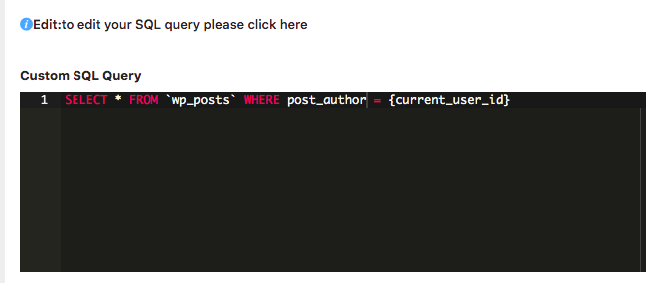
Table templates (Free)
9 types described above might still seem difficult for someone who is a total noob in the WordPress tables world. Or you might even be lazy to follow the points!
So, Ninja Tables is here to do 80% of your work.
- Pick table templates to use
- Import the JSON file
- Customize the table with your own data
And you’re done!
Final words
We find Ninja Tables the easiest, yet most feature-rich tool as a WordPress table plugin to create data tables. Naturally, we might seem a little biased here because it’s our own product! We gave our most honest verdict anyway.
However, we’d like to add some other table plugins in WordPress as honorable mentions.
- TablePress
- wpDataTables
- Data Tables Generator by Supsystic
Finally, if you want our honest opinion, we suggest you go for Ninja Tables without further doubt! This WordPress table plugin is absolutely perfect for all kinds of dynamic online tables you want to create.
From creating tables with form entries, Google Sheets data to WooCommerce products and WP Posts, Ninja Tables is an all-rounder. After the recent update, it can also create a table with Ninja Charts entries!
This article’s target was to inform you about the dynamic ways to create online data tables on your WordPress website. Ninja Tables seems to tick-mark every category of user-comfort!
Let us know about your experience and suggestions, if you have any, in the comment section.
-

How to Create an Event Registration Form on WordPress in Minutes
Discover how you can easily Make An Event Registration Form. -
10 Best TablePress Alternatives in 2026 (For Every Use Case)
TablePress works for simple tables. When you need a more -

Best Payment Gateway for WordPress: 7 Top Options Compared (2026)
Compare the 7 best payment gateways for WordPress in 2026.
Leave a Reply
You must be logged in to post a comment.