


Having a massive amount of data on a table means it’s pretty hard to find the ones you’re looking for. Fortunately, there’s a term called “Conditional Formatting” that’s responsible for highlighting table content depending on the cell value. As a result, you can quickly find what data you want. Now, how to use conditional formatting?
If you have used Excel or any other table plugin, you might have a vague idea. However, we will be showing you the easiest way of using this feature with a quality plugin so that you get a clear understanding.
How to use Conditional Formatting in a WordPress table plugin
Usually, online data tables have unlimited rows and columns, making it very informative, but hard to find specific data without searching. So, when would you use conditional formatting on a cell?
You may want to see an amount from a huge payment table you created years ago, but you forgot the exact amount or column name! You can highlight cells using “Equal”, “Not equal”, or “Between” conditions.
This process is a bit complex in Excel with options like conditional formatting rule, command, type, style, etc. Although, you will find the table plugin in our demonstration much easier to use.
We are going with Ninja Tables to show you how to use conditional formatting on a data table with just a few steps.
Some extra tips after these points will wrap up this article.
Step 1: Pick a table to add conditions
First of all, decide what table you want to configure and insert conditions to highlight. For example, we have created a new table, “Conditional Column Formatting”, with Ninja Tables.
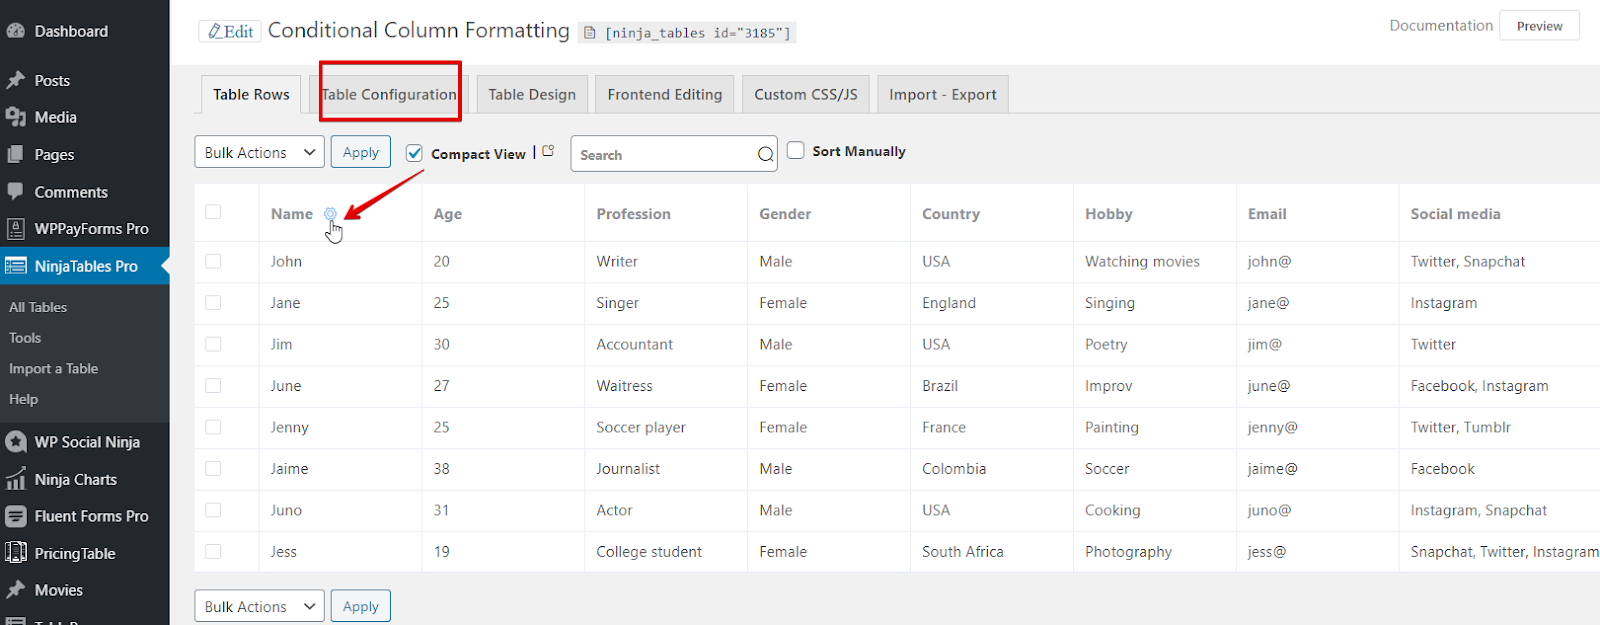
Now, you can hover the mouse over a column and click the settings icon that will become visible, or you can click “Table Configuration” from the top panel.
Step 2: Set conditions
Once you’re in the configuration tab, click on the pencil icon from the “Available Columns” area. A drop-down menu will appear with four options. Click the Conditional Formatting option from there.
Here’s how to create conditional formatting.
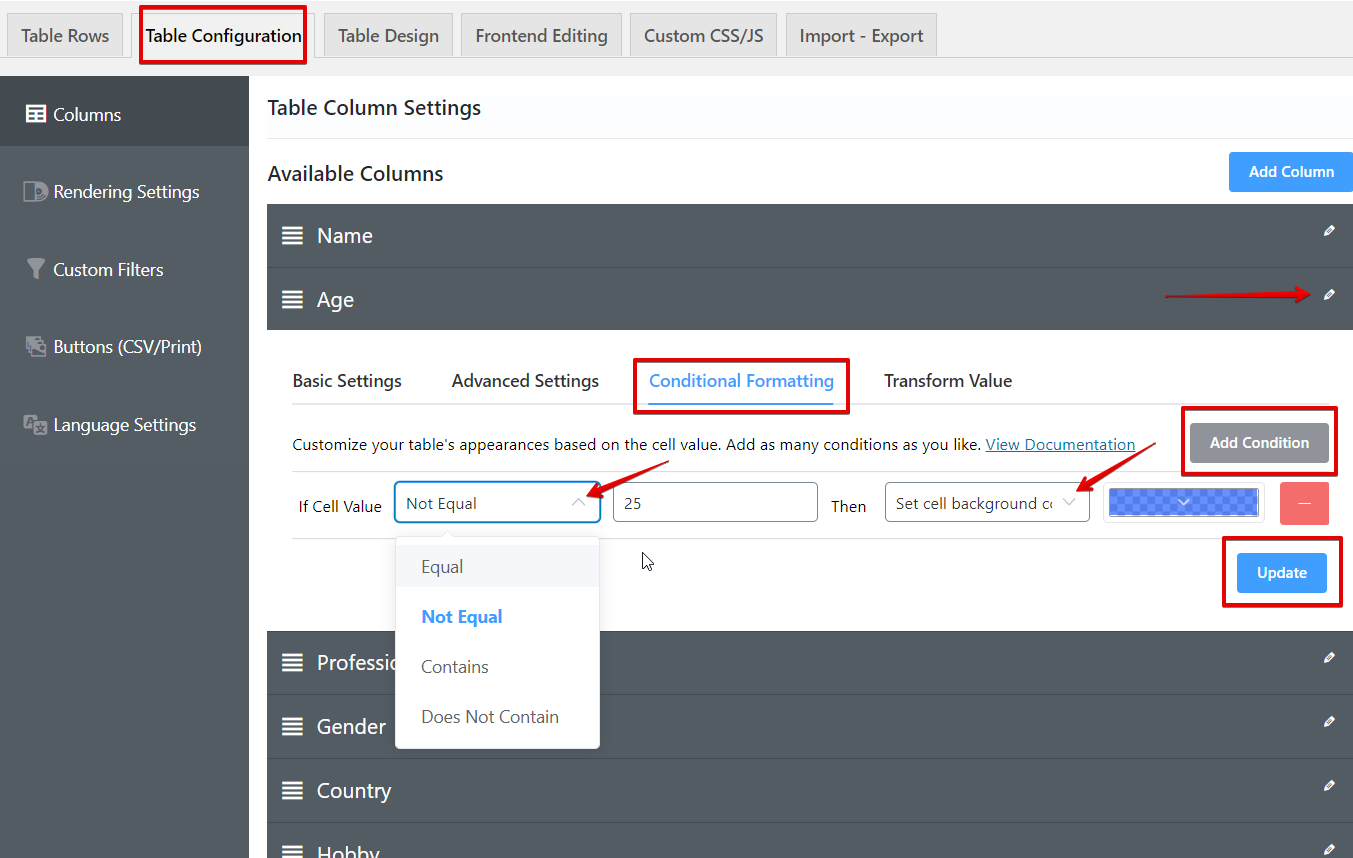
Note: You must click “Add Condition” to see the drop-down panel of conditions. And the value should be an exact match.
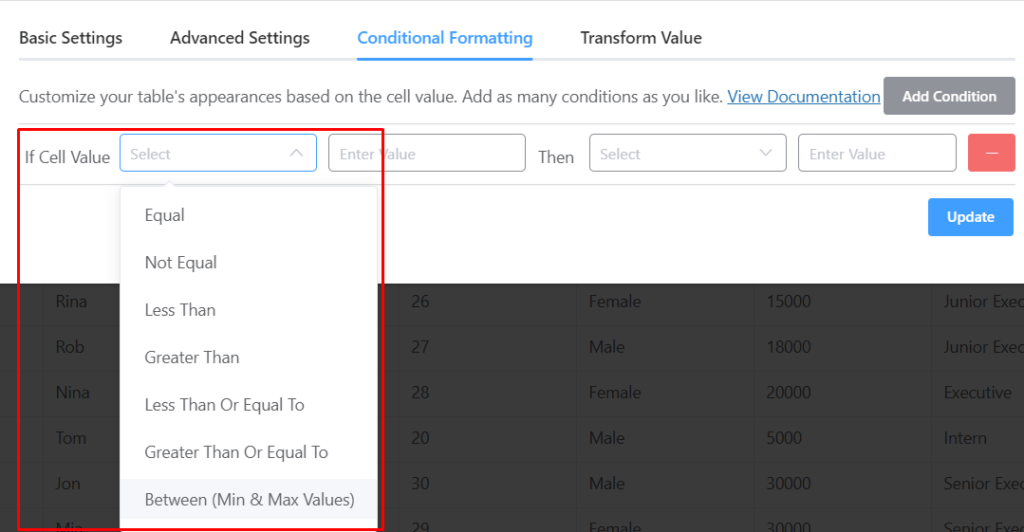
Add as many conditions as you’d like for a single column. The condition rule is “If Cell Value_Then”. From the first box, choose what type of condition you’d like to add, then add the value, and move on to the final box to highlight. This box has several options for which the conditions will be applied.
Cell options
- Set cell color
- Background color
- Content
- CSS class
- Reset cell color to default
- Reset cell background color to default
- Remove cell CSS class
Row options
- Set row color
- Row background color
- Row CSS class
- Reset row color to default
- Reset row background color to default
- Remove row CSS class
Column options
- Set column color
- Column background color
- Add column CSS class
- Remove column CSS class
Select desired cells and add multiple conditions depending on the cell values. And if you want to delete a condition, simply click the red subtract button.
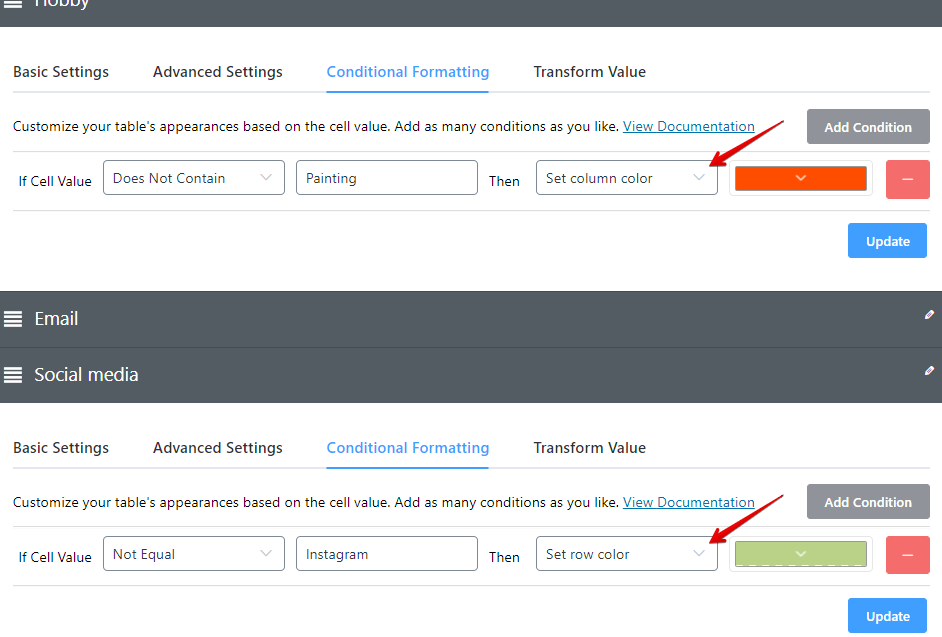
For this example, we went with “Set cell background color” and highlighted the cells with different colors for six corresponding conditions.
- Not equal to 25 for the Age column- Blue
- Contains “Accountant” in the Profession column- Red
- Does not contain “Male” for the Gender column- Yellow
- Contains “USA” in the Country column- Green
- Contains “Painting” in the hobby column- Orange
- Does not contain “Twitter” in the Social Media column- Purple
Step 3: Update the condition
Finally, after you’re done with setting conditions, click on “Update” and open the preview window.
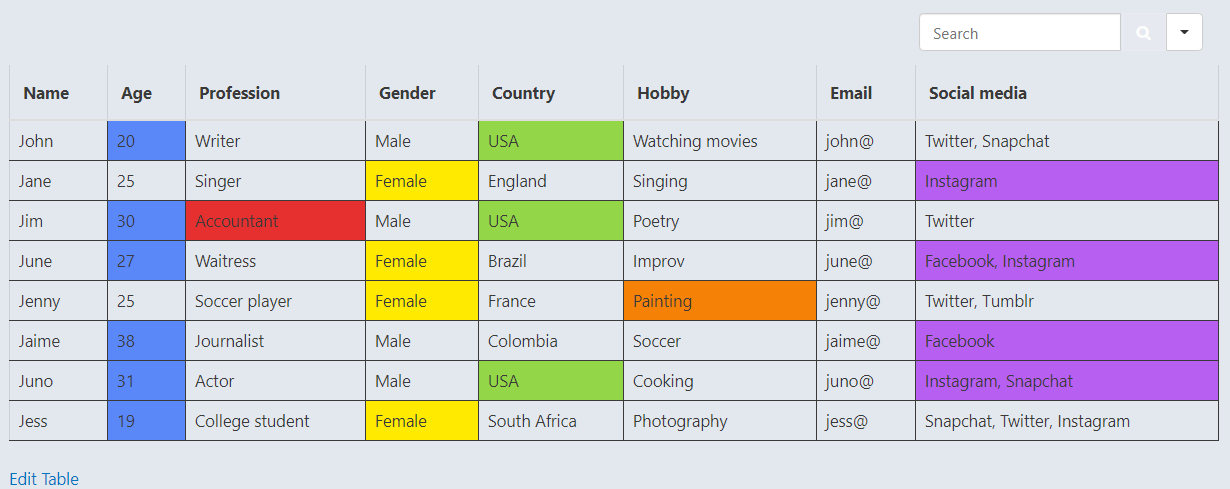
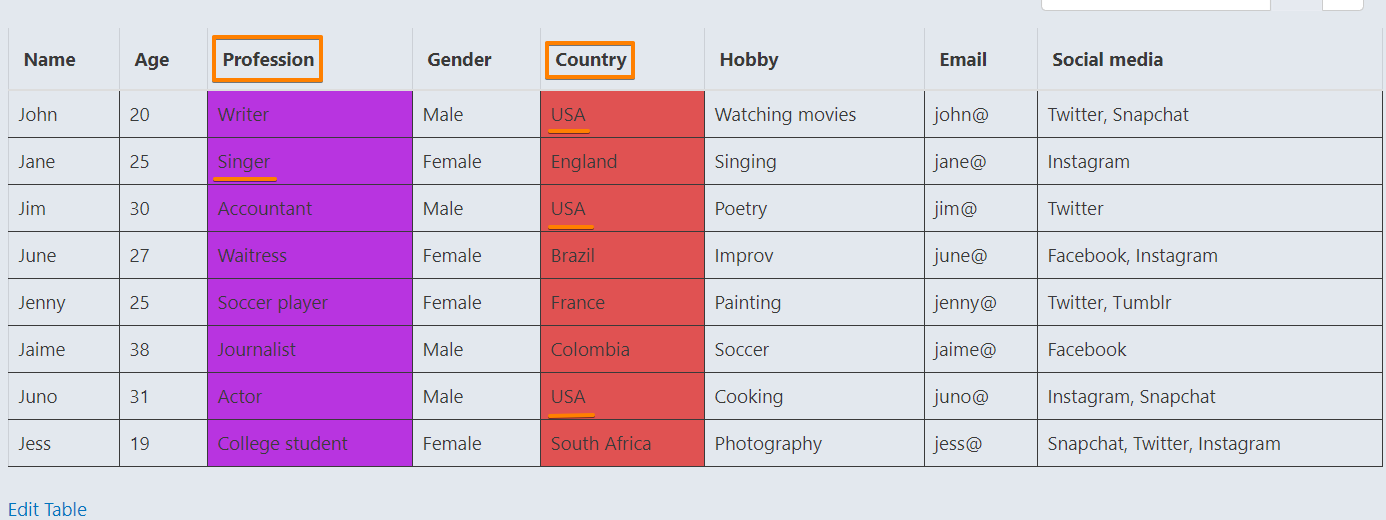
As you can see from the snap above, the table is ready following the conditions we have set.
If you want to embed this table on a WordPress post, copy the Ninja Tables shortcode and paste it.
Here is how the table appears on a demo post.
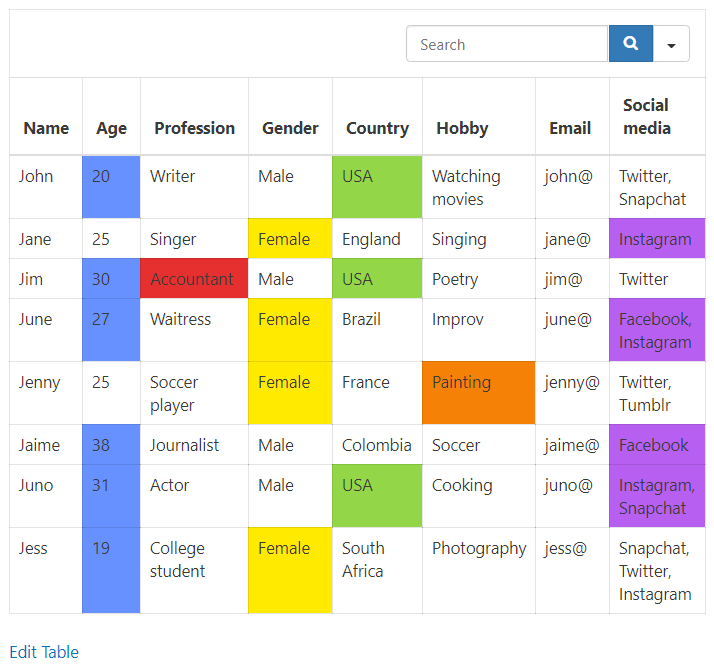
You can update the table all you want from the Edit Table option on the bottom left, and the new update will automatically appear on the embedded table. Isn’t it awesome?
Extra tips
i)
Are you wondering about how to apply Conditional Formatting to an entire column?
Simply follow Step 2 of this article, and select “Set column background color”.
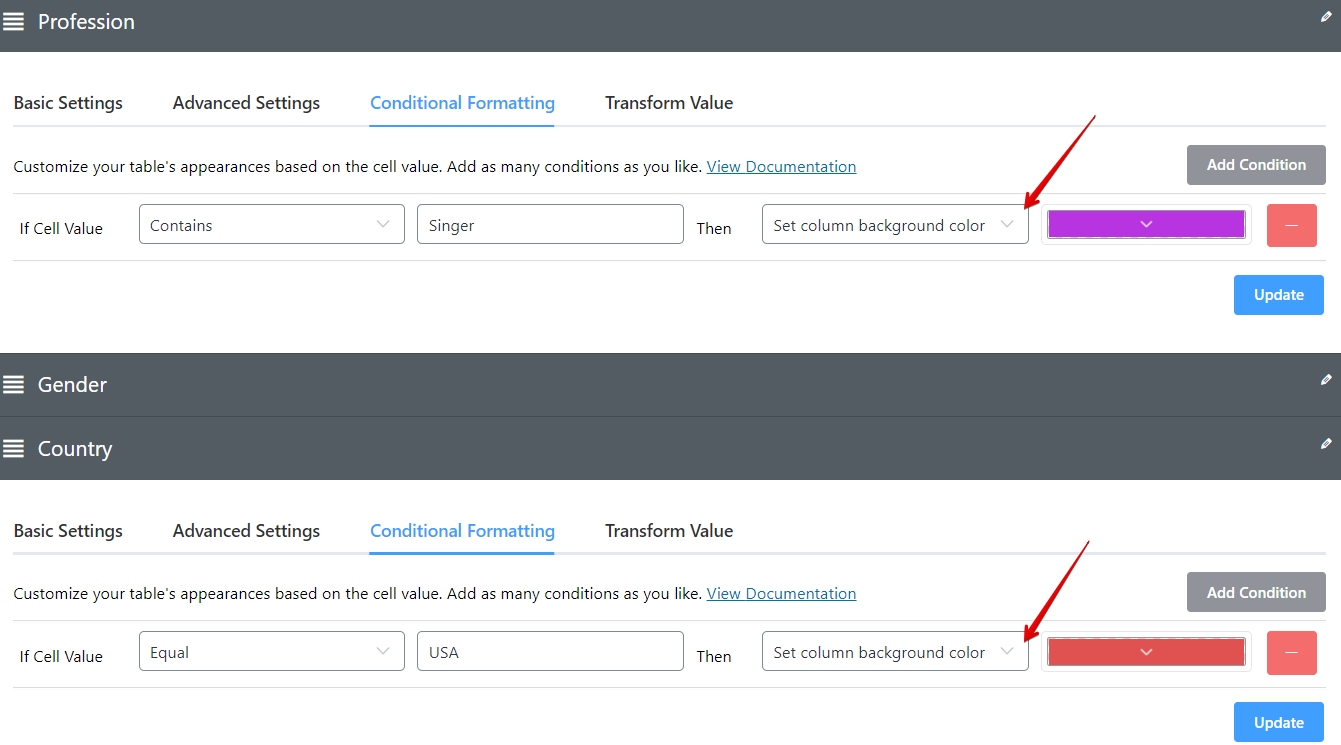
Do this for any column (or row) you want. For instance, we colored the Profession column purple depending on the “Singer” value it contains and colored the Country column red for the condition that it’s equal to “USA”.
ii)
How do you conditional format a row based on a cell value? Just color the row with a row condition option. Go with any option Ninja Tables comes with.
This one looks a bit too funky with bright colors since that’s what we went for. You can definitely pick any color from the palette.

iii)
One more fact about this feature is that the conditions depend on data type too. For example, if the column data type is “Numeric Value” or “Date Field”, you get extra cell values to select from other than the usual four.
Have a peek at the Ninja Tables documentation to clear up any confusion.
The rest of the job is up to you, whether or not you want to design and customize the table further.
That’s it!
We have finished explaining how to use conditional formatting in Ninja Tables. An effortless three-step process to add required conditions to a WordPress table might sound too good to be true. But we suggest you give Ninja Tables a try to see it for yourself.
Without any coding knowledge or any idea about the Conditional Formatting formula, with Ninja Tables, you have the simplest way to highlight the cells, rows, and columns of your data table.
Start using the plugin and enjoy the lightweight and user-friendly features. Always reach out to us for any confusion.
-

How to Add Code Snippets in WordPress: 100% Free Guide
Learn how to add code snippets in WordPress safely and -

FluentHub MCP: Run Your WordPress Business Right From Your AI Chat
Use FluentHub MCP to connect WPManageNinja products with AI agents -

How to Embed Social Media Feeds on WordPress Websites (No Code)
Learn how to embed Instagram, Facebook, TikTok, and YouTube feeds
Leave a Reply
You must be logged in to post a comment.