

Automatically Highlight Table Cells Based on Input Value in WordPress

Won’t it be great if your online tables could automatically highlight the table cells based on the data input? It could save you a lot of labor and time you’d have otherwise wasted manually seeking to customize the entries according to the cell input value. “Ninja Tables” WordPress table plugin has a “Conditional Formatting” feature just for that.
Let’s say, you are listing the best smartphones that came out this year. And on that list, you’d like to color code the phones based on their price range like this-
- Highlighting the flagship smartphones with green if their price range is above $800
- Highlighting the midrange smartphones with orange if their price range is between $350-$800
- The budget phones can be color-coded yellow if they cost between $250-$349
- Leaving the phones below $249 without any special treatment on your online table.
Now, who in their right mind would volunteer to color-code the categories one by one manually if there are more than 20 phones listed on that table?
Well, that’s where Ninja Tables Conditional Formatting comes in! Today I’ll show you how you can customize your tables automatically, and never have to repeat the mundane tasks again.

Conditional Formatting: the amazing feature you are missing out!
If you are using the free version of Ninja Tables, I can confidently say – “Conditional Formatting” is one of the amazing pro features you are truly missing out on. Depending on the cell value of the table, you can easily match your need and select specific cells or columns you want to highlight in your table. Check this screenshot, for example.
Benefits of Conditional Formatting
Imagine you have a huge data table with lots of information. Now you want to highlight some cells or whole rows/columns on your table. What you will do? Manually highlighting the exact cells or columns will be time-consuming and tiresome if you have a large data table. Here comes our pro feature “Conditional Formatting”.
With this feature, you can select your column and set the condition you like-
- Equal
- Not Equal
- Contains
- Does not Contain
Then set some trigger values and the option for which condition you need to apply.
How to highlight table cells using Ninja Tables’ Conditional Formatting
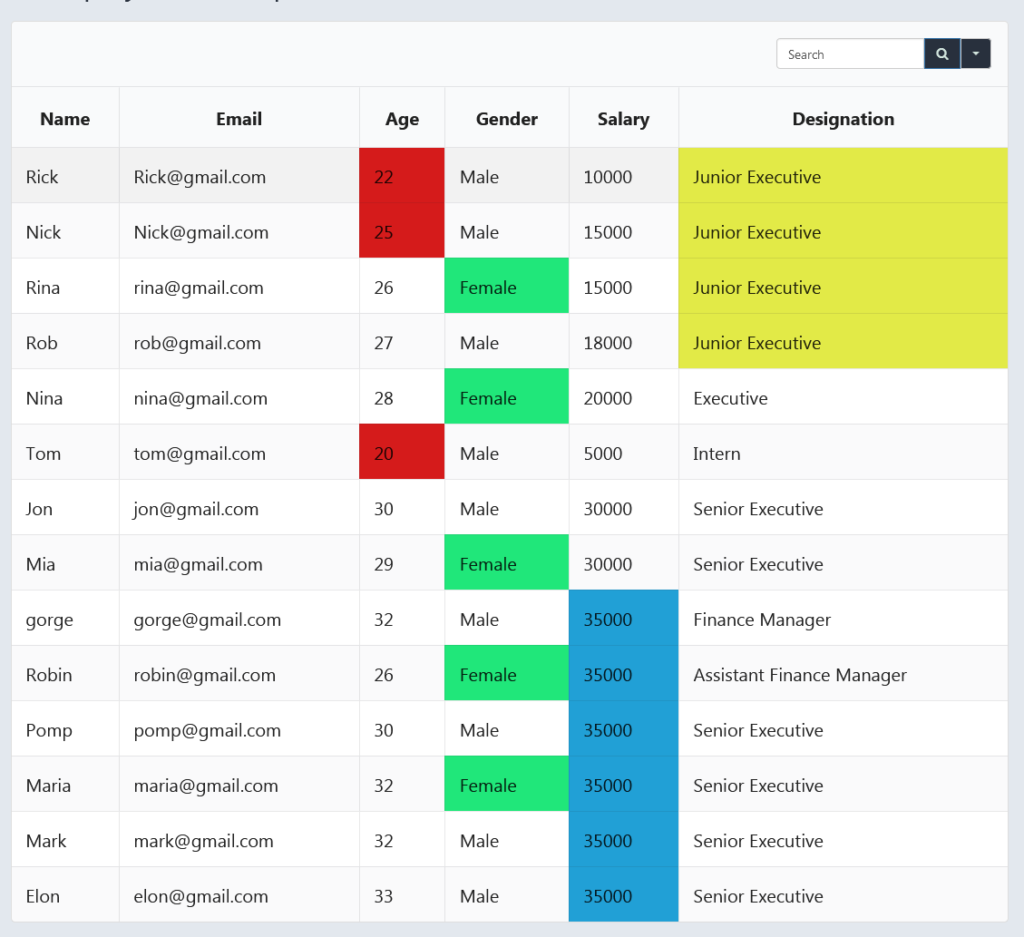
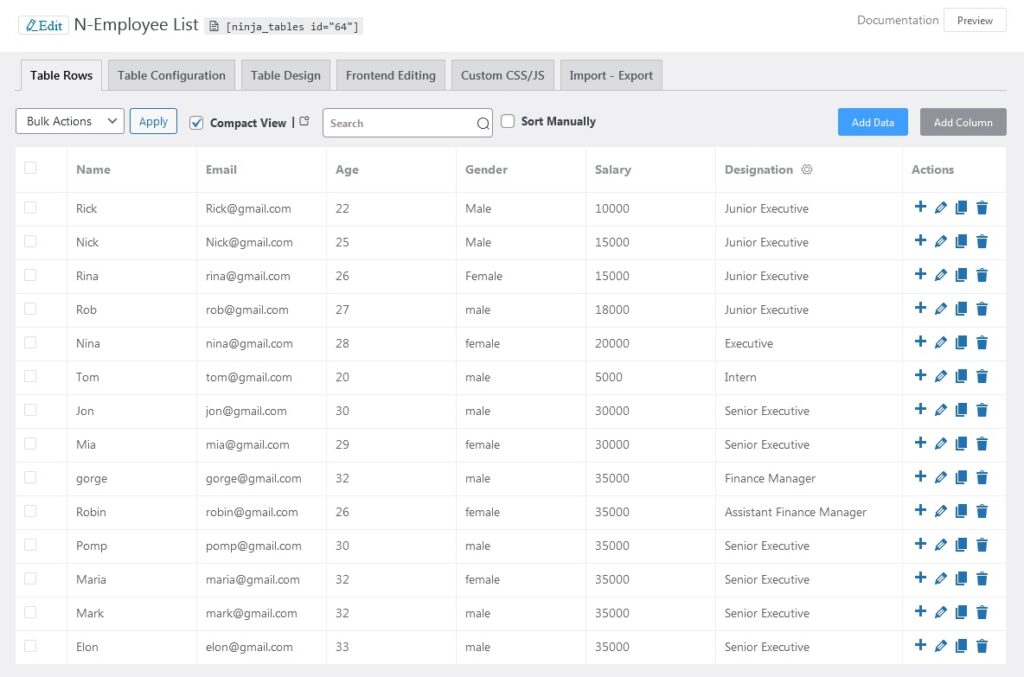
Now let me show you how to use conditional formatting to highlight the cells or columns as per your need. You will need a table with lots of data in it. Or you can use an existing table from your Ninja Tables dashboard. Here, we’ll be automatically customizing an employee information table for example.
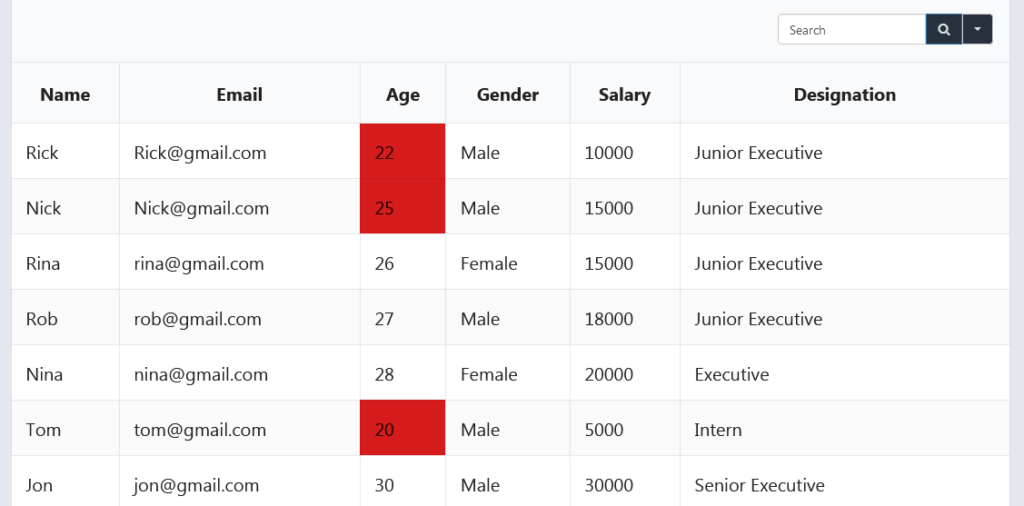
Now in this table, let’s highlight some employees under age 25. How do you do it? In Ninja Tables, if your column data type is “Numeric Value” or “Date Field”, you get extra cell values to select from other than the default options.
These extra options are-
- Less Than, Greater Than
- Less Than or Equal To
- Greater Than or Equal To
- Between (Max or Min Value)
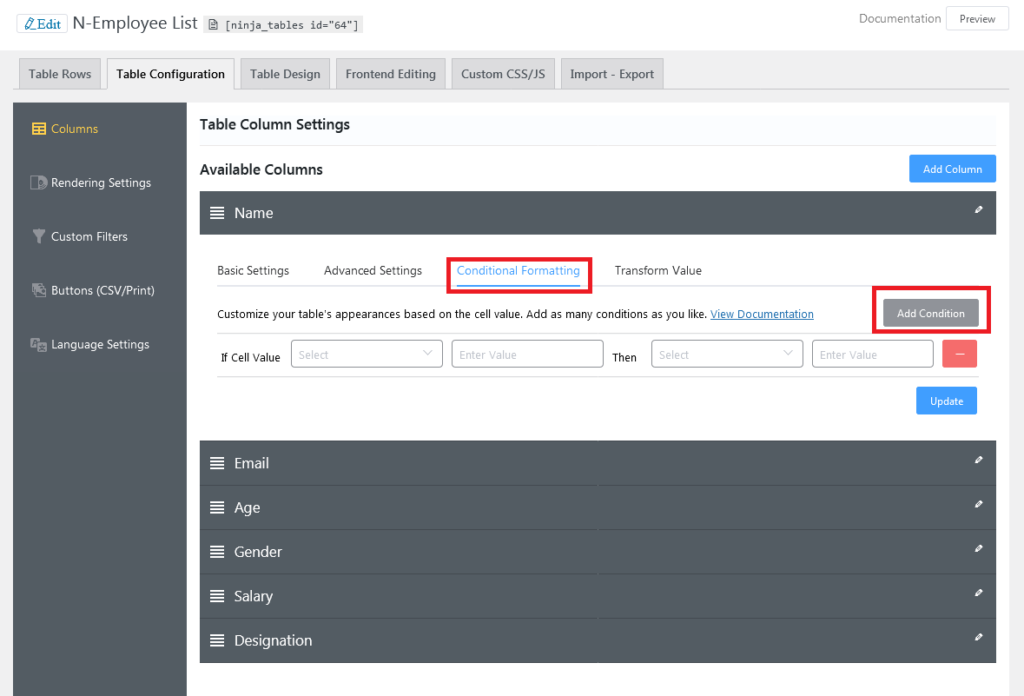
We will apply these conditions in our age column. There are two ways you can set conditional formatting. You can hover the mouse over a column and click the settings icon, or you can click “Table Configuration” from the top panel. Both will open an “Edit Table Column” option.

From that click “Conditional Formatting”. You will have to click the “Add Condition” button if you want to add various conditions. You can add as many conditions for a single column.
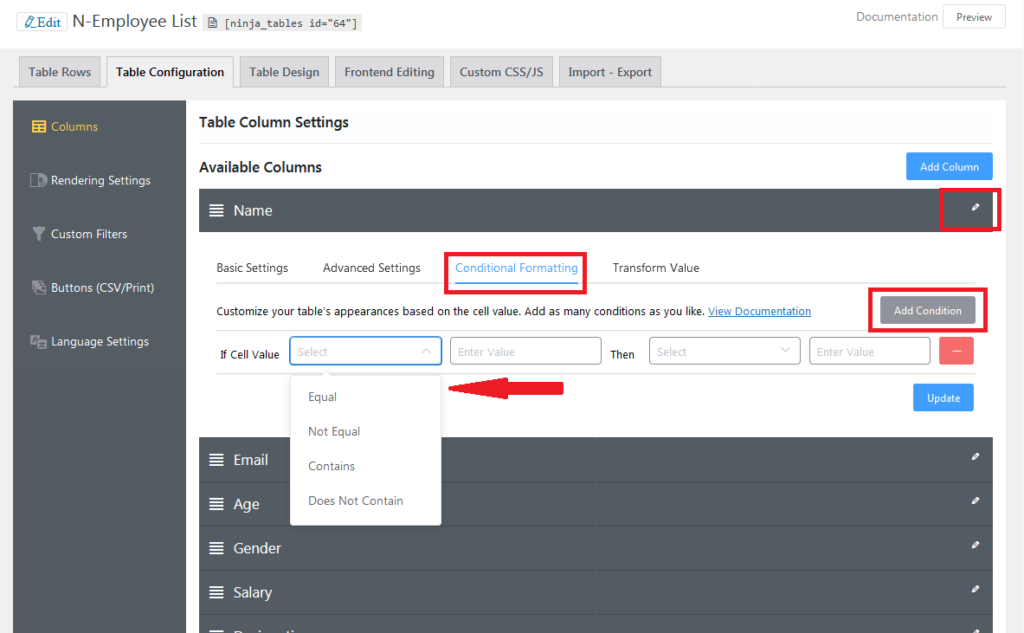
For our Age column, we will select the If cell value “Less Than or Equal To” because we want to highlight employees under age 25. Now Add 25 as trigger value. The next box has several options you can apply as your condition.
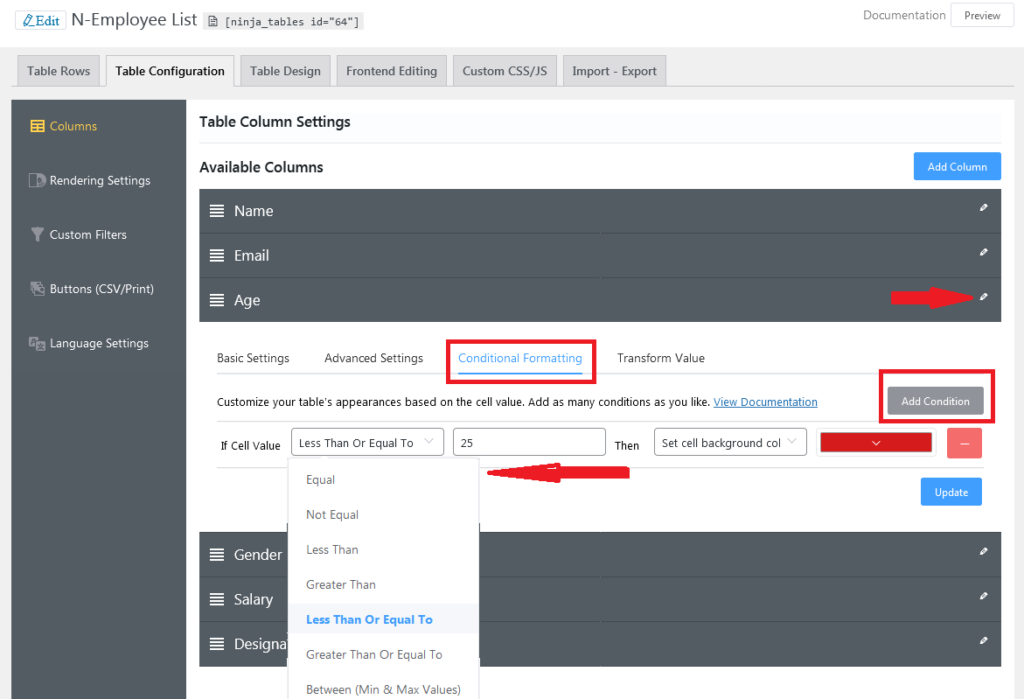
Cell options
- Set cell color
- Background color
- Content
- CSS class
- Reset cell color to default
- Reset cell background color to default
- Remove cell CSS class
Row options
- Set row color
- Row background color
- Row CSS class
- Reset row color to default
- Reset row background color to default
- Remove row CSS class
Column options
- Set column color
- Column background color
- Add column CSS class
- Remove column CSS class
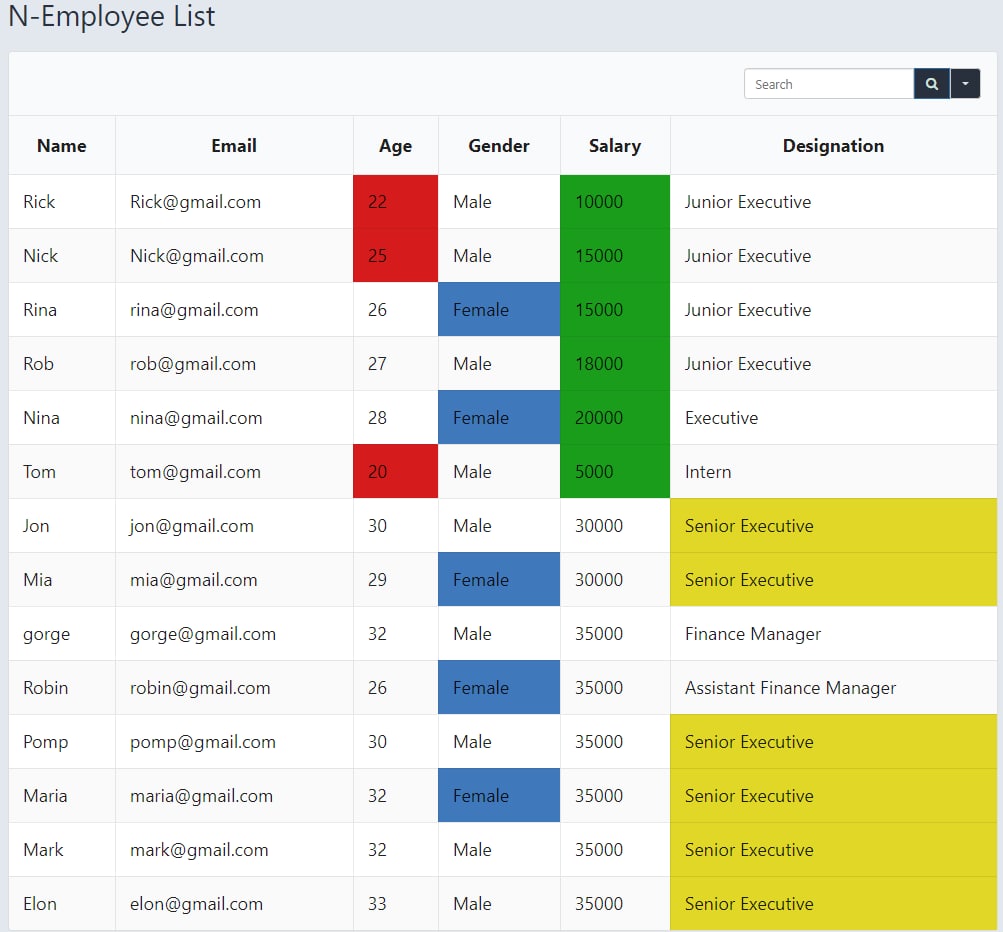
In our example, we will select “Set cell background color” and select the color red. Click update. Now click preview to see the updated table. You will see it worked. Employees under age 25 are now highlighted in red.
Now you can add as many conditions as you want here. Let’s use the three corresponding conditions below as examples.
- Contains “Senior Executive” in the Designation column – Yellow
- Does not contain “Male” for the Gender column – Blue
- Salary Less than or Equal to 20000 – Green
Here you can see below, all conditions are working fine in preview mode.
We can now embed the final table in our WordPress post or page using Ninja Tables shortcode. Just copy the shortcode and paste it in your post’s desired area. It will show up in your published post.
You can always update your table whenever you want using the edit table option. The changes will automatically appear in your blog post’s embedded table.
Using the Conditional Formatting feature you can design your table any way you want. Dive into our documentation to learn more ways you can play with “Conditional Formatting”.
Conclusion
“Conditional Formatting” is one of the most used features of Ninja Tables. I highly recommend trying this Ninja Tables pro feature, you will instantly fall in love with the feature if you are constantly managing large amounts of information in WordPress data tables. Without any coding knowledge, you can easily highlight the cells, rows, and columns of your data table.
Thank you for taking the time to read this short tutorial. Let us know in the comment if you have any confusion.
Don’t forget, we are running a limited-time 30% EID special discount on our major products including Ninja Tables! Grab Ninja Tables at a 30% discount from our regular price and use more awesome features like “Conditional Formatting” to make your data tables smart, efficient, and beautiful.
Don’t forget to subscribe to our YouTube channel to get WordPress-related tips and tricks. Also, follow us on Twitter and Facebook.
-
10 Best TablePress Alternatives in 2026 (For Every Use Case)
TablePress works for simple tables. When you need a more -

Designing Big Data Tables: UI/UX Principles and Best Practices
Designing big data tables requires more than clean layouts. Insights -

Charts vs Tables in WordPress: When to Use Each (with Examples)
If your website handles lots of dynamic data, it’s best…
Leave a Reply
You must be logged in to post a comment.