
WPPayForms provides you with 6 unique Product Input Fields. That can be used for creating Payment forms that deal with products. All these fields are available below the Product Fields segment found on the right side of the plugin’s dashboard.
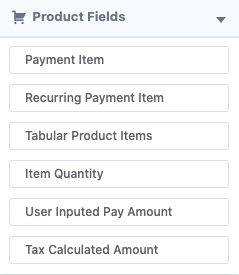
Now we will give you a closer look at each of these fields.
Payment Item
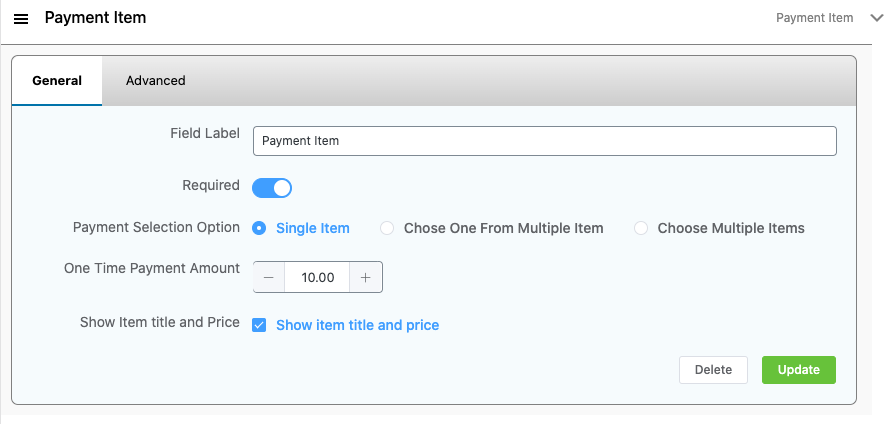
A Payment Item is used for displaying the number of items. Along with the price of that particular item. Here are the field options from the General tab:
Field Label: This option gives a label (sub-title) of this input field.
Required: This option allows you to turn on and off the field to make as mandatory. The choice required option states that the input area must be filled out before the form is submitted.
Payment Selection Option: With this option, you can choose the number of items to be selected. It can be Single, Choose one from Multiple Item, Choose Multiple Items.
One time Payment Amount: The amount required to pay for the item once.
Show Item title and price: This option enables you to display the item’s title and price on the form.
Enable Image: With this option, you can add an image when you enable this.
Disable Field: This option enables you to hide a particular field for later use.
Here are the field options from the Advanced tab:
Admin Label: This label is used if the admin wants to see the field’s label from the back-end.
Field Wrapper Class: This is a field used for adding a class for the field wrapper.
Recurring Payment Item
This field is used when the items need to be paid after every certain amount of time. Here are the field options from the General tab:
Recurring Payment Item Name: The name given for the Recurring Payment Item.
Required: This option allows you to turn on and off the field to make as mandatory. The choice required option states that the input area must be filled out before the form is submitted.
Show Price Label: This option enables you to display the price label of the item.
Show Payment Summary: This will display the overall summary of the payment of the item.
Choose your pricing plan: This option configures Recurring Subscription Payment Plans. Options include Simple Recurring Plan(Single) & Choose One from Multiple Pricing Plans.
Plan Name: This lets you select the name for the pricing plan for the item.
Price/Billing Interval: The price amount that needs to be paid after every certain amount of time. You can also enable user input amount to add your custom price amount.
Billing Interval: The time interval required to pay for the item. It can be Daily, Weekly, Monthly & Yearly.
Has Signup Fee: This option enables a one-time payment amount of the item while signing up.
Has Trial Days(in days): If the Signup Fee is disabled, then this option lets you add the number of days for the Free trial of the item. The user will be charged automatically after the trial period ends.
Total Billing Times: This is the total number of times the user will be charged until canceled.
Tabular Product Items
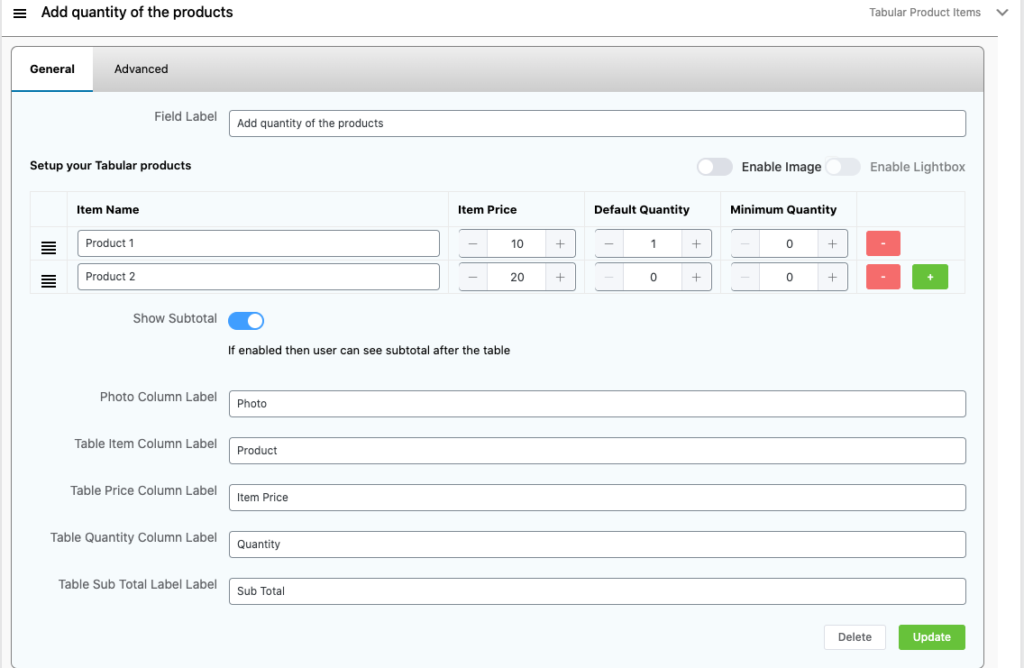
This field is used to display all the product items in a tabular format. Here are the field options from the General tab:
Field Label: This option is used to give a label (sub-title) of this input field.
Setup your Tabular products:
Item Name: The name entered for the particular item.
Item Price: This option lets you add the price of the item.
Default Quantity: This is for adding the default numbers of items.
Minimum Quantity: This option is for adding the minimum number of items.
Maximum Quantity: This option is for adding the maximum number of items.
Enable Image: Switch this option on if you want to add images of the items.
Enable Lightbox: Switch this option on if you want to add an image lightbox of the items.
Show Subtotal: If enabled then the user can see subtotal after the table.
Item Quantity
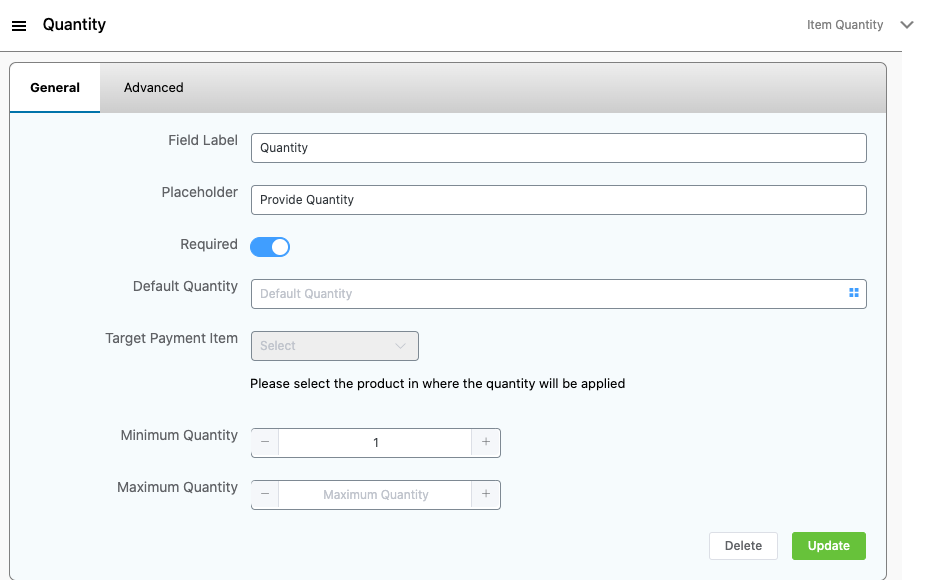
This field is used to display all the number of items. Here are the field options from the General tab:
Field Label: This option is used to give a label (sub-title) of this input field.
Placeholder: Using this the placeholder name is given. This option will include a hint of the estimated value that will be shown before the user enters a number, e.g. you can use “Type your age” as a placeholder here.
Required: This option allows you to turn on and off the field to make it mandatory. The choice required option states that the input area must be filled out before the form is submitted.
Default Quantity: This option is for adding the default number of items.
Target Payment Item: To select the product where the quantity will be applied.
Minimum Quantity: This option is for adding the minimum number of items.
Maximum Quantity: This option is for adding the maximum number of items.
User Inputted Pay Amount
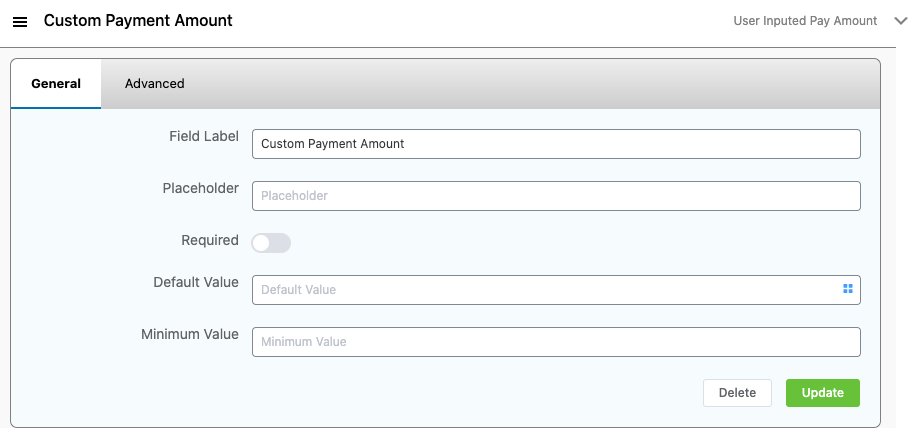
This field is used to add your custom payment amount. Here are the field options from the General tab:
Default Value: This option enables you to add the default value of the item.
Minimum Value: This option enables you to add the minimum value of the item.
Tax Calculated Amount
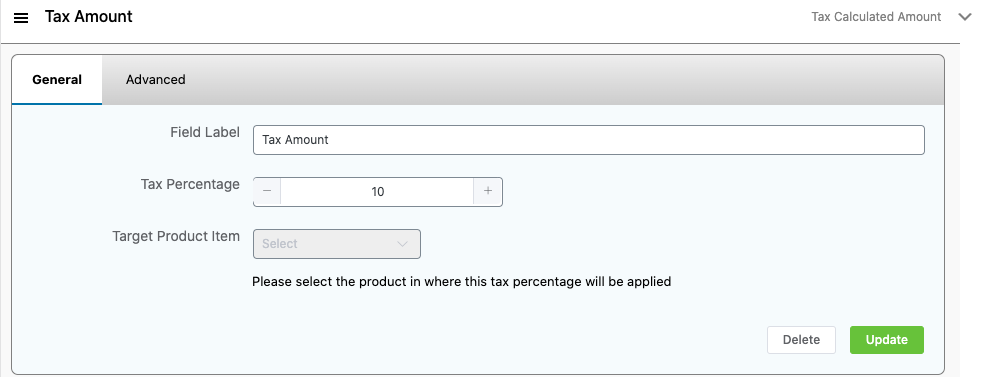
This field is used to add the amount of tax required to pay for the item. Here are the field options from the General tab:
Tax Percentage: The percentage of the total tax required to pay for the item.
Target Product Item: Here you can select the product where this tax percentage will be applied.
Those are all the product fields you can have on the WPPayForm plugin when using the plugin. All the fields here allow you to build an easier and smoother payment gateway.