
How to Set Up Stripe in WordPress Websites for Smooth Payments

Accepting payment in a WordPress website is now easier than ever. With the expansion of the online business industry, the online payment system also leveled up. It’s no more a headache for entrepreneurs of how to collect payments.
When it comes to the best online payment solutions, two names come into our minds – PayPal, and Stripe. PayPal and Stripe are so popular that anyone will suggest these brands if you’re just starting out. However, there are some debates on which one is better, but we’ll focus on Stripe today.
- Read an elaborate comparison between Stripe and Paypal
In the early days, PayPal was arguably the only option to accept payment online. The scenario is not the same as before. Many vendors provide rigorous support now, and Stripe is undoubtedly the most prominent contender. Stripe is developer-friendly, and the transaction fee is low.
A little bit about Stripe
Stripe is an online payment gateway that is able to process one-time and recurring payments for online stores. Hundreds of big organizations use this powerful tool, including Facebook and Shopify. They knew in the first place where to focus, and that’s why they stood alone with many amazing features. The developers love their Stripe API, and users adore simplicity. Beyond all the other functionalities, these two helped them to route faster towards success.
Important: Stripe requires your site to have SSL encrypted. It’s a prerequisite for credit card security. If your website doesn’t have SSL, do it now. Most of the hosting services offer it free.
How to add Stripe to your WordPress website
Well, Stripe doesn’t have a direct option to integrate with WordPress nor have a plugin. But you know how awesome the WordPress community is! There are several options to connect your WordPress site with Stripe. In this article, I’ll go through four amazing options to set a connection between your site and Stripe.
Developers usually leverage the uncomplicated API of Stripe, which allows them to make a bridge. By reading this guide, you’ll know how to utilize this super brilliant payment system to get paid for your hard work. I’ll walk you through four simple processes that are easy to understand and apply conveniently.
- Setup Stripe with FluentForms
- Connect with Paymattic
- Stripe setup with WooCommerce Store
- Connecting Easy Digital Downloads
Setup Stripe with Fluent Forms
A WordPress form plugin can be a great solution to set up Stripe for your business. It provides you with more freedom, as there are multiple options to customize.
As you can add more custom fields to your checkout forms, the transaction process will be smoother. Many WordPress plugins are available to connect to Stripe and accept payment.
Fluent Forms is an excellent choice among them, undoubtedly. This is a form-building plugin with multitudes of advanced features. You need to buy the pro version of Fluent Forms to use the payment option.
Now, I’ll show you how to make a connection between Stripe and Fluent Forms. You need to complete two things first.
- Signing up with Stripe
- Installing Fluent Forms
Assuming you have done the two steps, now I’m telling you how to activate the payment functions in Fluent Forms.
Step 1
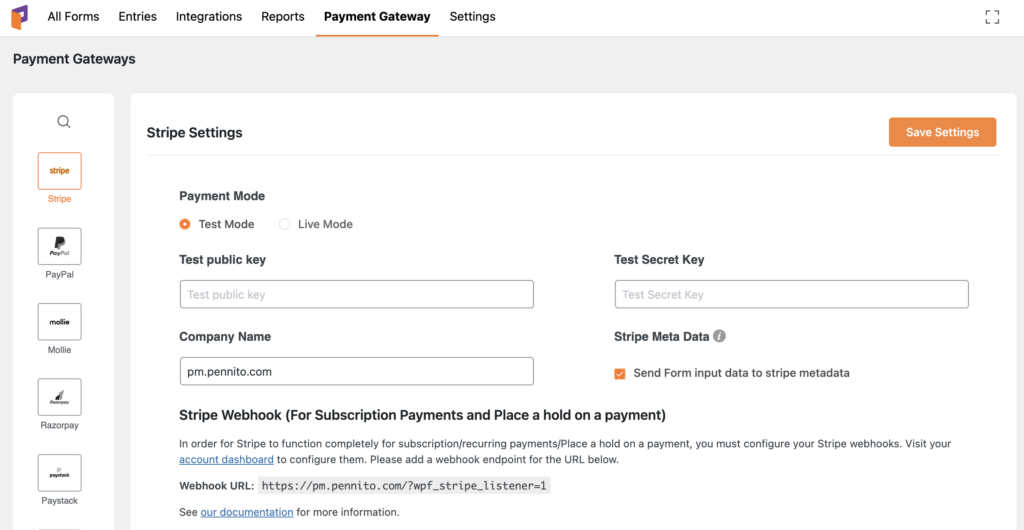
Go to the Settings of Fluent Forms Pro from the WordPress admin area. At the top left, you’ll find Payment Settings. Click on that, and you can see four options will appear.
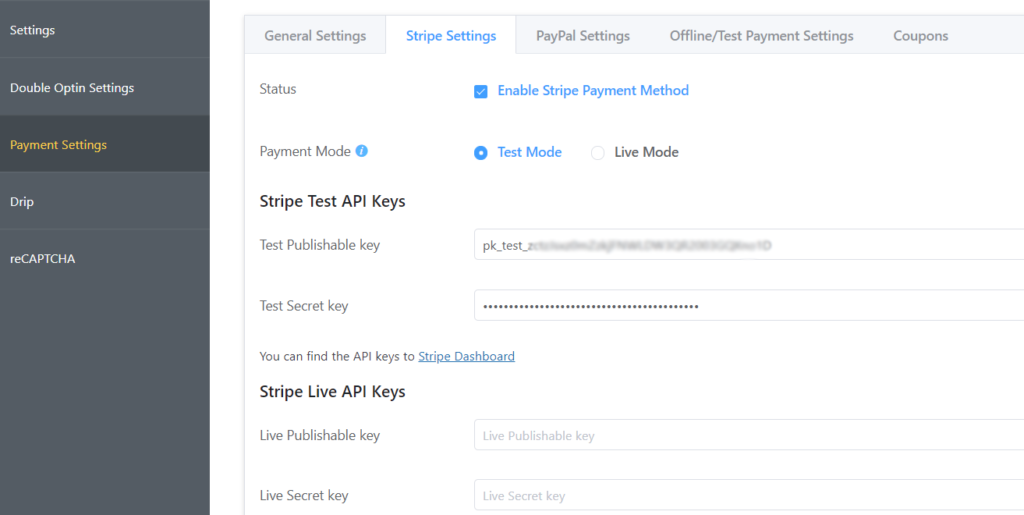
Click Stripe Settings from the second tab. Then, Enable Stripe Payment Method by checking the tickbox. Now choose either Test Mode or Live Mode. With test mode, you check the payment process without doing any harm, so go for it.
Step 2
You need Stripe Test API Keys to establish the bridge between Stripe and Fluent Forms. Go to Stripe’s dashboard and get two of the following keys:
- Test Publishable key
- Test Secret key
Copy both keys from there and paste them here on your Fluent Forms settings.
Go to the dashboard again for live action and copy the Stripe Live API keys. Click the Save Stripe Settings button, and you’re ready.
Another important thing: for recurring payments to work correctly, you need to configure Stripe webhooks. You’ll find the necessary instruction on payment settings.
Connect with Paymattic
When you want to set up a payment system without using the eCommerce platform, a WordPress payment plugin can be the most profitable solution. We chose Paymattic here as it’s one of the best solutions for setting up a robust payment system on your WordPress website.
Paymattic has both a free and premium version with a variance in features. The free version comes with a limited amount of amenities, where the pro version offers many out-of-the-box functionalities.
Step 1
You need to install the plugin first. Keep in mind that the free version has Stripe integration only. Go to the plugin directory from your WordPress dashboard. From the left panel of your WordPress dashboard, go to Plugins > Add New.
Search with Paymattic, and the plugin will appear. Click the Install Now button, and it will be installed quickly. Now, click Activate, and the plugin is ready to work.

If you go to Paymattic by clicking on the left side of your WP dashboard, you’ll be brought on the welcome screen.
Click the button that says Create a Form, and a list of prebuilt templates will appear.
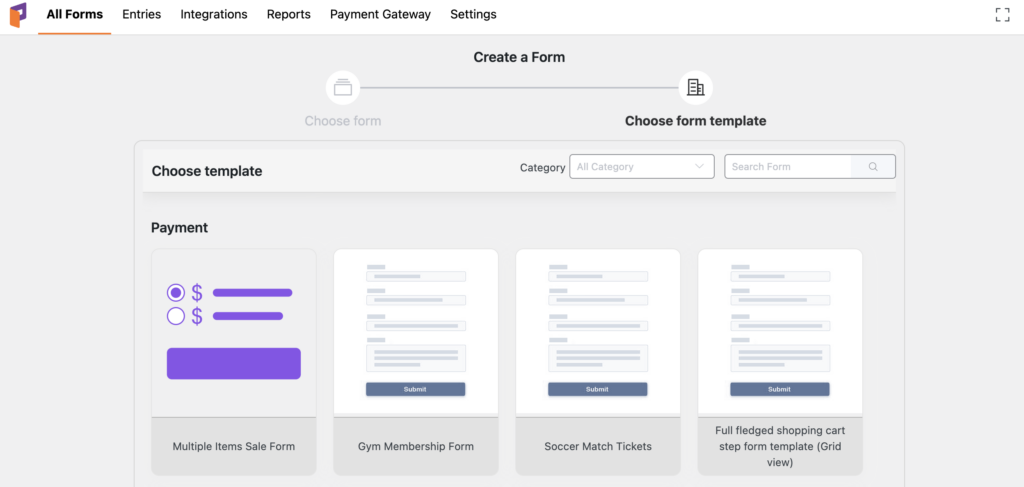
Choose the one that reflects your need or go for a blank form.
You’ve got the right start. Now I want to walk you through the settings, and the first one is how to activate the license if you’re using the paid version.
Step 2
For the free version, the activation process is easy. Just click the activate button after installation. But, if you use a pro version, you need to do a few additional steps.
Go to Paymattic Settings and then go to Licensing. Put your license key and activate it for the right action.
Step 3
Now we’re going to set up Stripe in Paymattic. Before doing that, you need to sign up for a Stripe account, and I hope you’ve done that already. I’m skipping this part, anyway.

Let’s go to your WordPress dashboard and go to settings from Paymattic. Now, follow through Payments, and you’ll come to the Stripe Settings first.
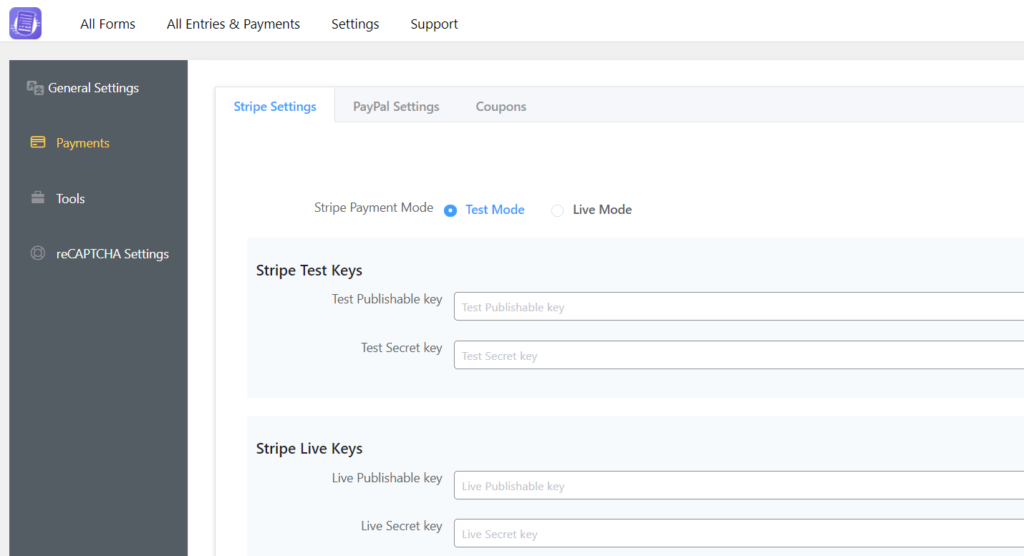
You can see two modes on top of this panel: Test Mode and Live Mode. Choose the test mode first because it will allow you to check multiple cards to determine whether it’s working.
Step 4
Now, log in to your Stripe account and go to the developer’s dashboard. From the API keys section, collect the Publishable key and Secret key.
Step 5
Come back to your WordPress dashboard now (suggested: open in a new tab for convenience). Go to the settings on Paymattic Pro and then proceed to Stripe Settings. Paste the API keys you have copied from your Stripe account.
That means starting by copying your Publishable key (begins with “pk_test”), switching to your Paymattic admin tab, and pasting it into the appropriate text box.
The Publishable key starts with pk_test, and the Secret key begins with sk_test. Under the right field on Paymattic’s setting, paste both keys.
Step 6
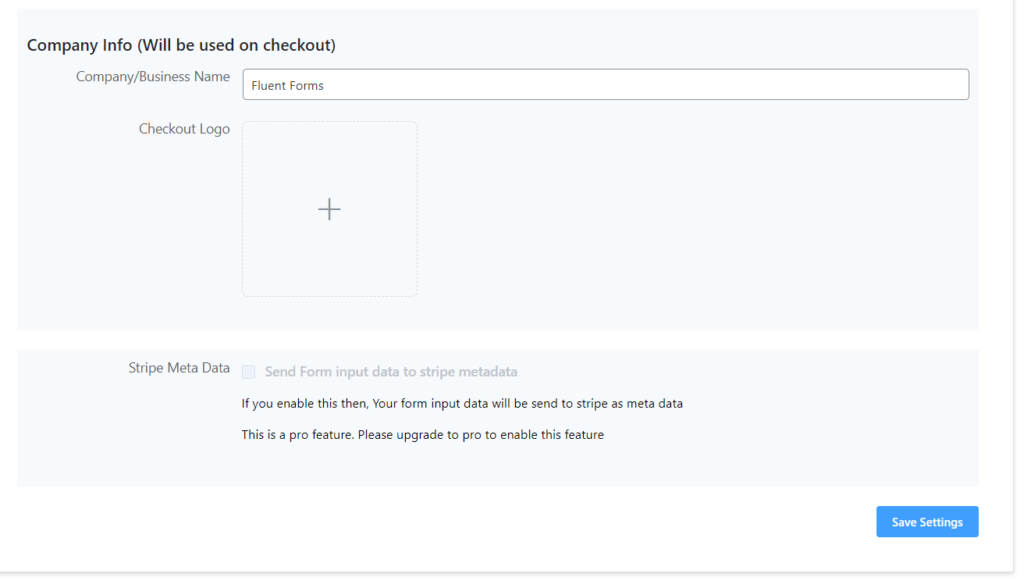
Give your company info that will be used during checkout, and include your business logo.
Step 7
For recurring payments, you need to configure webhooks in your Stripe dashboard. You will find the detailed instruction on the Paymattic dashboard.
Step 8
There’s nothing more. Click the Save Settings button, and everything will be alright.
Stripe setup with WooCommerce Store
WooCommerce is a very popular way to open a store online. Previously, you only have to buy the addon from WooCommerce to enable Stripe. But now, with various tools, you can painlessly setup Stripe for the payment system in your shop.
Step 1
The first thing is, you have to download the free stripe plugin from the WordPress directory and install it to your site.
Step 2
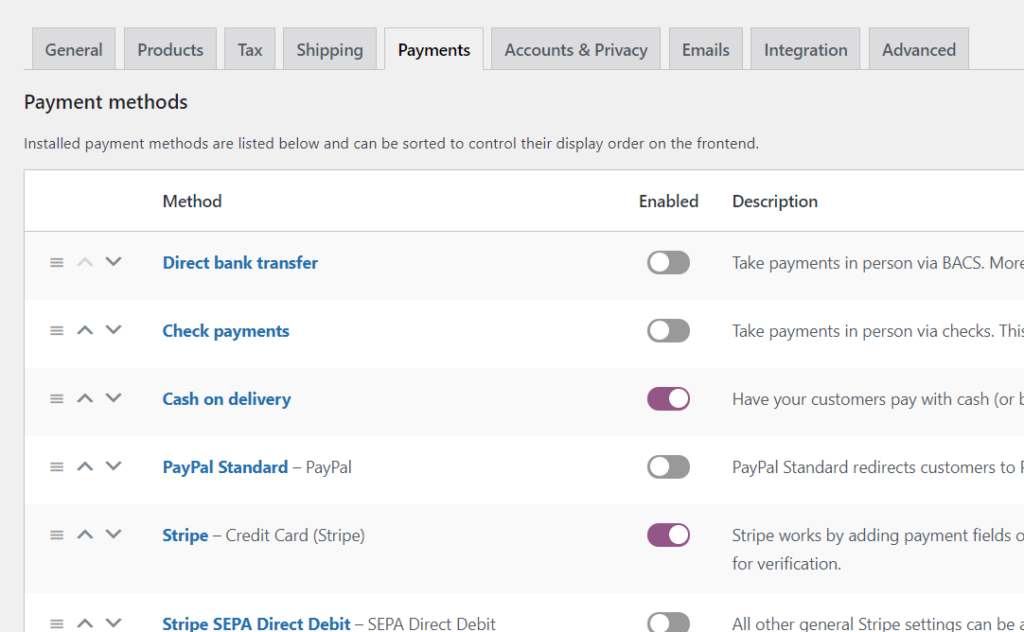
Go to the WooCommerce setting from your WordPress dashboard. Now go to Settings>Payments.
Step 3
Scroll down to Payment Methods and select Stripe. Enable it, and then click on the Manage button.

Step 4
You will get several fields to fill out, including title and description. But, what is important here is filling out the Publishable Key, Secret Key, and Webhook Secret. If you want, you can play with other options, like button customization and activating inline credit card form.
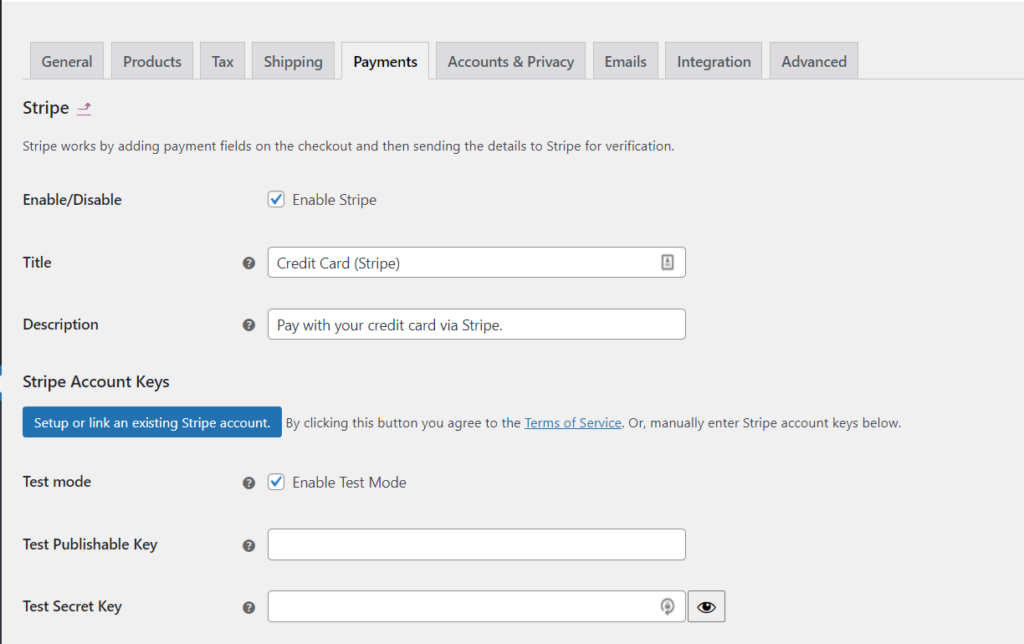
Get your Stripe API keys as you’ll need them to put into the respective fields.
Also, you have to choose whether to enable or not the Stripe Checkout. If you enable it, then a modal checkout form will appear with a buy button instead of the regular form. Scroll to the bottom and click Save Changes.
Step 5
Then go to the bottom and click on Save Changes.
Connecting Easy Digital Downloads
Easy Digital Downloads is another popular option for eCommerce payment. It was first built for digital products only, but it’s now can be used for physical products, as well. If you haven’t the plugin yet, get it now.
Step 1
After installing EDD, you need to have an extension for Stripe payment on your side.
Step 2
When you complete the installation, you’ll see a tool name Downloads – it’s EDD. Click there and go to Payment Gateways. Enable the Stripe first by checking the option. Now make Stripe your default gateway. Then select the credit card icons if you want to show them on checkout.
Click Save Changes.
Conclusion
Finally, I must say that setting up Stripe for WordPress is an uncomplicated task. Isn’t it? There are multiple methods, and all are for making the process easier and more convenient. Choose the method that seems right for you.
-

How to Embed Social Media Feeds on WordPress Websites (No Code)
Learn how to embed Instagram, Facebook, TikTok, and YouTube feeds -

Contact Form 7 vs Fluent Forms: Which one should you go for?
Learn the comparison between Fluent Forms vs Contact Form 7. -

WPForms vs Fluent Forms: An Honest Feature-by-Feature Comparison
Discover the Comparisons between WPForms vs Fluent Forms. See how
Leave a Reply
You must be logged in to post a comment.