


There is nothing wrong if we exchange something in return for a good deed. Nonprofit donation forms are the most crucial part of a voluntary organization.
Although most people know what a donation form does, voluntary firms as well as independent plugins or themes require a nonprofit donation form. Well, the drill is simple here.
Maybe an individual was looking for a particular feature or update but the donation form could be a reminder to encourage for a contribution.
But a major setback in setting up a donation form is, the core WordPress CMS doesn’t provide any options yet to receive payments on your websites. But thanks to the good developers all around the world, there are multiple ways to integrate payment features on a WordPress website.
Inside the amazing WordPress world, you have access to so many life hacks that can reduce your stressful daily workloads just by a few clicks.
Now the question is do you want to create a non-profit donation form in your WordPress website? Because if you do, there are handy tools and techniques to make it at ease.

Yes, alongside payment integration methods, you can also experience additional useful features like accepting nonprofit donations. In the WordPress site, it is expected to have a user-friendly donation set up in order to provide the best service to the users.
However, there are myths that WordPress is not safe for charities. Contrarily, non-profit organizations, as well as government sectors, are extensively using this platform. The right tool will always give you guaranteed security and the best deals to move ahead.
Before we dive into the easy-to-follow instructions, let’s elucidate why you may need nonprofit donation forms.
Nonprofit donation forms in WordPress
When we collect any donation then each penny counts in a non-profit donation. In WordPress, there are several ways of collecting charities.
Moreover, WordPress has added some excellent features in order to be the best platform for charities. Let’s check nonprofit donation forms in WordPress.
- Firstly, whether it is a startup or multinational company, you need a solution where you will have flawless service. And WordPress is the ultimate assistant in the current marketplace as no other platform can offer similar quality service.
- Secondly, WordPress is widely popular and has a massive support system. Furthermore, you can easily get what you want, including specific requirements such as a prebuilt form or a customized input field with a value.
- Thirdly, it is extremely easy and time-saving to use a donation form for charity. Organizations, as well as donors, always prefer to use a trouble-free platform. When you use the online medium instead of cash it is easy to handle without any complications.

- You will soon realize that there is yet to be a better solution than WordPress. You can segment your donations in weeks or months. Nonprofit donation forms have cut down transaction costs as well as fundraising costs.
- Without any kind of volunteering, it is now possible to reach many doors. Besides, simple and straightforward operating systems inspire more people to become involved in the donation.
- Lastly, customized options are a wonderful way of minimizing cost as well as supporting the actual purpose of a charity. Moreover, free as well as paid themes are a great supporting feature for charities. So that you can reduce expenses and focus solely on non-profit activities.
Using a quality payment gateway plugin
Choosing the right WordPress donation tool is not easy at all. Several standard options are out there in the market within easy reach.
However, there is no default method in WordPress to receive payments. So you need plugins. Installing a well-organized tool can speed up your work. In your WordPress site, you can add donation forms to accept payments. But the questions remain the same.
Which is the best plugin for making a nonprofit donation form?
We suggest you use Paymattic to accept charities. It is a convenient option with multiple payment gateway integrations.
Paymattic is a user-friendly plugin that understands your needs and is available in free and premium versions. The free version comes with the Stripe payment processor and the paid version comes with PayPal, Payrexx, Paystack, Razorpay, Mollie, Square, and SSLCOMMERZ integrations.
This is the most lightweight and secured integration. Along with its prebuilt form option, Paymattic has a customized drag and drop feature to adjust your donation form.
In this article let’s discuss how you can create your nonprofit donation forms. For demonstration purposes, we will go with Paymattic.
Step 1: Add New Form
To create a nonprofit donation form go to the dashboard of Paymattic.
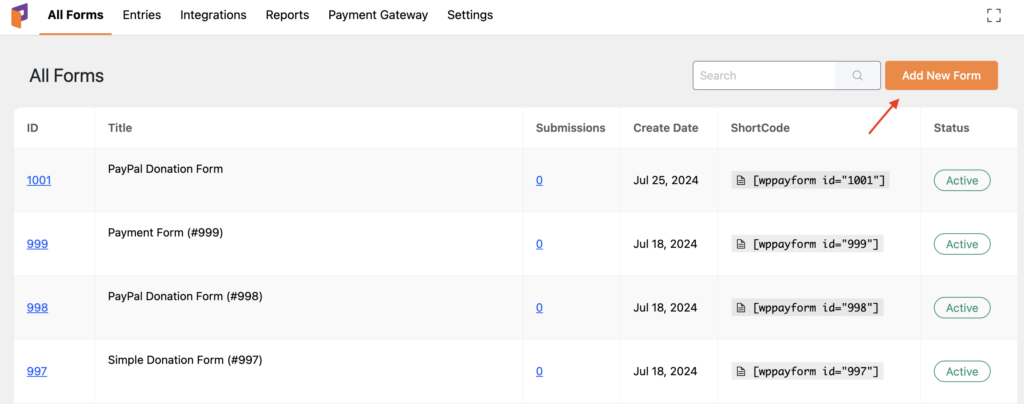
Now, click on the Add New Form button located on the top right corner of the dashboard.
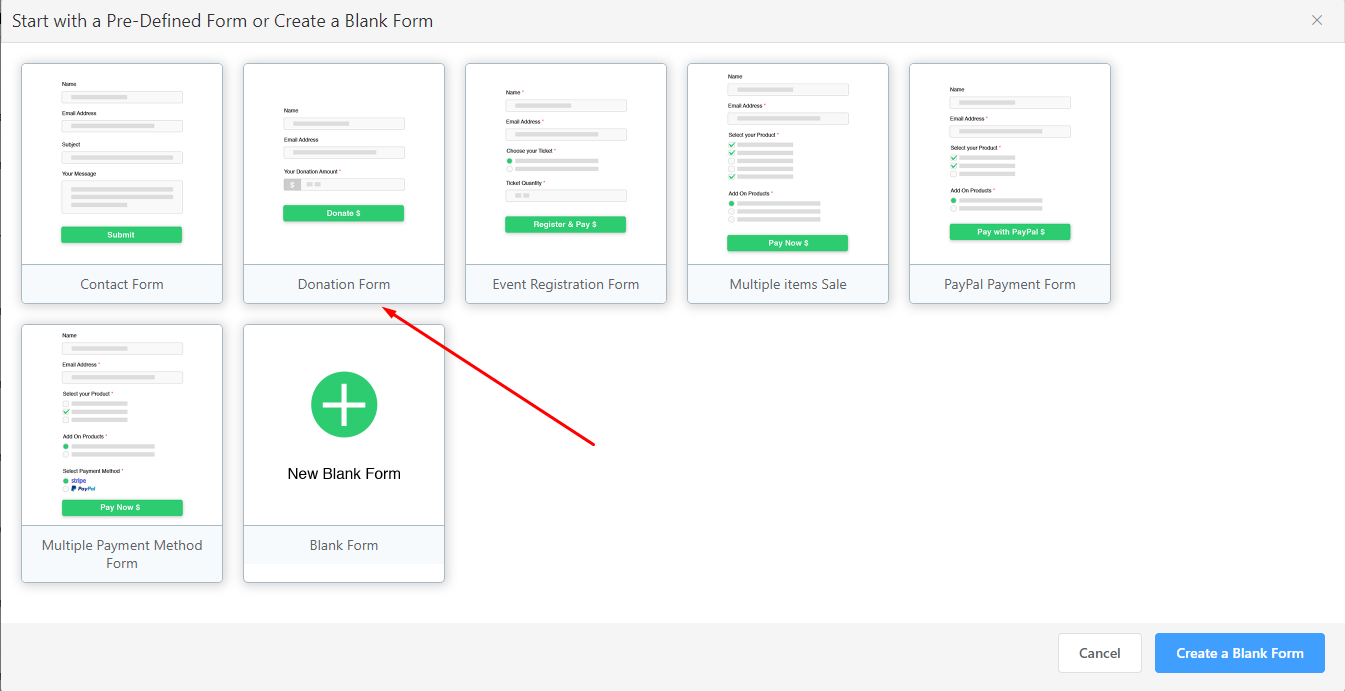
A pop-up will appear with Predefined form templates. Click on the Donation Form or you may click on the New Blank Form.
If you click on the New Blank Form you can drag and drop input fields from the right sidebar.
Here, we will start from the prebuilt Donation Form.
Step 2: Custom Form Fields

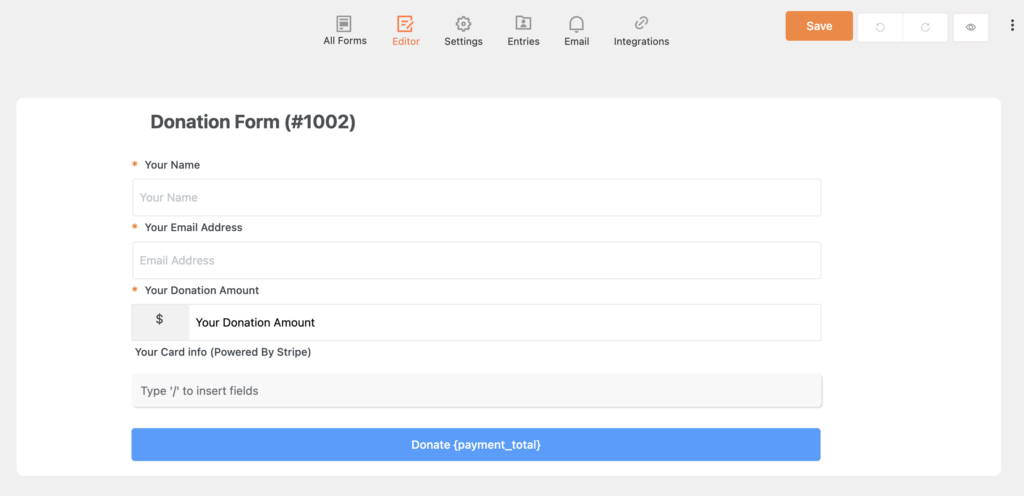
After clicking on the Donation Form, you will be taken to the Custom Form Fields section.
This section has five available input fields.
- Your Name
- Email Address
- Your Donation Amount
- Your Card Info (Powered by Stripe)
- Submit Button Settings
You will find the Field Label, Placeholder, and Required field in every input field.
Let’s check how you can customize Your Name field.
Step 3: Your Name
In this section, it will come up with the General and Advanced input fields. However, for further configurations, you can drag and drop from the right sidebar.
- General
General field has three subsections.
- Field Label
- Placeholder
- Required
It will allow you to customize Field Label and Placeholder. Here, you can put any title in the Field Label and Placeholder section.
For example, In the Field Label you can click to make any changes (for ex. Customer’s Name).
Next is Placeholder. Here, you may type some demo texts or keep the actual text. (for ex, Full Name)
Now, you can customize the Required button. You can enable or disable it if you want.
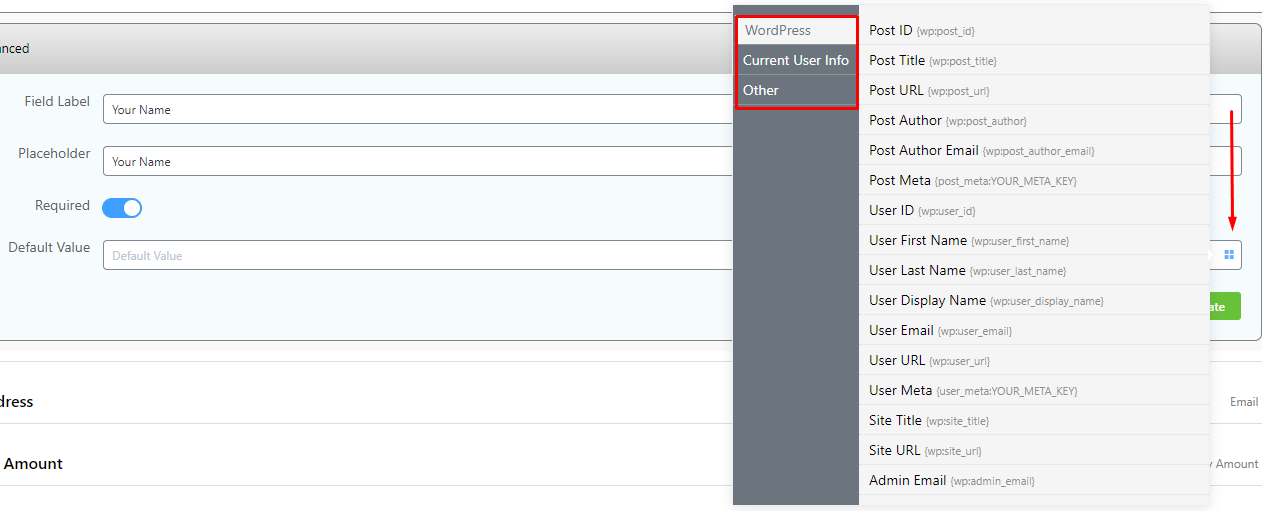
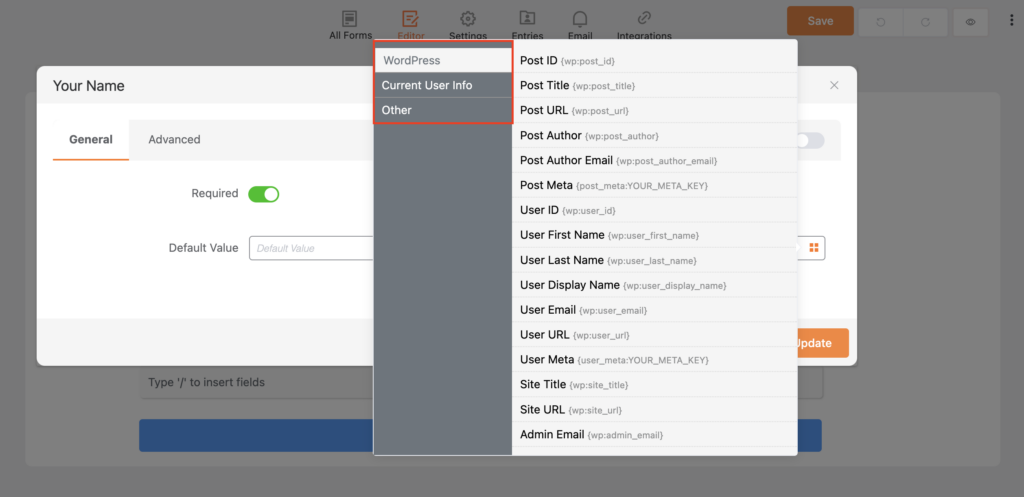
Add a Default Value in the next input field. There is an amazing tiny menu button in this section to configure your nonprofit donation form. Moreover, It has three extraordinary field ids to make your form more specific and comprehensive.
- WordPress
- Current User Info
- Other
WordPress consists of sixteen field ids. You can drag and drop new sections and add several particular items to your form.
Next is Current User Info. This will allow you to customize your form with eight distinct fields.
In the Other input field, you have four options to configure your form.
Once you are done with it, click on the Update button.
- Advanced

In the Advanced section it has three input fields.
- Admin Label
- Field Wrapper CSS Class
- Input Element CSS Class
The advanced section is generally for backend users. Well, here you can customize the fields with the necessary information. Make sure you click on the Update button after you are done.
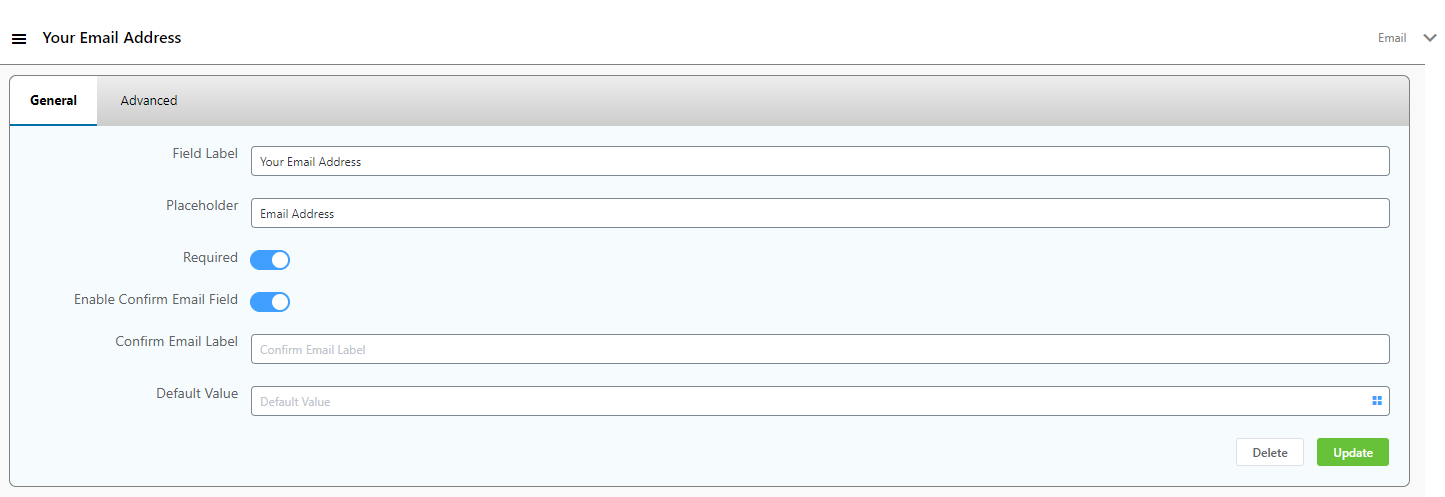
Step 4: Email Address
In this section you have several input fields for customization. It also has both the General and Advanced segment.
- General
General section includes:
- Field Label
- Placeholder
- Required
- Enable Confirm Email Field
- Confirm Email Label
- Default Value
You already know how to configure the Field Label, Placeholder, and Required button. Here, you can change the input fields. For instance, in Field Label you can put Customer’s Email Address.
The next is Enable Confirm Email Field. You may enable or disable the button. If you enable it, one new input field will appear. Consequently, this field will be used to reconfirm a user’s email address.
Next is Default Value. And you already know how to customize this field to configure your form.
Step 5: Your Donation Amount
Now that you are done with the name and email input ids, you may fill up your donation amount. This section has five available input fields.
- Field Label
- Placeholder
- Required
- Default Value
- Minimum Value
In the first field, you already know how you can customize your Field Label, for example, Customer’s Donation Amount. Similarly, configure the rest of the input fields. Along with Default Value, this section comes with Minimum Value.
Here, you can put any minimum amount (for ex.$10) according to your nonprofit donation form.
Step 6: Your Card Info (Powered By Stripe)
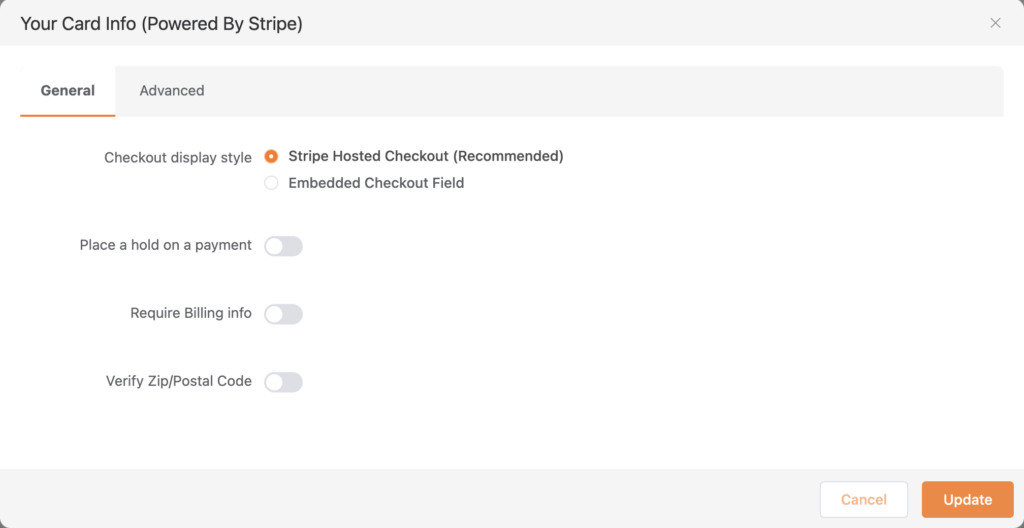
Next, you can check Your Card Info. Paymattic by default comes with Stripe Integration. So we recommend you to use Stripe. Moreover, we have four available input fields in this section.
- Field Label
- Checkout Display Style
- Require Billing Info
- Verify Zip/Postal Code
In this Field Label, you can put your card info. Next, in the Checkout Display Style, there are two options. Stripe Hosted Checkout (Recommended) and Embedded Checkout Field. You may select any.
Next, there are two toggle buttons.
- Require Billing Info
- Verify Zip/Postal Code.
You can enable or disable the button if you want.
Once you are done with it you need to click on the Update button.
Step 7: Submit Button Settings
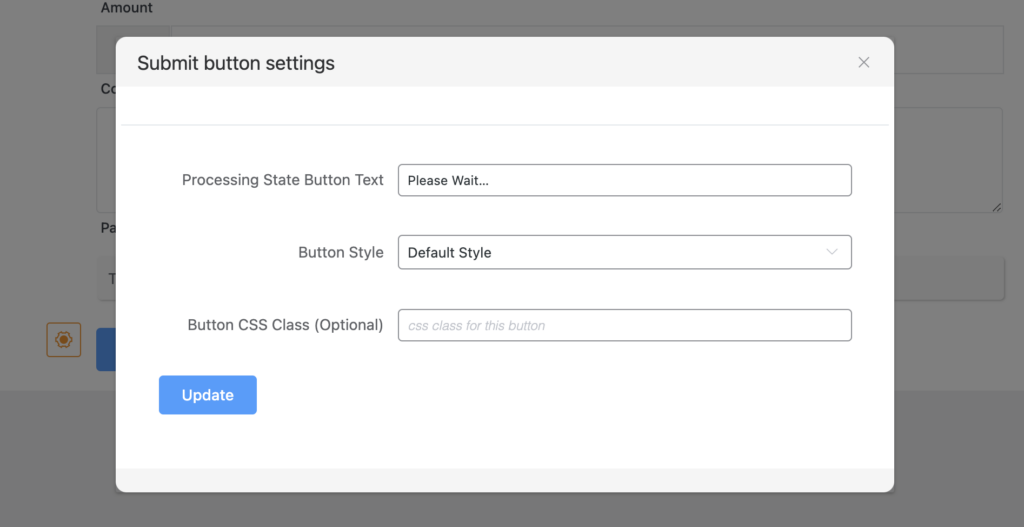
Next, we have Submit Button Settings. It has four available input fields.
- Button Text
- Processing State Button Text
- Button Style
- Button CSS Class (Optional)
Here, in the Button Text, you can fill up with appropriate text (for instance, Submit).
Next, we have the Processing State Button Text. You may write any other text in the place of “Please Wait..” in this field.
In the next stage, there is a Button Style. If we click on the arrow sign three types of button style will appear and you can select any.
After the button style, what comes next is Button CSS Class. Now click on the Update button to save the changes.
Last words
Global outbreaks like COVID-19 have a terrific impact on the whole world. In this situation, we all are trying to survive and help each other. During this pandemic, WP Manage Ninja has come forward to contribute with the Covid-19 package in order to overcome the combat.
In addition to that, donations are an excellent way to keep nonprofit organizations with low budgets up and running. In most cases, small businesses require charities in order to promote and continue welfare.
Moreover, there are plenty of people who work relentlessly to create something great but they don’t really sell their products or services. And the donation is an ideal way to encourage their good work as well.
To clarify, we hope this article was a practical trouble-shooter. If you are looking for a simple solution for the charity then try our awesome plugin Paymattic for nonprofit donation forms.
And if you have already been using Paymattic then reach out to us in the comment section for any kind of queries. We will be happy to guide you.
Paymattic
Stripe & PayPal Payments Made Simpler With Subscriptions Payments & Other Powerful Features
Also checkout Interesting Things About Stripe.
-

How to Add Code Snippets in WordPress: 100% Free Guide
Learn how to add code snippets in WordPress safely and -

FluentHub MCP: Run Your WordPress Business Right From Your AI Chat
Use FluentHub MCP to connect WPManageNinja products with AI agents -

How to Embed Social Media Feeds on WordPress Websites (No Code)
Learn how to embed Instagram, Facebook, TikTok, and YouTube feeds
Comments
-
I’m using Paymattic to accept donations for my nonprofit. I would like to give the donors the option to pay the processing fee of roughly 3%. How would I go about this. I tried the tax block and wanted to make it appear and disappear based on a conditional checkbox (“I agree to pay the processing fee”), but it doesn’t appear to have a conditional argument. Anybody have any ideas?
-
Sorry to inform you that right now it’s not possible to render the tax-calculated amount conditionally.
However, here’s a workaround: if you have a fixed donation amount, you can conditionally render a static payment amount using a radio field.
Additionally, we are currently working on a feature similar to a “numeric calculation field,” and we hope to roll it out in future updates.
Thank you.
Leave a Reply
You must be logged in to post a comment.