
6 Steps to Integrate Squarespace with WordPress
WordPress and Squarespace are two of the most popular website creation and hosting platforms. WordPress is good at handling highly customizable websites and Squarespace is known for its ease of use and personal support.
While Squarespace is great for beginners, it has an inherent problem. When you grow, Squarespace doesn’t. There just isn’t enough features and functions that WordPress offers. For any function you need, from payment gateways to UX there’s a WordPress plug-in. That’s something that doesn’t happen with Squarespace.
Unfortunately, you can’t run both platforms on the same website. These are two different systems, and they just don’t mix. However, there are plenty of ways you can go around that limitation.
Create a subdomain for WordPress
You may like the deal you’re getting with Squarespace, but it doesn’t have this one feature you desperately need. For instance, you may want to add a blog to your portfolio website, and the one Squarespace offers is just subpar. Or, you want to set up a shop, but the Squarespace one is so basic you can’t do any improvements on it.
In this case, you shouldn’t go all-in and switch from one platform to another. You can run them on the same domain name, just create a subdomain for WordPress. If your website looks like this “myportfolio.com,” a subdomain would look like this “blog.myportfolio.com.”
For all intents and purposes, these are two different websites, so you can run Squarespace on one and WordPress on the other. However, your visitors don’t experience it this way. They’ll be able to get from Squarespace to WordPress on the subdomain seamlessly.
Steps to integrate Squarespace with WordPress
Here’s how you make that happen.
Step 1: Get a hosting
Squarespace does provide free hosting. However, you can’t do everything you want with it. Especially if it involved running their biggest competitor.
You’ll have to get a third-party hosting to be able to run both simultaneously. On the positive side, you won’t pay over $5 for a starter hosting (compared to at least $12 for the cheapest Squarespace plan).
Do your research, and buy a hosting plan. Make sure it’s a reputable hosting company with good security and some room to grow.
Step 2: Transfer the domain to a new host
Now, you’ll have to transfer the domain name you got from Squarespace to the new host. It’s trickier than most things Squarespace would have you do, but it’s manageable. You can even ask the host for help.
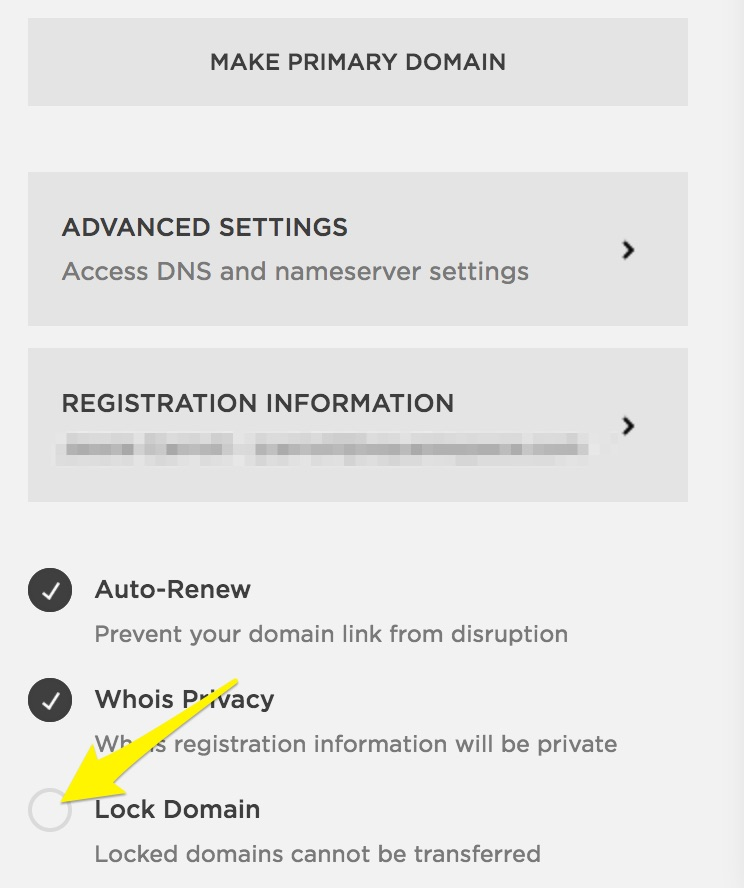
But first, you need to check if your domain is locked and unlock it if it is. Log into Squarespace, go to Menu > Settings > Domains. Then, scroll down, and uncheck the “Lock Domain” button.
From then on, you can ask the support at your new host to transfer the domain for you. Many hosts offer that as a part of the deal for newcomers.
Note that you can’t move domains for the first 60 days you’ve been on Squarespace. You’ll also have to pay for the domain name if you got it for free.
Step 3: Create a subdomain
Now, you have full control over your hosting and domain. It’s time to create a subdomain for your WordPress site. Log into the hosting’s CPanel and look for the “Subdomains” folder.
Create a new domain and name it as a page on the website. If you’re trying to get a better blog, create a blog.site.com subdomain.
Make sure you choose your current domain as the source.
Step 4: Install WordPress
Go over to WordPress.org and download the software. Then, install it to the folder that houses your new subdomain. You’ll get WordPress files in a .ZIP format. Unarchive it and upload the files to the core folder of the subdomain using FTP.
Then, you’ll have to create a MySQL database for WordPress. Don’t worry, you won’t need to learn programming to handle it, it’s all done in the WordPress admin panel.
Enter the CPanel and go to the “Databases” menu. Create a new MySQL database and change the sample file in it to “wp-config.php”.
If you’ve chosen the right host, you won’t even have to do all of that. Some hosts offer a simple button that lets you download WordPress seamlessly. If you have an “Install WordPress” button, just click that. Don’t forget to mention the subdomain, not the core domain when you’re installing it.
Step 5: Design
Now, you’re past the tricky technical parts and down to what you already know, designing a website. You can’t use Squarespace themes to design a website, so you’ll have to go with the most similar looking theme you can find on WordPress. Go over to WordPress.org, and browse through templates.
If it’s a good enough fit, go for it. You can always make it more similar to the way your current website looks because WordPress is highly customizable.
For instance, these two themes can be perfectly merged together.


At first sight, they look the same. However, both have plenty of white space and a centered simplistic menu. All you have to do to make the WordPress one look like the one from Squarespace is to change the menu items to a dar hue of grey, make the letters a smaller font, and change the logo to yours.
Download the theme to the subdomain folder. You can do it on the CPanel by FTP. The folder you should add the files to is “web/content/wp-content/themes.” Then, access the website creation panel by adding “/wp-login.php” or “/admin” to your subdomain address.
This will bring you to a login page with an address like blog.site.com/admin.” Log in, and go to Appearances > Themes and activate the new theme. Note, that this won’t work if you type it on the main domain like this “site.com/admin. ” If it’s still run by Squarespace, the website will not respond.
Now, you have full creative control over the page you’re creating.
Step 6: Create a seamless connection
While your main domain and the subdomain that houses WordPress are two different websites, your visitors shouldn’t be able to notice that. For all they know, they’re accessing a blog or a shop page.
The easiest way to do this is to make the navigation menus identical. The blog page may be slightly different in style from your Squarespace site, but the navigation is what makes both pages seem the same.
Make sure you match the style of the two while designing them and include all the links from the core domain on the subdomain and vice versa.
Export the Squarespace website
Do you need WordPress features on the main domain? Unfortunately, you can’t do it as the two platforms do not go together. The only solution you have is to export all the data from your Squarespace website and run it on WordPress.
Here’s what you have to do:
- Log into Squarespace
- Go to Settings > Advanced > Import/Export
- Choose to export to WordPress
- Save the file on your hard drive
- Save the images manually
- Get WordPress Importer
- Import the website to your WordPress hosting
- Add images manually
- Check if everything is working fine
Note that you won’t be able to export everything from Squarespace. You won’t get the custom CSS because it belongs to the company. You also won’t be able to export the changes in CSS you make on the platform and some page formats like events, albums, and covers.
If you want to make sure you can copy your website perfectly, keep it running to help you design the website anew on WordPress. This will also make it easier for your customers as they will not have to put up with downtime.
Wrapping up
Now you have two options for Squarespace to WordPress integration. You can’t run Squarespace and WordPress simultaneously, but you can combine the two systems on subdomains as parts of one website. If that’s not enough, you can also export your Squarespace website to WordPress.
-

How to Create an Event Registration Form on WordPress in Minutes
Discover how you can easily Make An Event Registration Form. -

Best Payment Gateway for WordPress: 7 Top Options Compared (2026)
Compare the 7 best payment gateways for WordPress in 2026. -

Recurring Donations in WordPress: Guide with Examples and Tips
Learn how to set up recurring donations in WordPress, and
Leave a Reply
You must be logged in to post a comment.