
How to Create a Beautiful Online Course Website with WordPress

Learning Management System (LMS) websites have seen a significant surge in recent times.
More and more people are learning online. Schools, colleges, and universities have embraced online learning and anyone with knowledge to share can do it on the internet. Online learning has always been there, but COVID-19 made it more popular than ever!
The world of online course creation can seem daunting to a new instructor. Fear not, as we can help you set up an eLearning site with minimum effort.
We understand that most people might not be adept at coding or do not have the resources to create a full-fledged website by themselves. And that’s where WordPress comes in!
Little needs to be said about WordPress, one of the most popular CMS tools around the world.
WordPress lets us have a large number of nifty tools and theme packs. Assisting us in setting up a site by simply dragging and dropping elements without much need for coding.
For this article, we are going to go through a comprehensive view of tools that will let us set up an LMS site with ease.
What does it take to create an online course website with WordPress?
Creating an eLearning site becomes easy when you have the right WordPress LMS plugin. We are going to be using Tutor LMS, an easy-to-use WordPress plugin that offers all required eLearning functionalities.
Also, we will be using Tutor Starter to make sure your eLearning site gets a wonderful look that your students will love!
Tutor LMS is trusted by over 40,000+ active users. It helps you create every aspect of a course website with multiple quiz preparation modules and so much more. The feature-rich LMS plugin was built with non-technical users in mind. As a result, it’s easy to create and deploy online course websites on WordPress with Tutor LMS!
Steps to create a beautiful online course website with WordPress
Even with a user-friendly plugin like Tutor LMS, it might be difficult for a newbie to create an online course website with WordPress. To make the task more organized, let’s break the process into some crucial steps:
- Installing an LMS plugin
- Adding themes and starter packs for beautification
- Setting up courses
- Monetizing the courses
With that, let us move on to our first task:
Step 1: Installing Tutor LMS
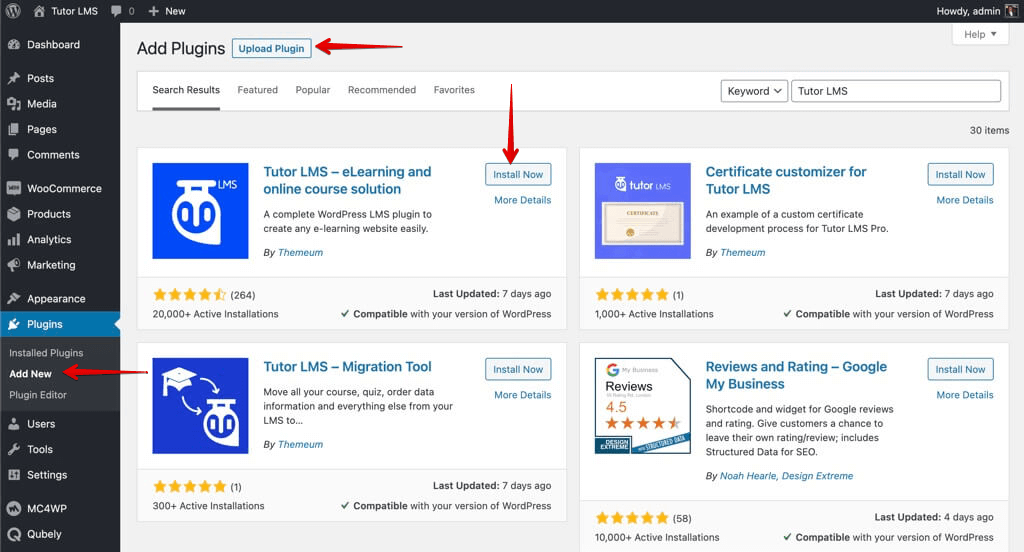
- To install Tutor LMS, navigate first to your WordPress admin panel.
- From the admin panel go to Plugins > Add new.
- Search for Tutor LMS then install and activate the plugin.
In a few minutes, it should be ready to use.
Step 2: Make the site look beautiful with a theme
Now that we have installed and activated Tutor LMS, we can get about to add a theme to our site. One of the great things about WordPress is that we can import a pre-built starter pack theme to our site to fill content into our site without difficulty.
Since we are using Tutor LMS, one of the best themes to go with it would be Tutor Starter. Tutor Starter is a specially designed theme with starter packs specifically for different course building sites.
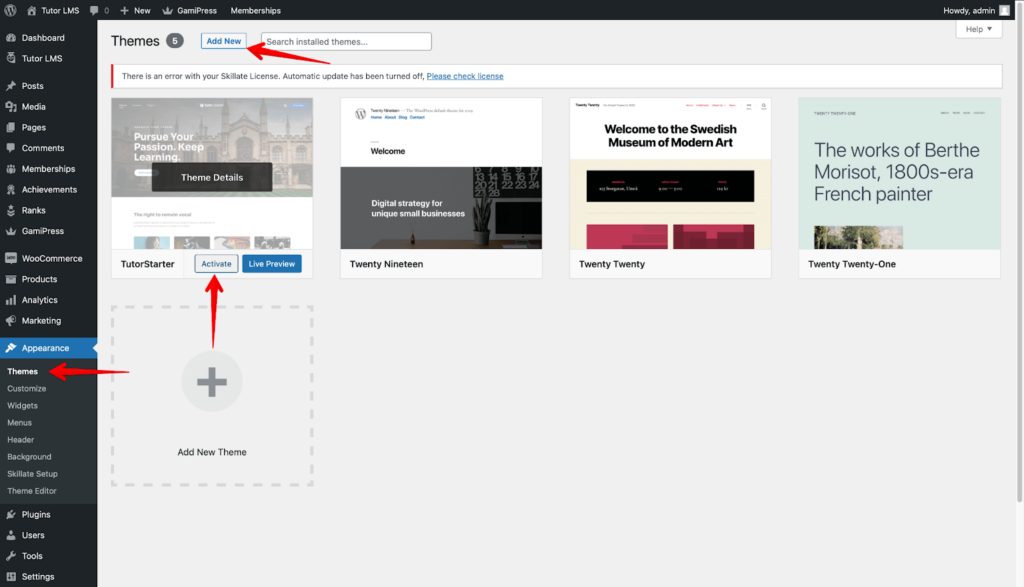
To download and activate Tutor Starter:
- Navigate to the Appearance tab.
- From here, click Add New and search for Tutor Starter.
- Hit install and activate to finish setting up Tutor Starter.
One more task remains before we can use Tutor Starter, we need to install TutorMate. TutorMate is an essential installation for Tutor Starter to work properly as TutorMate is a companion demo importer plugin for the Tutor Starter theme. Of course, both of these are free so you don’t have to make any purchases!
To install TutorMate:
- Navigate to Plugins > Add New and search for TutorMate.
- Install and activate TutorMate, and you are good to go!
Alright, we can now use Tutor Starter to import starter sites to our site.
From the WordPress admin panel:
- Go to Tutor Starter > Starter sites. We can find 4 different and unique demo starter sites made to fit your LMS needs.
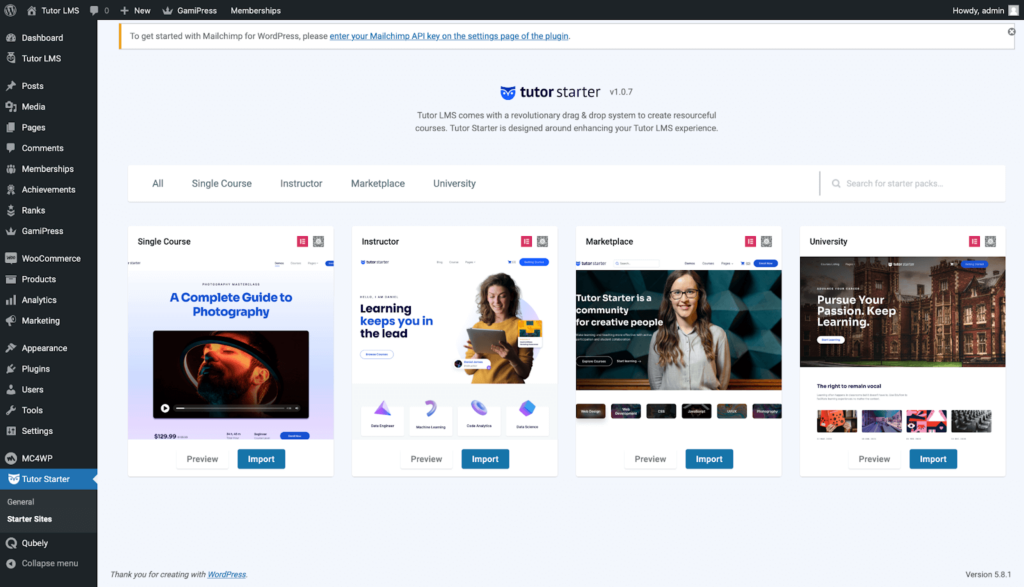
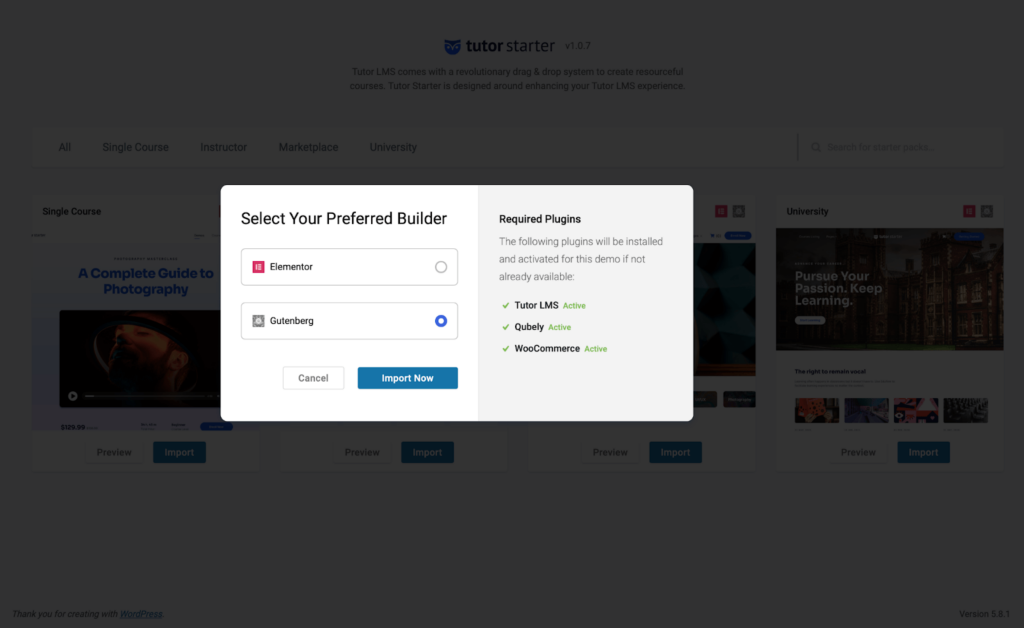
2. You can preview a site before you decide to import the demo onto your live site. When you have decided which site to import simply click the Import button.
This will bring up a popup where you’ll be asked to select a preferred Builder. We can choose the builder we are comfortable with.
For this article, we are going to go with the Gutenberg builder. During the demo import Tutor Starter also shows us the additional required plugins we need and even installs them for us if we are missing any.
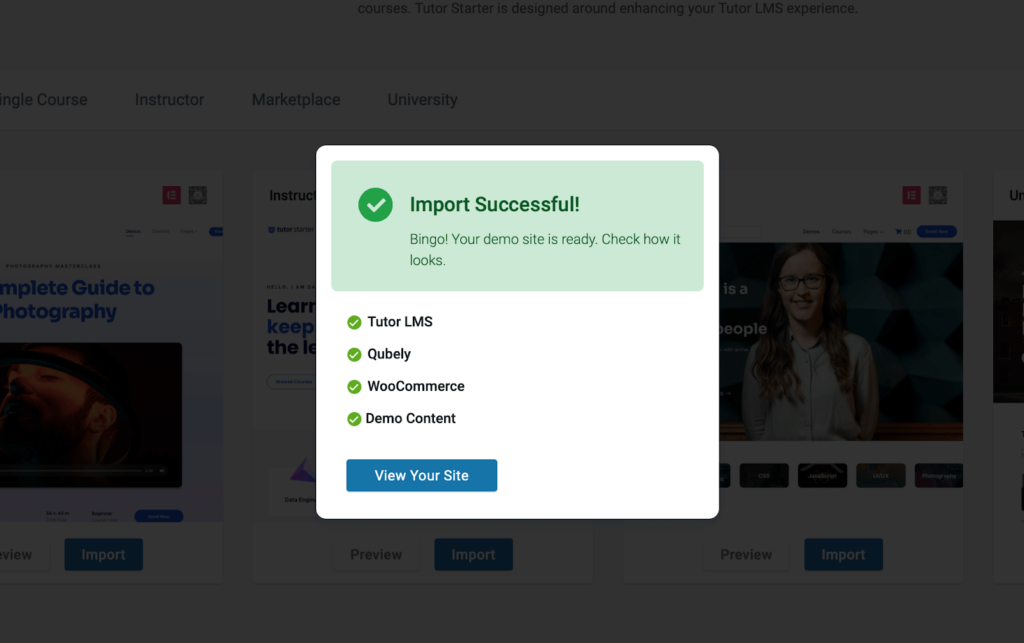
3. Once the import is complete click on View Your Site.
4. To edit the page, go to the WordPress admin dashboard and select Customize Your Site.
This takes us to the customization page where we can access all the background changes, widgets, and so much more. You can add your design flair to your site by changing elements and blocks to exactly how you want them to be.

Step 3: Set up the backend
Alright, now that our website is ready, we can go ahead and start setting up the backend of our LMS. Let us go over addING, editing and selling our courses to the world!
To set up our courses from the WordPress admin dashboard, navigate to Tutor LMS > Courses > Add New.
We are then taken to the backend course editor. Here we input the course name, add a course description, add a video if we need it, and a lot more. There is also a featured image section that we can utilize to let students know what our course is about.
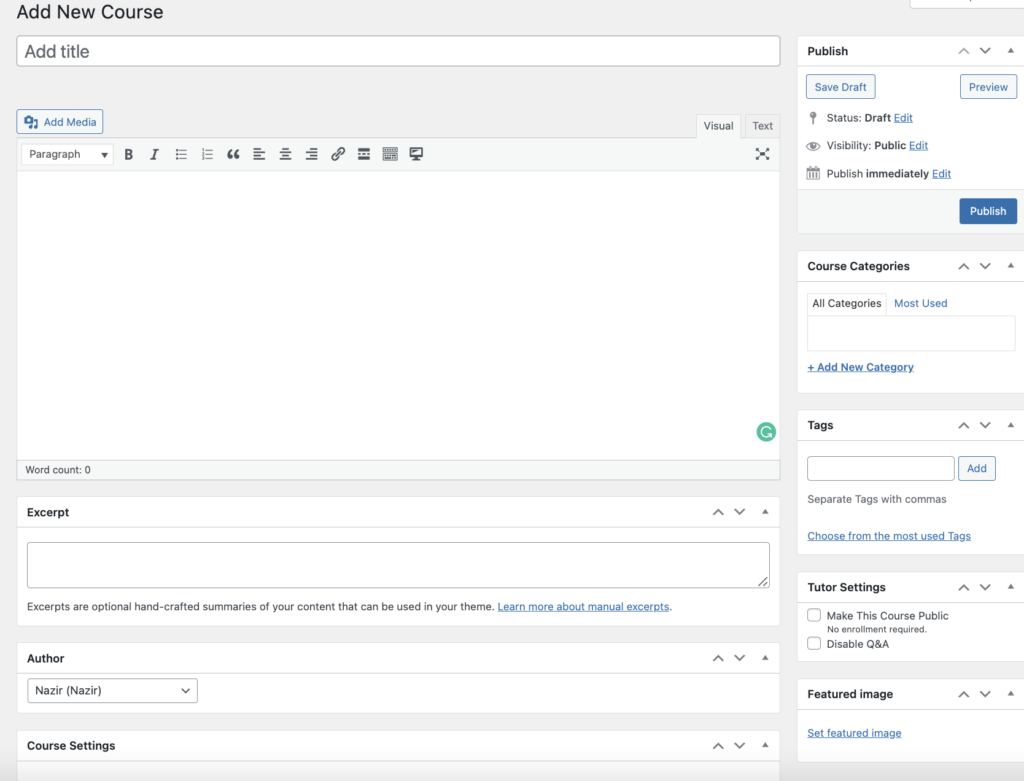
There are a lot of customizable options within Tutor LMS. There is an intuitive embedded video player which lets you link videos from YouTube and other mediums or upload straight from your device. You can even have a Q&A section with your students where you can interact with them. Inform students about what to expect from courses before they decide to be enrolled.
How to create quizzes
Creating and having lessons with quizzes are what give life to a course. Our courses need the substance to make it a course and all of this is made intuitive and straightforward in Tutor LMS. So let us walk through the entire quiz-building process.
1. Adding a topic
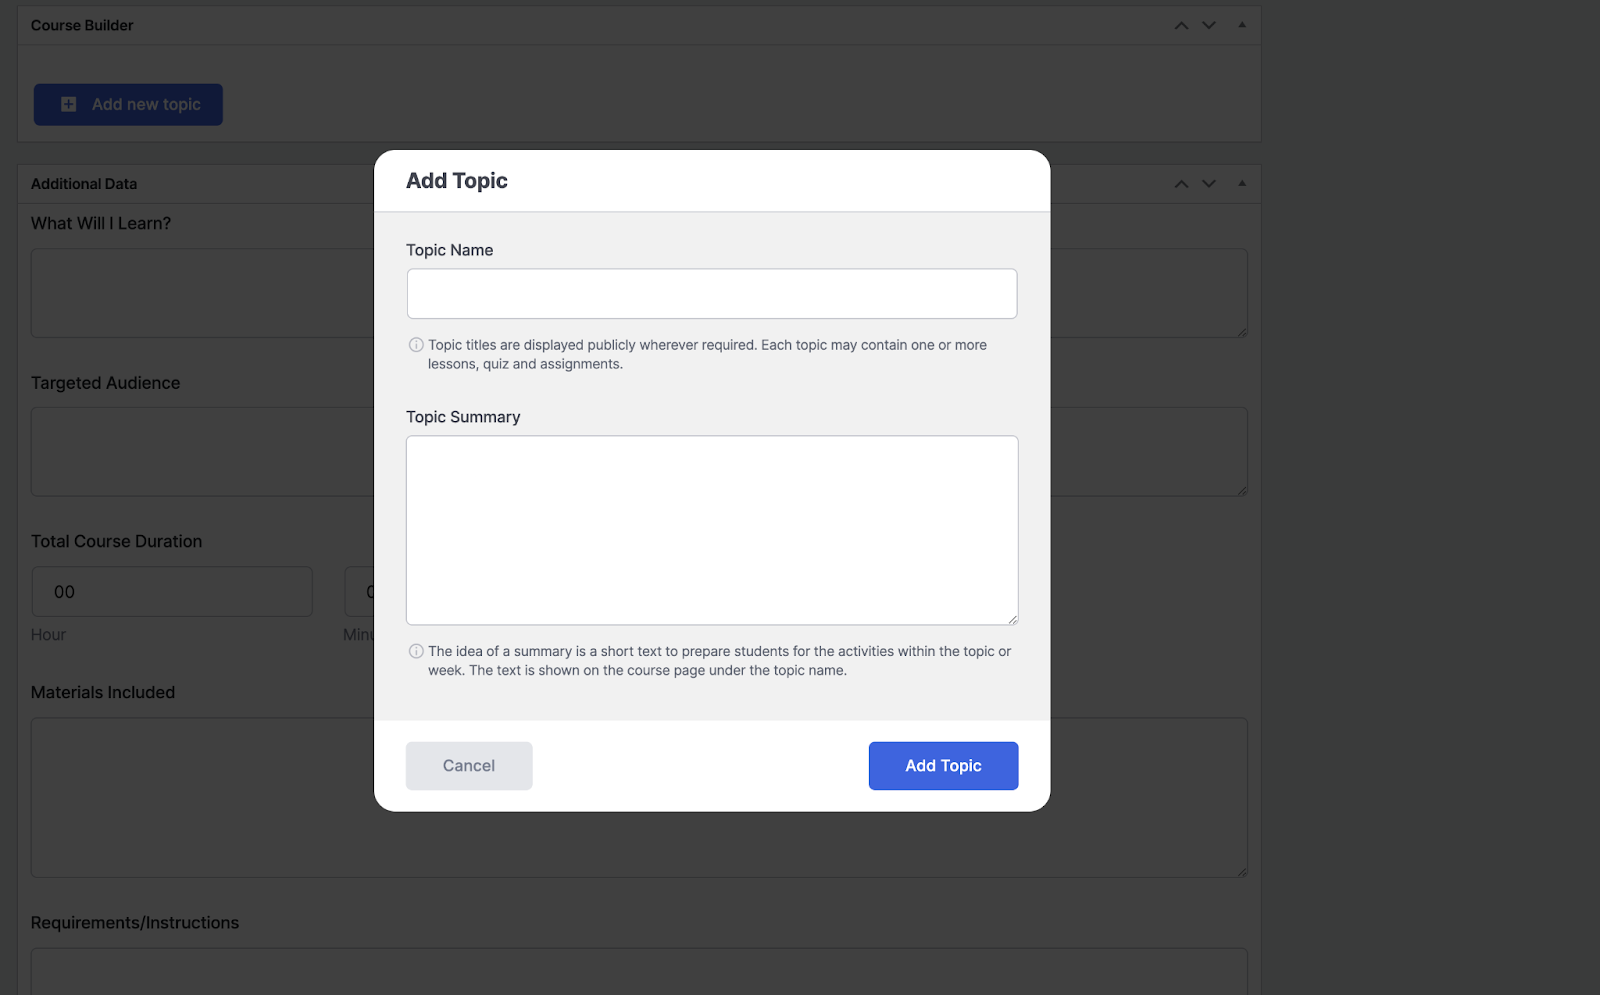
Before we can create a quiz we first need to have a topic followed by a lesson. From the course creation page scroll down to find the Course Builder section.
In the course builder section, click the Add new topic button and you get the topic creation pop-up box. Give your topic an appropriate name and add a summary to introduce the topic. Click on Add Topic and your topic is now ready for the next step.
2. Create a lesson for your topic
We can already see a quiz button under the topic we just created but logically you would want to quiz students on a lesson and not just a topic.
To create a lesson click on the Lesson button and you will see this pop-up.
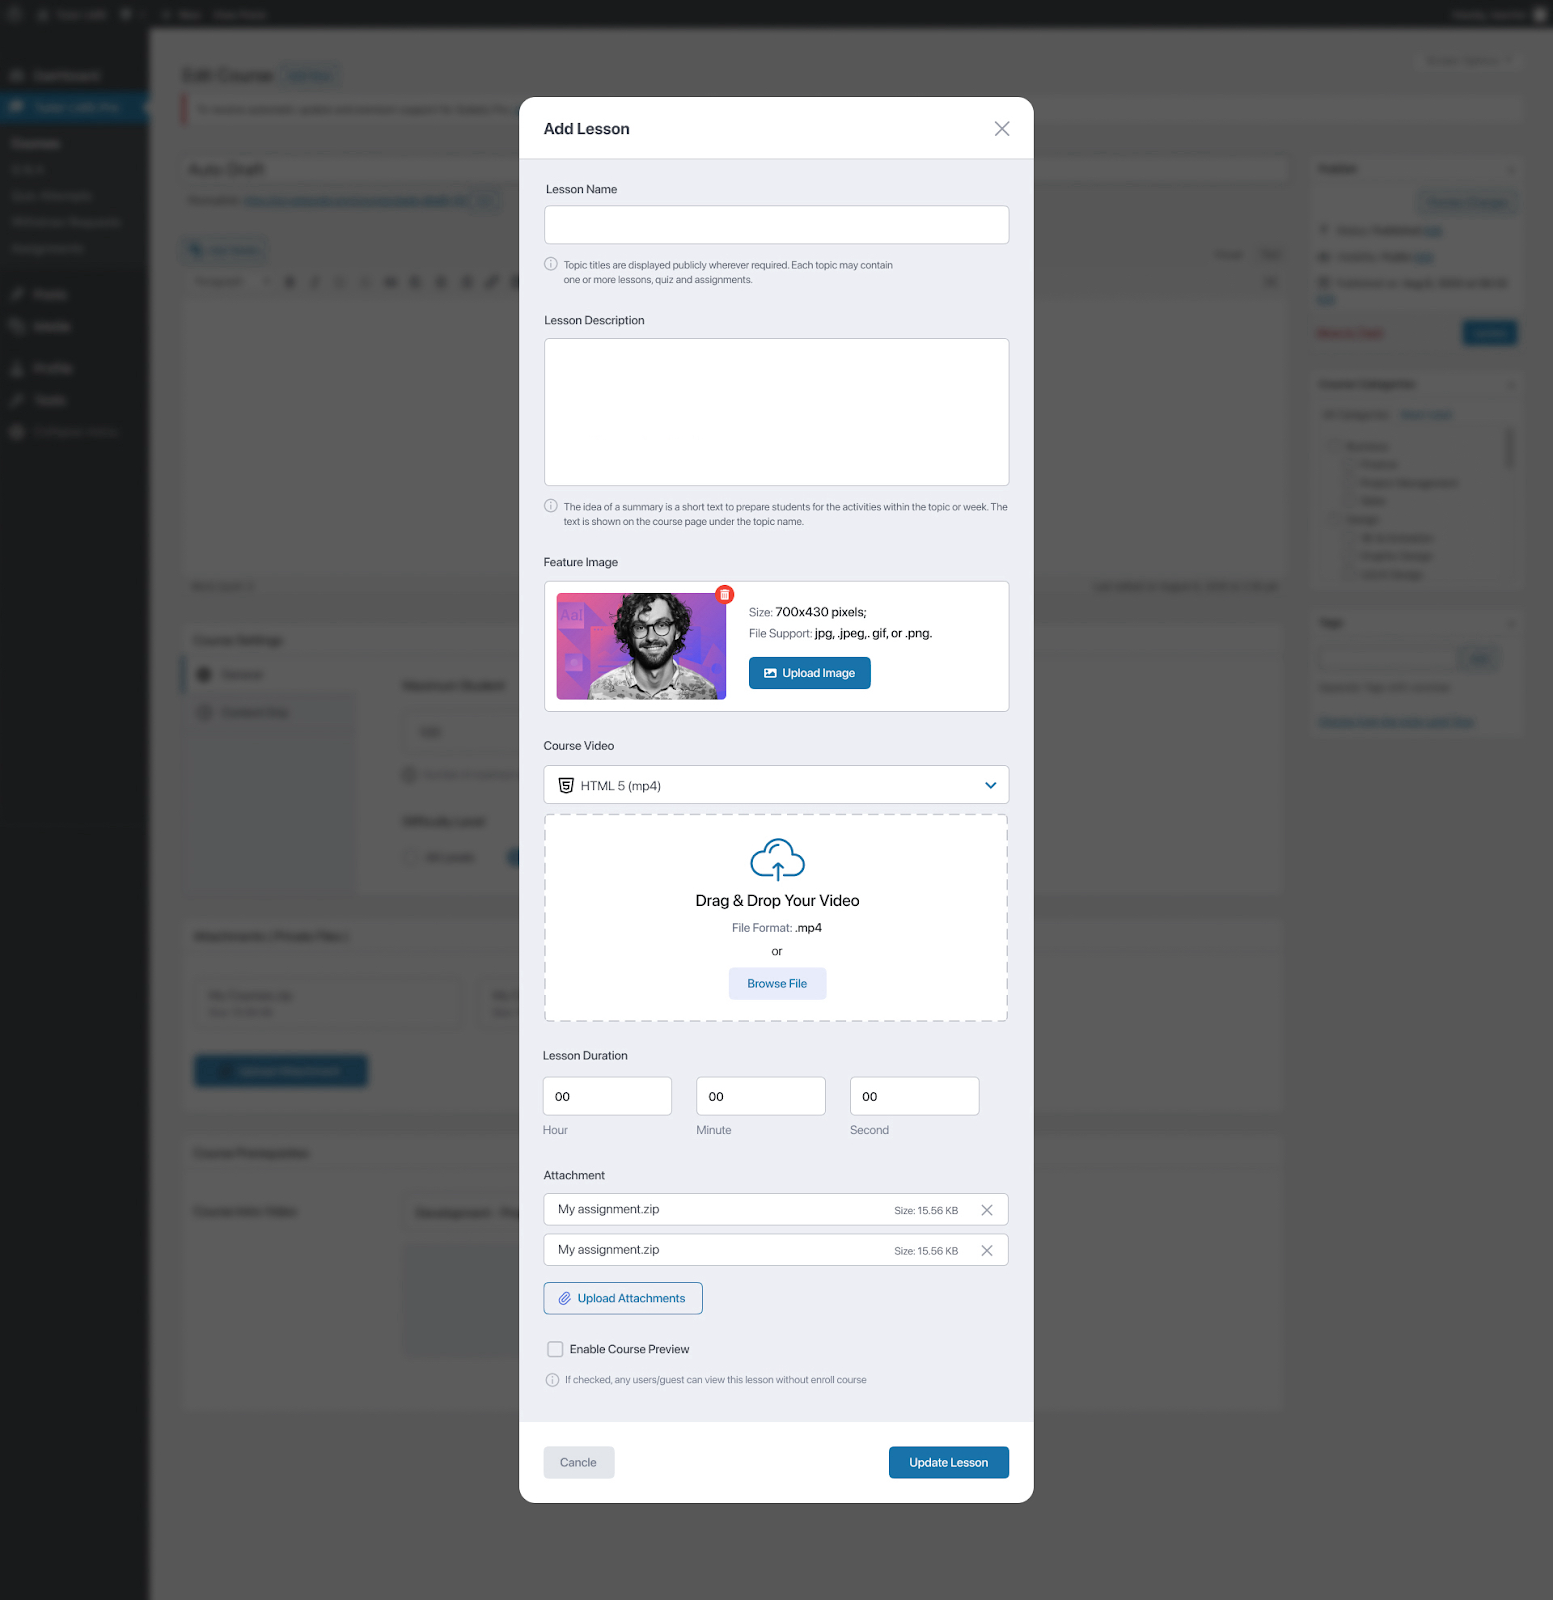
Set a lesson name, description, and image that defines your lesson best. You can add a video as well as other attachments to go with your lesson. Lastly, configure whether students can view this lesson without being enrolled in the course. This might help convince someone to enroll/purchase the course as they will know what they can learn from the course.
3. Quiz your students
After we have created a lesson, for evaluation we need to add a quiz. From the course builder beside the lesson button, we click the Quiz button to show the quiz pop-up menu.
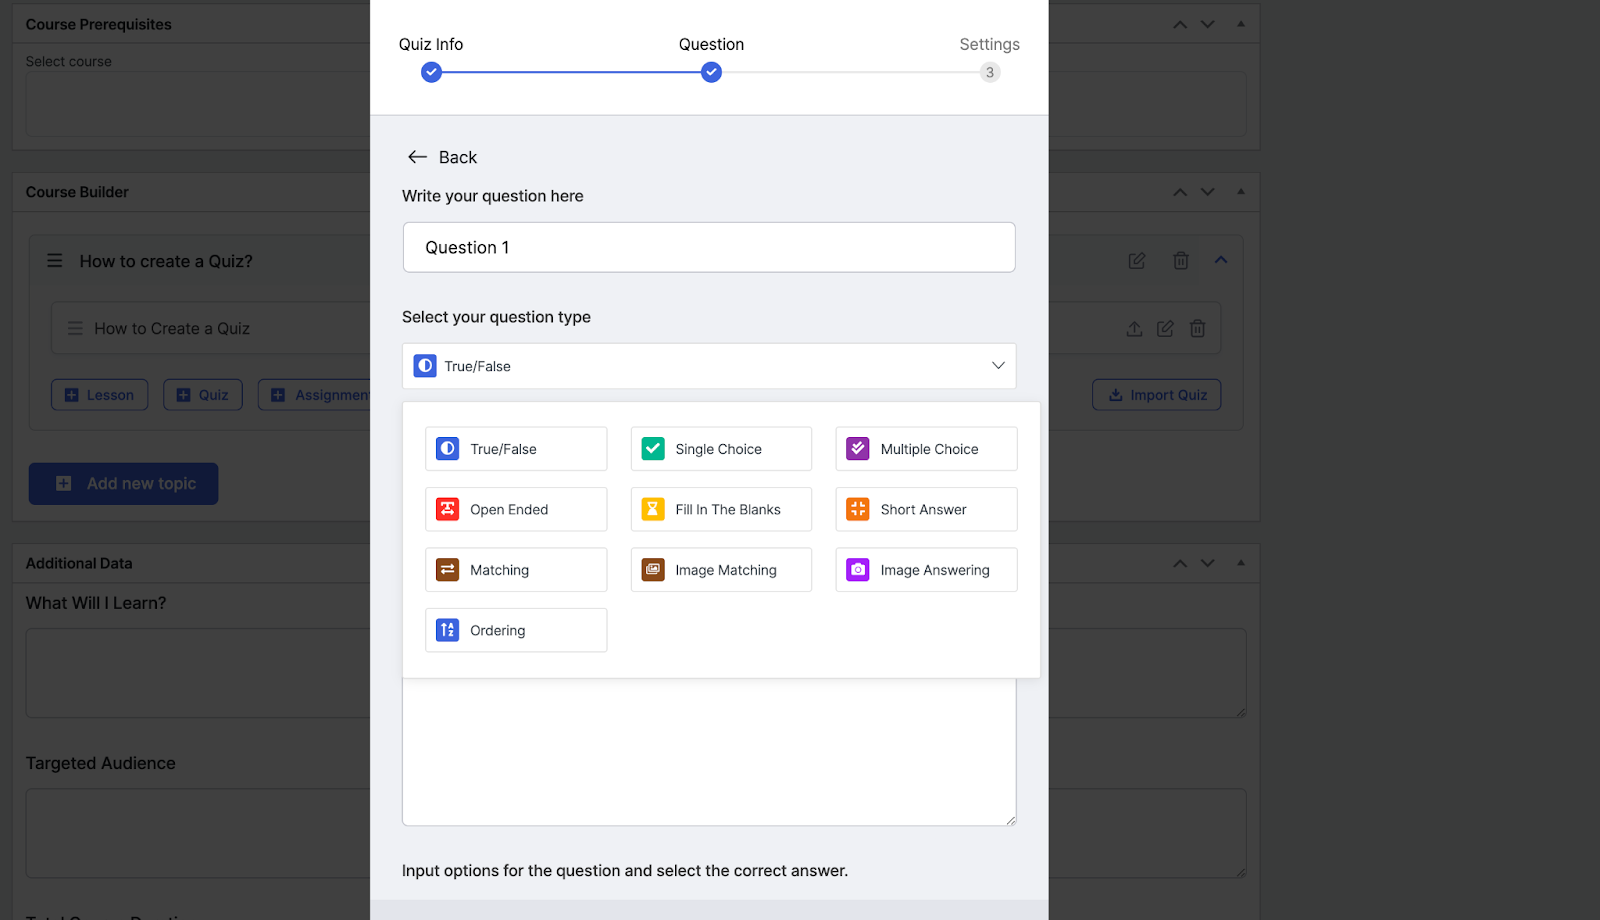
First, we’ll add a quiz name and description and hit Save & Next. The next tab gives the quiz question option where we configure what type of question we want to set for students. We then select the name of the question and access the drop-down Question Type menu that shows us all the different types of questions that we can set.
Some quiz types are locked behind the Pro version of Tutor LMS. But the free ones are enough for us to get the job done. The quiz builder has a lot of other extra settings as well for added customizability. Feel free to play around with them until you’re completely happy.
Step 4: Monetize courses
All of these provide you with different monetization options apart from the ones WooCommerce does. Do check those out if WooCommerce is not your cup of tea. For the sake of this article and initial setup, we are going to go ahead with showing how to integrate WooCommerce.
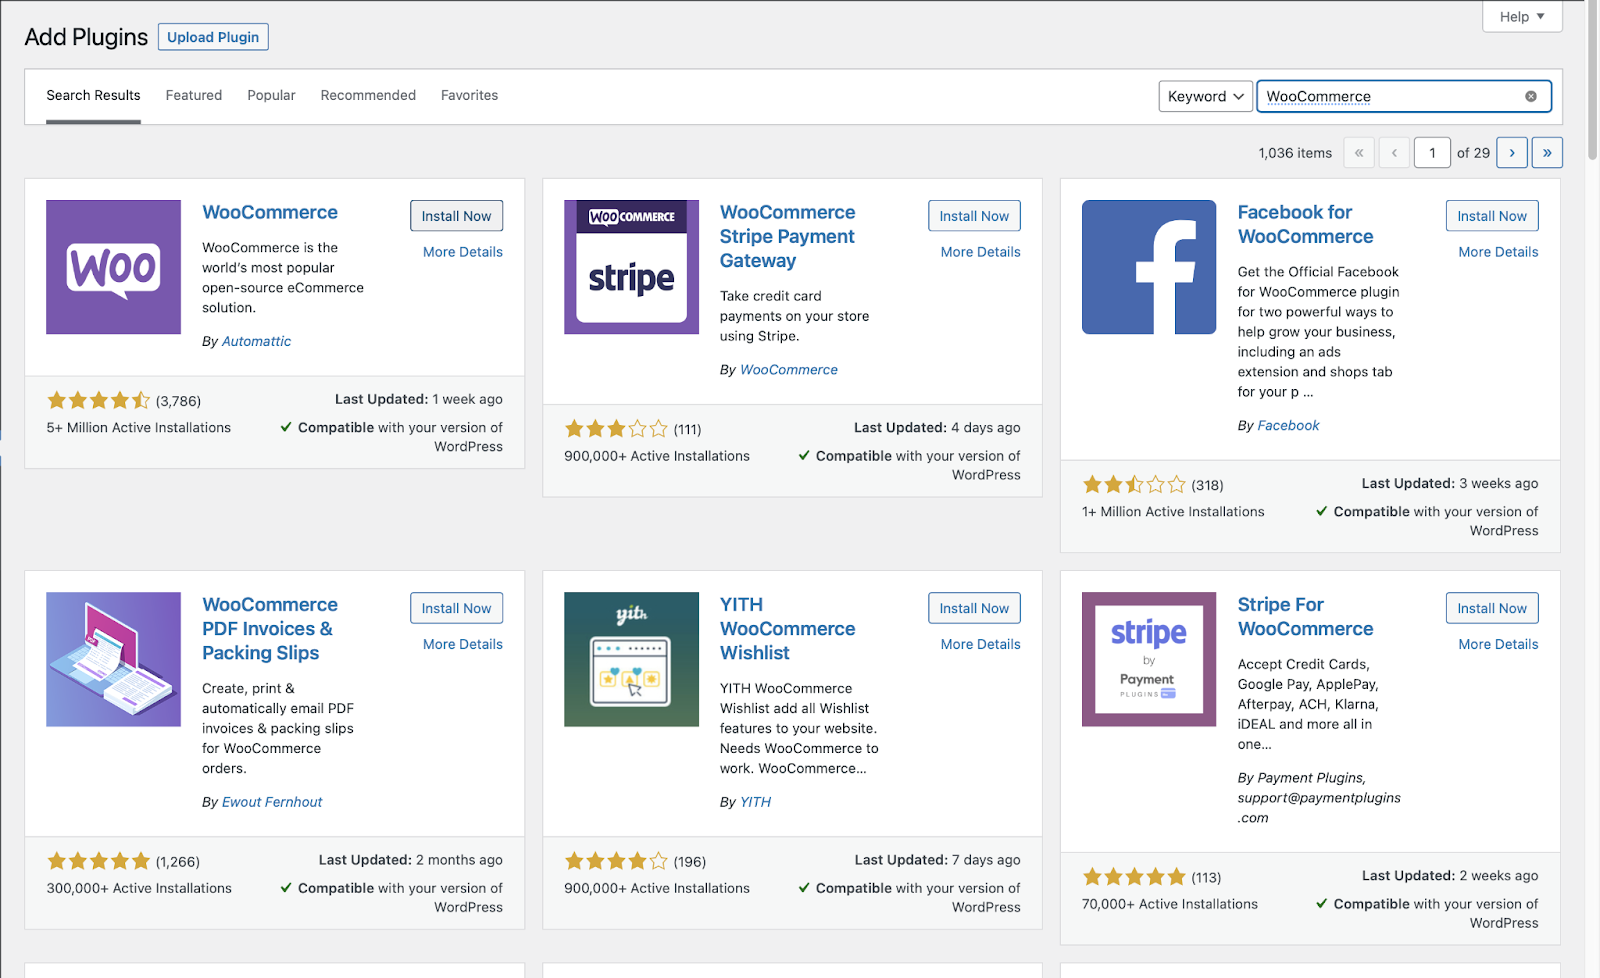
To enable WooCommerce you will need to download and activate the plugin from WordPress if you don’t already have it. Similar to the Tutor LMS plugin installation process, go to the Plugin menu of WordPress admin and search for WooCommerce.
Install and Activate WooCommerce before proceeding.
Navigate to Dashboard > Tutor LMS > Settings > Monetization > Enable Monetization.
Next, from the Select eCommerce Engine drop down make sure to select WooCommerce.
Great! We have activated WooCommerce for our LMS site. But how do we link the course to WooCommerce so that it can be paid for?
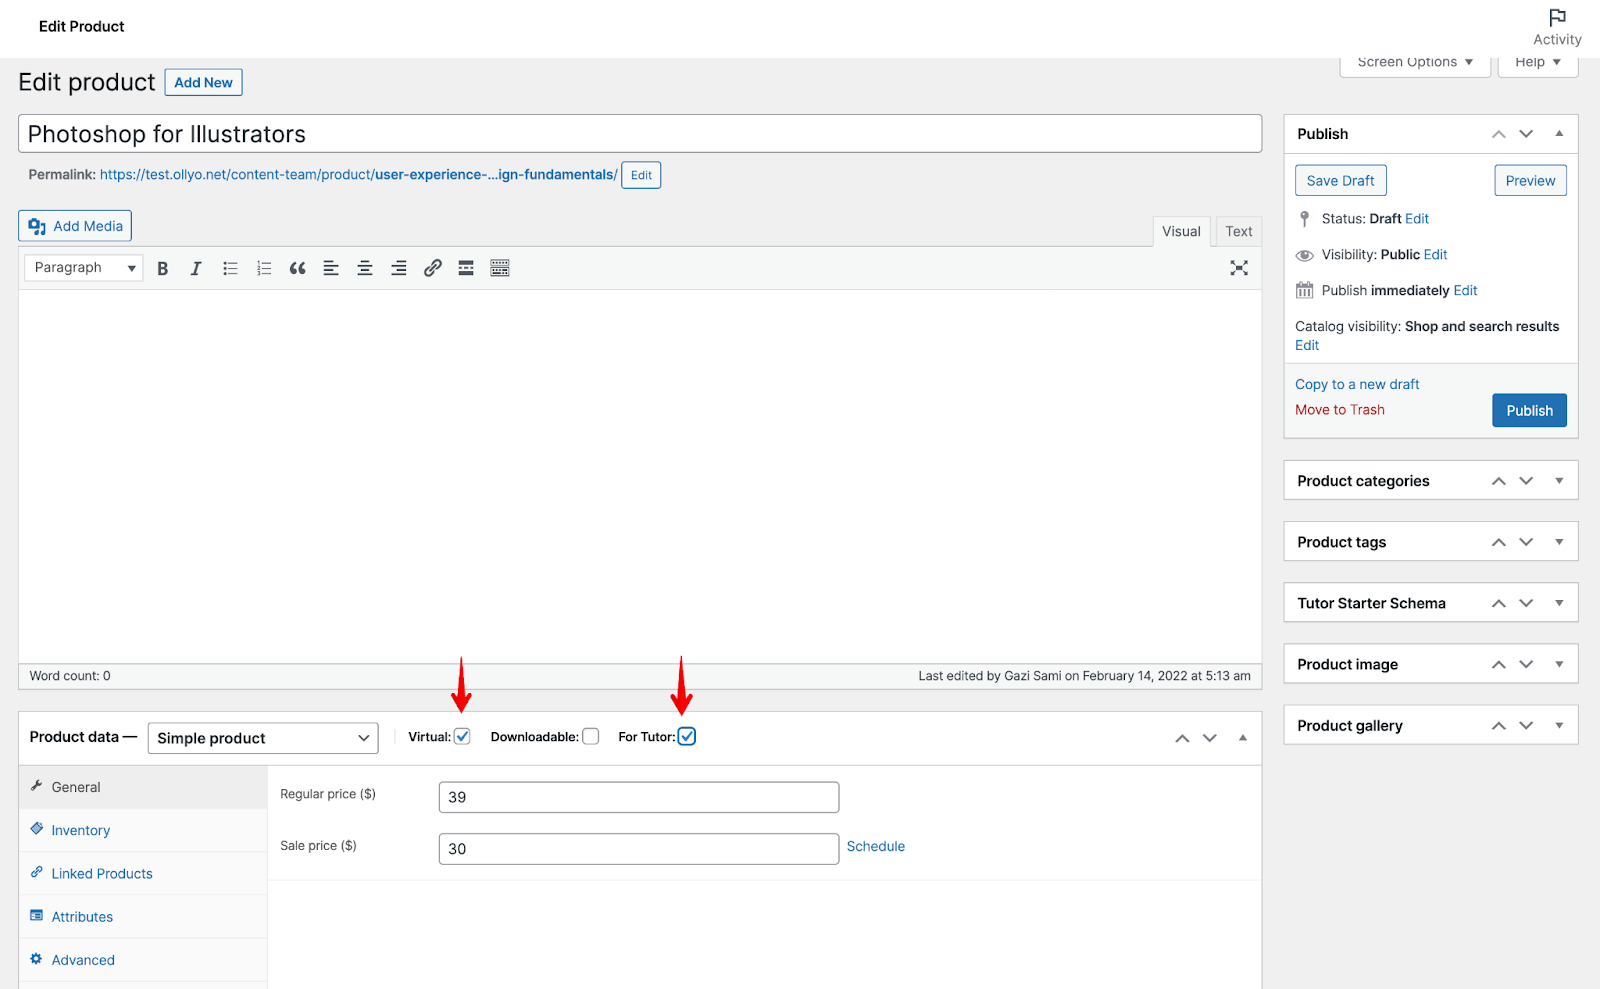
We need to first create a Product to sell through WooCommerce!
Go to the WordPress admin panel where you will see a new Product tab. From there we can add a new product. Set the type of product and select the two marked boxes. Finish the process by setting the price for the product. You can opt-in for a sale price as well if you wish.
One last task for us to do now. We need to go to the back end of the Tutor LMS course page and click on Edit Course for the course we want to monetize.
Scroll down and find the Add Product dropdown menu and select the product you just created.
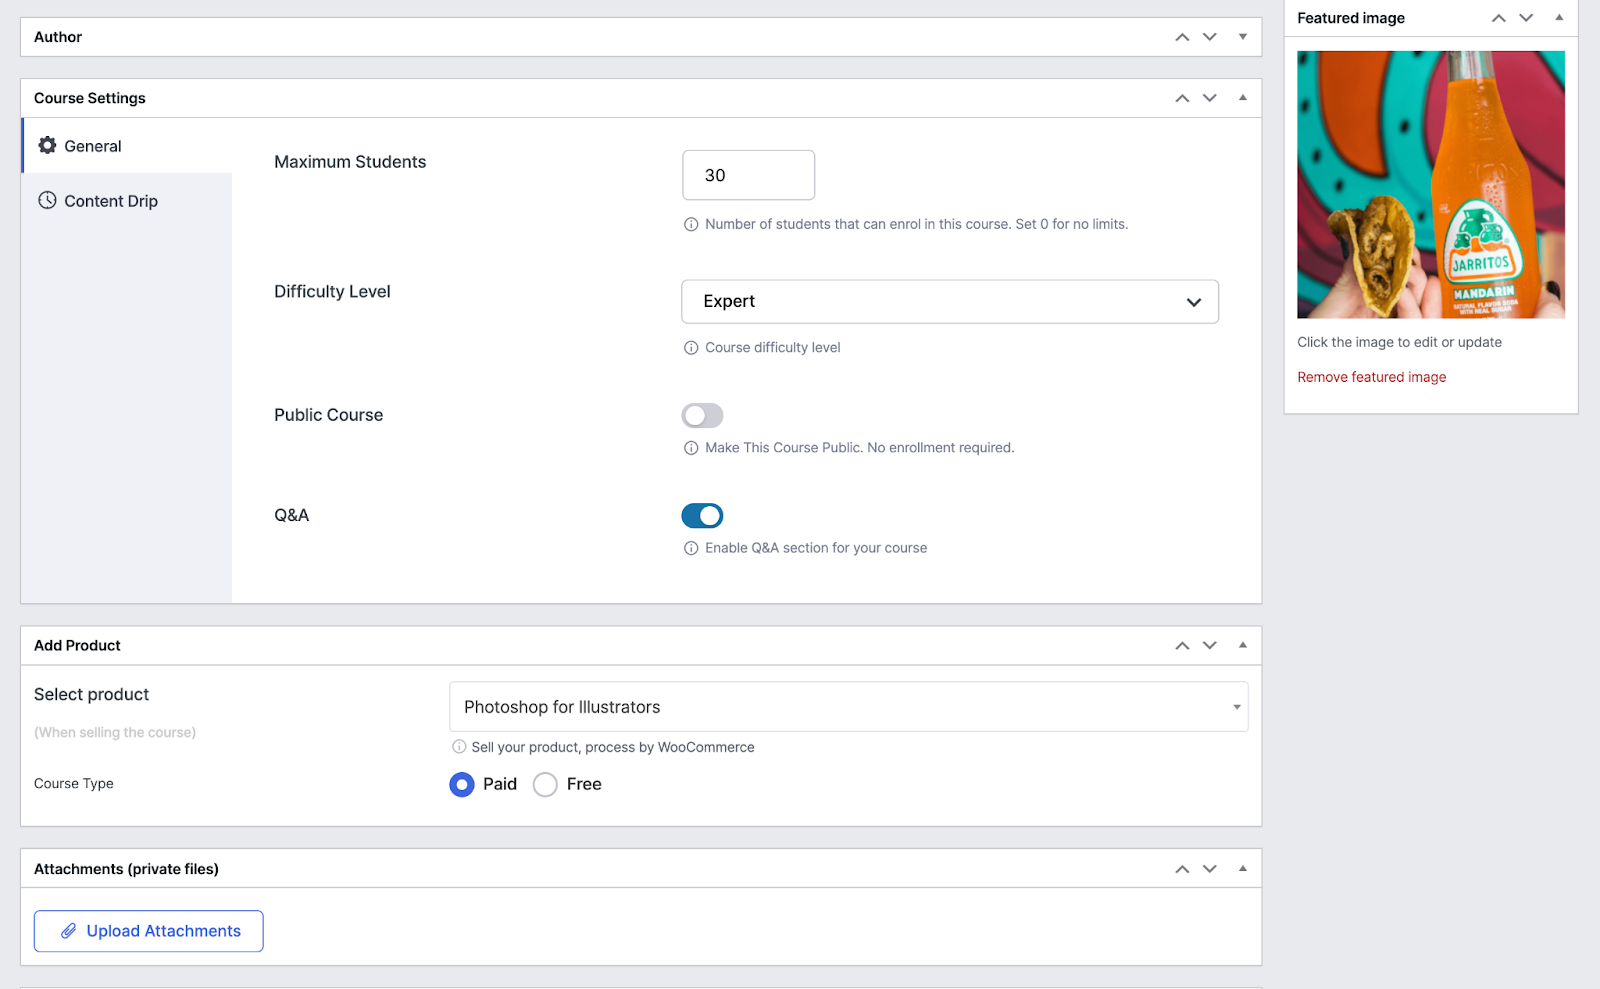
This tags your course with WooCommerce, select Paid in the course type and you can start generating revenue. Students can now purchase this product from your site.
Apart from WooCommerce, there are other monetization options, such as EDD, Restrict Content Pro, and Paid Membership Pro that work with Tutor LMS.
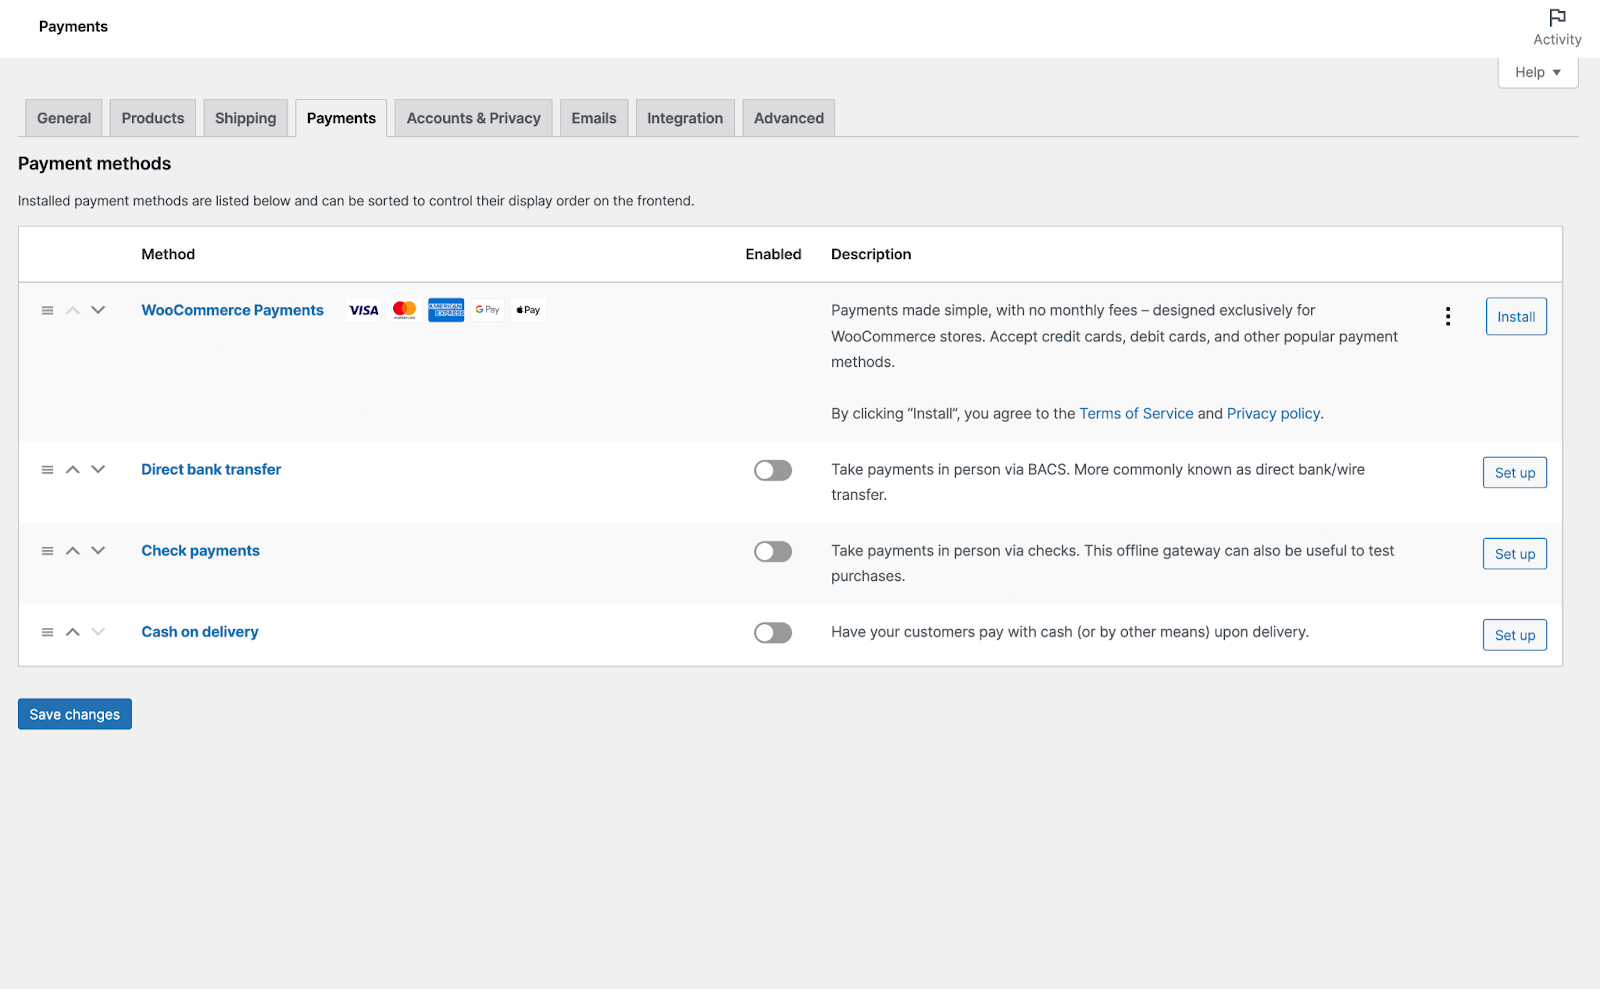
Payment methods
We have monetized our course, but how are we going to accept the money that comes in with every purchase?
For that, we go to WooCommerce Settings and navigate to Payments. Here we can see all the different types of payment methods.
For the next course that you want to monetize, just follow these steps to create a product first and then add the product to the course.
Ensuring and increasing further sales
We have the basic setup and pipeline for monetizing our courses through Tutor LMS and WooCommerce. But one-time sales aren’t going to keep our business up and running, we need to have a steady, stable, and constant flow of sales/memberships.
So how do we manage that?
A tried and tested method of getting attention and letting users know about your offers and products is email marketing. email marketing is a great way to reach out to your existing students to let them know about existing and future offers.
But here’s the next speed bump, you’re going to be having hundreds if not thousands of students enrolling in our LMS site over the months. How are you supposed to email them individually and keep track of it?
This is where FluentCRM comes in! FluentCRM is an email marketing tool that can help you market your online course through emails. You can send email campaigns, set email sequences, and automate your entire LMS course marketing while being supported by efficient email marketing data.

You can send one off email campaigns to inform students of offers and send lesson and topic updates through automated emails that will be sent at the exact time of your choice.
Not just that, you’ll get to analyze reports and make data-driven decisions on how to plan your next campaign for optimal success. FluentCRM is an easy to install WordPress plugin with simple instructions to use!
Creating a robust LMS site becomes a moot point if your marketing strategy is not up to par with it. Half of the work lies in creating the site and the other half in marketing. Email marketing and campaign management is an endless journey and something that you have to constantly stay at.
With all things considered, we wholeheartedly recommend FluentCRM to Tutor LMS users.
Wrapping up
With that, we are finally at the end of our LMS setup journey. Or are we? We have completed only one leg of the journey, the second phase is to make sure we can make our eLearning site popular and successful.
You should now have a good idea of how to start building and setting up your eLearning site and customize it. We have showcased the free version for Tutor LMS. The free version of Tutor LMS comes packed with a plethora of features.
But there are plenty of features hidden behind the pro version of Tutor LMS. You can look further into the prices of TutorLMS and FluentCRM if you want to expand your site further in the future.
As always, be sure to let us know your experience with building an eLearning site and reach out to us if you need any support. Sayonara!
-

Best Payment Gateway for WordPress: 7 Top Options Compared (2026)
Compare the 7 best payment gateways for WordPress in 2026. -
Recurring Donations in WordPress: Guide with Examples and Tips
Learn how to set up recurring donations in WordPress, and -

How to Start a Blog: A Beginner’s Guide for WordPress (2026)
Learn how to start a blog with WordPress. Step-by-step guide
Leave a Reply
You must be logged in to post a comment.