

A Smart Way of Adding Product Tables To A WooCommerce Marketplace

Are you an online business owner wondering why you can’t seem to get your sales up? The success of an eCommerce business greatly depends on the target audiences’ ability to go through the services being offered. Maybe what your website needs is the magic of a WooCommerce product table!
Right after WooCommerce came, it conquered all the websites in the online marketplace. Subsequently, the online merchants, business owners (small or large) soon saw their business booming. But there’s a catch! Customers don’t always feel comfortable with the grid format of an online store.
So, what’s the solution then? The answer is pretty simple. All you need now is a product table plugin for your WooCommerce items!
These are the contents we are going to cover-
- WooCommerce plugin
- What is a WooCommerce product table
- A table plugin with WooCommerce integration
- How to use it
- A recap
- Final verdict
Let’s start discussing the topics.
WooCommerce plugin
A WooCommerce product store is a place where online merchants showcase their products. But with the default plugin, the products appear in a grid format with image, name, price, and the add to cart button.
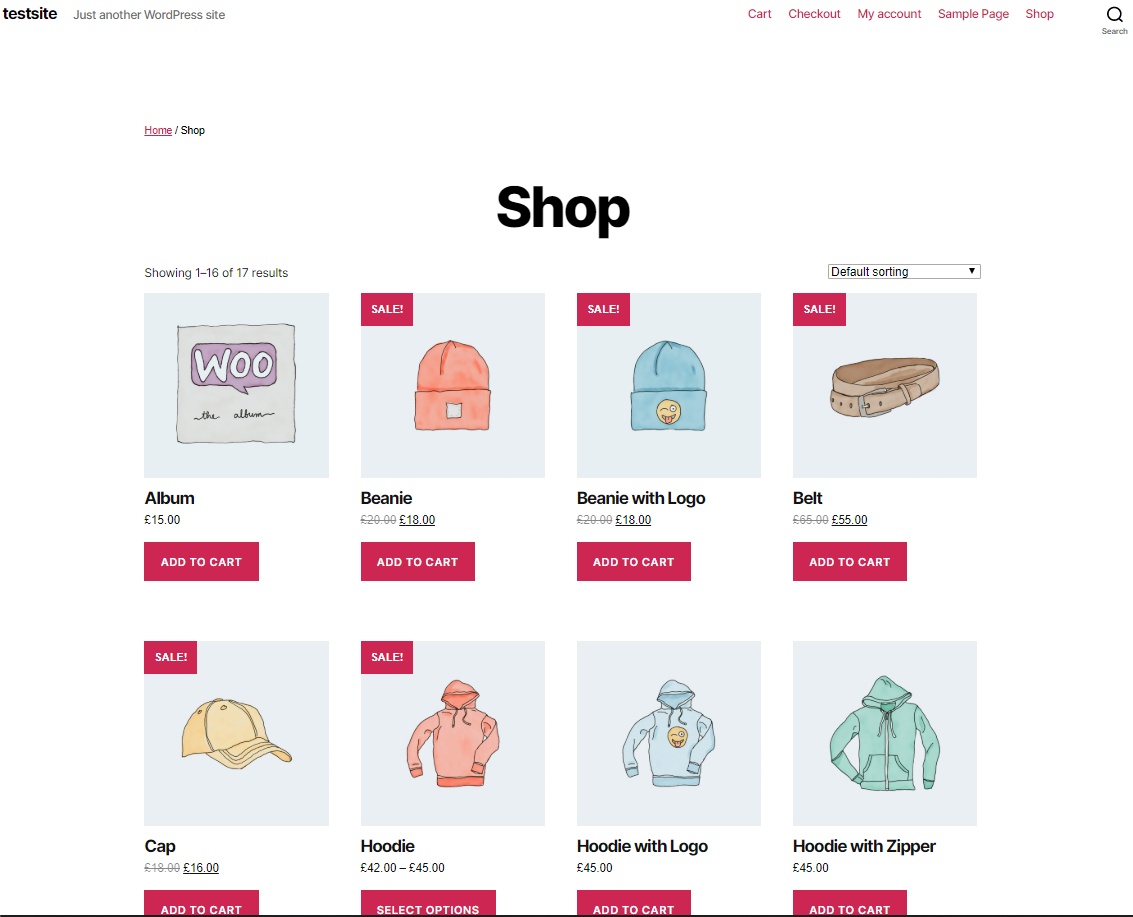
The storefront will have multiple blocks for each product with a medium-size image. Here is how the store looks. We are using dummy data for example.
If you think you can go for the basic WooCommerce grid-style product store, go to the “Plugin” option from the dashboard and click “Add new.” Install the one by Automattic and “Activate.”
Where did the products come from?
For a WooCommerce store with the plugin, you need to create products first. Go to Dashboard>>WooCommerce>>Products>>Add new. The image above is showing the store with dummy WooCommerce products that come with the plugin.
What is a WooCommerce product table?
You can’t create a table with products for your store with the WooCommerce plugin. It has a fixed grid layout to display all the products in your store, but the grid-style is not always optimal.
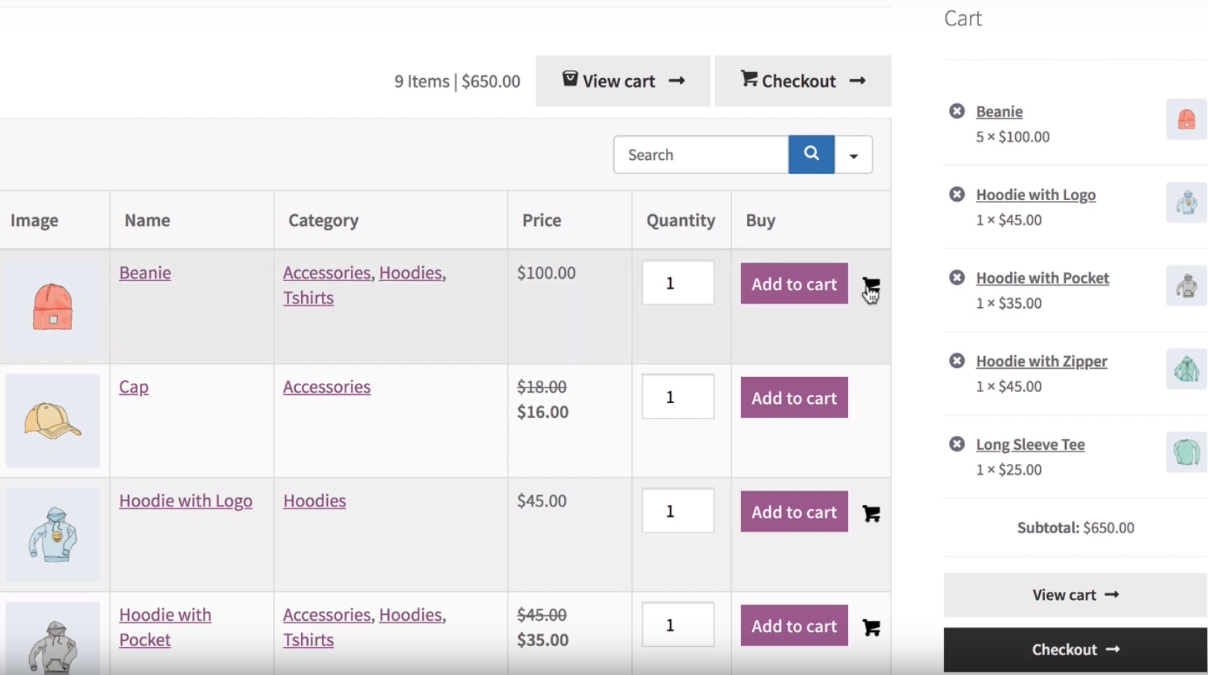
Integration with a table plugin is another scene where you create a product table with all the necessary details of a particular product.
As a result, details like image, name, price, stock, quantity, reviews, sale time, a short description, “add to cart” button, and many more information appear in a table layout.
You can already see the difference between grid and table format. Let’s elaborate on why an online store needs product tables.
If you want to arrange and display your online store in a way that attracts customers, having a product table is key.
A table plugin with WooCommerce integration
We will demonstrate how to add product tables to the online marketplace using a quality table plugin, Ninja Tables.
Integration with WooCommerce is only available in the Pro version of Ninja Tables. It’s one of the many features that make this plugin stand out.
Does it mean you don’t need WooCommerce plugin?
We have already mentioned that you do need the WooCommerce plugin to create a product table. After all, the products to show in the table have to be created with WooCommerce first. This is the thread to follow – WooCommerce>>Products>>Add New. We’ll get to that later.
How to add product tables in WooCommerce
Ninja Tables is the most dynamic and user-friendly among all the table plugins. Moreover, its extensive list of features is easy-to-follow for all levels of users. Moreover, the WooCommerce integration places Ninja Tables among top-5 plugins!
Here’s how Ninja Tables helps to create an interactive product table.
- Installing and activating
- Creating products
- Creating products table
- Table options
- Final results with Ninja Tables
Installing and activating
First of all, to create a product table with Ninja Tables, install and activate both plugins in your WordPress and upgrade Ninja Tables to Pro.
Creating products
Now you need to create the product with all the information you want to show on your table. Select WooCommerce>>Products option from the dashboard.
Go to the “Product” option. You will see a page like the following image-
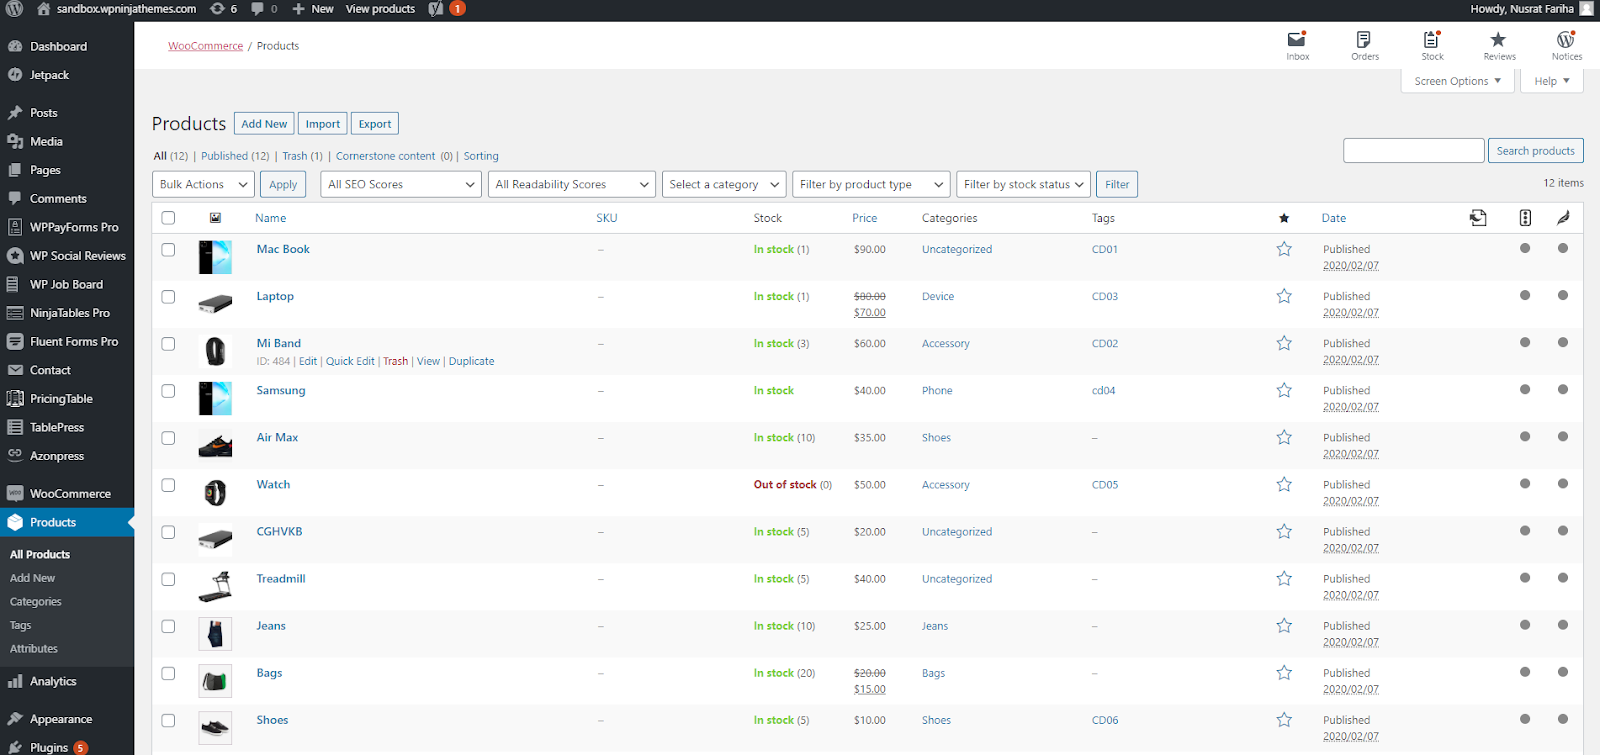
Click on “Add New” to create a new product. We have a list of products ready for this illustration. Here is how it will go.
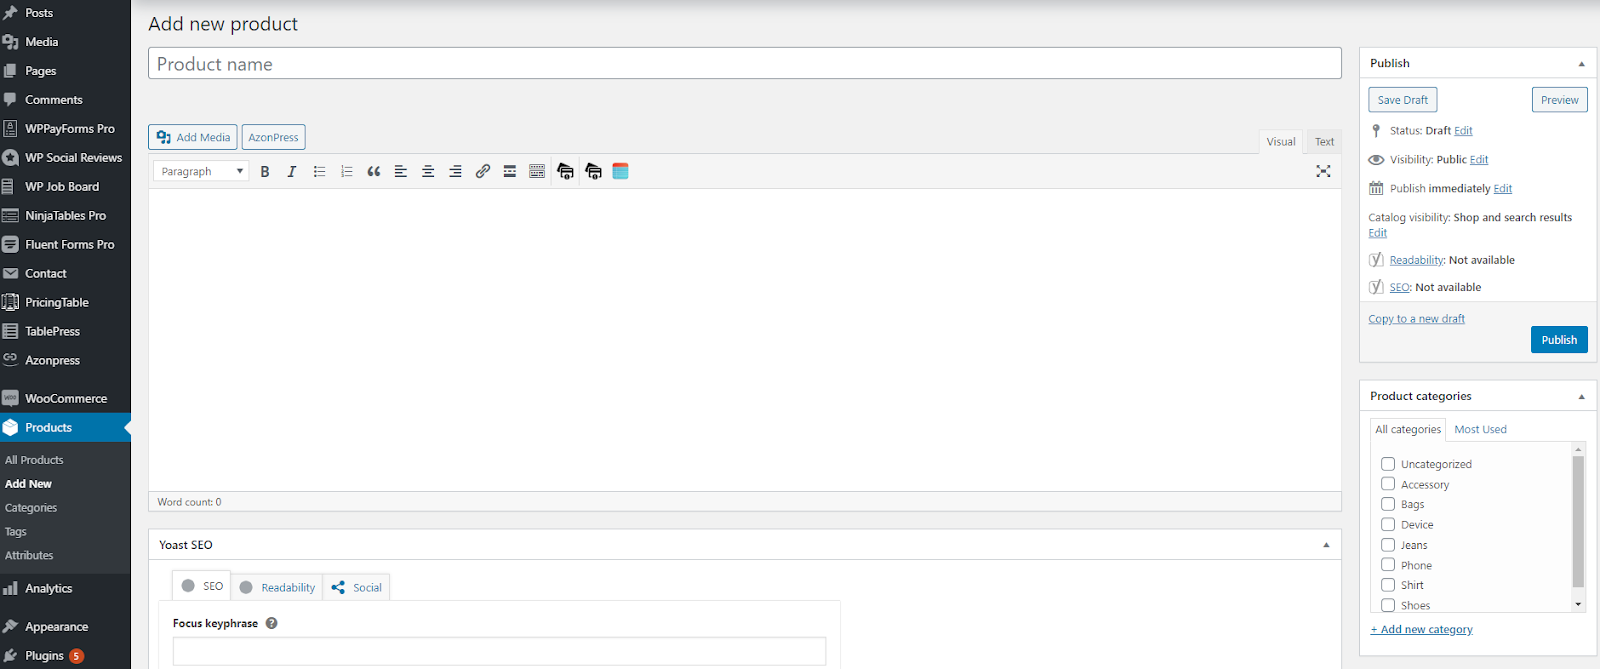
You have to add the “Product name” first, then you can choose the “Category”. The screenshot below shows a product’s primary data for a product table.
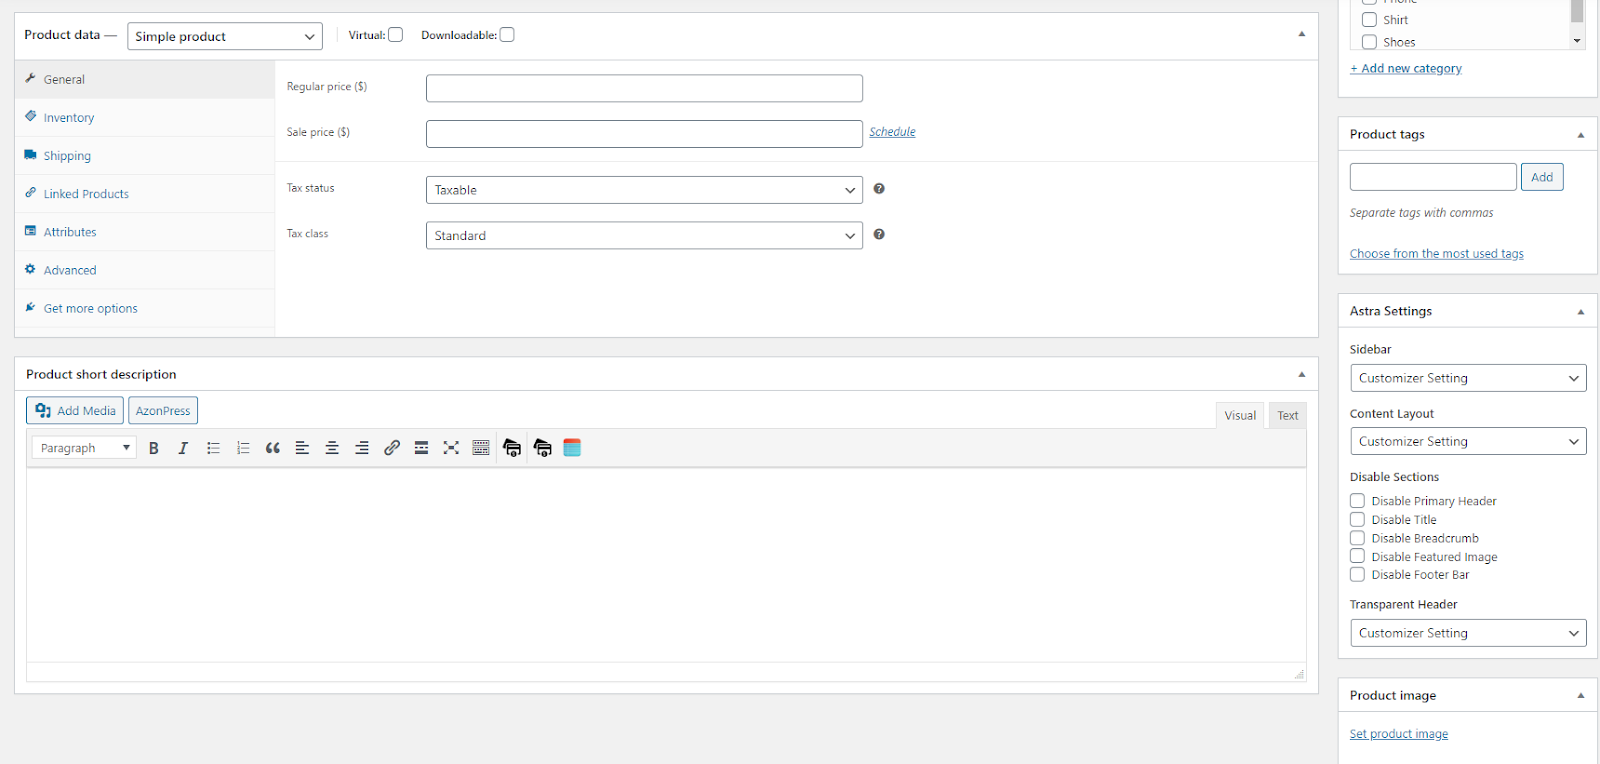
Here’s what it says-
- Product data: Set the product type. Select whether it’s simple, grouped, external/affiliate, or variable.
- General: Input your product price, regular or sale. If the product is on sale, then click on “schedule” to set the timeline. Then add the tax status and class.
- Inventory: “stock status” is to show whether or not your product is in stock.
- Shipping: Set the weight and dimension of the product for shipping. You can also add shipping class.
- Linked products: It’s a great feature because you can link the products that are “upsells” and “cross-sells” for more business.
- Attributes and advanced options: Add product attributes from the “custom product attribute” bar. And in the “advanced” option, add a simple purchase note for buyers.
You can’t expect your products to be eye-catching without a featured image. Once you select it, the image will show up in the table. Add tags if you want to select products by it.
Creating product tables
After you create products, it’s time to create the table! To make it happen, go to “Add Table” from Ninja Tables and select the “WooCommerce table”. You will get a different layout than basic tables.
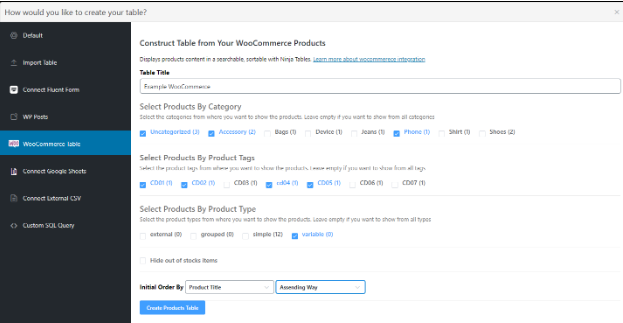
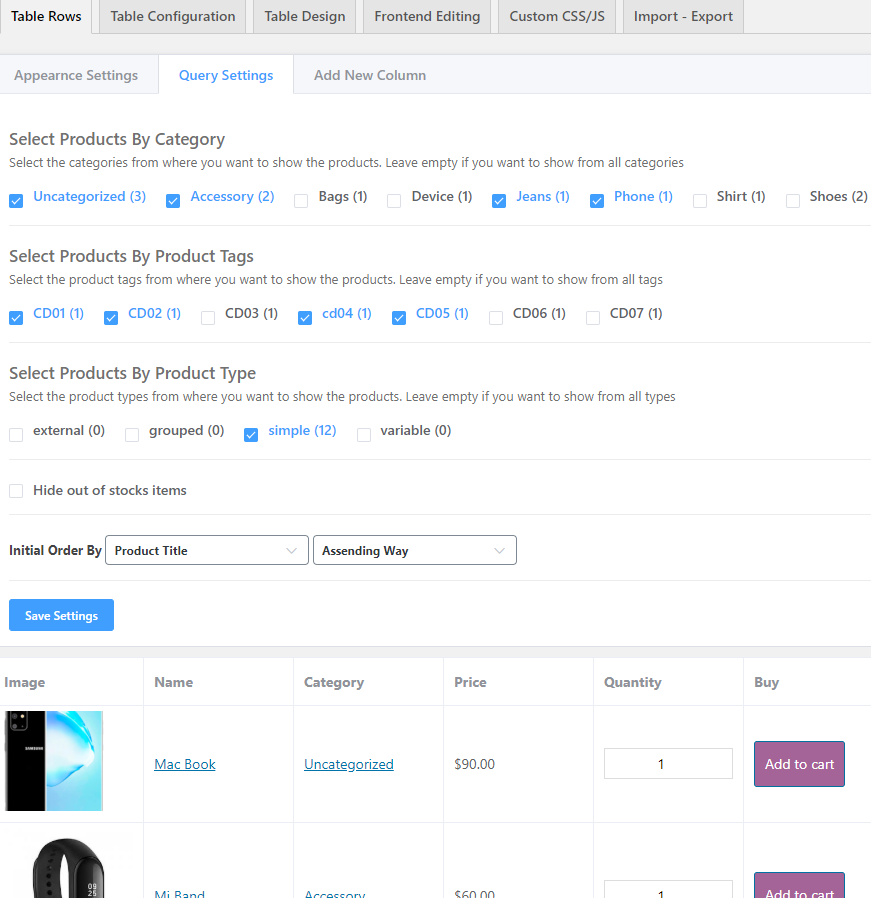
Since we had our products ready, we selected these options for demonstration purposes.
Here, we named the table first, then selected products by product category. After that, chose them by tags, type, and finally, set the order.
You can enable “Hide out of stock” items if you don’t want them on display. Now, click “Create Product Table”.
Here is the result, and as you can see, the product information is all in one place sequentially. So, buyers don’t need to click on the product to open another window like in grid style.
Table options
You can see there are some customizable options. Before we go through all these, you should know that some of these are Pro features. Let’s dig in.
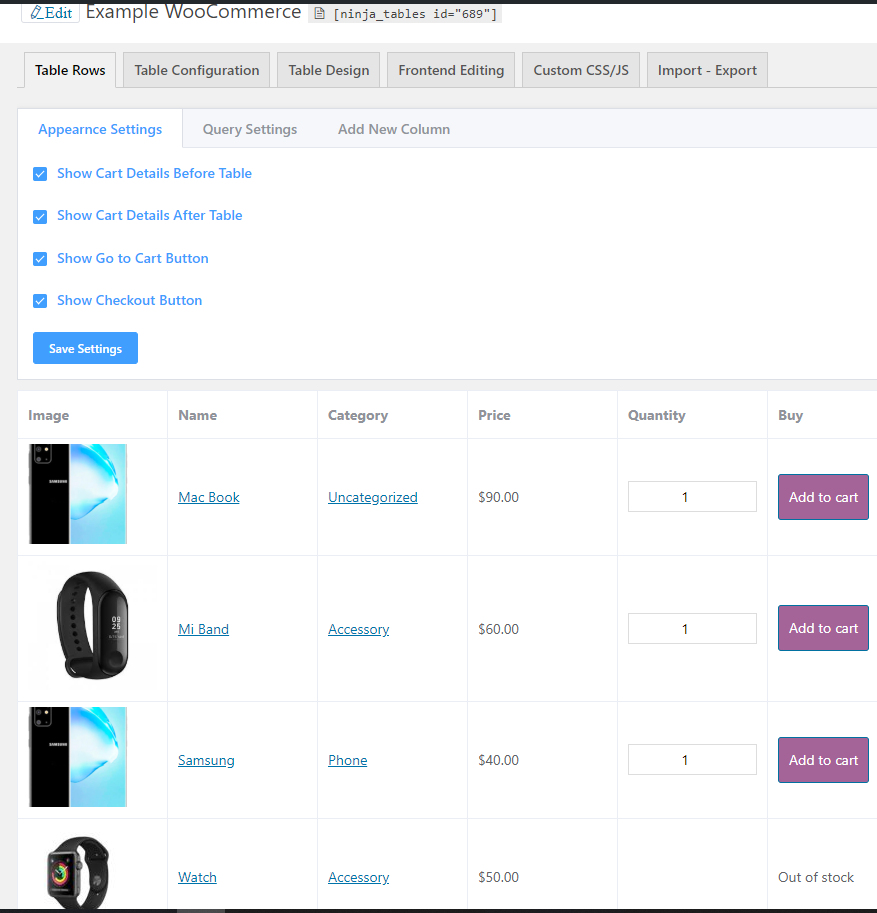
Table Rows
This part has three distinct table editing options.
- Appearance settings: There’s a dropdown with four more options about cart details and cart buttons. You can either choose to show the cart details before or after the table contents. Similarly, you can choose whether or not you want to show the “go to cart” and “checkout” button.
- Query settings: You can edit all the options you selected while creating the table. If you wish to add more products, simply select other tags and “save settings”.
- Add a new column: If you have created a table with Ninja Tables, this option doesn’t need further explanation. You can set the column name, data type, responsive breakpoint, field type, and the field value.

Table Configuration
The table configuration process is the same as in any regular table in Ninja Tables. You can edit-
- Columns: For instance, the columns of this table we’re demonstrating have image, name, category, price, quantity, and buy. As usual, you can edit the “Basic settings,” “Advanced settings,” “Conditional formatting,” and “Transform value.”
-Basic settings give you another chance to edit the column name, data type, etc.
-For advanced settings, add extra classes, max-width, text and content alignment, disable filtering and sorting, colors of column background, and text.
-Conditional formatting and transform value are for changing appearance based on a cell value and concat the column values into HTML.
- Rendering settings: You will see three new terms here – Table render, Legacy table, and Ajax table. Use Legacy Table to render the table from the side. Use Ajax table to load a huge data table. You can enable “Full HTML Cache” too.
- Custom filters: Select box/radio button with this option and show a group of rows from your table.
- Buttons and language: This option has CSV/print buttons. Similarly, lets you set the language of empty result texts, search box placeholder text, and dropdown heading.
Table design
This feature is the most dynamic and the most exciting one of Ninja Tables Pro alongside the WooCommerce integration. Select from three different library styling (Semantic UI, Bootstrap 3, and 4). You can select color scheme, pagination, search bar position, sorting, and many more.
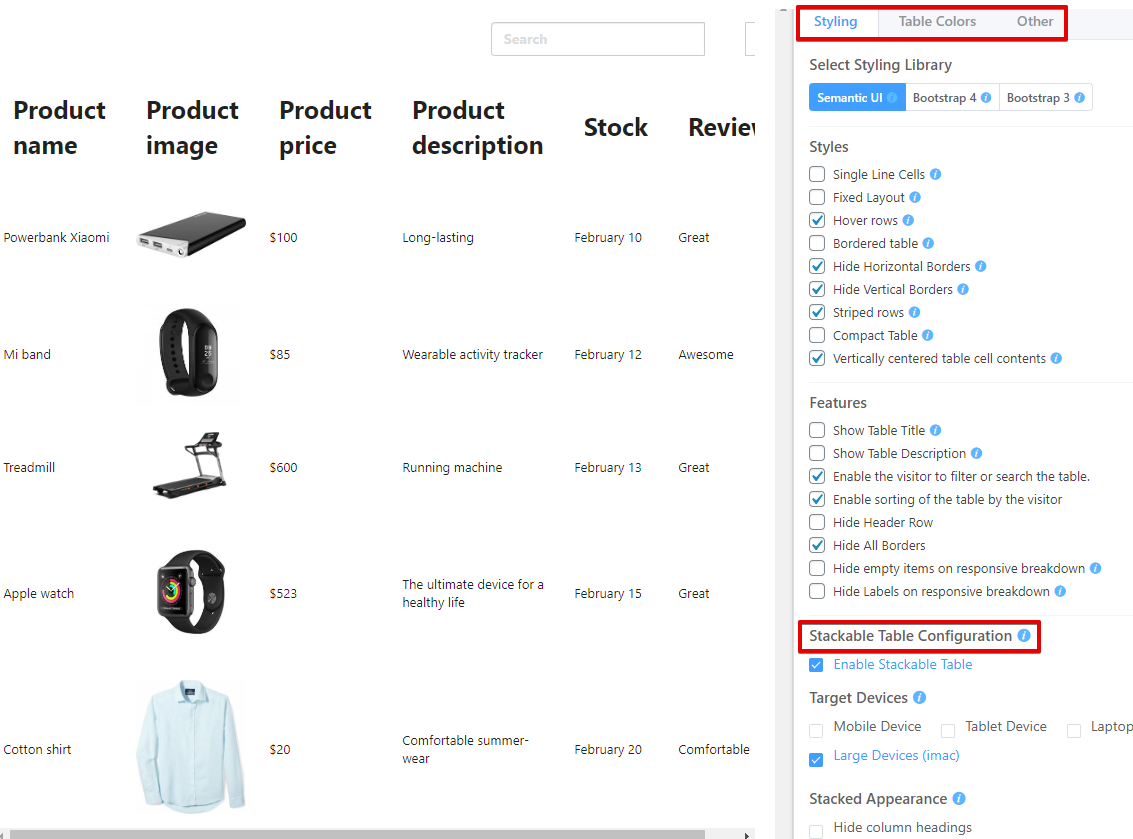
There’s “Stackable table configuration” at the bottom of all library styles. It lets you decide what device screens you want your table to fit.
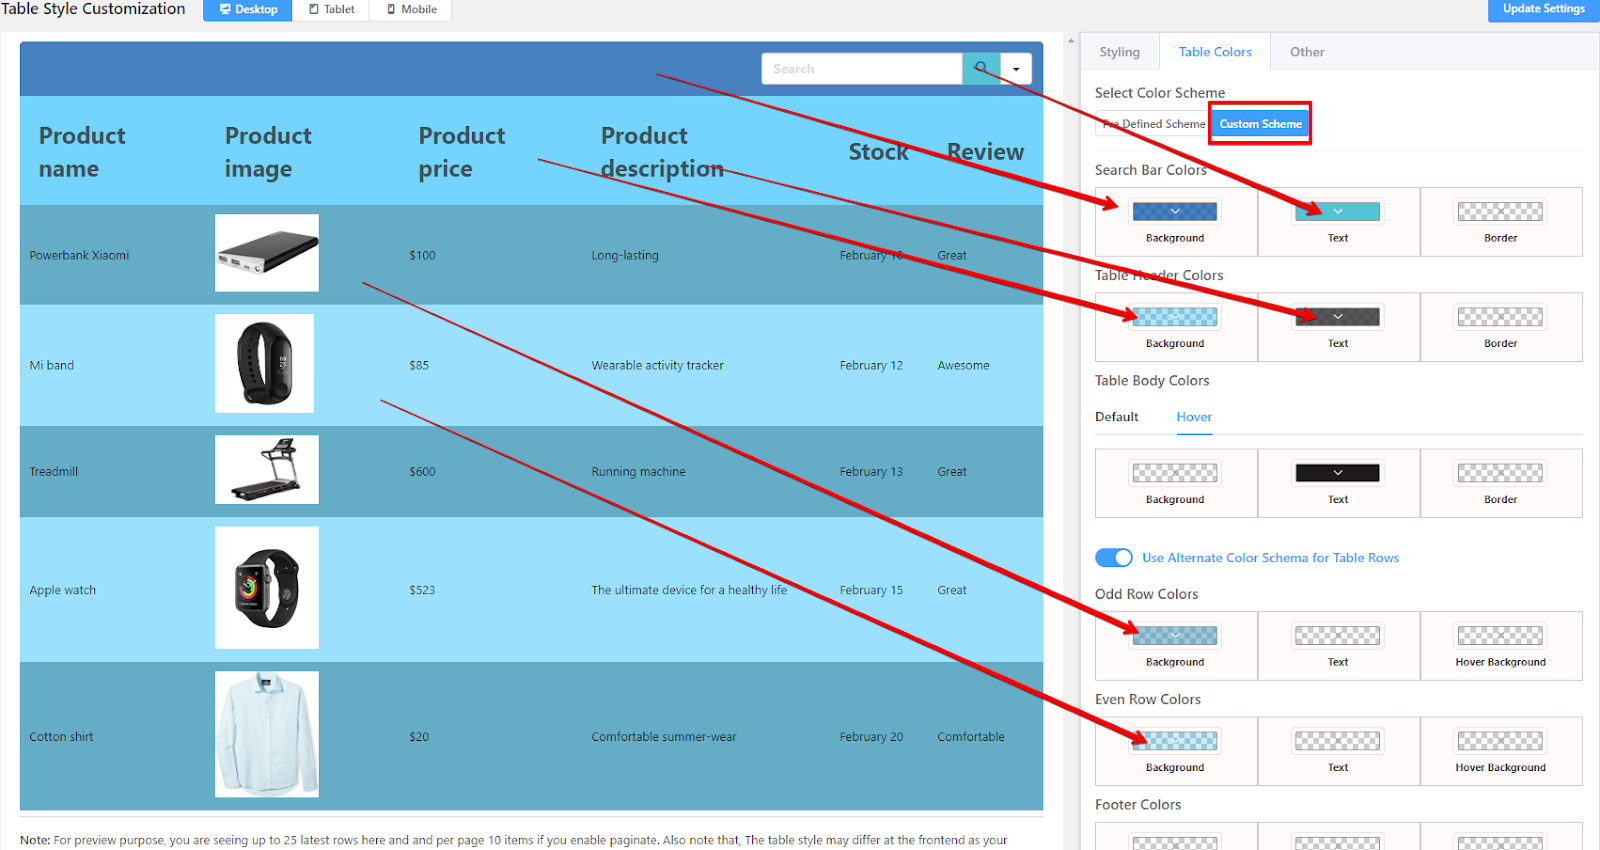
Let’s take a bit more time with “Table colors.” The custom color scheme lets you add any color to your table and alter them among the rows, as you can see in this product table example.
Frontend editing
After enabling frontend editing, you’ll get data from users and modify. You can specify user roles as well. It’s a Pro feature though.
Custom CSS/JS
Customize the CSS class for your tables. Add footable parent ID as CSS selector prefix and add a valid Javascript code to run.
Import-Export
Browse CSV or JSON files and choose the file to import. While exporting, you will select the format of the file.
Final WooCommerce product table with Ninja Tables
Making all the edits and updates and then forgetting to save the setting is a blunder you don’t want to make! You will get to see your final table clicking the “Preview” button from the top right. Here is another product table example using vibrant colors.
Surely you can see how appealing it looks, making product hunting easy on the eyes.
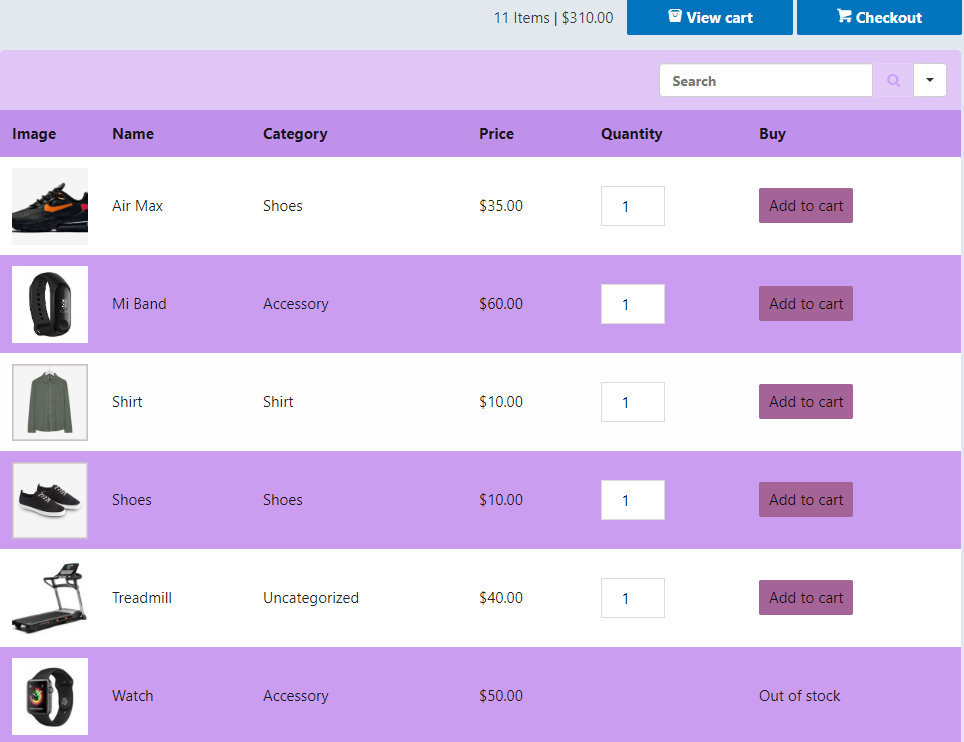
It doesn’t matter what absurd amount of data or columns you want to add, all of it will show up on the table. “View cart” option will display the products you added to cart, and if users “Checkout”, they will be redirected to a page with billing details. There, they can enter a coupon code if you offer any.
Check out more about Ninja Tables WooCommerce integration.
A recap
Our aim was to offer you an easy way of adding a product table to the online marketplace. Sure, there is a default WooCommerce plugin to make a grid-list for online merchandise.
However, you can choose from the WordPress table plugins to create a product table for your online store that is beautiful, intuitive, and much more user-friendly.
Several table plugins have integrations with WooCommerce, but we recommend Ninja Tables.
It is one of the best plugins that offer dynamic product table creation facilities so that users can create, configure, & customize tables. Scroll up again to see how incredibly user and customer-friendly it is!
Final verdict
If you decided to read this article, chances are, you were looking for a better way of adding product tables to your WooCommerce website. We hope this discussion helped you decide whether to go for a table plugin with WooCommerce integration or from the core plugin alone.
But if we are to suggest, we’d say jump in the online marketplace with Ninja Tables WooCommerce product table plugin. It will make your work easier, make your product tables more user-friendly while allowing you to give it a touch of personality!
While you’re thinking it over, we should tell you that Ninja Tables LTD is running a massive discount (Upto 49%) for a very limited time. So, hurry up and decide to grab this table plugin.
*Prices will NOT be lower than this, even for BFCM.
-

How to Add Code Snippets in WordPress: 100% Free Guide
Learn how to add code snippets in WordPress safely and -

FluentHub MCP: Run Your WordPress Business Right From Your AI Chat
Use FluentHub MCP to connect WPManageNinja products with AI agents -

How to Embed Social Media Feeds on WordPress Websites (No Code)
Learn how to embed Instagram, Facebook, TikTok, and YouTube feeds
Leave a Reply
You must be logged in to post a comment.