
A Beginner’s Guide to Ninja Tables

A table in your WordPress website is a great tool for presenting information in a visually appealing and logical way for your audience. Readers have easy access to the data they need because tables highlight the relevant information.
But when it comes to showcasing data tables in WordPress, you’ll likely have to create everything manually- using raw HTML and CSS to make everything look good.
You can use Gutenberg’s block editor, but it’s not the most convenient.
People want simple solutions for creating tables in their WordPress blogs. And WordPress table builder plugins come with the necessary features.
Why You Should Use Table Plugins
Table plugins let you create excel-style tables on your website. You can create a table comparing products, showcasing various information, and managing a huge data load in an organized manner.
These plugins have features including drag and drop, filters, sorting, pagination, responsive design, styling options, media support, and import/export functionality.
You can improve your user’s experience by displaying a wide range of data faster and more efficiently with a table builder plugin.
Most table plugins available are mobile-friendly and offer a responsive design, a much-needed aspect for a fast website. You can easily add tables with a shortcode! A preview button is often included in WordPress table plugins that let you see how the table will look on your website before it’s live.
You should always compare and consider your needs when choosing a table plugin.
If you need a pricing table, then pick one that allows you to create tables with CTA buttons and showcase media into them. If you need to gather basic information from a table, select one that offers a useful layout.
And if you want a simple yet efficient WordPress table builder with every feature you need, go for “Ninja Tables”! It’s one of the most user-friendly table plugins out there with multiple integrations.
“We love Ninja Tables for its powerful features, intuitive user interface, and the ability to display complex data tables in a user-friendly format”
Donald Chan, founder of marketing tech blog MarTech Wise.
A checklist of our topics-
- Introduction to Ninja Tables
- Free features
- How to install
- Plugin interface
- How to create tables
- Pro features
- Demo for beginners
Introduction to Ninja Tables- Best WordPress Table Builder Plugin
Ninja Tables plugin is a mobile-responsive table plugin that includes a variety of features. With Ninja Tables, you will find the solutions to all the problems you face while creating tables for your WordPress website.
Here is a quick video about Ninja Tables.
This dynamic table plugin gives you a wide range of options for creating WordPress tables, so you can use them however you like. It comes with the most advanced frontend table styles and customizing options as well.
Your WordPress table can be designed any way you want without a single line of code!
Even if your online table contains thousands of rows of data, it won’t affect the performance of your website. You can quickly and easily create and manage tables from the admin panel.
The best part of Ninja Tables? It offers a free version. You can use and test it yourself. This version offers more than just the basic features, while the pro version will definitely allow you to access more advanced options.
Key Features of Ninja Tables Free Version
Ninja Tables free version offers basic functionality to start creating tables right from your dashboard. Here are the key features of the free version:
- Responsive breakpoints table for any device
- Easy export-import option
- Editing basic column settings
- Fluent Forms and Ninja Charts integrations
- Multiple data types for columns
- There is no limit to the number of columns/rows and the amount of data entry
- Fixed layout, hover rows, and single-line cell
- The table and rows are bordered and striped
- Creating compact tables
- Toggle position and extra CSS class
- Ajax table rendering setting
- Library styling options (Semantic UI, Bootstrap 3, or 4)
- Stackable table configuration
The free version of Ninja Tables comes with multiple benefits. Especially if you are just starting in WordPress customizations, the Ninja Tables free version is ideal for beginners.
If you want a full free vs paid version comparison, dive into Ninja Tables Free vs Pro.
How to Install Ninja Tables
Ninja Tables free version is available in the WordPress directory.
You can also install it from your WordPress site dashboard.
- Go to the “Plugins” section.
- Click “Add new”
- Find Ninja Tables in the search box.
- Click the “Install Now” button.
- After installation click “Active Now”. It will automatically activate Ninja Tables in your plugin dashboard.
Check out why Ninja Tables is the best table plugin for your website if you’re having second thoughts!
Ninja Tables Plugin Interface
After installing Ninja Tables for the first time, here’s how you can create a table in a minute!
Find your newly installed Ninja Tables on the left in your WordPress dashboard.
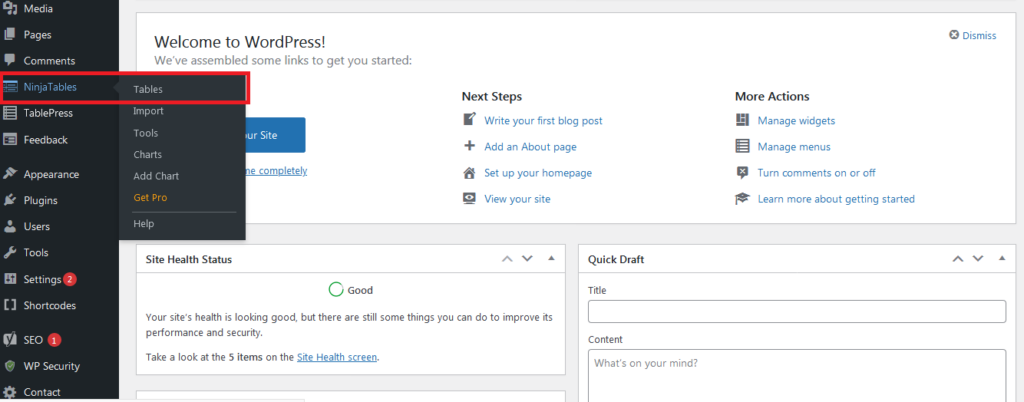
Click on the plugin’s name to get the “All Tables” area.
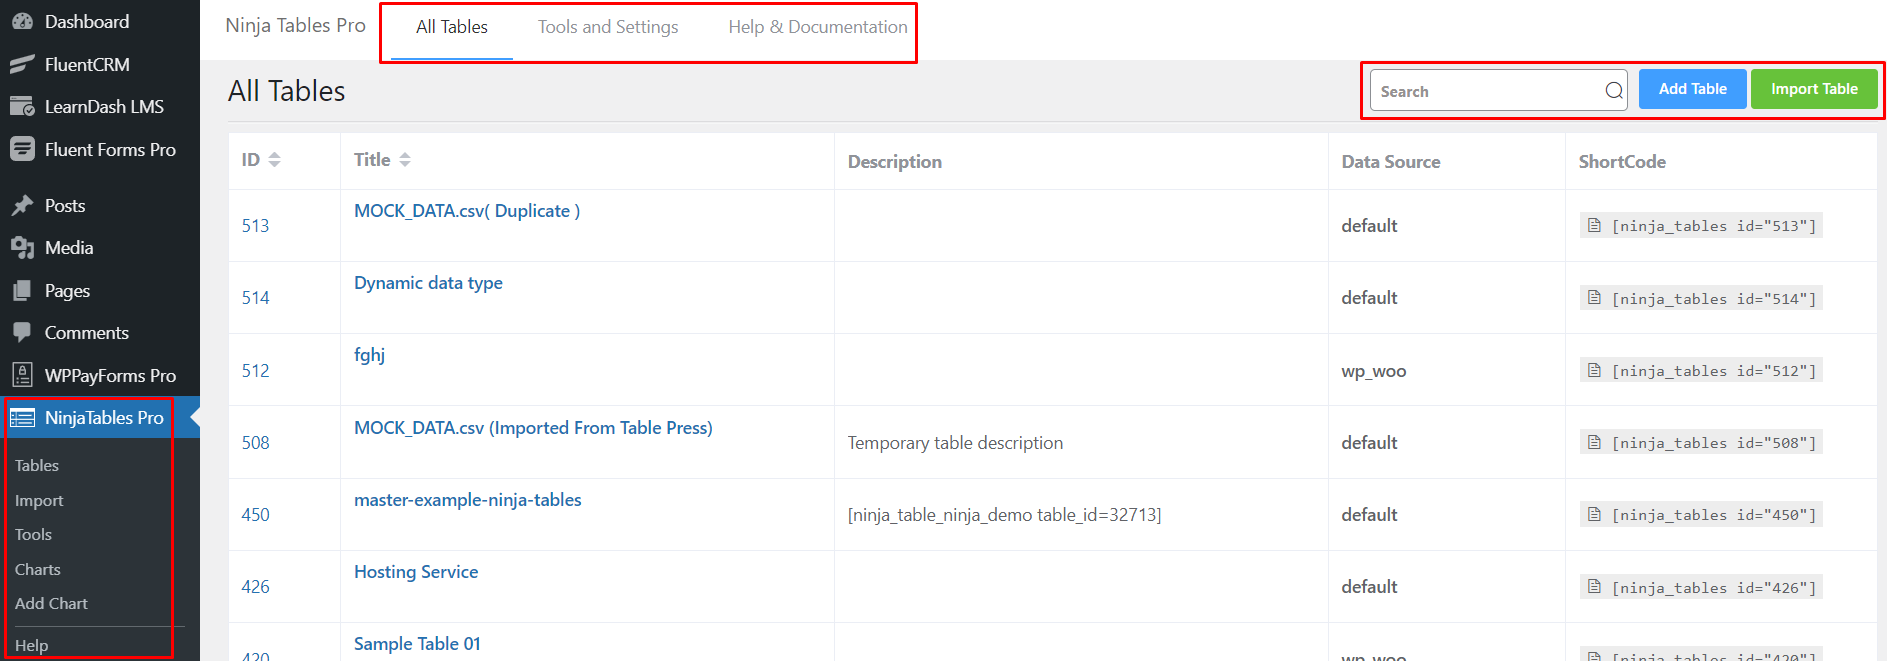
The “All Tables” area above will showcase your tables after creation. You will see the following sections:
- All Tables
- Tools and Settings
- Help & Documentation
Plus, the blue “Add Table” and green “Import Table” buttons. We’ll get to those later.
The highlighted menu bar on the side will show:
- Tables: It’s the same as “All Tables” where all your pre-made tables are.
- Import: CSV/JSON file import from Ninja Tables or from other table plugins.
- Tools: This tab has similar options from “Tools and Settings”-
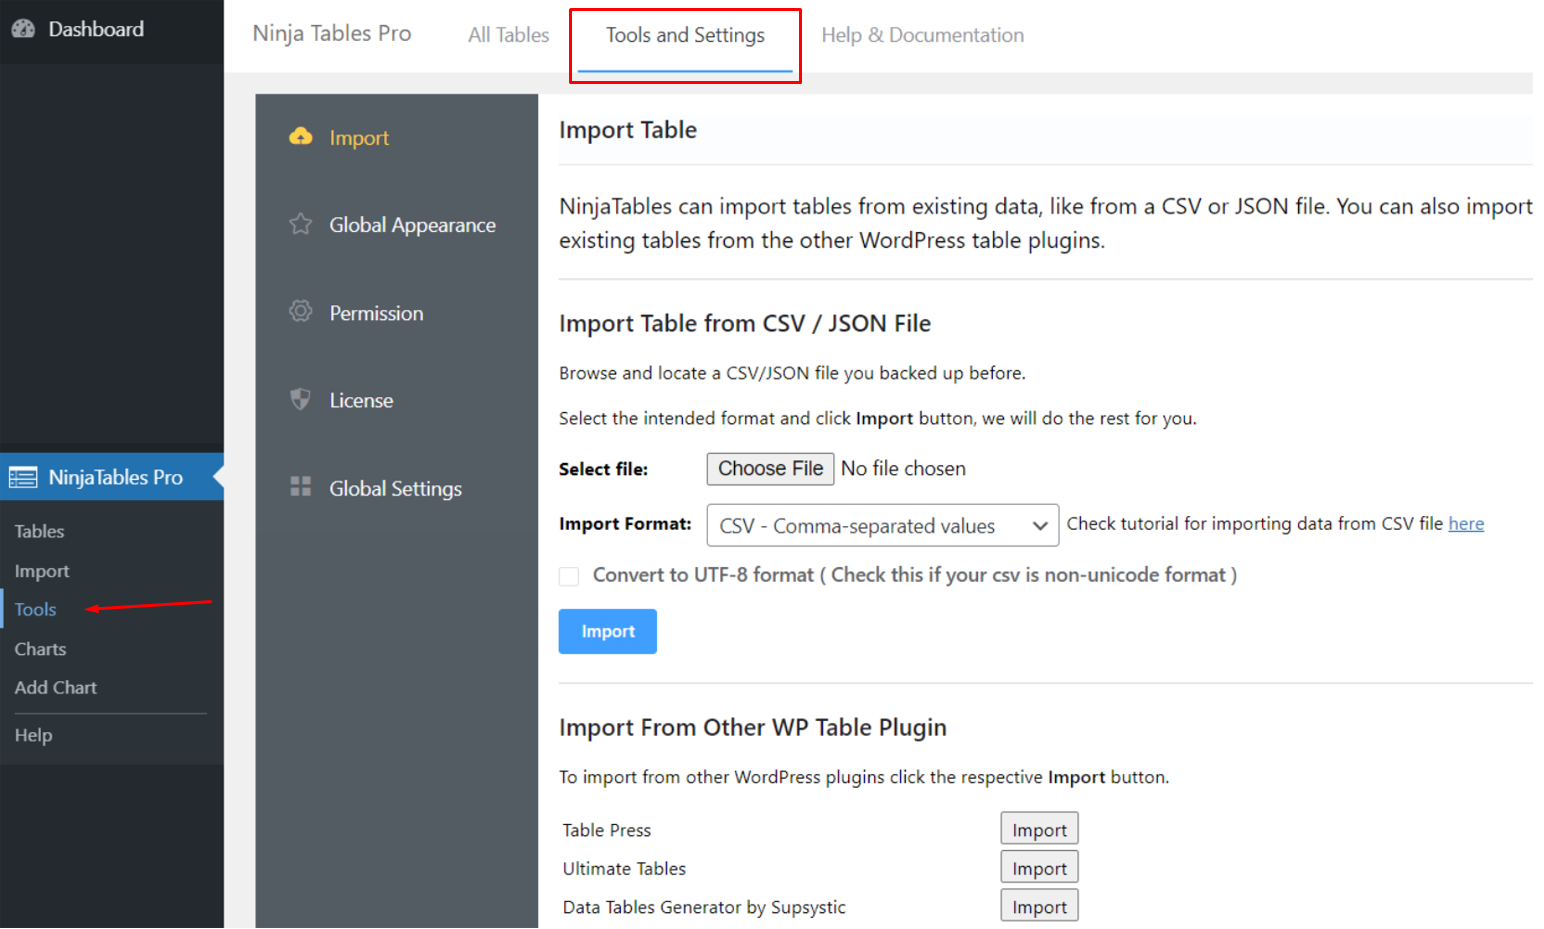
- Charts: All the pre-made charts by Ninja Charts.
- Add Chart: To create charts manually or using Ninja Tables and Fluent Forms data.
- Help: The user guides and documentations.
How to Create Tables Using Ninja Tables
Now, it’s time to create a table. In your Ninja Tables dashboard, you will see a blue “Add Table” button. This is the button you will use to create new tables. Now, click the button. A new window will pop up, showing an option with “Manually Create a Table”. It’s the default option of Ninja Tables. We will cover this option in detail for this guide later.
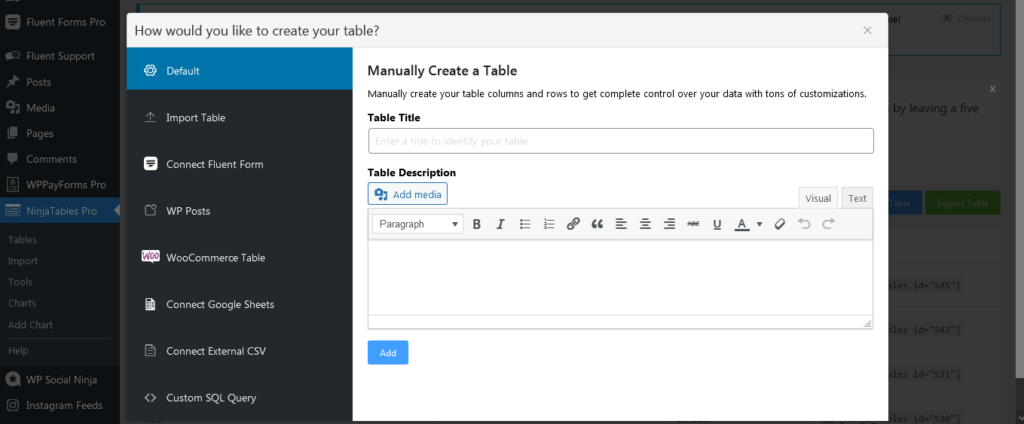
You will see the other seven options. These are-
- Import Table– If you have your table archived in an existing CSV or JSON file, you can use this option to upload the file to your Ninja Tables dashboard.
- Connect Fluent Forms– You can use forms entries from the Fluent Forms plugin and turn them into accessible data tables. You must have installed Fluent Forms and Ninja Tables on the same site for this to work.
- WP Posts– Do you have a large site with a lot of posts or pages? You can provide website content with a searchable, sortable view using the WP post option.
- WooCommerce Table– If you have the “WooCommerce” plugin installed then it will show this option called “WooCommerce Integration”. You can show your products from your WooCommerce store in a tabular format using this option. You can add images, links and CTA buttons too!
- Connect Google Sheets– Have huge data in your google sheet but could not find any solution to make it accessible to website visitors? With this option you can connect your google sheets with your WordPress tables. Whenever you edit your google sheet it will be automatically reflected here. You don’t have to lift a finger after publishing the table on your website. You just have to provide the publishable public URL of your google sheet. That’s it!
- Connect External CSV– Like the previous option, you can connect to a remote CSV File. Your remote CSV data will be synchronized automatically here whenever it changes.
- Custom SQL Query– This option lets you create online tables from an existing SQL database table on your website. By using Ninja Tables custom SQL, any changes to the database or plugin will be reflected in the frontend table.
If you want a deep dive into every option, check our blog- 9+ Productive Ways to Create Online Data Tables.
As this is a beginner’s guide, we will use the default option to showcase “How to create a table manually”.
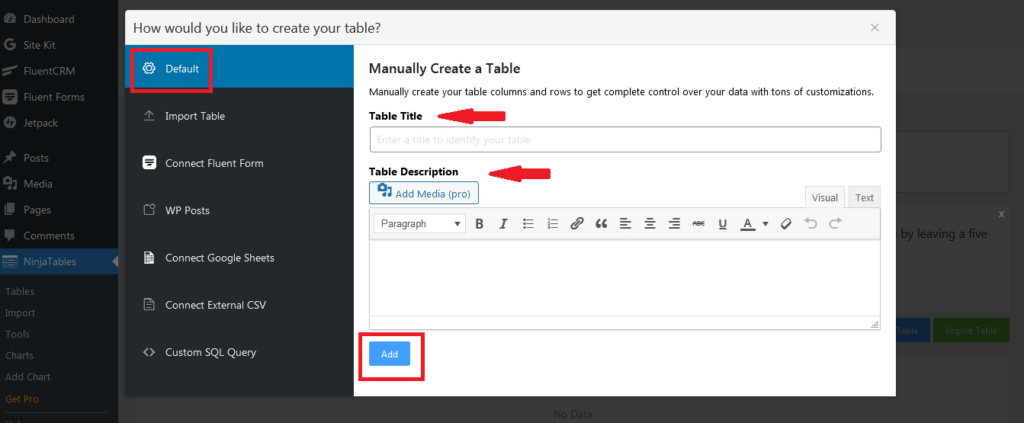
First, name your table. You can add a table description if you like. There is an option to “Add Media” into the table description as well. Click Add, you will transfer into a new window with all options of the newly created table.
You will see there is a blue “Add Column” button in the middle. Your newly created table is still empty. You have to add data, add rows and columns. When you click “Add Column”, a new window will pop up with the “Basic settings” for column options.
Adding Columns
When you click on the “Add Column” button, here’s what appears.
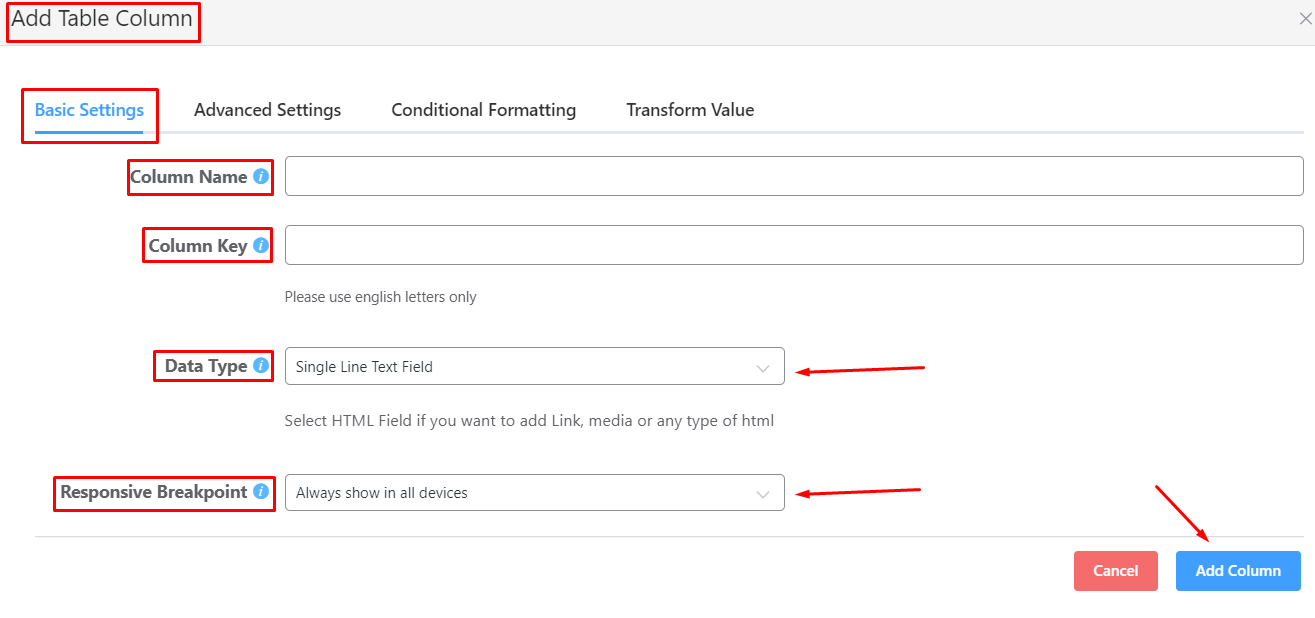
Basic Settings
- Column Name
- Column key (automatically created)
- Data Type– Eight dynamic data types to add any sort of data in tables! You can learn in detail about Ninja Tables data types from our data type documentation.
- Responsive Breakpoint– Using this function, you can decide if you want to show a certain column in a certain device or not. Follow “Responsive Breakpoint” documentation for a detailed understanding.
Adding Data To Columns
Now, after basic settings, click “Add Column” to create a new column.
Keep adding as much data you need by clicking the newly appeared blue “Add Data” button.
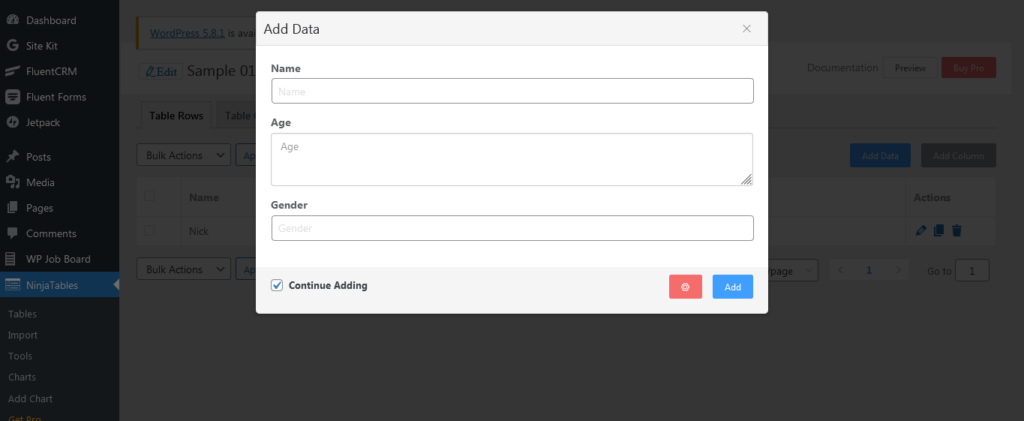
Repeat the process if you want more columns and data.
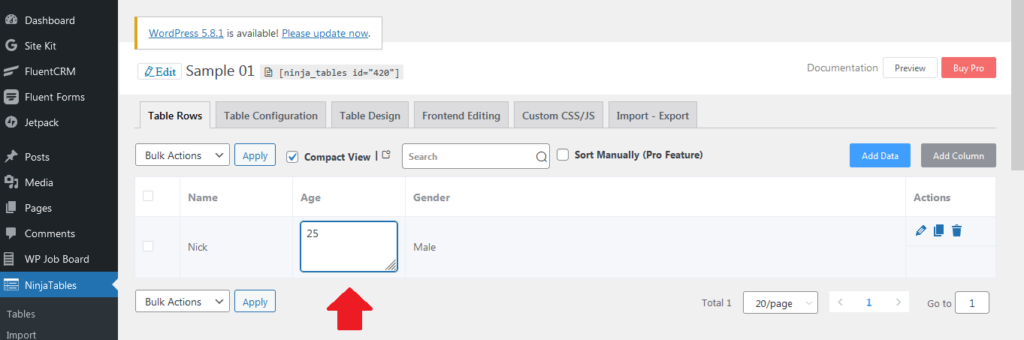
Edit Columns
You can edit data in your columns, duplicate it, and delete a full row using these buttons in your rows.
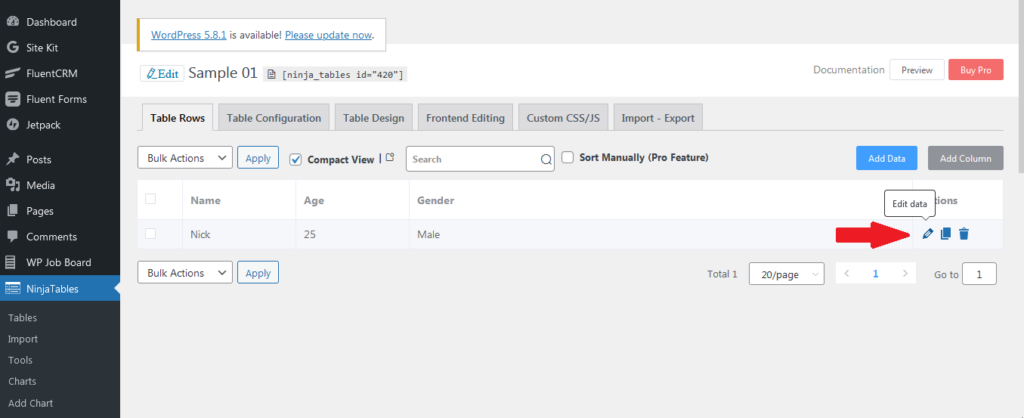
Because of the Excel-like interface, users can simply edit a cell by clicking on it.
Basic Table Menu
Every table has a default menu to configure the tables further Ninja Tables has six:

- Table rows – Shows all your data with columns and rows.
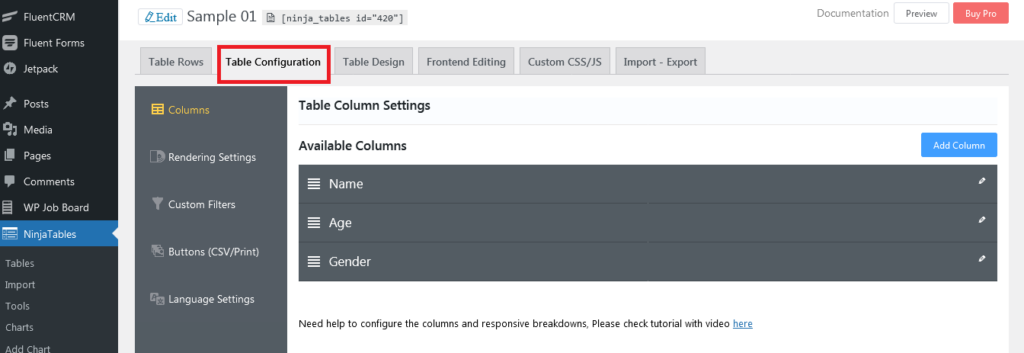
- Table Configuration – Here you can manage your available columns. Drag and drop to rearrange columns from here.
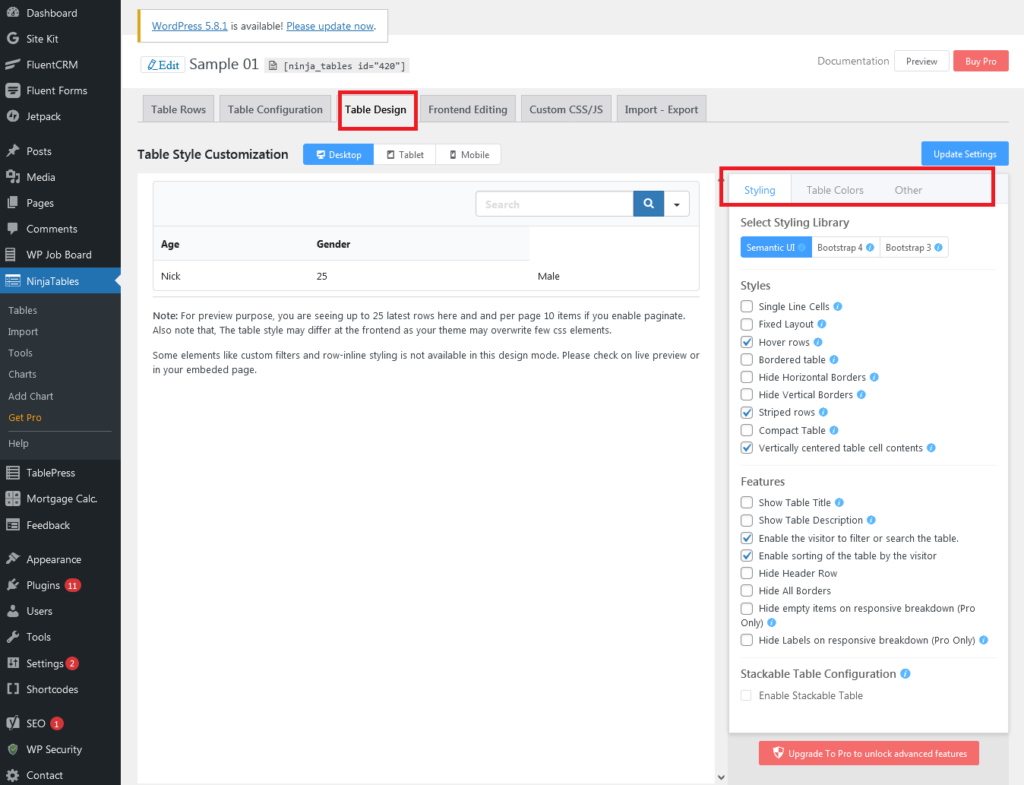
- Table Design – You can style your table using three “Styling Library”, “Table colors”, and “Other” options.
- Frontend Editing– Select user roles who can edit/delete data from frontend.
- Custom CSS/JS – Show your coding skills here and customize the tables as you want.
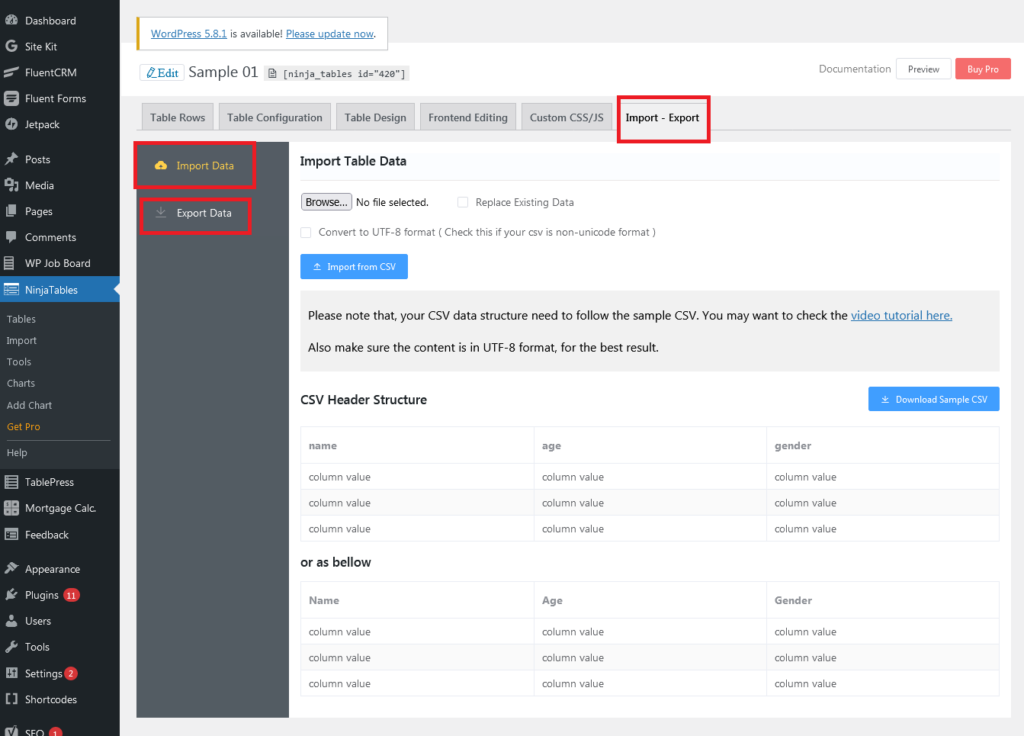
- Import-Export – An easy way to import or export your existing table data.
Here is a step-by-step video tutorial to visually show you how to create a table using Ninja Tables.
After creating your table, you can see it in real-time by clicking the “Preview” button.
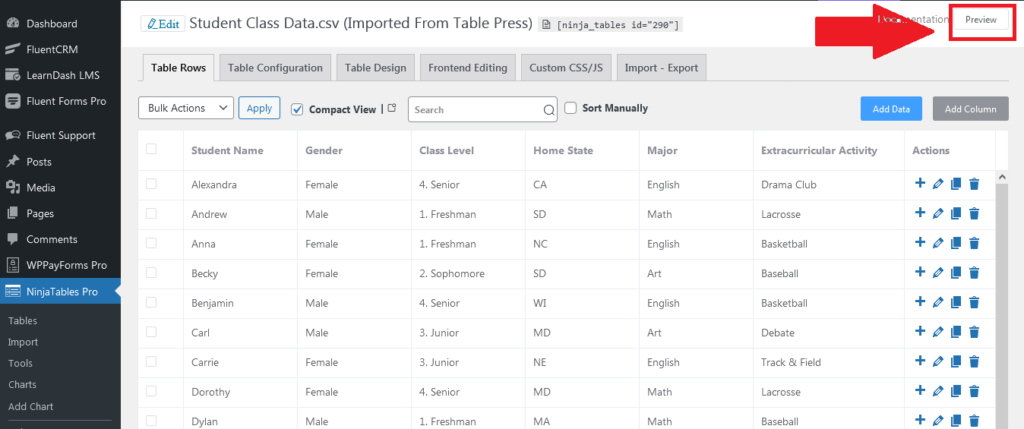
Here is how a newly created table will look in preview mode.
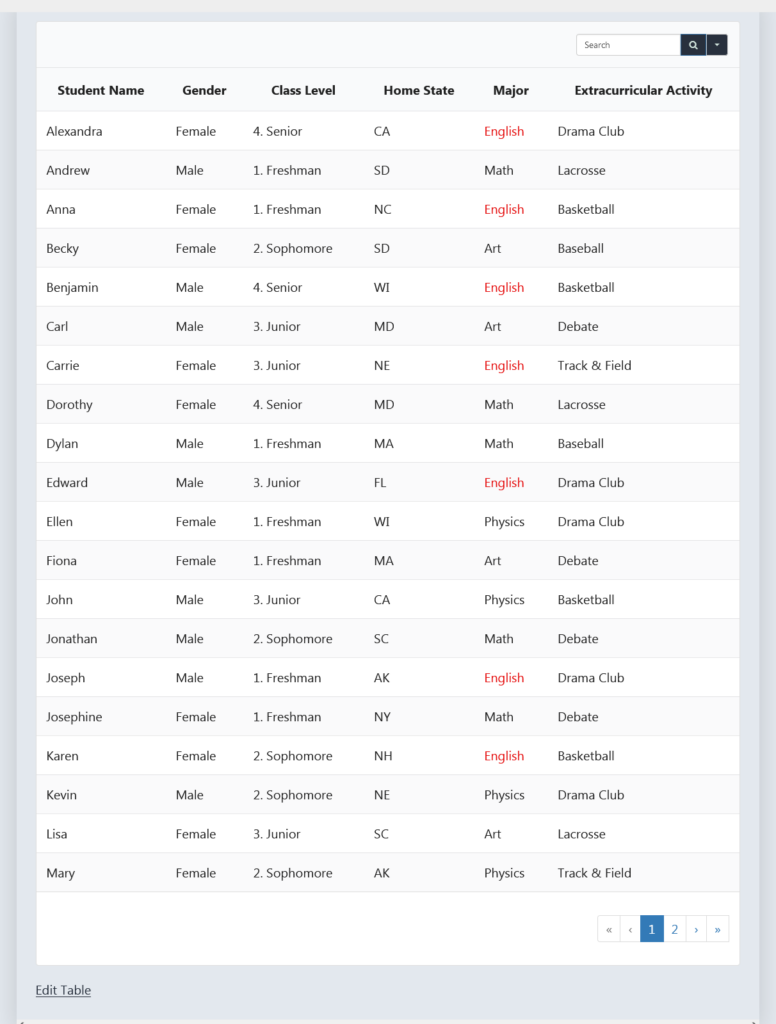
Grab the shortcode as it appears next to the table name and paste it on any post or page on your site. Your newly created table will go live immediately.
Ninja Tables Pro Version Features
Now you have a good insight about Ninja Tables capabilities as we have shown you step by step how you can create a table. Its pro version is capable of doing much more, including the free features!
Here are the best pro features that made Ninja Tables number one in the “WordPress Table Builder” category.
- Conditional formatting
- Value transformation
- Unlimited custom color
- Custom CSS
- Google Sheets integration
- WooCommerce product tables
- Shortcode in cells
- Colspan/rowspan
- WP Posts table
- Frontend editing
- Numeric data calculation
- Stackable Table Configuration
- Custom filter
- Manual sorting
Ninja Tables Demo For Beginners
Just because Ninja Tables is a top table plugin doesn’t mean a newbie can’t use it. It’s quite beginner-friendly, and table creation is really fun with it!
Here are some demo tables by Ninja Tables.
- Basic Table with Ninja Tables
- Amazon Product Listing
- WooCommerce Product Table
- Pricing Table
- Product Specification Table
- WP Post
- League Points Table
- Cryptocurrency Table
- Movie Review Table
Depending on your website needs, you can create any data table you want. Grow your business with WordPress tables.
Conclusion
WordPress table plugins save the time and headache of creating tables manually. These plugins are available for all sorts of particular needs, ranging from customization to responsiveness and large data sizes.
Ninja Tables stands apart from other available WordPress plugins in terms of features and integration. You can try the free version as a beginner. Likewise, the pro version is easy to use even with so many features!
Try out Ninja Tables PRO and discover unlimited options and creative ways to customize your data tables.
Here’s some detail on free vs pro. Hopefully, after comparing free and paid capabilities, you can decide when to move from beginner to expert with Ninja Tables!
-

How to Embed Social Media Feeds on WordPress Websites (No Code)
Learn how to embed Instagram, Facebook, TikTok, and YouTube feeds -

Contact Form 7 vs Fluent Forms: Which one should you go for?
Learn the comparison between Fluent Forms vs Contact Form 7. -

WPForms vs Fluent Forms: An Honest Feature-by-Feature Comparison
Discover the Comparisons between WPForms vs Fluent Forms. See how
Leave a Reply
You must be logged in to post a comment.