

Free Influencer Marketing Tools: Build, Manage, and Grow Creator Network
Working with three creators is manageable. You find them, send a message, agree on terms, and keep track of the collaboration.
Then the network grows. Applications arrive through different channels. Media kits disappear into inboxes. Campaign briefs live in shared documents, while someone maintains a spreadsheet of creator statuses. When a launch approaches, the team spends its first afternoon finding information it already collected.
An expensive influencer platform is one answer. If your business already runs on WordPress, there is another: make your website the operational home of your creator network.
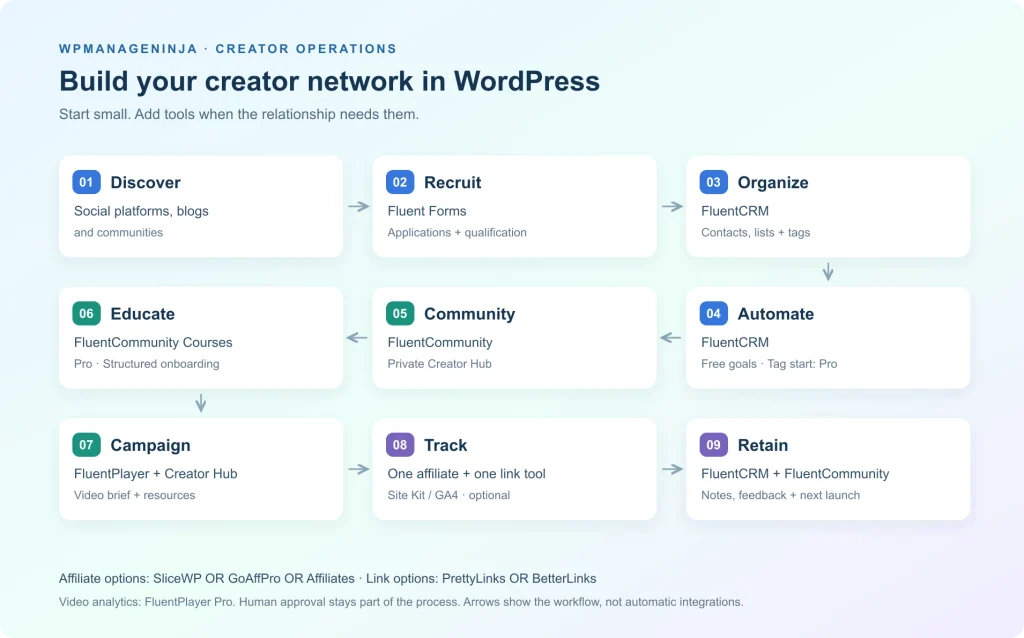
This guide puts free influencer marketing tools to work across a practical process: discover, recruit, qualify, organize, onboard, educate, collaborate, measure, and retain. Social platforms remain useful for discovery. WordPress takes over when a creator enters your brand’s ecosystem.
You can start with free applications, a creator CRM, and basic email automation. Courses, separate tag-triggered automations, and detailed video analytics are paid upgrades, clearly identified below. Hosting, email delivery, creator fees, and product samples remain separate costs.
Key Takeaways
- Use social platforms to discover creators, then bring applications, communication, and campaign resources together in WordPress.
- Start with Fluent Forms and FluentCRM for creator applications, contact organization, and basic onboarding automation. Keep approval and partnership decisions in human hands.
- Add FluentCommunity when creators need a shared hub, and FluentPlayer when product demonstrations or campaign briefs work better as video.
- Budget separately for premium features: FluentCommunity Courses, FluentCRM’s separate tag-triggered automations, and FluentPlayer analytics require paid versions.
- Choose optional tracking tools by need: one affiliate plugin for referrals and commissions, one link manager for branded URLs, and analytics to understand website activity.
- Keep successful creators connected after each campaign so your next launch builds on relationships you already know.
What an Influencer Marketing System Actually Needs
Influencer marketing means working with people whose content and audience can introduce your product to relevant customers. A useful system supports the relationship before, during, and after that introduction.
Start with recruitment and qualification: collect contact details, channels, audience information, and collaboration preferences. Then organize those records so your team can select suitable creators and communicate with them. Approved partners need onboarding, product education, campaign briefs, announcements, and somewhere to ask questions.
Measurement has several layers. A referral plugin records eligible sales and commissions. Creator-specific links distinguish campaign traffic. Website analytics show what visitors do after arriving. Your relationship records explain whether someone communicated well, understood the product, and delivered useful content.
The core setup does not search social networks, verify follower authenticity, negotiate contracts, or pay sponsorship invoices. Those remain separate jobs.
Find relevant creators before collecting applications
Search YouTube for tutorials your customers would watch, Instagram and TikTok for relevant demonstrations, and LinkedIn for specialists who explain your industry. Explore blogs, podcasts, communities, and customers already teaching others about your product.
Review several recent posts, audience questions, and previous partnerships. Ask shortlisted creators for current audience information where public profiles are insufficient. A smaller, relevant audience can be more useful than a large following with little connection to your customers. Send a personal invitation explaining the fit, then direct interested creators to your application page.
Step 1: Build Your Influencer Application With Fluent Forms
Create a dedicated page at yourdomain.com/creators/ or yourdomain.com/influencer-program/. Before the form, explain your brand, the creators you want, available partnerships, what participants receive, and how review works. Distinguish paid sponsorships, affiliate arrangements, product gifting, and content production so applicants understand the offer.
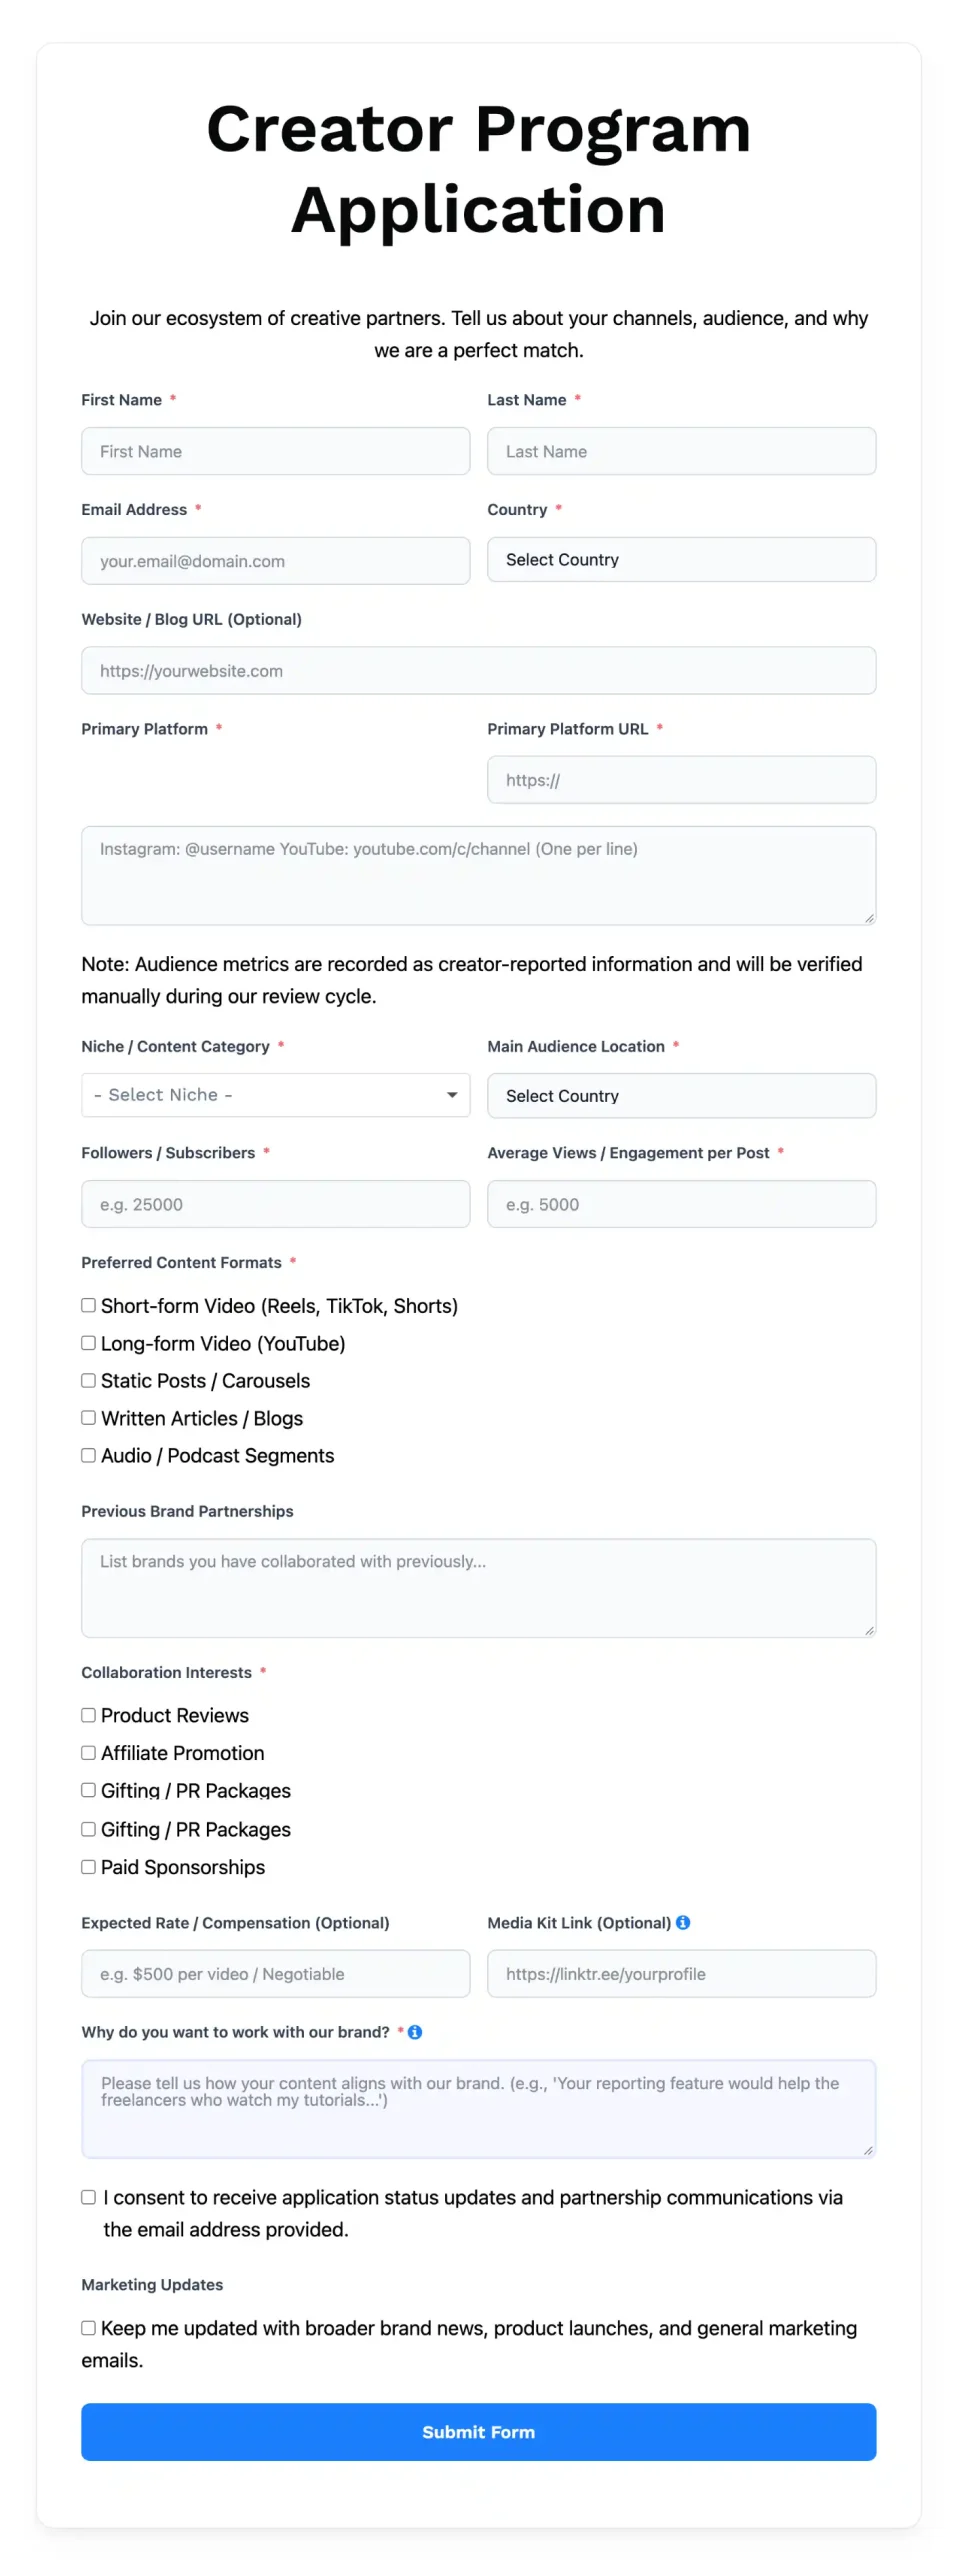
Install and activate Fluent Forms. Open its form dashboard, add a new blank form, and name it “Creator Program Application.” Build around these groups:
Use dropdowns for consistent categories, number fields for audience figures, and text areas for thoughtful answers. Require the essentials; make secondary channels optional. Ask for a media-kit link rather than requiring a file upload in the free workflow.
The brand-fit answer deserves attention. “Your reporting feature would help the freelancers who watch my tutorials” tells you more about a potential partnership than a follower count alone. Record audience figures as creator-reported information, with a review date, rather than treating them as independently verified data.
Add clear wording about application communications and a separate choice for broader marketing emails. Configure the confirmation message and an internal notification, then embed the form using the Fluent Forms block on your recruitment page.
Make the questions relevant with conditional logic
Field conditional logic is included in Fluent Forms Free. Select a field in the editor, open its advanced options, enable conditional logic, and set the condition controlling when it appears. The conditional logic tutorial explains the editor controls.
For example, show a YouTube channel URL, subscriber count, average views, Shorts/long-form preference, and upload frequency when Primary Platform = YouTube. An Instagram selection can reveal profile URL, follower count, average Reel views, and relevant Story views instead.
If the applicant selects paid sponsorship, reveal expected rate, package rate, and preferred deliverables. For affiliate interest, ask about previous affiliate experience and the main promotion channel. If applicants can choose multiple partnership types, test every combination.
This keeps a blogger from working through irrelevant video questions. Preview the form on desktop and mobile, switch between choices, and confirm that hidden required fields do not prevent submission.
Step 2: Build Your Creator Database With FluentCRM
A spreadsheet can store names. The difficulty is keeping application details, review decisions, campaign participation, and email history connected as several people work on the program.
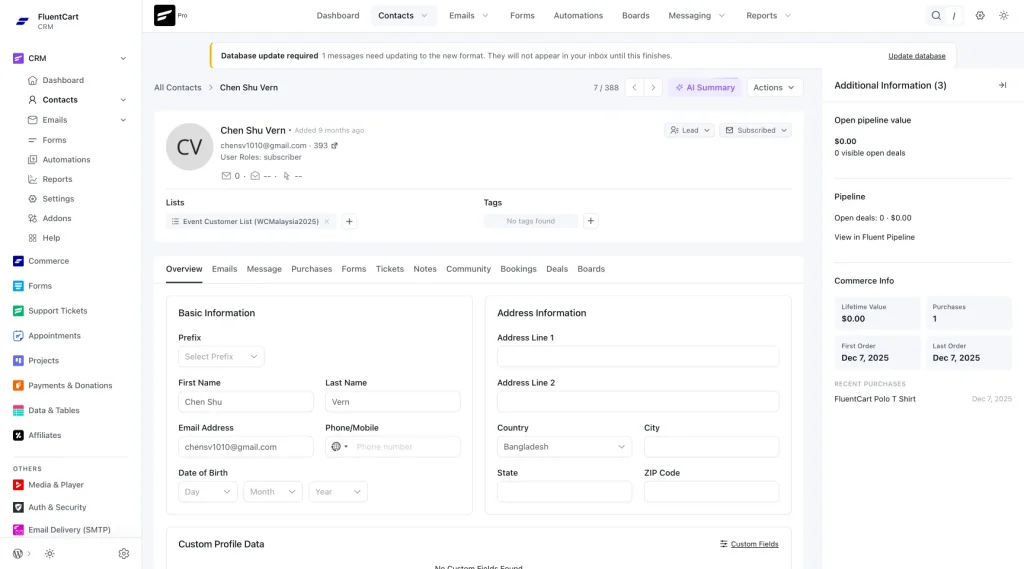
Use FluentCRM as the internal creator database. Under Contacts, create one list called Influencers, then use tags for overlapping categories:
Define audience-size categories internally; thresholds vary by platform and do not replace qualitative review. For application status, remove the previous status tag when applying the next. Keep historical campaign participation in campaign-specific tags or contact notes so “Campaign Completed” does not obscure an active new assignment.
Create custom fields for useful details such as primary channel URL, niche, audience location, average views, expected rate, and last review date. The original application remains the detailed source record.
Lists, tags, and basic filtering are available free; saved dynamic segments and advanced filtering belong to Pro. Use the available filters and review the selected audience before sending.
The database should make questions such as “Which approved YouTube creators suit this launch?” or “Who is interested in affiliate campaigns?” easier to answer. See the Free/Pro comparison for the segmentation boundary.
Step 3: Connect Fluent Forms and FluentCRM
The next application should become a CRM contact without a CSV export or manual copying. Install both plugins on the same WordPress site and follow the official integration setup:
- In Fluent Forms, open Integrations and enable the FluentCRM module.
- Open “Creator Program Application,” then Settings & Integrations → Configure Integrations.
- Choose Add New Integration → FluentCRM Integration and name the feed “Creator applications.”
- Select the Influencers list. Map email and name to the corresponding CRM fields.
- Apply Influencer Applicant. Map country and relevant custom fields through the additional field mapping controls where supported.
- Check subscription settings against the applicant’s consent. Enable the feed and save it.
- Submit a test application using an address you control. Check the form entry, CRM record, mapped values, list, and tag. Submit again with the same email to check the update behavior.
The basic FluentCRM integration is free. Keep this starter feed unconditional; conditional integration feeds are separate from free field visibility logic and require Fluent Forms Pro. Assign platform and partnership tags during review if you are staying with the basic setup.
Step 4: Automate Creator Onboarding
Automate the repetitive communication around approval. Keep content assessment, audience relevance, partnership terms, and the approval decision with a person.
The workflow has a deliberate human checkpoint:
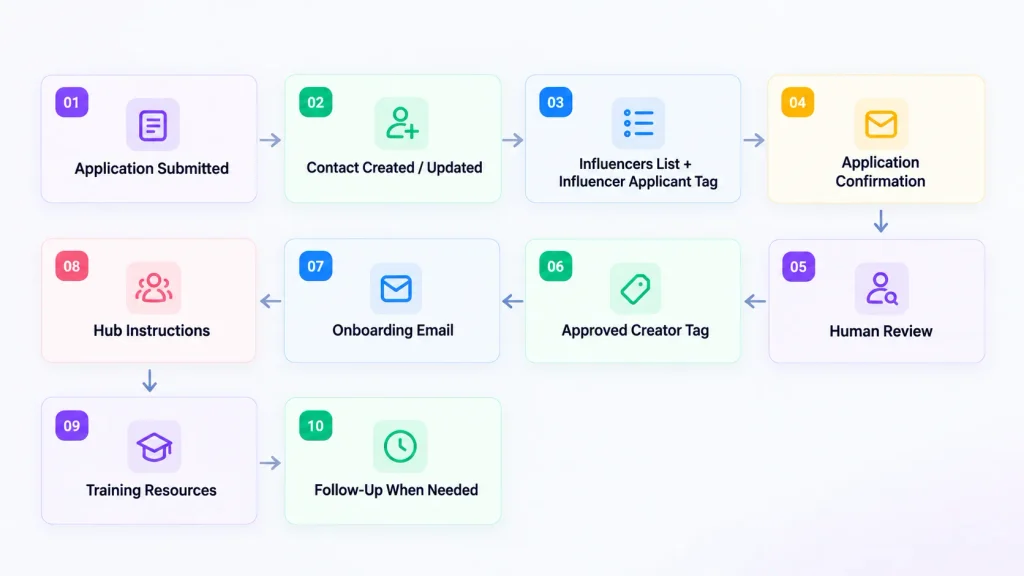
Keep application handling and approved-creator onboarding separated by that checkpoint, so a submission never grants approval or private campaign access.
Creator onboarding steps
For the free application stage, open FluentCRM → Automations → New Automation and select New Form Submission (Fluent Forms). Choose the creator application and map the contact fields.
Add Send Custom Email with a short acknowledgment: “We’ve received your application. Our team will review your content and contact you about suitable opportunities.” Let the integration feed handle the list and applicant tag; avoid a second form notification sending the same acknowledgment.
Free automation actions include delays, custom emails, and applying or removing lists and tags. The dedicated Email Sequences module, tag/list triggers, and more advanced automation tools require Pro, as documented in the detailed comparison.
For free onboarding within the same funnel, add Tag Applied from Goals/Benchmarks, select Approved Creator, and set Benchmark Type → Essential Point. Disable direct contact entry at this goal so only applicants already in the funnel proceed. Add the welcome and training emails after it. An Optional Point would not enforce approval. The goal settings documentation explains the distinction; test that an unapproved applicant stops here.
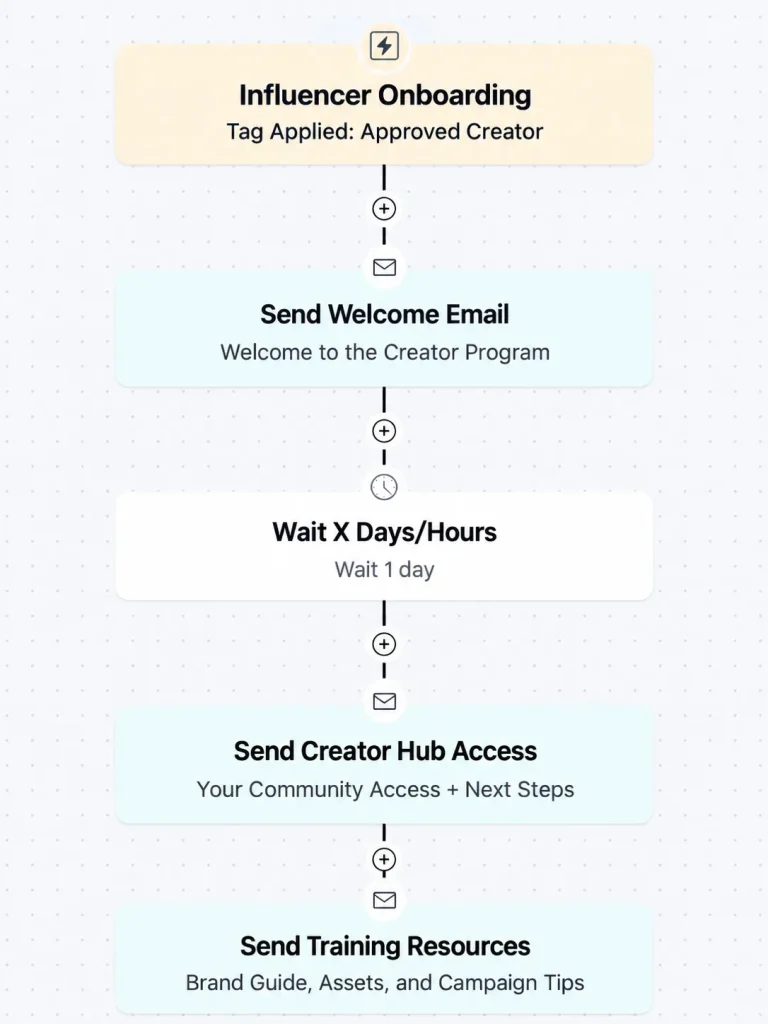
To start a separate onboarding funnel directly from an approval tag, use FluentCRM Pro. Create a second automation with Tag Applied → Approved Creator, then add an onboarding email, a delay, and a training-resource email. The trigger documentation covers its settings. Leave repeat entry disabled unless your process needs it.
The backend process
A reviewer removes Under Review and applies Approved Creator only after agreeing on the partnership. The first email explains access and the next step; the second links to training. Check for replies or completed onboarding before sending a reminder. A time delay alone cannot tell whether someone finished training.
For an even simpler start, skip the goal and send an onboarding campaign to the manually reviewed group using lists/tags. You still eliminate application copying and repeated acknowledgment emails.
Before activation, use a test contact and verify delivery, subscription behavior, and duplicate handling. FluentCRM needs a working mail-delivery configuration; the plugin is not itself an email delivery service.
Step 5: Build a Private Creator Hub With FluentCommunity
Email is useful for telling someone that a campaign is ready. It is less useful as the permanent location of the brief, corrected screenshots, product FAQs, and a discussion that several creators need to follow.
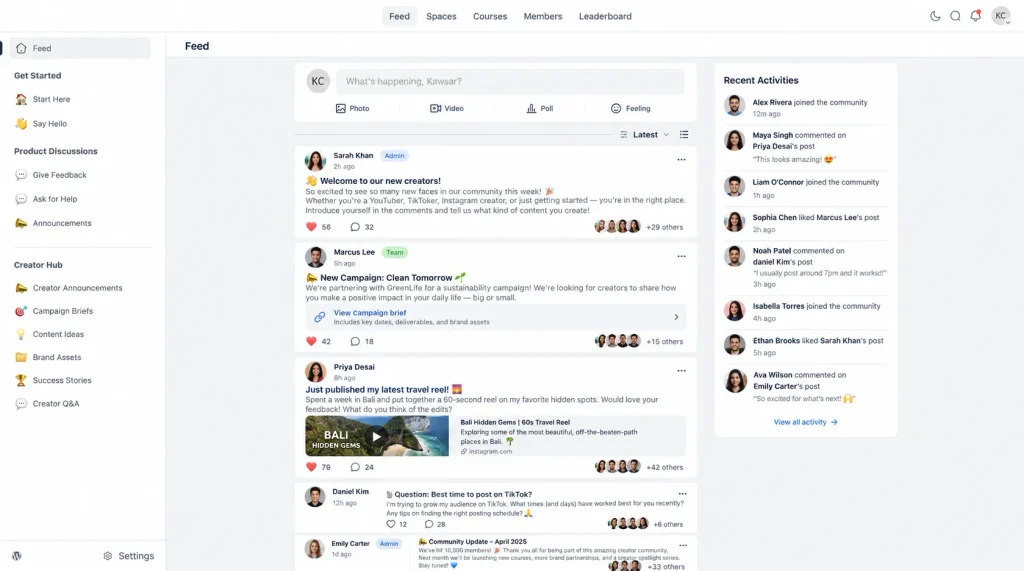
Start with one active Creator Hub in FluentCommunity. In the community portal, choose Spaces → New Space → Discussion Space. Name it Creator Hub, describe its purpose, and select Private access. Private Spaces are discoverable in the directory, but their content is restricted to members. A Secret Space is hidden from non-members. Follow the Space creation guide for these controls.
Add approved creators as members after arranging their WordPress accounts. A CRM contact is not automatically a WordPress user or Space member. Likewise, an approval tag does not grant hub access unless you configure a separate supported integration.
Prepare a welcome post and a small set of useful resources: “New Product Launch Campaign,” “This Month’s Creator Opportunities,” “Brand Assets and Product Screenshots,” “Campaign FAQ,” “Share Your Published Content,” and “Creator Wins.” Use the FAQ thread to answer a question once and improve the brief when confusion repeats.
Core community discussions can start free. Courses, direct messaging, and the document library are among the Pro features described in the product documentation. In the free hub, use posts and appropriate resource links rather than promising a premium file library.
Test access as a member and as a non-member. Check linked files separately: placing a public media URL inside a private Space does not make that file private.
Step 6: Create a Creator Academy
When every new creator asks the same product questions, a course becomes useful. FluentCommunity’s course module requires Pro; it is an optional upgrade to this free starting workflow.
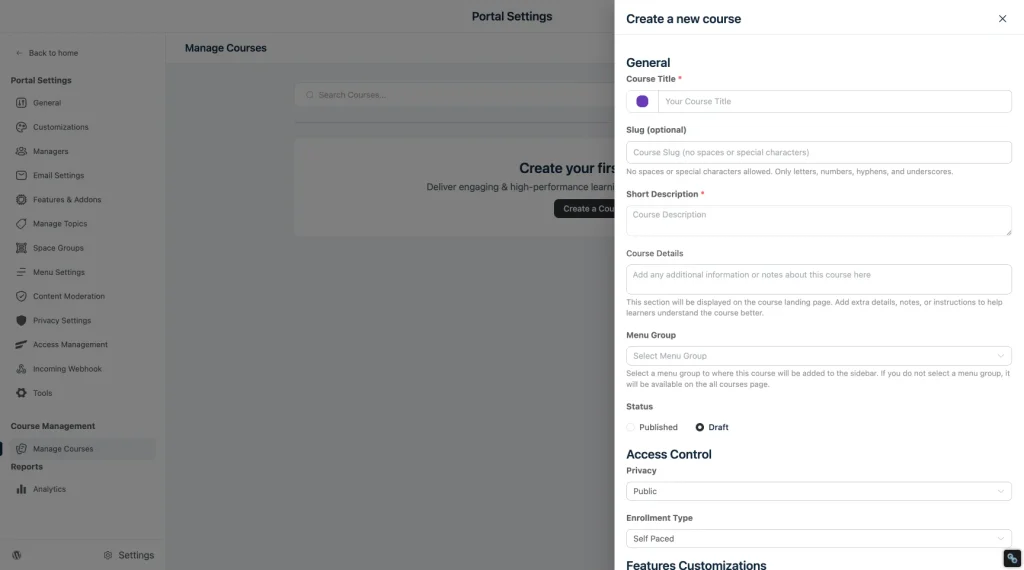
Enable Portal Settings → Features & Addons → Course Module, then open FluentCommunity → Courses (Pro) → New Course. The course setup documentation walks through these settings.
Create “Become a Certified Brand Creator” as an internal brand-training course. Explain what completion means; the name does not imply an external qualification. Add a description, cover image, and these modules:
Set the course’s own access and enrollment rules for approved creators; hub membership alone is not the test. Preview it through a learner account before sharing it.
Keep lessons focused on helping creators make informed choices. Show where a feature is useful, who it serves, and what it cannot do. Leave room for honest opinions and each creator’s voice. On a free setup, present the essentials as an ordered series of hub posts until structured lessons justify the upgrade.
Step 7: Use FluentPlayer for Campaign Briefs and Product Training
A written brief can specify deliverables, but a screen recording often explains the product more clearly. Use video for onboarding, brand stories, feature demonstrations, setup tutorials, content examples, and launch walkthroughs.
In FluentPlayer, open Media → Add Media, name the item “Creator Launch Brief,” and choose the video file or supported source URL. Add a thumbnail, choose a player preset, and save. The media setup guide covers this process. Embed the player using its block or generated shortcode on the appropriate training page.
For a longer recording, select the player block and open Block → Chapters. Add timestamps that match the actual edit, for example:
00:00 — Product overview

02:15 — Ideal customer

04:40 — Main workflow

08:10 — Features worth demonstrating

12:30 — Common mistakes

15:00 — Campaign requirements
The in-player chapter menu is free; the chapter strip beneath the player requires Pro. Core embedding and playback can also start free. Playlists, resume playback, and built-in analytics require Pro.
Put deadlines, deliverables, and required links beside the video as text so creators can check them quickly. For the visitor-facing side of a video campaign, see the guide to a WordPress video funnel. Video hosting and bandwidth are separate from the player plugin. For unreleased material, check both the training page’s access and the source video’s privacy settings.
Step 8: Measure Creator Training With Video Analytics
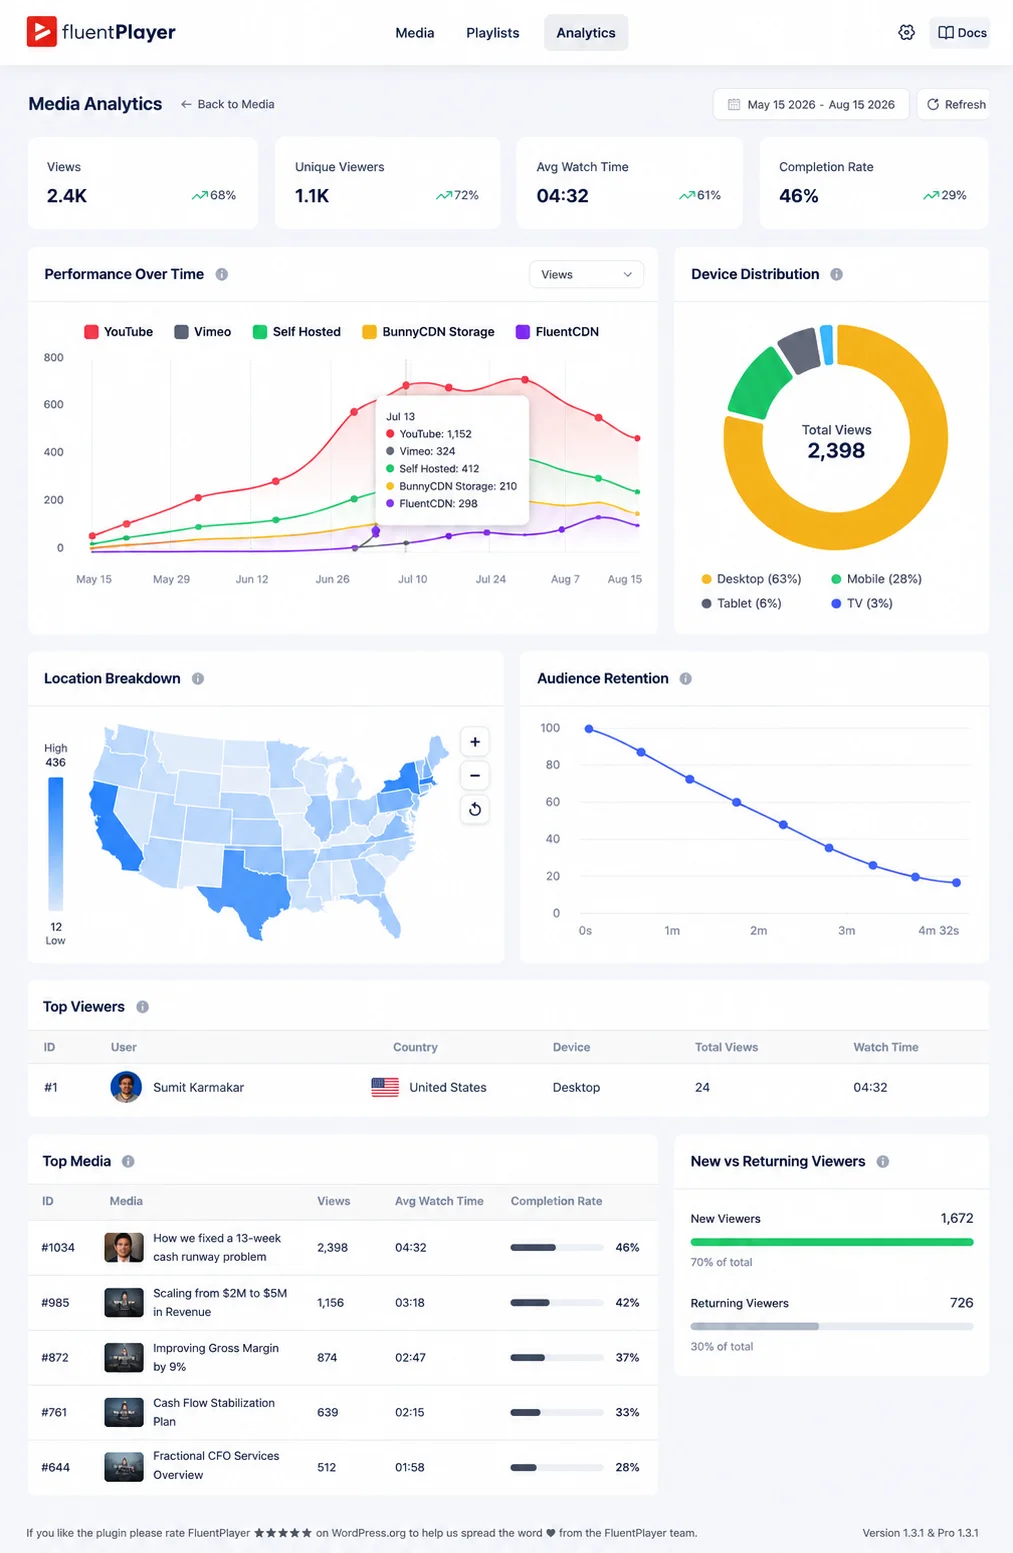
Uploading training does not tell you whether it helped. FluentPlayer Pro’s built-in analytics reports views, unique viewers, average watch time, completion rate, and audience retention.
Open Settings → Analytics → FluentPlayer Analytics, enable analytics, and save. Then use the Analytics menu to inspect the relevant media and reporting period. Tracking needs to be enabled before the viewing activity you want to measure.
Suppose a 20-minute onboarding video repeatedly loses viewers around minute three. That is a hypothetical example, not a campaign result. The useful next step is to inspect that section: perhaps an extended introduction delays the demonstration, or creators only need individual chapters. Try a shorter edit or split the recording, then compare subsequent engagement.
Logged-in viewing can support per-user insights; anonymous totals cannot reliably identify which creator watched. Neither completion nor watch time proves understanding. Combine analytics with questions, feedback, and the accuracy of the content creators produce.
A new program may have little data at first. Wait for enough actual viewing activity to spot a pattern before changing the training around a single visit.
What Your WordPress Influencer Stack Does Not Replace
WordPress can become the operational home of your influencer program, but it does not need to do every job.
The setup above handles creator applications, contact management, communication, onboarding, community, training, campaign briefs, and video engagement. A few parts of influencer marketing still happen outside that system.
Creator discovery
You still need to find the right people.
Search YouTube, Instagram, TikTok, LinkedIn, blogs, podcasts, existing customers, and relevant communities. WordPress becomes useful once you want to move promising creators from scattered conversations into a structured process.
Audience and creator evaluation
Follower counts submitted through an application are useful screening information, not independent verification.
Review recent content, engagement quality, audience relevance, previous partnerships, communication style, and whether the creator genuinely understands the problem your product solves.
Keep the final approval decision human.
Contracts and campaign agreements
Your creator database can record partnership type, rates, deadlines, and campaign notes, but it does not replace an actual agreement when one is required.
Define deliverables, usage rights, deadlines, compensation, disclosure requirements, revisions, exclusivity, and any other important terms before the campaign starts.
Creator payments and product fulfillment
FluentCRM can help you track who is participating and what was agreed. It is not a creator payment system.
Sponsored-content payments, product samples, shipping, reimbursements, affiliate payouts, and related accounting still need to follow your normal business process.
Complete sales attribution
Traffic, video engagement, campaign activity, and creator relationships provide different pieces of the picture.
No single number tells you whether a creator partnership worked. A creator may influence a purchase without receiving the final click, while another may generate traffic that never becomes a customer.
Use the data available to you, but judge partnerships using both measurable outcomes and the quality of the relationship and content.
The goal is not to force every part of influencer marketing into WordPress. It is to use WordPress for the work it handles well: turning scattered creator interactions into an organized, repeatable relationship system.
How the Complete WordPress Influencer Marketing Stack Fits Together
Start with recruitment and a creator database. Add community, education, and tracking tools as the program needs them.
Discovery happens on YouTube, Instagram, TikTok, LinkedIn, blogs, and communities. Fluent Forms collects applications; FluentCRM organizes contacts and communication.
FluentCommunity hosts ongoing discussion, with Courses available in Pro. FluentPlayer delivers demonstrations and briefs. Add one affiliate solution for commissions, one link manager for campaign URLs, and Site Kit/GA4 for website reporting.
A small program may need only Fluent Forms and FluentCRM. Relationship-driven programs can add FluentCommunity; video-heavy programs can add FluentPlayer. Ecommerce campaigns may justify an affiliate plugin, while campaign attribution may justify links and analytics.
These are operational stages, not a promise that every plugin automatically synchronizes with every other. Record the creator’s affiliate identifier and assigned campaign URL in the CRM where useful. Test any additional integration before relying on it.
Example: Running a Creator Campaign From WordPress
Consider a WordPress product company preparing a major launch. Here is how the workflow could support that campaign.
The team identifies YouTubers teaching site building, WordPress bloggers, developers with social audiences, short-form creators, and customers who lead relevant communities. Each invitation explains why the person’s content fits and links to the Creator Program page.
Applications enter through Fluent Forms and become FluentCRM contacts. A marketer reviews recent content, audience relevance, communication style, and partnership preferences. One creator proposes a detailed tutorial; another prefers a short demonstration. Those differences shape the brief instead of forcing everyone into identical deliverables.
Approved partners receive onboarding communication and access to the Creator Hub. The product training explains the workflow, while a FluentPlayer launch brief shows what changed. Creators discuss questions in one campaign thread and use the agreed deadline, disclosure instructions, and asset links from the written brief.
Where a performance-based arrangement makes sense, the team creates an affiliate account in its chosen system. Each creator can also receive a branded campaign URL. Keep the launch name consistent in the destination parameters:
utm_source=youtube

utm_medium=influencer

utm_campaign=product-launch

utm_content=maria
Preserve any affiliate parameter generated by the affiliate plugin as well. A UTM does not create a payable commission. Test the full redirect and referral path with a test transaction before distributing links.
After launch, compare website visits and relevant key events with affiliate records and the published content. Clicks, sessions, and credited sales will not necessarily match. Review content usefulness and delivery reliability alongside measurable outcomes; WPManageNinja’s guide to vanity versus actionable metrics explores that distinction.
Record the published URL, campaign notes, and future opportunities in the creator’s profile. Ask what would make the next collaboration easier. The campaign can end without the relationship ending.
Free Influencer Marketing Doesn’t Have to Mean Manual Marketing
Free influencer marketing tools can remove application copying, centralize creator information, and handle basic communication. Starting free does not require a permanent collection of scattered spreadsheets and DMs.
Budget separately for hosting, reliable email sending, video delivery, creator compensation, and your team’s time. Upgrade because a specific bottleneck needs solving, whether that is repeated onboarding work or a lack of training insight.
Build a Creator Network, Not Just Another Campaign
The first few campaigns teach you who communicates well, understands the product, reaches relevant people, and produces useful content. Tracking adds evidence about traffic and conversions. Together, those lessons make the next campaign easier to plan.
Keep them attached to the relationship. Maintain the creator records, refresh product resources, and invite suitable partners back when there is a meaningful opportunity.
Eventually, the question changes from “Who can we contact for this campaign?” to “Who in our creator network is right for this campaign?”
Start with an application and a well-organized database, then build around the relationships that develop. Social platforms are where creators build their audiences. WordPress can be where your brand builds the relationship.

WordPress, automation, eCommerce and growth marketing specialist, a WordPress Core Contributor and Media Corps member blending storytelling with technology to craft strategies in SEO, email marketing, and beyond.
-
10 Best jQuery Table Plugins for Best Data Visualization in 2026
Discover the 10 best jQuery table plugins for 2026. Compare -

Black Friday Marketing Strategies for 2026: Core and Advance Move
Black Friday is the most celebrated shopping season worldwide. Discover -
How Much Can You Earn With Amazon Affiliate Marketing? Rates & Niches
How much can you earn with Amazon affiliate marketing? Dive


Leave a Reply
You must be logged in to post a comment.