

We will never spam you. We will only send you product updates and tips.
A few days back, someone was asking me about creating multi-step forms in WordPress. I was at a party, somehow in a conversation, the issue came into existence. I was not in a mood to explain the regard at that very moment but as I am working with WordPress, I felt to convince him and somehow I had to make him understand.
Later on, the issue took my consideration and I thought of writing a tutorial based post on it that might help others creating a multi-step form in WordPress. That’s why I am giving a try to make this possible.
Why Design Multi-Step Forms?
A form is one of the easiest ways to collect information & get in touch with your audience. It might be a simple casual form, it might be a business form or any kind of survey related form.
Fluent Forms Pro
Try Fluent Forms today and see for yourself!
However, long forms are sometimes disgusting to users and can be ultimately considered as bad UX as well. To get rid of this problem, almost all of the big firms are using multi-step forms which are broken into sections and pages.
The progress bar on top of the page offers the users more comfort and control on filling up the form and most importantly it provides a different flavor of interactiveness with your users. Moreover, it increases your engagement with users rapidly.
How to Create A Multi-Page WordPress Form With WP Fluent Form
I will be using WP Fluent Form here to make you understand. WP Fluent Form is a fast-growing user-friendly WordPress form plugin for creating any kind of form.
First of all, you need to install and activate the WP Fluent Form plugin in WordPress. For more details, see our step by step guide on how to install a WordPress plugin.
After activating the WP Fluent Forms plugin and completing the licensing process you will have a congenial environment for creating a multi-step form on your website.
I think you are going to create three steps multi-step form as I am doing right now. The first step is for the user’s personal info, the second page is for the user’s educational info and the third page will cover the user’s hobbies. Now, I am going to show you how to make it happen using WP Fluent Form.
WP Fluent Forms offers you 60+ numerous built-in ready-made form templates. You can use any one of them with a single click for serving the respective purpose. Once you’re done with the click, you will see that a respective form has created automatically.
You can also create forms manually from scratch. To create a form from scratch, simply go to the Fluent Form —> Create a Blank Form, it will display a dialogue box with three default form format and a custom option for creating a new form.
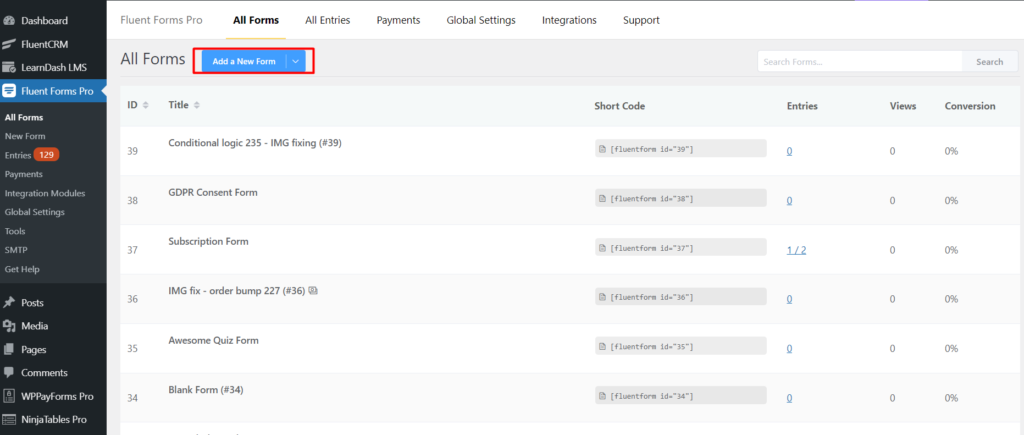
For more details, see how to create a new form with the Fluent Forms.
Once you’re done with the click on the Create a Blank Form, you will find a form builder that will appear with the configuration options. From the right sidebar, you will find a drag & dropable input fields to add the specific feature into your form.
After creating the form, now you have to put the necessary fields into that form. To make it possible, drag and drop the desired fields; for instance, for personal info from you will put four different fields on the form.
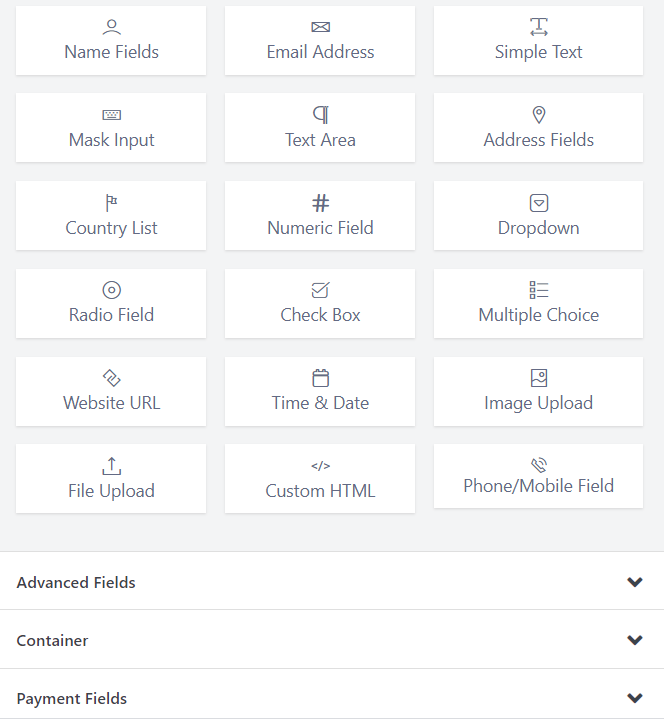
You have the input fields, now you have to click or drag and drop any specific input field to add any feature into your form. Once you have added any input field, change the Element Label for each part according to the desired name. I am leaving a couple of screenshots for your better understanding.
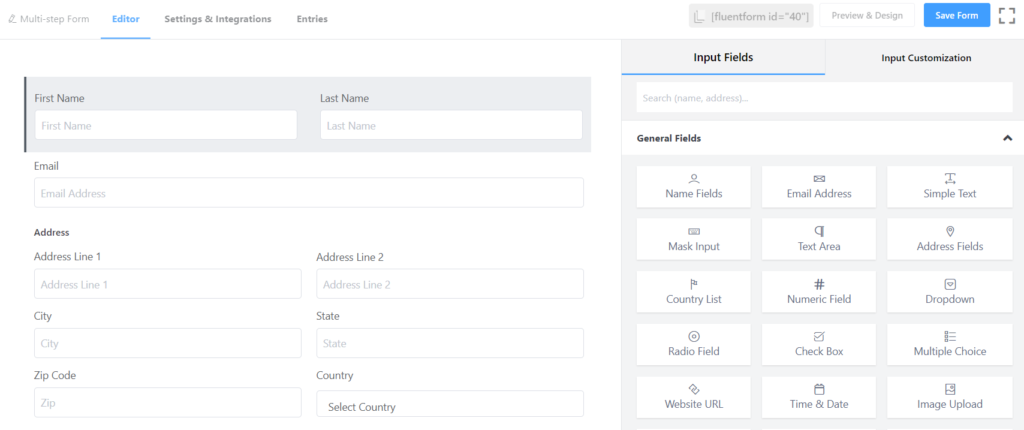
Add Name Fields, Address Fields, Emails according to your need. You can customize every input fields and change their Admin Field Label, Placeholder, Element Label etc.
I’m adding the Dropdown input field to the editor prior to the Address field and naming it as Gender. In the Gender section, you have to configure the options for the dropdown menu.
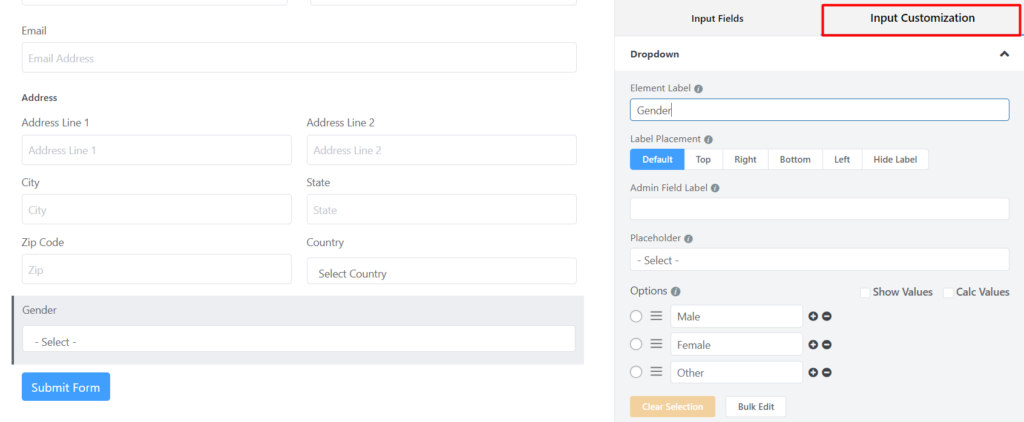
You also can rearrange the input fields simply by dragging & dropping. As you see in the following image that I’m dragging & dropping the Gender input field.
Add Form Step input field where you like to finish first step of your form. This will create a page break in your multi-step form. Add other fields below it to appear in the next page.
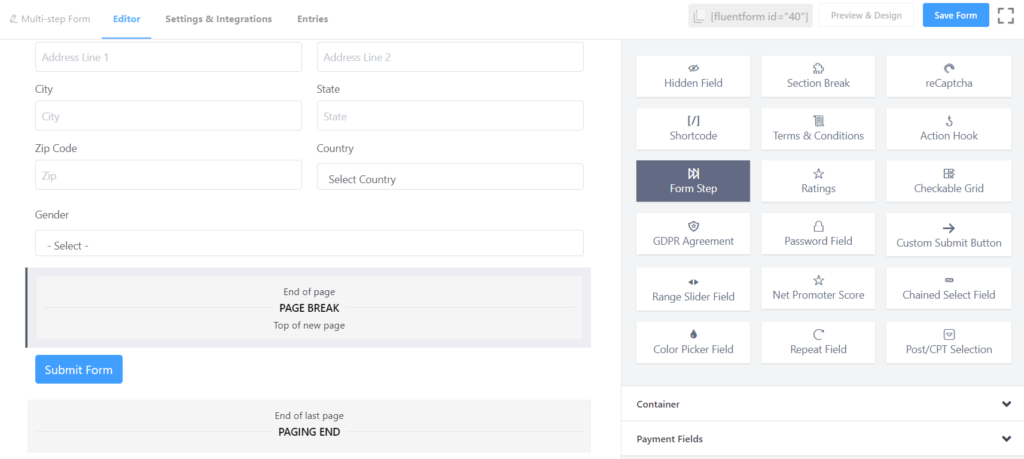
Now put the cursor over the Paging Start section, then you will find the Edit option (a pencil icon). Click on it, and it will take you to Input Customization. There, you have to give a title for every step by clicking the Progress Bar button.
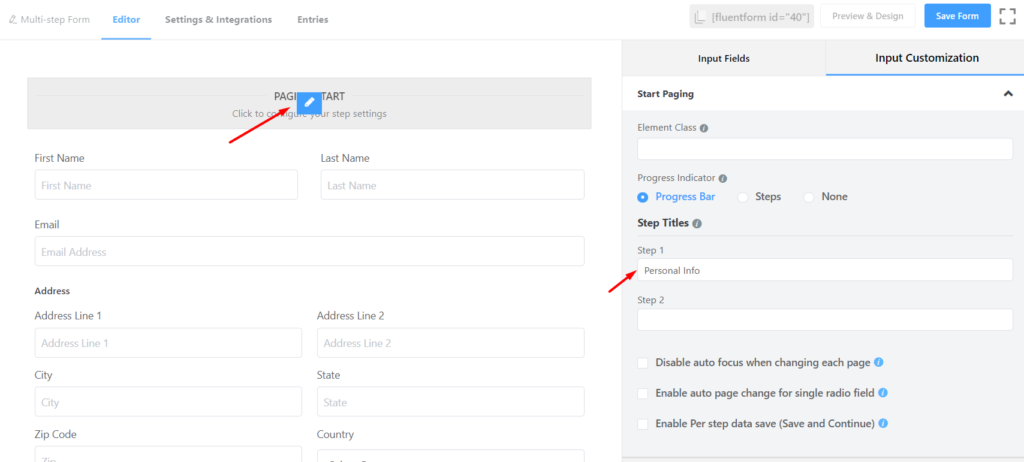
Write down the title name for each step. For instance, write Personal Info in the Step 1 input field. Write Education in the Step 2 input field and so on. Now take a look at the preview section.
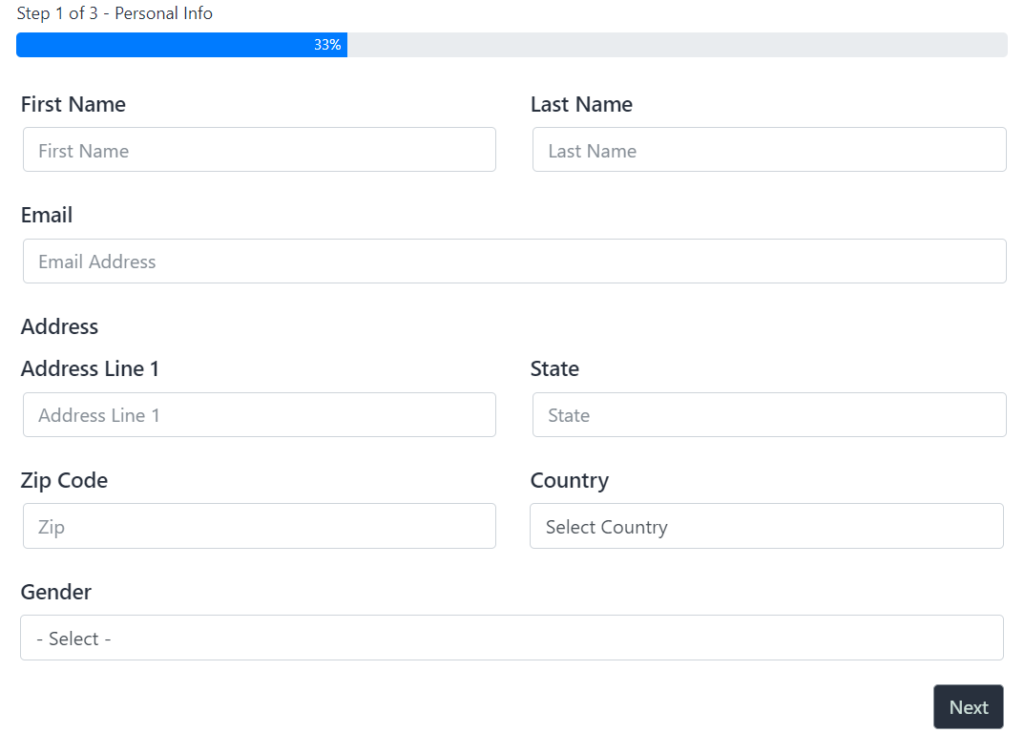
The picture shows that one progress bar and one Next button as an indicator in the top & bottom part of the form respectively.
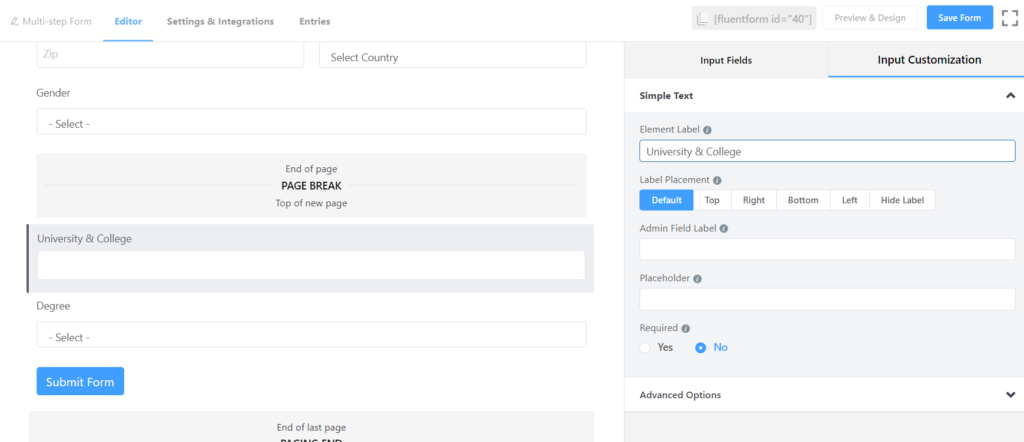
Now you have to work on the second page of the form which indicates the education part of the form. For this, you can use the Simple Text field for University & College for input. You have to use the Dropdown field for ‘Degree’ input in the form.
Let’s take a look at the screenshot for each and every input field. For university and college, you have to customize labels first.
For the Degree input field, you have to use the Dropdown input field. In this case, you have to customize your label first, then you have to give options for the dropdown list.
Now, you will go to the third page which is related to the hobby of the user. To make this happen we have to select again Form Step to make an approach for this.
A new input field will be created instantly after clicking the Form Step field in the Paging Start section. Write down the title name for the third step by clicking on the Edit option of the ‘Form Step’ section.
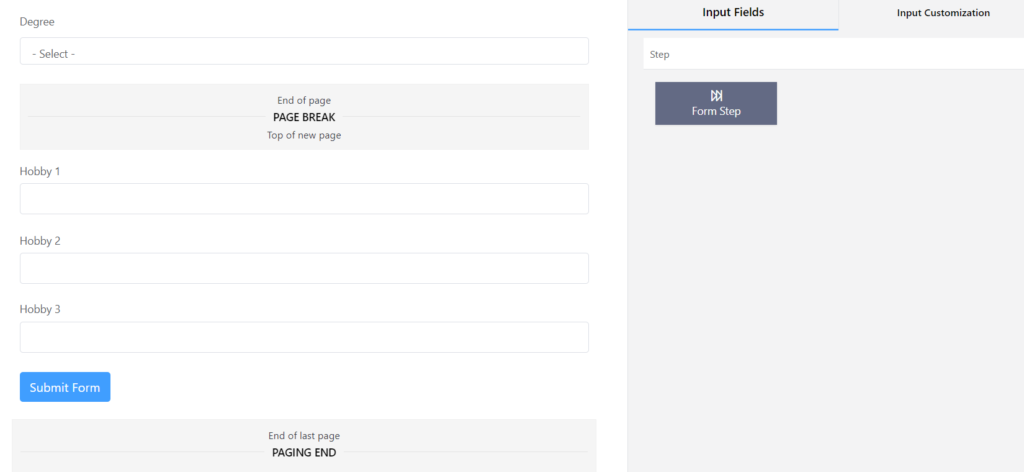
Write down the title by typing Hobby in the input field. Then go for the third section of the form. You can select a Simple Text field for each hobby.
You have to drop it to right above the Submit Form button.
In this way, you can take two more Simple Text area to give a total view in the third section of the form. Then customize the ‘Element Label’ with the text of Hobby One.
You have to customize the rest of the two fields with the name of Hobby Two and Hobby Three respectively. Then look at the preview of this interface.
At the bottom of the page, you can give the Terms & Condition field to complete the total procedure. Then we can have look through to the total process of submitting the form.
Now, take a look at the ultimate preview.
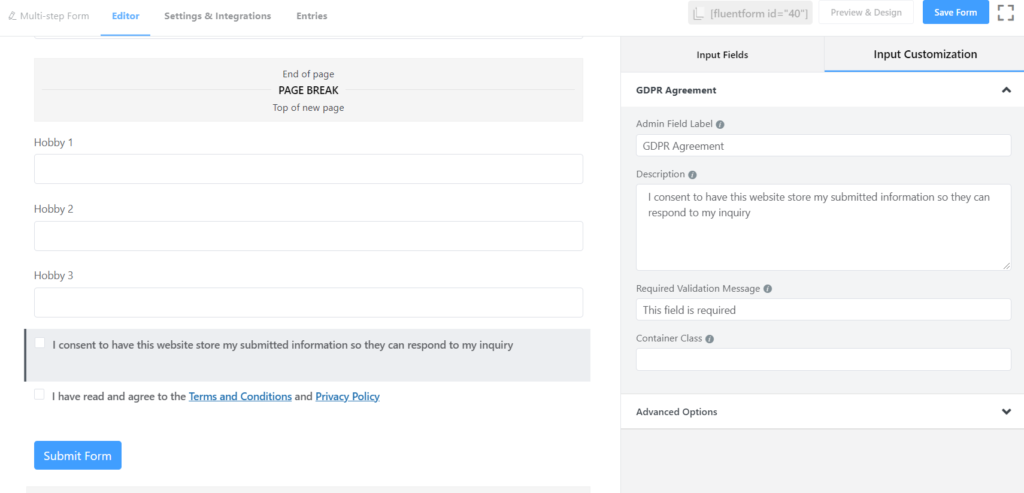
This is how you can create a multi-step form using WP Fluent Form. This is pretty handy and effective working with WP Fluent Form as it gives you the most convenient features making a multi-step form for serving your specific purposes.
To avail this functionality and create beautiful, compact and intuitive multi-step forms, download WP Fluent Form Pro Add-on now!
Do subscribe to our YouTube channel to get WordPress-related tips and tricks. Also, follow us on Twitter and Facebook.

Related Posts
Comments
-
I usually follow this kind of subject. In the form of a nice chat, the question is answered. I think it’s successful.
-
Enjoyed the post.
-
Happy to see that you found the article enjoyable. Thanks for your feedback!
-
-
Pretty nice post. I just stumbled upon your weblog and wished to say that I have really enjoyed surfing around your blog posts. In any case I will be subscribing to your feed and I hope you write again soon!
-
[…] of form helps to keep the users on track without making them bored. WP Fluent Form allows you to create this type of multi-step form on your […]




Leave a Reply
You must be logged in to post a comment.