

How to Build a RevOps Service With the Best Free CRM Software
Most local service businesses lose leads every day. Inquiries pile up in a shared inbox, calls go unanswered, and follow-up never happens until it’s too late.
To solve this mess, they need a proper customer relationship management system that keeps track of everything.
Usually, when looking for free CRM software, most guides just compare feature lists instead of showcasing any real use case.
In this guide, we’ll build a complete system for a business using free CRM software, along with a few other free tools, to create one working RevOps workflow.
Key Takeaways
- A productized RevOps service turns a free CRM setup into a fixed-price offer: a one-time setup fee, then a monthly retainer to run it.
- FluentCRM, Fluent Forms, FluentBooking, and FluentSMTP work together as one connected ecosystem, entirely on the free tier.
- The workflow runs itself end to end: a website inquiry gets tagged and welcomed instantly, a booked consultation logs automatically, and a follow-up automation sends a budget estimate and closes the deal two days later.
- FluentBooking’s free tier includes a working FluentCRM integration, not a Pro-only feature, which is the build’s key differentiator.
- Because everything lives on self-hosted WordPress, the client owns their contact data outright, even if the retainer ends.
What a Productized RevOps Service Actually Is
Let’s look at an example to explain this.
A landscaping company owner keeps losing leads because inquiries pile up in an inbox nobody checks. Instead of charging by the hour every time they need help, you sell a single package.
A flat fee sets up their CRM, then a small monthly fee keeps it running. That’s a productized service: the owner knows exactly what they’re paying for, and you know exactly what you owe them in return.
This guide walks through one version of that offer, built for a local service business: a CRM and follow-up system, sold as a setup fee plus a monthly retainer.
The example used throughout is a residential landscaping company, but the same setup works for clinics, contractors, and other local service businesses.
Why FluentCRM Works as a Free CRM Software Foundation
Building that offer starts with picking the right foundation.
FluentCRM handles contact storage, tagging, email campaigns, and basic automation, all within WordPress rather than on a separate hosted platform.
The free version isn’t a stripped demo. It includes unlimited contacts, list and tag management, a full email campaign composer, and automations triggered by real events like form submissions.
That combination is what makes it viable as the base of a paid service. A client doesn’t need enterprise marketing automation. They need:
- Every inquiry captured the moment it comes in
- A fast first reply, before the lead cools off
- A simple way to book a call
And a Free CRM software like FluentCRM already covers all three.
Who Buys This Service?
Capability answers one question; the market answers another.
The buyer is any owner-operated local business currently losing leads to a shared inbox or a sticky note.
So, landscaping is a strong example niche because the sales stages repeat: inquiry, on-site consultation, proposal, won or lost. A missed lead is expensive because landscaping jobs often run into the thousands of dollars, so losing one means losing real money.
Without CRM software, the owner has to remember every lead by hand, and something always slips through.
That’s why they pay for a complete system. A business running two or three consultations a week doesn’t need anything complicated. It just needs every lead saved and followed up the same day.
What Do You Need to Build the Workflow?
FluentCRM alone is not a complete system. It stores and manages contacts, sends emails and SMS, but it needs two more free tools to capture leads and turn them into booked appointments: Fluent Forms, FluentBooking, and a free SMTP tool, FluentSMTP, to deliver emails.
Here’s what each one handles:
- Fluent Forms: Builds the inquiry form on the website and pushes every submission straight into FluentCRM.
- FluentBooking: Gives prospects a public page to book a consultation, then logs that booking back on the same contact record.
- FluentSMTP: Handles email deliverability, making sure your automation and campaign emails actually land in the recipient’s inbox instead of getting lost or flagged as spam.
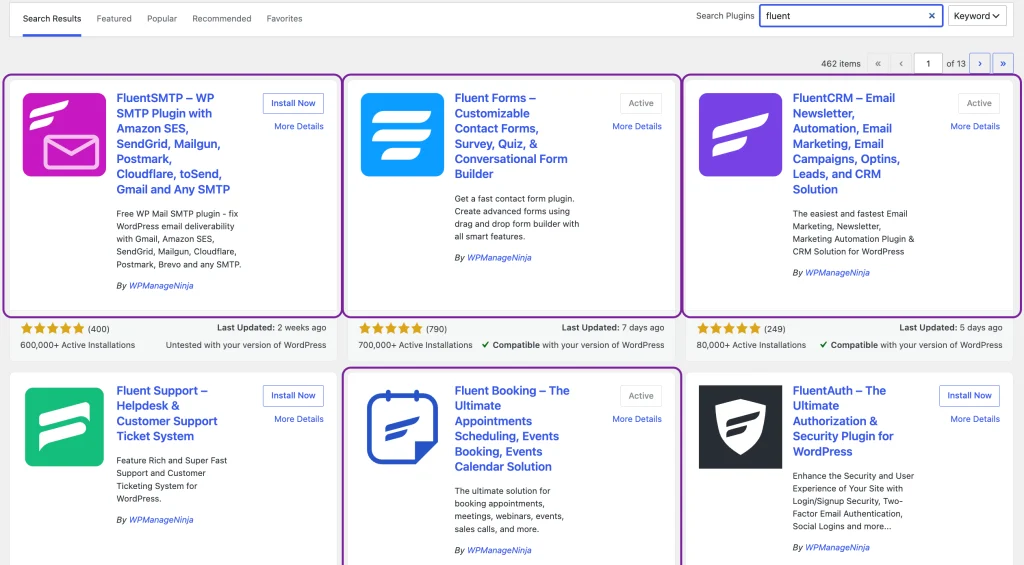
With all related pieces defined, here’s how to get everything running. You need a WordPress site and four free plugins.
If you’ve installed a plugin before, this takes about five minutes:
- In your WordPress dashboard, go to Plugins > Add New.
- Search for FluentCRM and install the plugin listed as FluentCRM by WPManageNinja.
- Repeat the search for Fluent Forms, FluentBooking, and FluentSMTP, then install and activate all.
Except for FluentSMTP, the other three plugins connect natively once they’re active on the same site. There’s nothing extra to configure to link them together.
For FluentSMTP, you just need a minute or two to set it up for your website.
All four plugins are built by the same team as one connected ecosystem, so they work in sync without additional setup.
Set up FluentSMTP for reliable delivery
FluentSMTP is the one exception: it does not work out of the box. It needs to be pointed at a real mail provider before it can send anything:
- Go to Settings > FluentSMTP in your WordPress dashboard.
- Click Add New Connection and choose a mailer, such as Brevo, SendGrid, or Amazon SES.
- Enter the API key or SMTP credentials from your chosen provider’s dashboard.
- Set this connection as the default mailer.
- Send a test email from the FluentSMTP dashboard to confirm it arrives.
Build the Free Workflow, Step by Step
The build below uses the landscaping example so the field names and screens are concrete, but the structure works for any local service business. Swap the specific tags and questions for your own niche.
Step 1: Set up the contact model in FluentCRM
Before connecting any form, decide how contacts get organized.
FluentCRM uses two structures for this, and both are unlimited on the free plan.
Lists track where a contact sits in the relationship: New Leads, Active Clients, and Past Clients. A contact belongs to one list at a time, which keeps campaign targeting unambiguous.
Tags track behavior and interest, and a contact can carry several at once.
To create lists and tags,
- FluentCRM > Contacts > Lists and click + Create List
- FluentCRM > Contacts > Tags and click + Create Tag

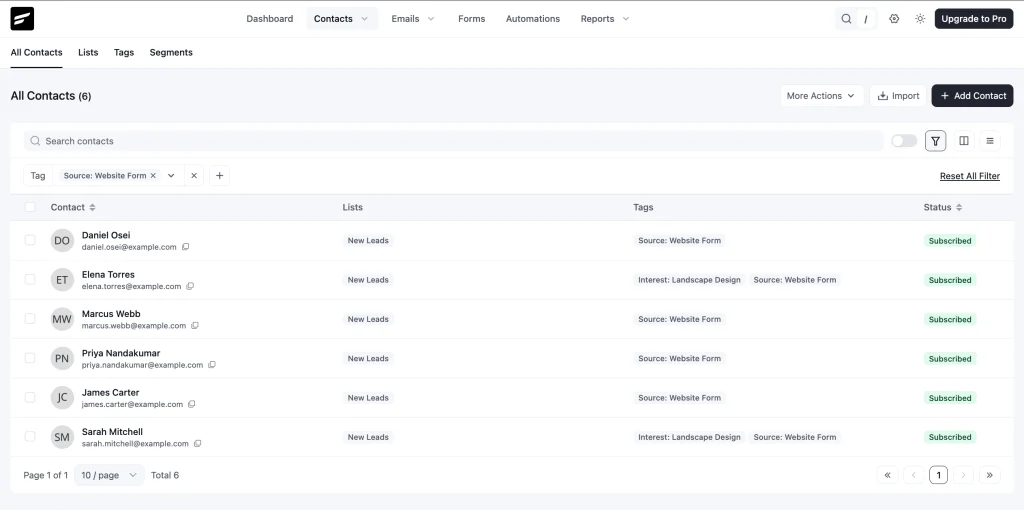
This workflow uses Source: Website Form, three interest tags tied to a dropdown on the lead form (Interest: Landscape Design, Interest: Lawn Care Program, Interest: Hardscaping), and pipeline tags: New Website Lead, Consultation Booked, Won, and Lost.
This workflow has four tag groups that cover the pipeline end to end, and each one gets applied by a different part of the workflow, covered step by step below:
- Source: Website Form: Marks where the contact came from. Fluent Forms applies it automatically the moment someone submits the lead form (Step 2).
- Interest: Landscape Design, Interest: Lawn Care Program, and Interest: Hardscaping track what the prospect actually wants.
They’re tied to the project-type dropdown on the lead form, and later campaigns segment on them (Step 4). - New Website Lead: Flags a fresh, unworked inquiry. The welcome automation applies it right after the first form submission (Step 3).
- Consultation Booked: Marks a scheduled call. FluentBooking applies it automatically through its own FluentCRM integration feed the moment someone books (Step 5).
- Won & Lost: Close out the pipeline. Apply these by hand once a deal is decided (Step 6), since the free plan doesn’t support that branch automatically.
Step 2: Capture leads with Fluent Forms
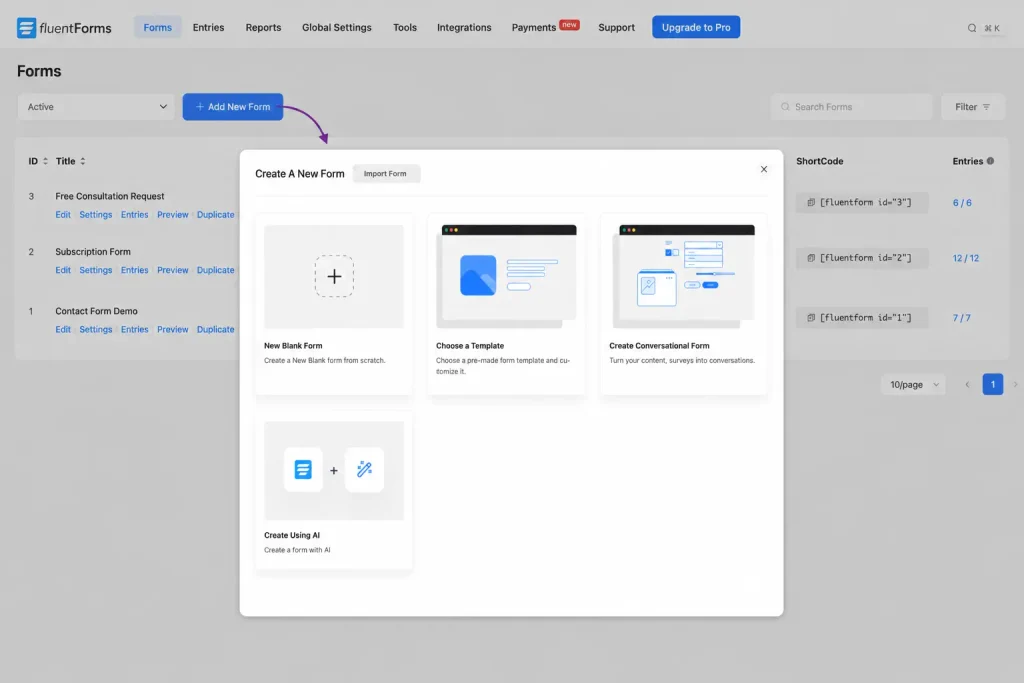
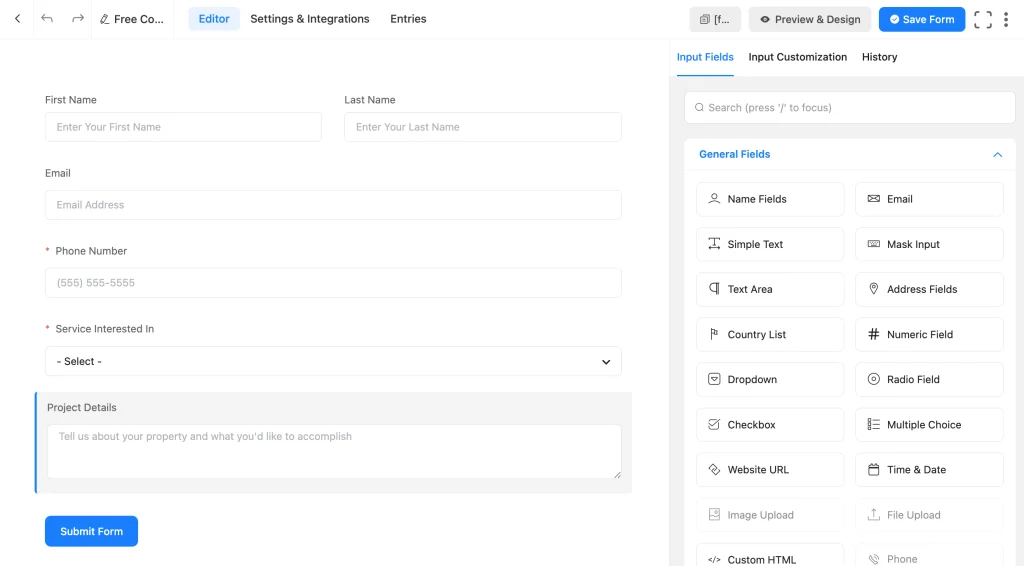
Fluent Forms builds the actual inquiry form to capture leads, in this case a Free Consultation Request form asking for name, email, project type, and a short description of the space.
Build it in five steps:
- Go to Fluent Forms > Add New Form and choose a blank form.
- Add Name and Email as required fields.
- Add a dropdown for project type, matching your interest tags.
- Add a text area for the space description.
- Save the form.
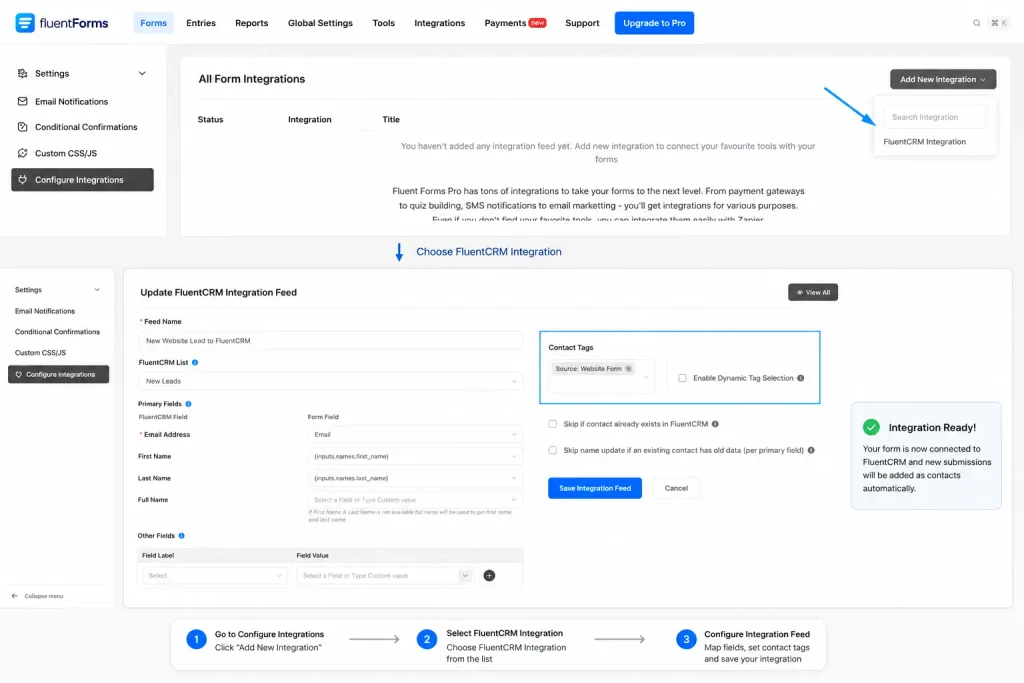
Now connect it to FluentCRM. This integration is fully available in the free version of both plugins; no add-on required:
- Open the form and go to Settings & Integrations > Configure Integrations.
- Click Add New Integration and choose FluentCRM Integration.
- Name the feed New Website Lead to FluentCRM.
- Set the list to New Leads.
- Map Email, First Name, and Last Name to their matching form fields.
- Enable the feed and save.
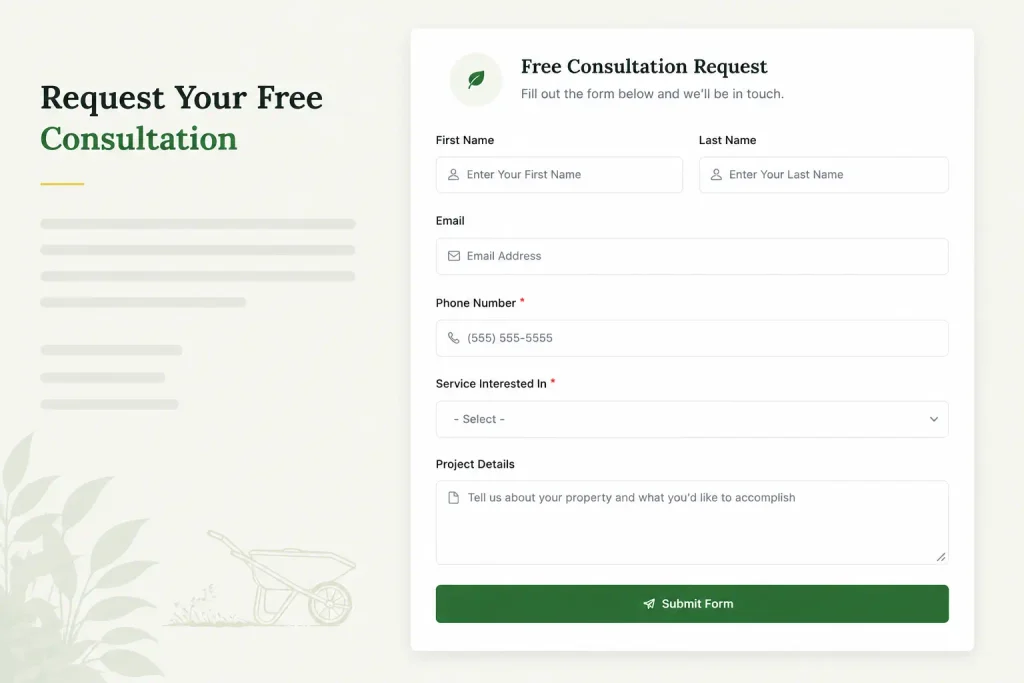
With the form built and connected, the next step was putting it where visitors could actually find it. We copied the shortcode and placed it inside the main website where people can easily navigate to it for an inquiry.
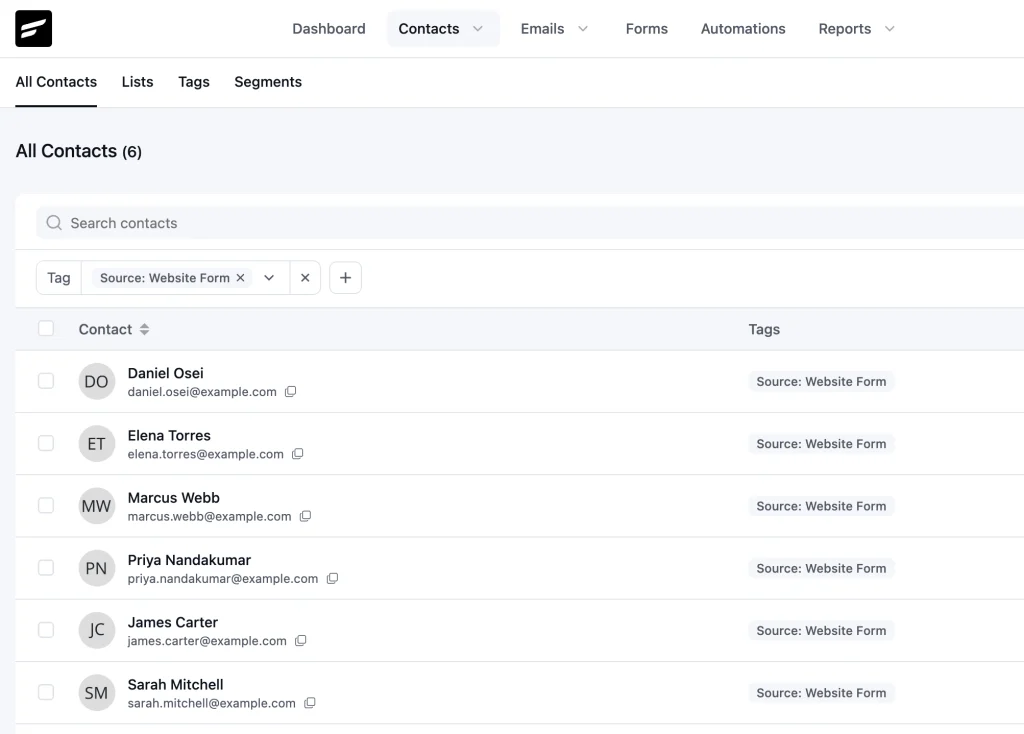
Six real submissions were run through this exact feed during testing, and every one appeared in FluentCRM on the New Leads list with the Source: Website Form tag applied automatically.
Step 3: Send an instant welcome automation
Getting the lead into the CRM is only half the job; replying fast is the other half.
This is where many free CRM software tutorials assume the free tier is too limited to bother with.
It isn’t. FluentCRM’s free automations, called funnels, support a real trigger and a genuinely useful set of actions.
For this business, the goal is simple: reply to every new inquiry within minutes, not hours, so the lead never sits untouched in a shared inbox.
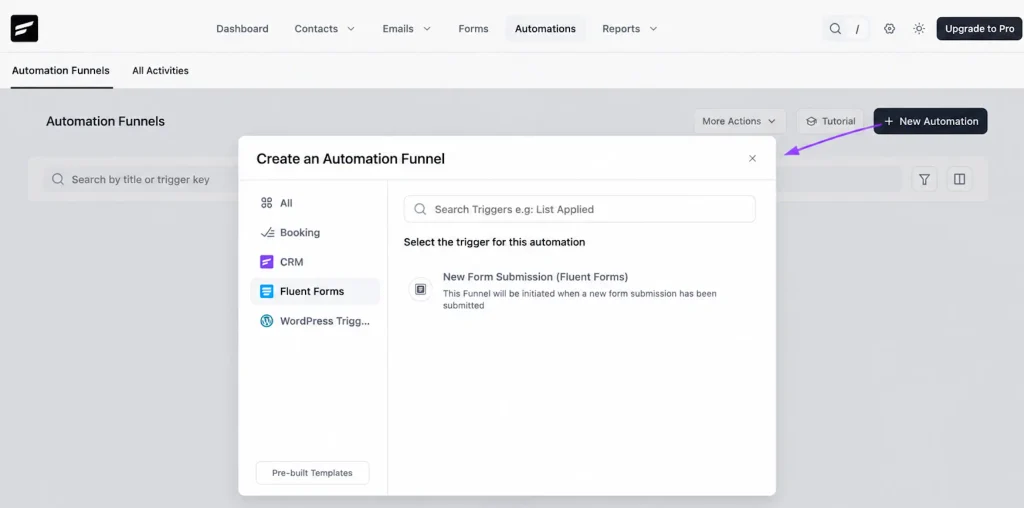
For this, we are going to prepare an automation and select the New Form Submission (Fluent Forms) trigger. It will instantly identify the leads coming into the contact profile through the form we configured earlier.
Here’s the complete funnel building process:
- Go to FluentCRM > Automations > New Automation.
- Choose the New Form Submission (Fluent Forms) trigger and select your form.
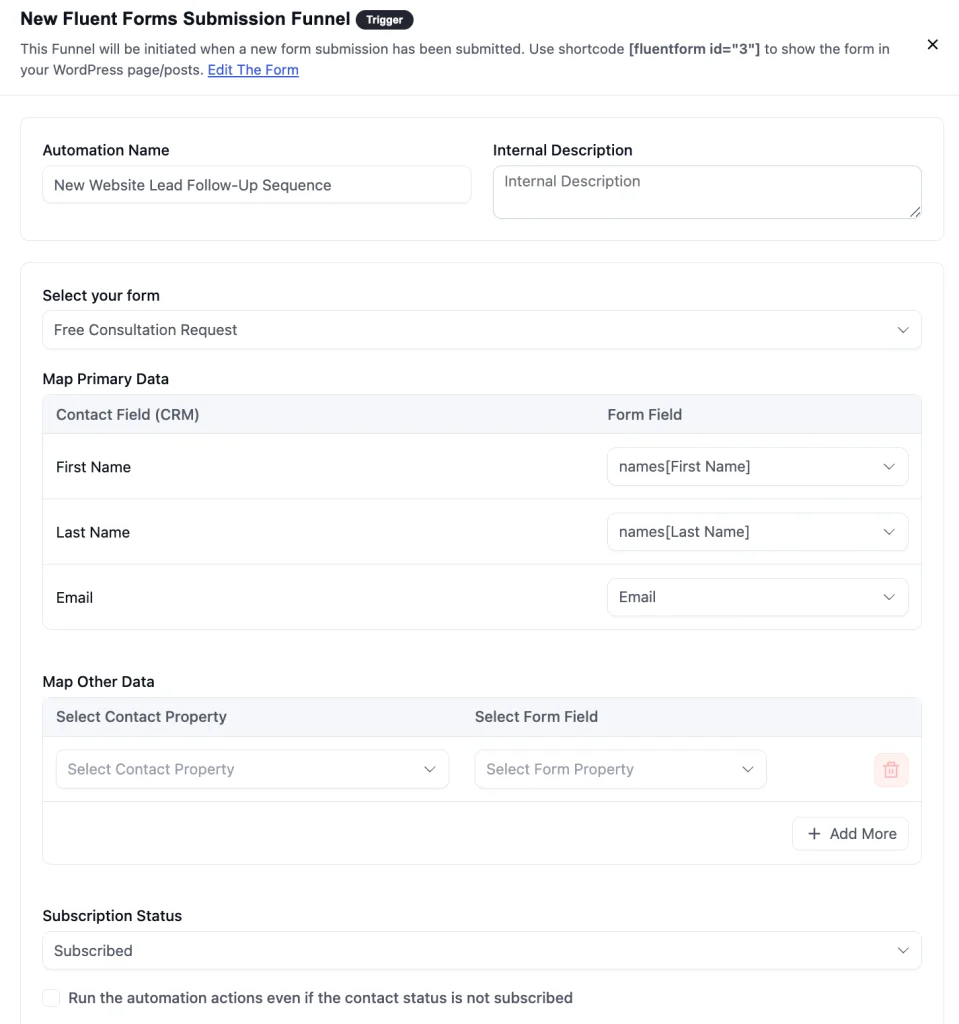
- Name it New Website Lead Follow-Up Sequence.
- While configuring, select the Free Consultation Request form from the ” Select your form” dropdown so this automation only fires on real inquiries from that form.
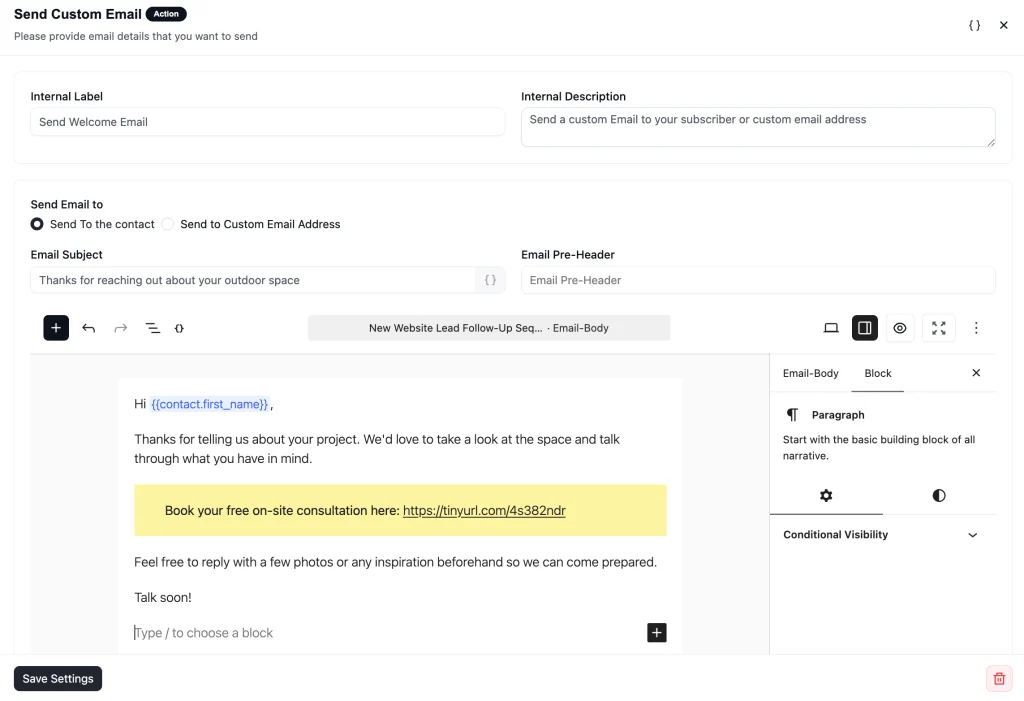
- Add a Send Custom Welcome Email action that sends an instant welcome email with a link to book the consultation. (Step 4 covers how that booking link and page get set up.)
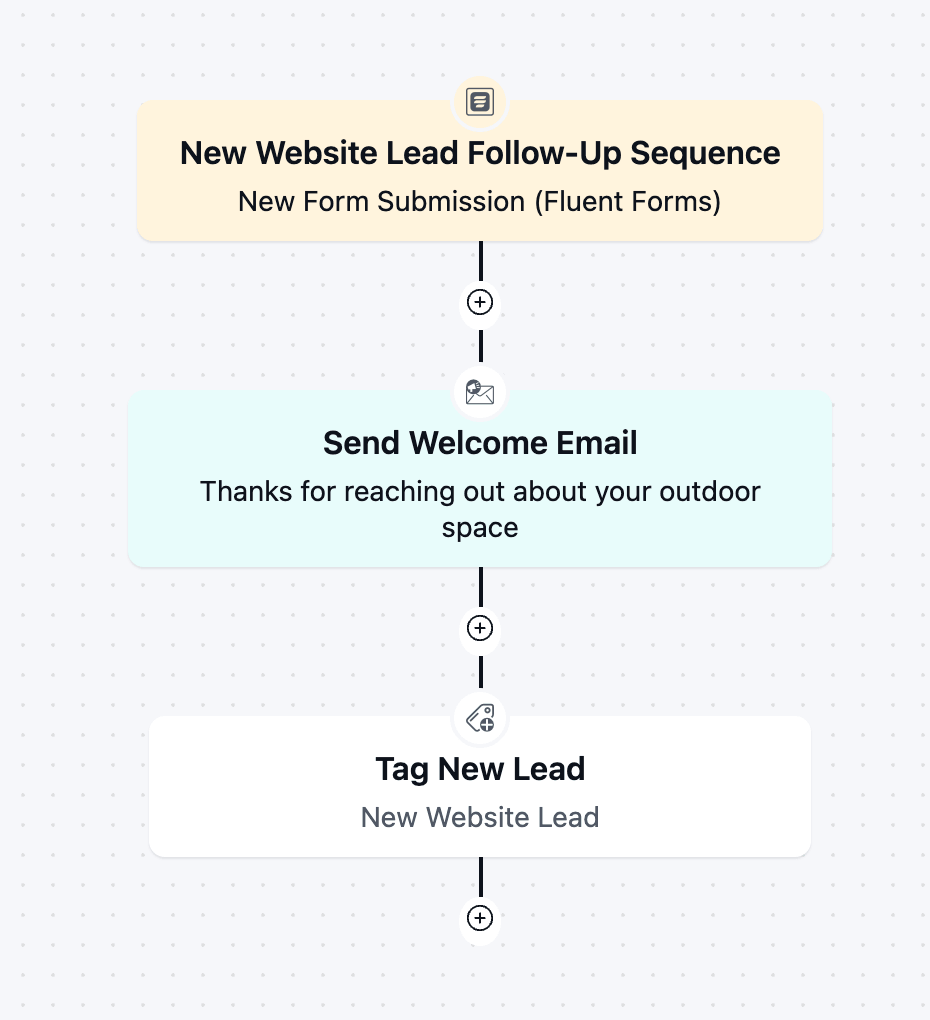
- Add an Apply Tag action and apply New Website Lead.
- Set the automation to Published.
Step 4: Book consultations with new leads using FluentBooking
This step produced the most useful finding in the whole build.
FluentBooking‘s free tier includes a working FluentCRM integration, not just a Pro teaser. Set up the event first:
- Go to FluentBooking > Calendars and create a host calendar.
- Click Create Event and choose One-to-One.
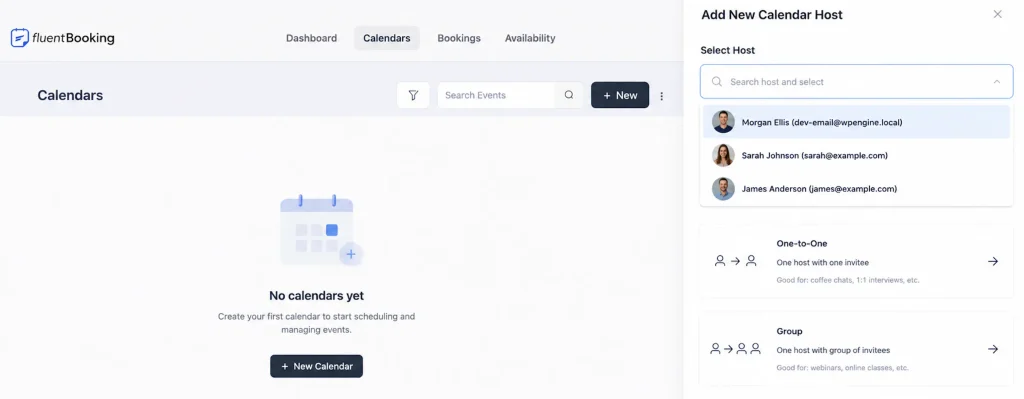
- Name it Free Landscape Design Consultation and set the duration to 30 minutes.
- Set the location to In Person (Attendee Address).
- Set your weekly availability.
- Save the event.
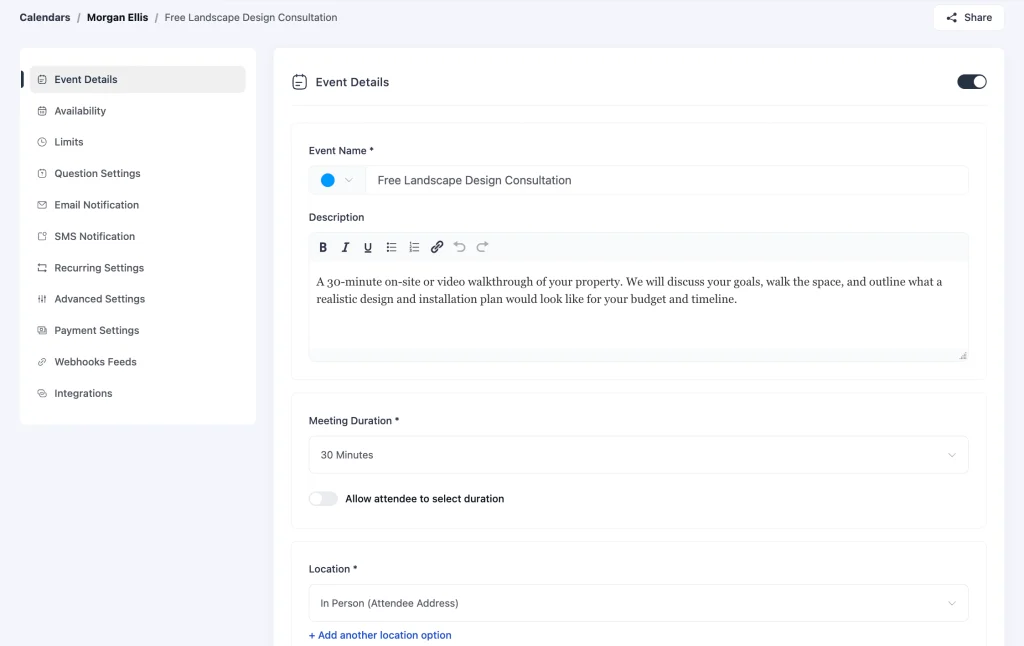
Although Video conferencing locations, including Google Meet, Zoom, and Microsoft Teams, are marked Pro inside the event editor.
For a landscaping business built around on-site visits, that’s not a real limitation. For a service built around remote calls, it’s the first good reason to consider Pro.
Now connect the event to FluentCRM:
- Open the event’s Integrations tab.
- Click Add New Integration and choose FluentCRM Integration.
- Map guest name and email to your CRM fields.
- Apply the Consultation Booked tag.
- Set the trigger to Booking Confirmed and save.
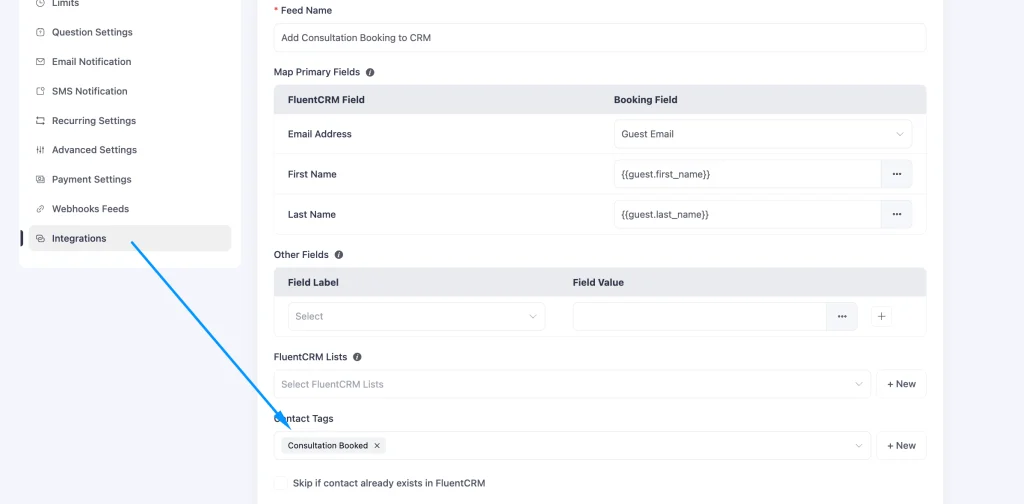
Once the booking is set for the launch, the booking link is then copied and shared via a Custom Welcome Email so the new leads can have direct communication.
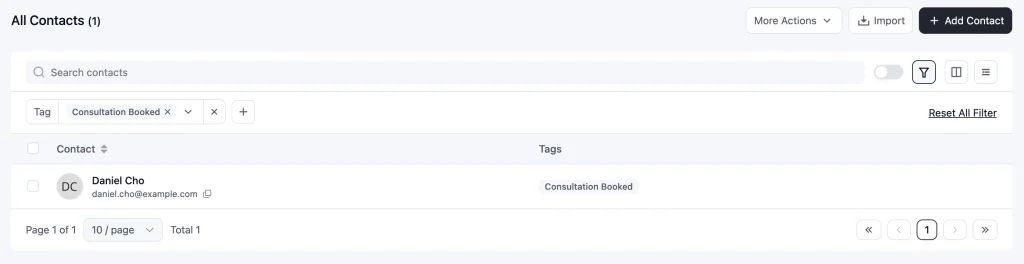
For testing and demonstration, we ran a real booking through the public scheduling page to confirm this works.
After a prospective client booked a slot, their FluentCRM record showed the Consultation Booked tag and a Bookings tab listing the event, its status, and its date. The booking shows up on the timeline, not just as a bare tag.
Step 6: Automate the follow-up to close the deal
The consultation itself happens on-site, off the CRM. What happens right after it wraps up is what keeps the deal moving.
FluentBooking marks an event Completed once its scheduled time passes, and that status change can trigger a second automation on its own:
- Go to FluentCRM > Automations > New Automation.
- Choose the Booking Completed (FluentBooking) trigger and select the Free Landscape Design Consultation event.
- Name it Post-Consultation Follow-Up.
- Apply List action and set it to Active Clients, so the contact moves off New Leads.
- Add a Wait X Days or Hours action and set it to 2 days.
- Add a Send Custom Email action with a written budget estimate and the recommended next step.
- Add an Apply Tag action and apply Won.
- Set the automation to Published.
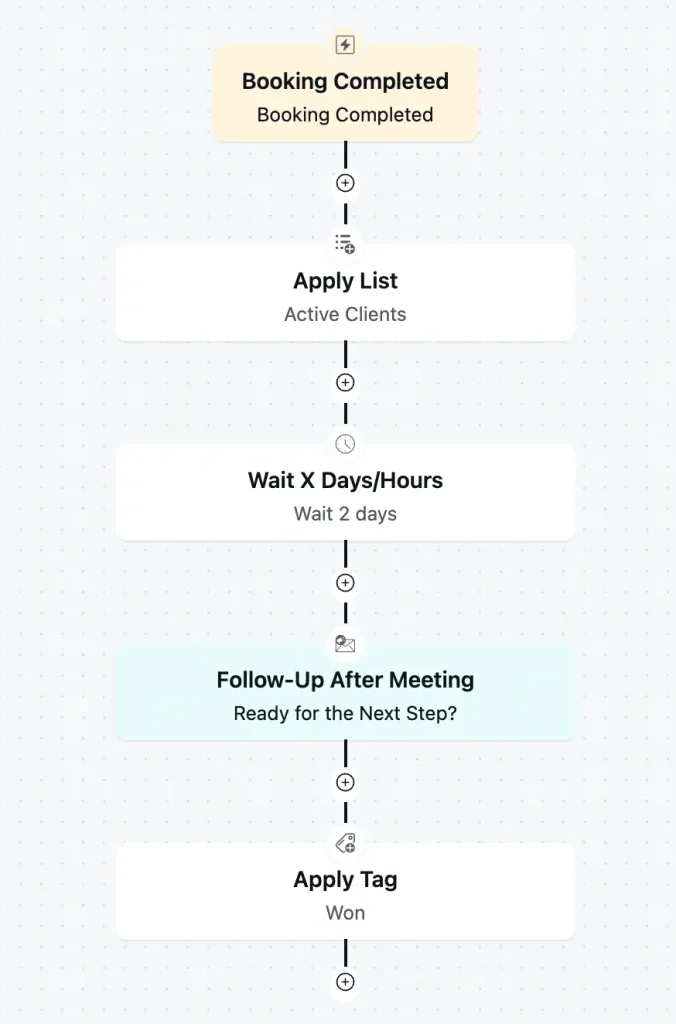
Remember: The wait time matters more than it looks. It gives enough time to put a real number on the estimate instead of firing off something generic the moment the consultation ends.
By the time the follow-up lands in the client’s inbox, the deal is closed on the CRM side too, as the contact moves to Active Clients. And once the response happens, that client is moved to the Won tag automatically; no manual action required.
Test the Workflow Before You Launch It
Before turning any of this on for a real client, run it through its paces the same way each piece was tested while building it. Run at least five test submissions covering the range of real leads before making anything public:
- A Strong Lead: Submit with a clear project type and full details. Confirm the contact lands on New Leads with the right tag and the welcome email arrives.
- A Vague Lead: Submit with minimal detail in the description field. Confirm the data still lands correctly so you can follow up manually.
- An Incomplete Lead: Fill only the required fields. Confirm nothing breaks, and the contact still gets created.
- A Booking: Click through to FluentBooking and book a real test slot. Confirm it appears in FluentBooking and the tag lands on the matching CRM contact.
Where Fluent Forms Pro, FluentCRM Pro, and FluentBooking Pro Come into Action?
The free build above is a complete, usable, and sellable first offer.
It isn’t the ceiling. Specific paid features remove specific manual work.
For example
- Conditional Automation Branching: Replaces the manual “move won/lost deals” step with a real yes-or-no branch. Worth it once a client closes enough deals that the manual step becomes a bottleneck.
- Dynamic Segments: It replaces static list membership with rules that update automatically, useful once a client’s list is large enough that manual segmentation starts missing people.
- Recurring Campaigns & Email Sequences: These matter once the retainer produces more than one send a month.
- Video-conferencing: Locations in FluentBooking matter the moment a client’s consultations aren’t done on-site, which covers most service categories besides trades like landscaping.
- Payment fields in Fluent Forms: It lets a client pay a deposit directly on a form instead of over the phone or by invoice. Useful once the budget estimate email explained in Step 6 needs a way to actually collect money, not just propose a number.
Data Ownership Is Part of the Pitch
One real advantage of building this on self-hosted WordPress instead of a hosted platform is worth stating plainly: the client’s contact data lives in their own database, not inside a vendor’s system that could change pricing or shut down.
If the retainer ever ends, the client already owns their data. This is a business consideration, not a security guarantee.
Self-hosting shifts responsibility for backups and updates onto whoever manages the site, typically the service provider as part of the retainer.
Turn This Into a Repeatable Service
The lists, the tag categories, and the monthly checklist are all niche-agnostic.
Only the interest tags, the form questions, and the campaign copy need to change from one client to the next. Keep a template site with this structure pre-built, and the second client becomes a configuration job measured in hours.
The workflow demonstration is given here; save it and start with FluentCRM, connect it to Fluent Forms, FluentBooking, and FluentSMTP, and you can have the full workflow running for a real client within an afternoon.

Words are my favorite playground. As a Creative Writer at WPManageNinja, I don’t just produce content; I tell stories. By mixing fiction and metaphors with real-life examples, I turn my writing into a creative journey that’s easy for readers to digest and relate to.
-
10 Best jQuery Table Plugins for Best Data Visualization in 2026
Discover the 10 best jQuery table plugins for 2026. Compare -

Black Friday Marketing Strategies for 2026: Core and Advance Move
Black Friday is the most celebrated shopping season worldwide. Discover -

How Much Can You Earn With Amazon Affiliate Marketing? Rates & Niches
How much can you earn with Amazon affiliate marketing? Dive


Leave a Reply
You must be logged in to post a comment.