
How to Sell Videos Online With WordPress (Step by Step) in 2026
Selling videos online is one of the smartest ways to turn knowledge into income. Fitness trainers, consultants, course creators, and niche educators are building real, recurring revenue from it every day.
The audience is there. According to Wyzowl’s 2026 State of Video Marketing report, 91% of businesses use video as a marketing tool, and the average person now spends 17 hours per week watching online videos. That is nearly 2.5 hours every single day.
Most creators jump straight to platforms like Gumroad, Teachable, or Udemy. They are quick to set up, but you trade away your margins, your customer data, and your control from day one.
Platform rules change. Commission rates go up. Accounts get suspended. And everything you built lives on someone else’s infrastructure.
WordPress gives you a different path. You own the store, the content, the customer relationships, and every dollar you earn beyond payment processor fees.
In this blog, we will walk you through the complete process: which tools you need, what each one does, and how to set everything up step by step so you can start selling confidently.
TL;DR
- You need WordPress hosting, a domain, and an SSL certificate before anything else
- FluentCart is your store: it handles product listings, checkout, payments, subscriptions, and bundles
- There are two main selling approaches: direct video download (simple) or gated course delivery via FluentCommunity (structured)
- FluentPlayer lets you embed a branded video preview on your product page before purchase
- After payment, buyers either get a download link in their account or get auto-enrolled into a FluentCommunity course
- FluentCRM connects to FluentCart to automate tagging, welcome emails, follow-ups, and upsells
- Test each phase as you build, then do a full end-to-end run before going live
Before You Start: What You Will Need
You cannot sell anything without a live WordPress site. If you already have one, skip ahead to the plugins section. If you are starting from scratch, here is what you need to get in place first.
- A domain name: Your website’s address (for example, yourname.com). Register one through a domain registrar like Namecheap or through your hosting provider.
- Web hosting: A server that keeps your site online and loads it fast. For video sellers, performance matters. Slow product pages and checkout flows cost you conversions. Choose a managed WordPress host that includes SSL in the plan.
- An SSL certificate: Required for accepting payments. Most hosting providers include this free. It shows as the padlock in the browser and encrypts data between your site and your visitors.
- WordPress installed: Your host will either install it for you or provide a one-click installer from your hosting dashboard.
Once WordPress is running and you can log into your dashboard, you are ready to build your video selling setup.
The Two Ways to Sell Videos on WordPress
Before installing anything, decide which selling approach fits your content. This shapes which plugins you actually need.
Path A: Sell videos as direct downloads
The buyer pays, gets a secure download link in their order confirmation email and account area, and downloads the video file to their device. This works well for single or bundled video assets, stock footage, recorded webinars, or short-form tutorials where the buyer just needs the file.
Main plugins you need for this path:
- FluentCart (required).
- FluentPlayer (optional, for embedding a short preview clip on your product page).
- FluentCRM (optional, for automated email follow-ups).
Path B: Sell gated video courses or libraries
The buyer pays and is automatically enrolled into a members-only course or community space where the videos are hosted and streamed. They watch inside your site, not by downloading a file. This works well for structured courses, video libraries, coaching programs, or any content you want people to consume inside a controlled, branded environment.
Main plugins you need for this path:
- FluentCart (required).
- FluentCommunity (required for access control and course delivery).
- FluentPlayer (recommended for a branded watch experience inside lessons).
- FluentCRM (recommended for onboarding and follow-up automation).
Both paths use FluentCart as the commerce layer. The difference is what happens after payment. We will cover both clearly in the steps below.
Plugins You Will Install
Here is the full list of what gets installed and what each one does, so nothing surprises you mid-setup.
- FluentCart: The ecommerce engine. Handles product creation, checkout pages, payment gateways, order management, subscriptions, and bundles. Self-hosted, no transaction fees beyond your payment processor. Installation guide.
- FluentCommunity: The members hub and course delivery system. Creates private courses and spaces that are only accessible to paying buyers. Integrates natively with FluentCart so enrollment happens automatically after purchase. Used in Path B only.
- FluentPlayer: The video player. Lets you embed a branded, controlled video experience on your product pages (for previews) or inside course lessons (for full content). Supports self-hosted files, BunnyCDN streams, YouTube, Vimeo, and HLS. Optional but strongly recommended.
- FluentCRM: The email automation system. Connects to FluentCart to tag buyers, send welcome emails, drip sequences, and upsell campaigns after purchase. Optional but recommended for anyone building a real business.
Step 1: Install FluentCart and Run the Setup Wizard
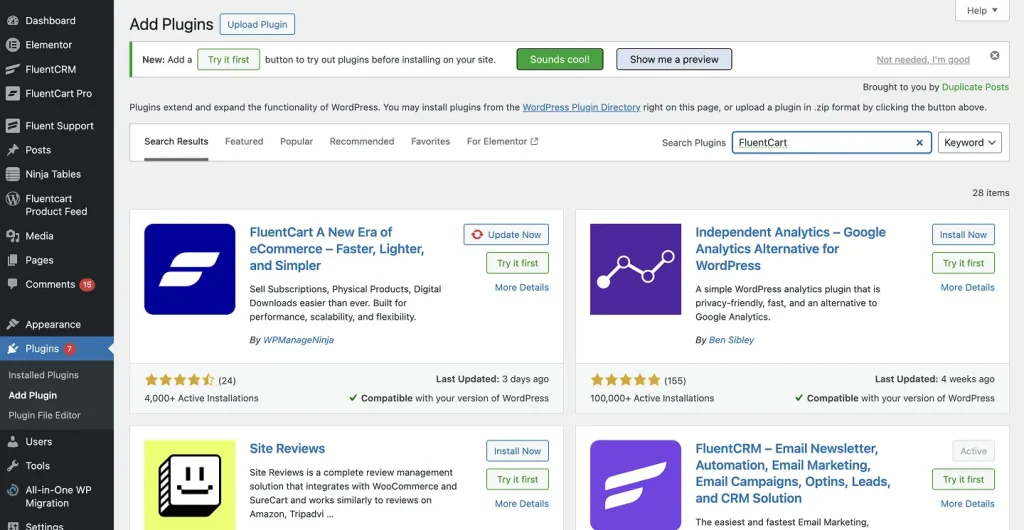
Go to your WordPress dashboard, navigate to Plugins > Add New, search for FluentCart, click Install Now, then Activate.
If you have purchased FluentCart Pro for advanced features, download the Pro Addons zip file from your FluentCart account, then go to Plugins > Add New > Upload Plugin, select the zip, install and activate it.
Enter your license key when prompted to enable automatic updates. Full installation steps are in the FluentCart installation documentation.
After activation, the setup wizard launches automatically. It walks you through three steps.
Store basics
- Shop Name: Enter your store’s public name.
- Store Currency: Select your primary currency. FluentCart supports multiple currencies, so choose the one your audience uses. If you are selling internationally, check that your payment gateway supports it.
- Shop Logo: Upload your brand logo (WEBP, SVG, PNG, or JPG, minimum 512px wide recommended).
Click Continue.
Store pages
FluentCart needs dedicated pages for your shop, cart, checkout, receipts, and customer profile. The easiest option is to click Generate Pages.
This creates all required pages automatically with the correct shortcodes embedded and assigns them in your settings.
You can also select existing pages manually if you prefer. These settings live at FluentCart Pro > Settings > Store Settings > Pages Setup and can be adjusted any time.
See the initial setup wizard documentation for the full breakdown.
Products
Skip this for now. You will create your video product properly in the next step.
Click Save to finish the wizard. You land on the FluentCart dashboard.
Step 2: Create Your Video Product in FluentCart
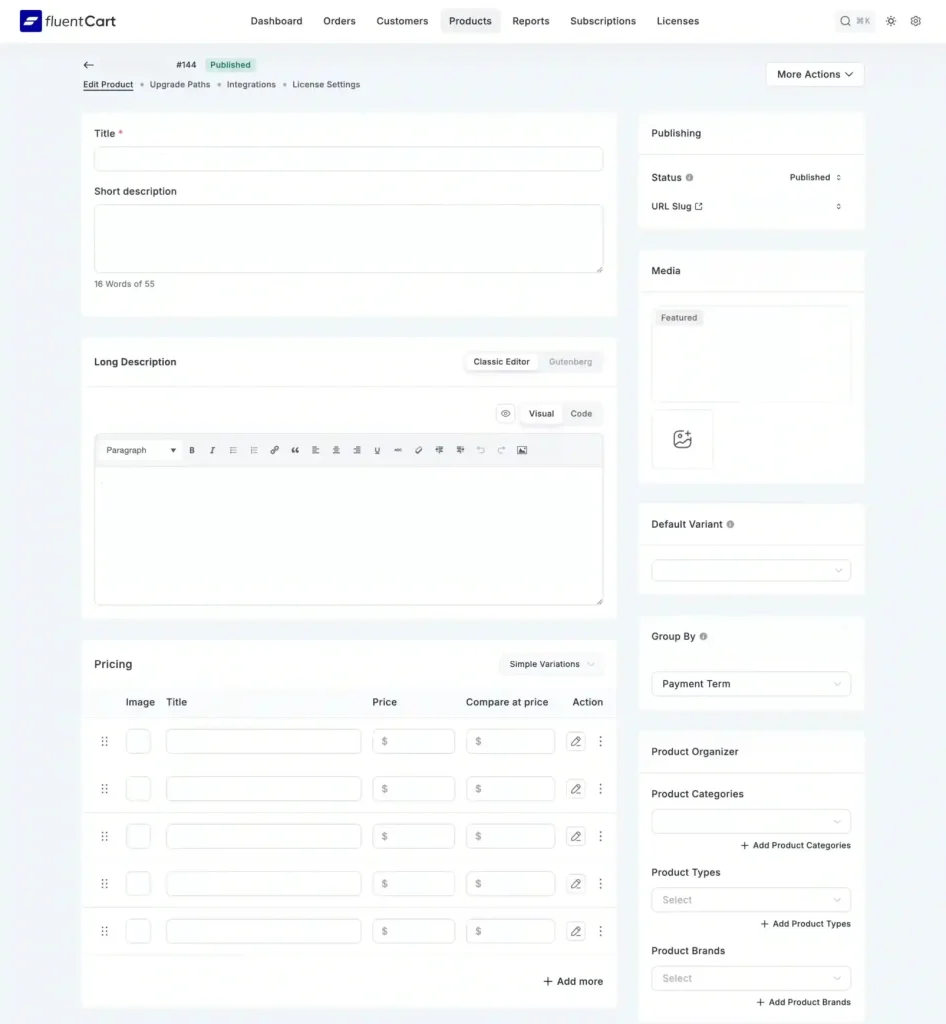
From your WordPress dashboard, go to FluentCart Pro > Products and click the Add Product button at the top right. A modal appears. Enter your product name and select Digital Product as the type. Click Add Product. You are taken to the product edit page.
Fill in your product details
- Title: This appears on your shop page, in the cart, and at checkout. Make it specific. “30-Day Strength Training Video Series” is better than “Workout Videos.”
- Short description: A brief summary that appears near the price on your product page. Write one sentence that communicates the core value.
- Long description: Use the Gutenberg visual builder or the classic editor to write your full product description. Include what the buyer gets, the video duration or quantity, the skill level, and any requirements. A clear, detailed description reduces refund requests because buyers know exactly what they purchased.
- Featured image: This is your product thumbnail. It appears on the shop page, product page, and in order emails. Use a high-quality image that immediately communicates what the content is about. You can also upload additional images or a short video clip under Add Media.
- Categories: Assign the product to a relevant category. This helps with storefront filtering and organization.
Set your pricing
Scroll to the Pricing section. FluentCart gives you two structures.
- Simple (one price): A single fixed price for a one-time purchase. Best for standalone videos, recorded workshops, or single-topic tutorials. Set the Price field, and optionally a Compare at price (shown with a strikethrough to indicate a sale).
- Simple Variations: Multiple pricing tiers. Use this for bundles, resolution tiers (SD vs. HD), or access levels. Each variation gets its own title and price. For example: “Single Video – $29” and “Full Series – $79.”
For subscription pricing, you set a recurring billing interval (monthly, quarterly, annual) on the pricing variant. This is the structure for ongoing video libraries where buyers pay to keep access.
The managing subscriptions documentation covers this in full.
Attach your downloadable video file (Path A only)
If you are selling direct downloads, scroll to the bottom of the product edit page and check the Downloadable Asset(s) checkbox. A new section appears. Click Add Asset and upload your video file or paste an external URL (for example, a private S3 link or a BunnyCDN stream URL).
Important note on file storage: Uploading large raw video files directly to your WordPress media library will significantly slow your site and can cause hosting account issues if you exceed bandwidth limits.
For anything over a few hundred megabytes, store the file on a CDN like BunnyCDN or Amazon S3 and link the URL in the asset field instead of uploading directly. FluentCart supports Amazon S3 storage natively under FluentCart Pro > Settings > Storage Settings.
After purchase, FluentCart generates a secure, auto-expiring download link that the customer receives in their order confirmation email and can access from their account area. The link is protected from search bots and unauthorized access.
Set your refund policy
FluentCart lets you define a refund window per product. A 7 to 14 day window is standard for digital video content. It reduces purchase hesitation without exposing you to unlimited refund risk.
Click Publish when you are ready to make the product live. To find your product page URL, look in the Summary section on the right side of the product edit screen.
Step 3: Add a Video Preview With FluentPlayer (Optional but Recommended)
Whether you are selling a download or a gated course, showing a short preview clip on your product page before purchase is one of the most effective conversion tools available.
A 15 to 60 second clip that demonstrates your teaching style, production quality, or content value gives buyers confidence before they pay.
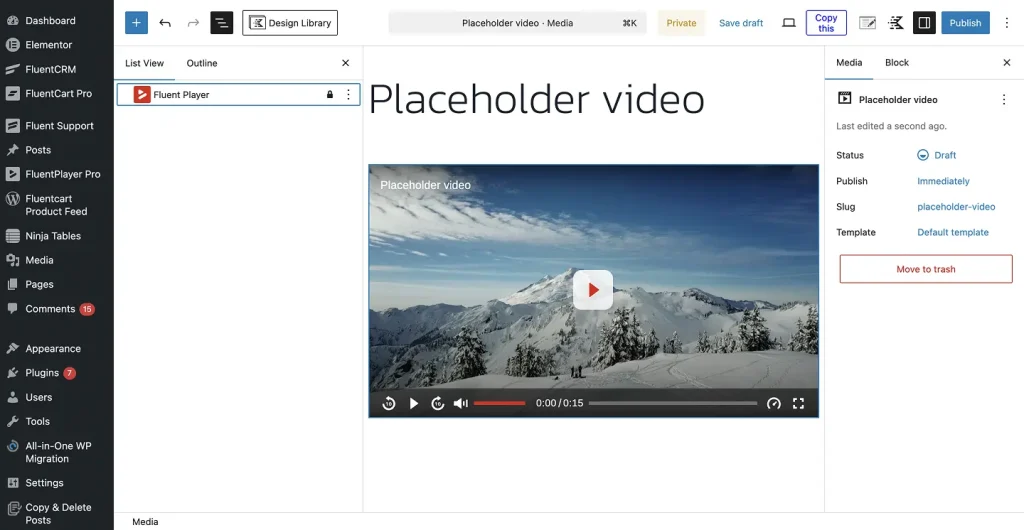
Install FluentPlayer from Plugins > Add New, search for FluentPlayer, and activate it.
On your product page, open the page editor (the product page FluentCart created uses WordPress blocks). Add a FluentPlayer block to your page layout, above the purchase button or in your product description section.
In the block settings, paste your preview video URL. This can be a YouTube link, a Vimeo embed, a BunnyCDN stream URL, or a direct file URL. FluentPlayer works with all of these from the same interface.
Configure your player for the preview
- Custom branding: Upload your logo and set the control bar color to match your site’s design. This makes the preview feel like it belongs to your brand, not a generic embed.
- Autoplay settings: For a preview on a product page, autoplay muted can work well to catch attention immediately.
- Disable chapter markers and progress bar save: These features are more useful for full-length course content. Keep the preview player clean and simple.
The full video (hosted on your CDN) never appears on this public product page. The preview clip is all buyers see before purchasing. After payment, they either get the download link (Path A) or get enrolled into the members area where the full content lives (Path B). For full FluentPlayer feature documentation, see the FluentPlayer features page.
Step 4: Create a Bundle (If Selling Multiple Videos Together)
If you want to group multiple videos into a single offer, FluentCart’s bundle feature handles this without requiring any extra plugins.
Go to FluentCart Pro > Products > Add Product. In the modal, enter a bundle title and select Digital Product as the type, then enable the Bundle option. Click Add Product.
The bundle edit page
- Add your products: Search for and select the individual video products you have already created. Each product in the bundle retains its own download assets and settings. Licenses and fulfillment rules apply per product, not just at the bundle level.
- Set bundle pricing: Use a single price for the whole bundle, or use Simple Variations if you want multiple bundle tiers. You can also set a Compare at price to show the savings versus buying each video separately.
- Featured image: Upload a single image that represents the full bundle, ideally showing all included items.
- Categories: Assign to a relevant category.
For step-by-step bundle configuration, refer to the creating product bundles documentation.
Publish the bundle when ready. It appears as a single product in your shop with a single add-to-cart button.
Step 5: Set Up Payments
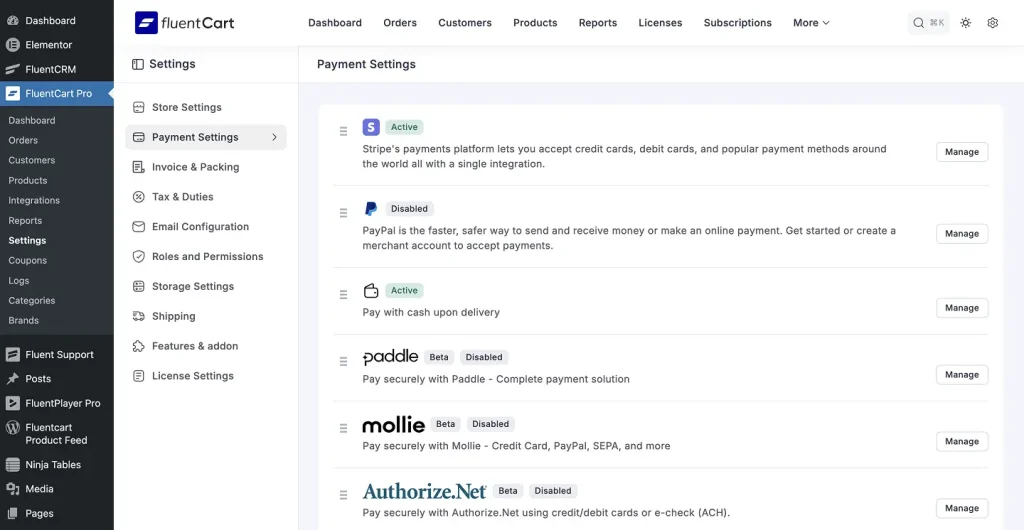
Without a payment gateway, nothing sells. Go to FluentCart Pro > Settings > Payment Settings. You will see all available gateways listed.
FluentCart supports Stripe, PayPal, Paddle, Razorpay, Flutterwave, Paystack, and Mercado Pago. For most sellers, Stripe is the recommended starting point.
Connecting Stripe
Click Manage next to Stripe. You will see two tabs: Test credentials and Live credentials. Start with Test credentials while you are building and testing, then switch to Live when you are ready to accept real payments.
Click Connect with Stripe. You are redirected to Stripe’s site to log in and authorize the connection. Once connected, return to FluentCart and ensure the Payment Activation toggle is switched on. Click Save Settings.
Next, configure your Stripe webhook. FluentCart shows you a unique Webhook URL on the Stripe settings page. Copy it and add it as an endpoint in your Stripe dashboard under Developers > Webhooks.
Select all recommended events (including checkout.session.completed and charge.refunded). This step is important: webhooks are what allow Stripe to notify your store about payment events in real time. Full Stripe setup steps are in the Stripe settings documentation.
Connecting PayPal
Click Manage next to PayPal and follow the OAuth connection flow. PayPal supports one-time payments and subscriptions. Full setup is at the payment settings documentation.
Test your payment setup:
Before going live, go to Payment Settings and enable Test Mode. Place a test order on your product page using a Stripe test card number (4242 4242 4242 4242 with any future expiry and any CVC).
Confirm the order appears in your FluentCart > Orders dashboard and that the confirmation email arrives. Then switch Test Mode off.
Step 6: Connect FluentCommunity for Course Delivery (Path B)
If you are selling gated video courses or a video library where buyers stream content inside your site (not download), this is the step that makes it work. If you are only selling direct downloads, skip to Step 7.
Install FluentCommunity from Plugins > Add New, search for FluentCommunity, install and activate it.
FluentCart automatically detects FluentCommunity once both are active. You will see a green Enabled badge next to FluentCommunity in FluentCart Pro > Integrations. No manual connection step is needed.
Create your course
In the FluentCommunity portal (accessible from FluentCommunity > Portal in your WordPress sidebar), click to create a new Course. Give it a title, add a description, and build your lesson structure.
Each lesson is a content block where you can add text, files, or a FluentPlayer block with your full video embedded.
Inside each lesson, add a FluentPlayer block and paste your video URL (your CDN stream URL, YouTube, Vimeo, or self-hosted file link). Configure chapter markers and playback position memory here so returning students pick up where they left off.
Set the course to Private
In your course settings, set the privacy to Private. This makes the course invisible and inaccessible to anyone who has not been granted access.
You can also configure a custom Lock Screen, which is the page visitors see when they try to access the course without access. This lock screen acts as a built-in sales page with a CTA button pointing to your FluentCart product page.
Link your FluentCart product to the course
In your course settings, click the Paywalls tab. Click Add Paywall. You have two options.
- Option A: Search for a product you already created in FluentCart and select it. The integration feed is created automatically.
- Option B: Click + New to create a new FluentCart product on the spot without leaving FluentCommunity. Enter a title and price, click Create, and it is linked immediately.
Once a product is linked, FluentCommunity automatically creates an integration feed in FluentCart.
When a customer pays for that product, they are enrolled into the course immediately, with no manual action required on your end. Access is also automatically revoked if the order is refunded or a subscription lapses.
For advanced integration settings (adding buyers to multiple spaces, marking profiles as verified, changing the enrollment trigger), go to FluentCart Pro > Product > Integrations tab and edit the FluentCommunity feed that was auto-created.
Full documentation is at the FluentCommunity integration guide and the FluentCart integration documentation.

Test course access
Complete a test purchase of the linked product (using Stripe test mode). After the order processes, log in as the test buyer and confirm the course appears in their FluentCommunity portal.
Click into a lesson and verify the video plays correctly. Then process a test refund and confirm the course access disappears.
Step 7: Set Up FluentCRM for Email Automation
A purchase is the beginning of a customer relationship, not the end of one. FluentCRM connects to FluentCart and automates everything that happens after the sale.
Install FluentCRM from Plugins > Add New and activate it. FluentCart detects it automatically. You will see a green Enabled badge next to FluentCRM in FluentCart Pro > Integrations.
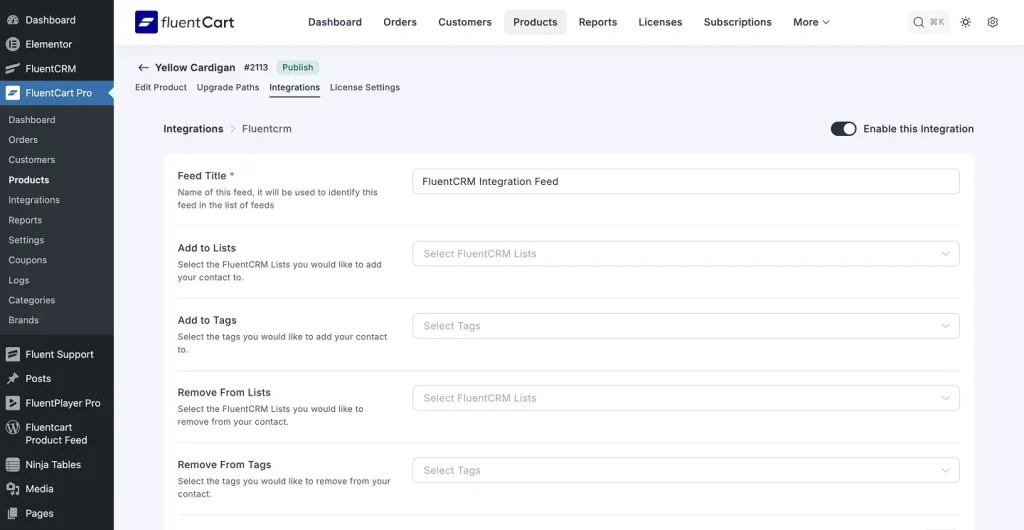
Set up a product-level integration feed
Go to FluentCart Pro > Products, open your video product, and click the Integrations tab. Click Add Integration and select FluentCRM. Configure the feed:
- Trigger: Set to Order Paid so the automation fires the moment payment is confirmed.
- Apply Tag: Create and apply a tag for this specific product (for example, “Video: Strength Training Series”). Tags are how FluentCRM identifies what each contact has purchased and what automations to run for them.
- Add to List: Optionally add the buyer to a mailing list.
Save the feed. Now every buyer of this product gets tagged in FluentCRM automatically.
Build your automation sequence
In FluentCRM, go to Automations > Create New Automation. Set the trigger to Tag Applied and select the tag you just created. Then add your sequence of actions:
- Immediately: Send a welcome email with your store name, a personal note, and a clear “Start Here” link pointing directly to their FluentCommunity course (Path B) or to their account downloads page (Path A). The faster a buyer accesses their content, the lower your refund rate.
- Day 3 to 5: Send a short check-in email. Ask if they have started watching and if they have any questions. This single touchpoint dramatically reduces early buyer’s remorse.
- Day 7 to 10: Send a review request. Buyers who are still engaged at this point are your best source of social proof. Keep the ask short and frictionless.
- At completion or day 21: Trigger an upsell email offering a related product, a bundle upgrade, or a subscription. Buyers who have finished your content and gotten value are at peak intent for another purchase. Our guide on ecommerce upselling covers how to frame these offers so they feel helpful rather than pushy.
FluentCRM also handles subscription renewal reminders (sent automatically before the next billing date) and win-back campaigns for buyers whose subscriptions have lapsed. For a detailed guide on connecting the two, seebuilding a WordPress community with FluentCommunity and FluentCRM.
Step 8: Strengthen Your Product Page Before Launch
Your product page is doing the selling before the buy button is clicked. Three additions make a measurable difference.
- Add social proof with WP Social Ninja: Display verified buyer reviews and testimonials directly on your product page. Real reviews from real buyers answer the “is this worth it?” hesitation before it becomes a reason to leave.Nielsen’s consumer trust research has consistently found peer recommendations to be the highest-trust source across every demographic.
- Build a pricing comparison table with Ninja Tables: If you offer multiple tiers, a single video vs. a bundle vs. a subscription, a clean comparison table makes the difference between each option immediately obvious. Buyers who can compare clearly make faster decisions. See how to pair Ninja Tables with FluentCart in the Ninja Tables and FluentCart product table guide.
- Launch an affiliate program with FluentAffiliate: Your existing buyers are your best potential promoters. FluentAffiliate connects with FluentCart to track referrals, calculate commissions, and handle payouts automatically. A buyer who refers a friend who also buys is worth far more than any cold ad impression. See the FluentAffiliate first look for setup details.
Step 9: Full End-to-End Test Before Going Live
Test each phase as you build it. Check payment after Step 5. Test course access after Step 6. Test email delivery after Step 7. Then, before you publish and promote, do one complete end-to-end test that covers the entire customer journey.
Run through this checklist
- Switch Stripe to Test Mode in FluentCart > Settings > Payment Settings.
- Add your product to the cart and complete checkout using the test card (4242 4242 4242 4242).
- Confirm the order appears in FluentCart > Orders with a paid status.
- Check that the order confirmation email arrives with the correct download link (Path A) or “Start Here” link (Path B).
- For Path B: log in as the test buyer and confirm FluentCommunity has enrolled them in the course automatically. Open a lesson and confirm the video plays without issues.
- Check that the FluentCRM tag was applied and the welcome email was triggered.
- Test on mobile. FluentPlayer handles mobile inline playback without forcing full-screen, but verify this on both iOS and Android before launch.
- Log out of WordPress entirely, visit your course URL directly (Path B), and confirm the content shows a locked screen, not the actual lesson.
- Process a test refund from the order screen and confirm course access is revoked (Path B) and the download link is no longer valid (Path A).
- Switch Stripe back to Live Mode before publishing.
Common Mistakes to Avoid
- Uploading raw video files to WordPress media: Large files slow your site and can trigger hosting account suspensions. Store video files on BunnyCDN or Amazon S3 and link them in FluentCart’s asset field.
- No members area for course buyers: Buyers who pay and cannot find their content will raise support tickets and request refunds. The FluentCart and FluentCommunity integration eliminates this, but only if it is properly configured and tested before launch.
- Skipping the welcome email: The hour after a purchase is when enthusiasm is highest. A “Start Here” email sent within minutes of payment, pointing directly to the content, dramatically reduces early refunds and increases completion rates.
- Testing checkout but not refunds: A broken refund flow is as damaging as a broken purchase flow. Always test that access revocation works cleanly before going live.
- No analytics: FluentPlayer tracks view counts and average watch time. FluentCRM shows email open rates and click-throughs. FluentCart shows conversion rates and revenue per product. Use all three together to identify what is working and what needs fixing.
Wrapping Up
Selling videos on WordPress comes down to choosing the right approach for your content and wiring the right tools together.
For direct video downloads, FluentCart handles everything from product creation to checkout to secure delivery. Add FluentPlayer for a branded preview on your product page, and FluentCRM for automated follow-ups.
For gated courses and video libraries, FluentCommunity joins the stack. Buyers pay through FluentCart and are automatically enrolled in their course or space. FluentPlayer delivers a branded watching experience inside the lessons. FluentCRM handles the relationship after the sale.
Both paths run entirely inside your WordPress site. No platform taking a cut. No third-party deciding your terms. You own everything.
Set it up step by step, test each phase, and you have a video selling system that works reliably every time a buyer clicks purchase.
Frequently Asked Questions
Yes. FluentCart manages subscriptions (monthly/yearly, renewals, retries), FluentCommunity handles gated access, and FluentCRM takes care of reminders and win-back emails.
It depends on how you deliver content. If you’re selling downloadable videos, FluentCart is enough. If you want users to stream videos inside your site with restricted access, you’ll need FluentCommunity.
BunnyCDN Stream is a great starting point, secure, fast, and affordable. Avoid hosting large videos in WordPress itself. For higher security needs, you can use Amazon S3.
Use private access via FluentCommunity, domain-restricted playback with FluentPlayer, and expiring stream URLs from BunnyCDN Stream. This prevents most sharing, but screen recording can’t be fully stopped.
Yes. FluentAffiliate integrates directly with FluentCart to track referral visits and conversions, calculate commissions automatically, and process payouts.
You set your commission rates per product, create branded affiliate landing pages, and give affiliates their own dashboard to monitor performance.
Not necessarily. FluentCommunity’s course builder handles structured lesson sequences, progress tracking, completion states, and access control.
If you need complex quizzes, SCORM content, or formal certificates, a dedicated LMS may be worth adding. Our best LMS plugins for WordPress comparison covers the options.

A published literary author, and a musician. I thrive on marketing for tech companies while composing music, collecting books of lasting depth, exploring cinema with a discerning eye, and studying the arts and history.
-
Kanban vs Scrum vs Agile vs Waterfall: What’s the Difference?
Get a clear, no-jargon breakdown of Kanban vs Scrum vs -
Email Deliverability Hacks: Complete WordPress Guide With Free Tools
Improve WordPress email deliverability with FluentSMTP, SPF, DKIM, DMARC, list -
How to Embed Social Media Feeds on WordPress Websites (No Code)
Learn how to embed Instagram, Facebook, TikTok, and YouTube feeds
Leave a Reply
You must be logged in to post a comment.