

How to Migrate from Mailchimp to FluentCRM: 4 Practical Methods
Moving a contact list is easy. Moving it without losing tags, consent records, suppression statuses, or segmentation logic takes more care.
FluentCRM includes a native Mailchimp importer, but that is not your only option. You can also export your Mailchimp contacts as CSV files and use an agent to prepare them, import them directly through FluentCRM MCP, or let a browser-enabled agent handle most of the workflow under your supervision.
This tutorial covers all four approaches. More importantly, it shows you how to keep unsubscribed and bounced contacts suppressed instead of accidentally turning them back into active subscribers.
Key takeaways
- Start with FluentCRM’s native importer. It is the fastest option for a standard migration and can map Mailchimp audiences, tags, and contact fields through an API connection.
- Use the CSV method when you need more control. An agent can clean duplicates, normalize fields, preserve tags, and prepare separate import files without receiving access to your WordPress dashboard.
- Protect contact status at every step. Keep subscribed, unsubscribed, non-subscribed, and cleaned contacts separate. Never turn a restrictive status into subscribed during the migration.
- Treat tags and segments differently. Mailchimp tags can become FluentCRM tags, but important saved segments must be exported separately or rebuilt using their original rules.
- Use MCP and browser access carefully. MCP provides controlled access to FluentCRM tools. Browser access covers more of the workflow, but it requires stricter checkpoints and approval before each live import.
- Expect to rebuild parts of your marketing system. Contacts and fields can move, but automation flows, email sequences, templates, forms, and reporting history need to be recreated or verified.
- Compare total operating cost, not just license prices. FluentCRM does not charge by contact count, but you still need WordPress hosting, an email delivery service, backups, and ongoing site maintenance.
The four migration methods at a glance
| Method | Best for | Access required | Control level | Our recommendation |
|---|---|---|---|---|
| Native Mailchimp importer | Most standard migrations | Mailchimp API key | High | Start here if the importer brings over everything you need |
| Agent-prepared CSV | Custom fields, cleanup, and transparent review | Contact CSV only | Highest | Best all-around alternative for most users |
| FluentCRM MCP import | Technical users and repeatable workflows | FluentCRM MCP connection | High | Powerful, but test with a small batch first |
| Browser-assisted migration | Users who want minimal manual clicking | Mailchimp and WordPress browser access | Moderate | Use only with checkpoints and final approval |
For most businesses, the native importer or agent-prepared CSV route is the right choice. MCP is useful when you want an agent to work directly with FluentCRM. Browser access offers the broadest automation, but it also requires the most oversight.
What can and cannot move automatically
Before choosing a method, separate your contact data from your marketing setup.
You can usually migrate:
- Email addresses and contact names
- Standard audience fields
- Custom fields, when they are mapped correctly
- Mailchimp tags
- Subscription status
- Mailchimp audiences or important segment memberships when you intentionally map them to FluentCRM lists
You should expect to rebuild or recheck:
- Saved segment rules
- Marketing automation flows
- Email sequences
- Campaign templates
- Signup forms and integrations
- Campaign analytics and engagement history
Mailchimp can export contacts, tags, consent-related fields, and several other profile fields. It does not include campaign open and click data in a standard contact export.
Its full account backup can export reports and templates separately, but those files do not become working FluentCRM campaigns or automations automatically. Mailchimp explains what is included in a contact export here and what is available through a full account backup here.
Before you migrate: prepare your Mailchimp data
Do not start by importing. Start by cleaning and mapping.
1. Audit your audiences, tags, and segments
Open Mailchimp and check:
- How many audiences you have
- Whether the same email appears in more than one audience
- Which tags are still useful
- Which saved segments drive active campaigns or automations
- Whether every contact has the correct marketing status
- Which custom fields you still need
Delete nothing yet. The goal is to understand the structure before changing platforms.
2. Plan how Mailchimp data will map to FluentCRM
Use this as a starting point:
| Mailchimp data | FluentCRM destination | Important note |
|---|---|---|
| Audience | List | Useful when you have more than one distinct audience |
| Saved segment | List or dynamic segment | Recreate the original filtering logic when the segment needs to remain dynamic |
| Tag | Tag | Preserve the same name unless you are intentionally cleaning the taxonomy |
| Subscribed | Subscribed | Import only contacts with valid marketing permission |
| Unsubscribed | Unsubscribed | Never reactivate these contacts during migration |
| Non-subscribed | Transactional, when appropriate | Use only for customers or users with a valid non-marketing relationship |
| Cleaned | Bounced | Keep these addresses out of future campaigns |
| Complaint or spam record | Complained, spammed, or permanent suppression | Never convert these records to subscribed |
A Mailchimp saved segment is a set of rules, not simply a label. A general audience export does not recreate those rules in FluentCRM. Export each important segment separately or document its conditions, then rebuild it as a FluentCRM list or dynamic segment.
3. Back up the full Mailchimp account
For a complete backup, go to your Mailchimp profile, open Account → Settings → Manage my data, choose the data you want, and request an export.
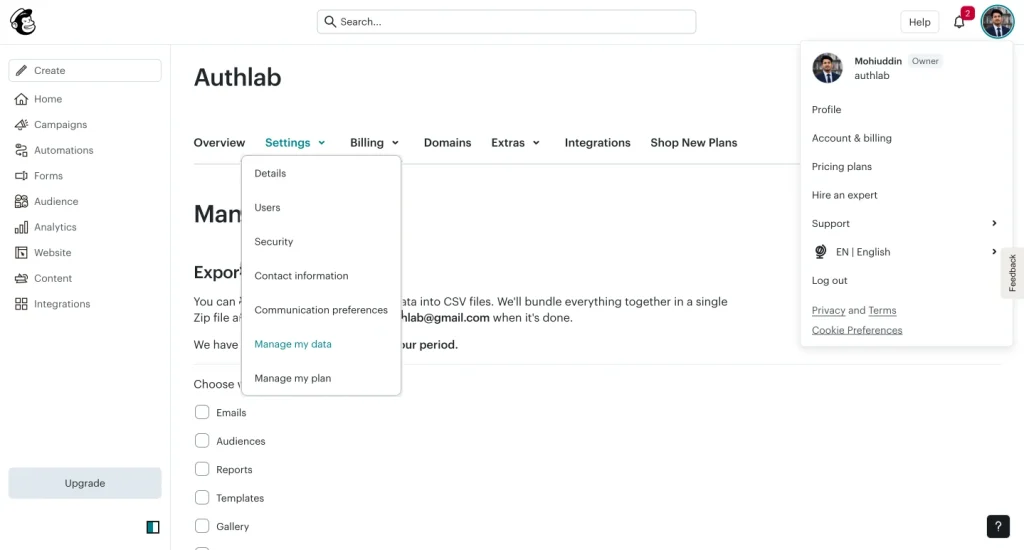
Mailchimp says a large account export can take up to 24 hours and will be delivered as a downloadable ZIP file.
Keep this backup even if you plan to use the native API importer. It gives you a recovery point for audiences, templates, reports, and other account data.
4. Pause migration-sensitive automations
In FluentCRM, temporarily pause any automation triggered by a list or tag you plan to apply during the import. During a CSV import, FluentCRM also provides a Do Not Trigger Automations option.
Enable it unless you intentionally want imported contacts to enter a live funnel.
5. Prepare email delivery before the final switch
FluentCRM stores and manages contacts inside WordPress, but campaign email still needs a properly configured email-sending service.
Set up your SMTP provider, sending domain, SPF, DKIM, DMARC, and bounce handling before sending to the migrated audience.
Method 1: Use FluentCRM’s native Mailchimp importer
This is the shortest route and should be your first test.
According to the official FluentCRM Mailchimp migration guide, the importer connects through a Mailchimp API key and lets you map lists, tags, and contact information.
Step 1: Open the importer
From WordPress, go to:
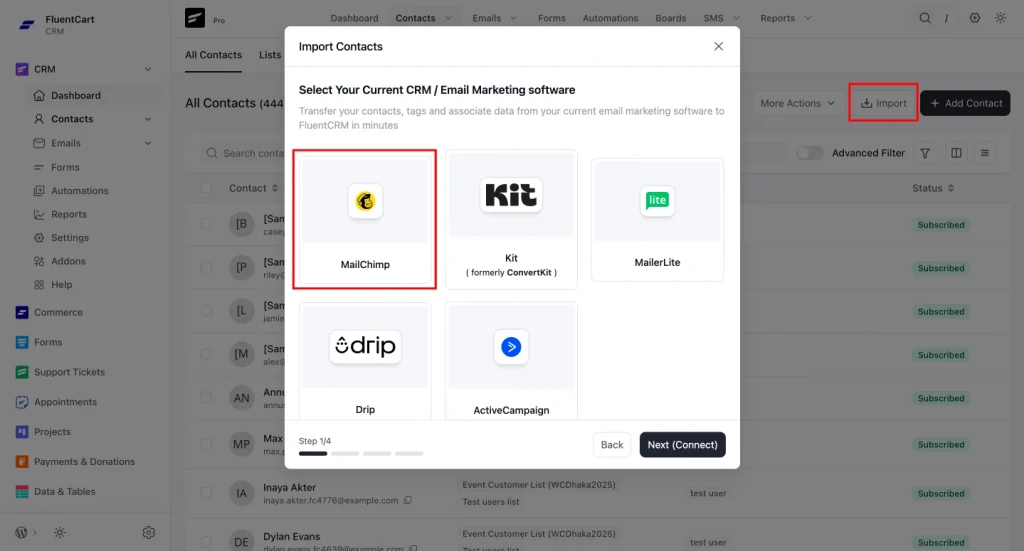
FluentCRM → Contacts → Import
Choose Import from Other Platforms, then select Mailchimp.
Step 2: Create a Mailchimp API key
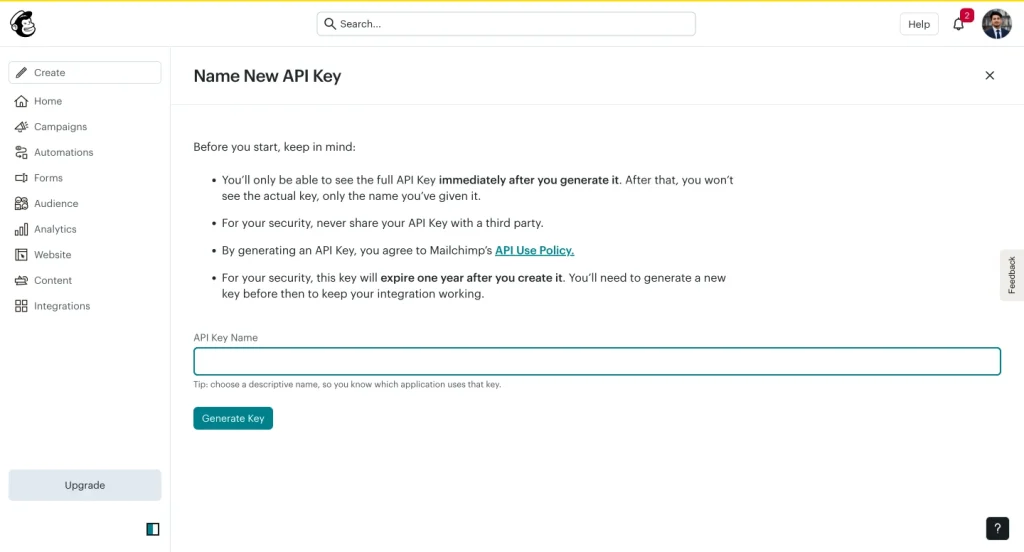
Open your Mailchimp account settings and create an API key for the migration. Copy it into the FluentCRM importer and continue.
Treat the key like a password. Do not paste it into a public document, shared prompt, screenshot, or support thread.
Step 3: Map the contact data
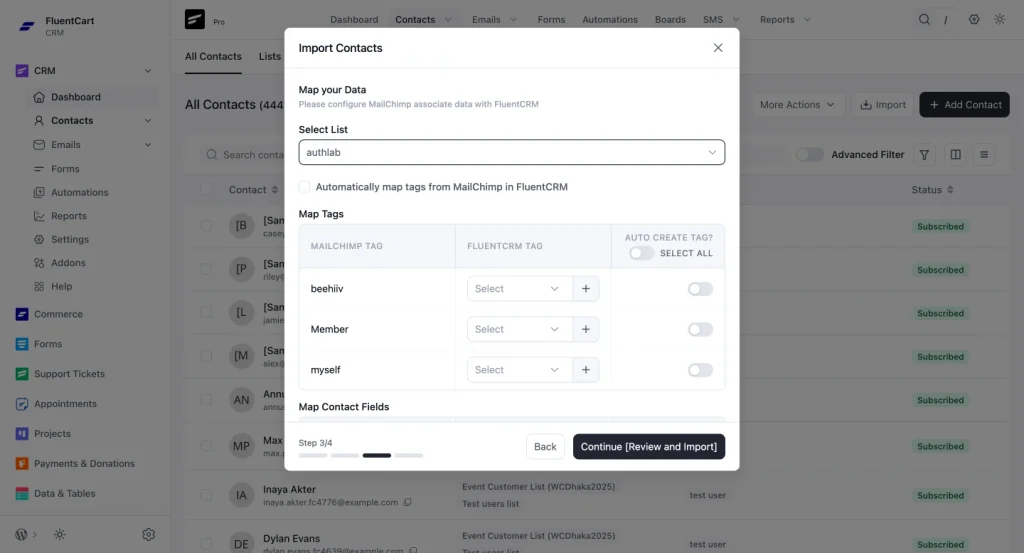
Choose the Mailchimp audience you want to import, then review how its fields, tags, and lists will map to FluentCRM.
Do not rush through this screen. Confirm that:
- Email is mapped to Email
- First and last names are mapped correctly
- Important custom fields have destinations
- Mailchimp tags are preserved
- Contacts are assigned to the intended FluentCRM list
- Suppressed contacts will not become subscribed
Step 4: Review and confirm
Start with one audience or a small sample when possible. After the import finishes, compare the source and destination counts before importing the rest.
Step 5: Revoke the temporary API key
Once the migration is complete and verified, remove the migration API key from Mailchimp unless you have a clear reason to keep the connection active.
When to choose another method
Use the CSV method if:
- Some tags or custom fields do not map correctly
- You need to combine multiple Mailchimp audiences
- You want to clean duplicates before importing
- You need a documented transformation process
- You want to inspect the exact records before they enter FluentCRM
Export contacts from Mailchimp for methods 2, 3, and 4
The next three methods begin with the same export process.
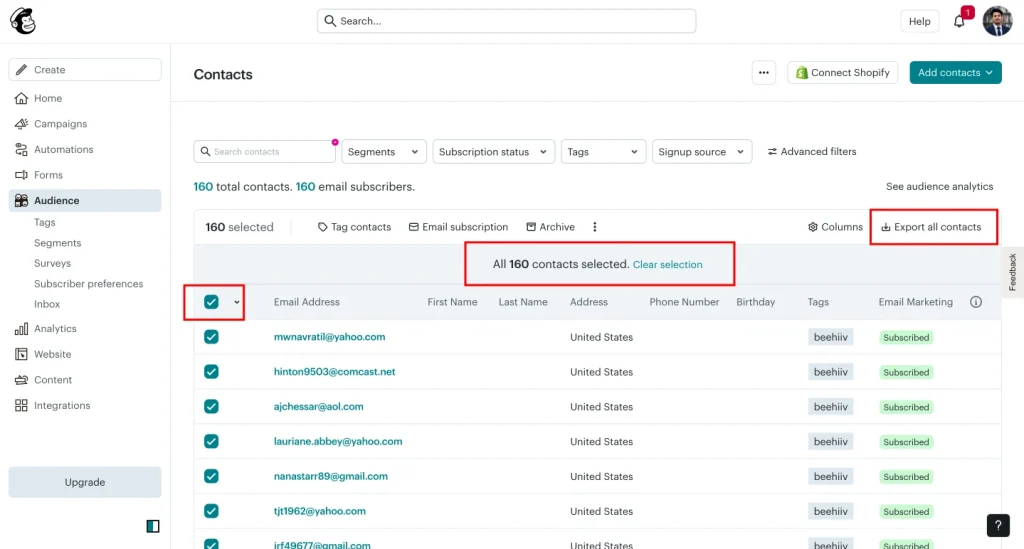
Step 1: Export the audience
In Mailchimp, open Audience and select the audience you want to migrate. Select the contacts and click Export all contacts.
Step 2: Wait for the export to finish
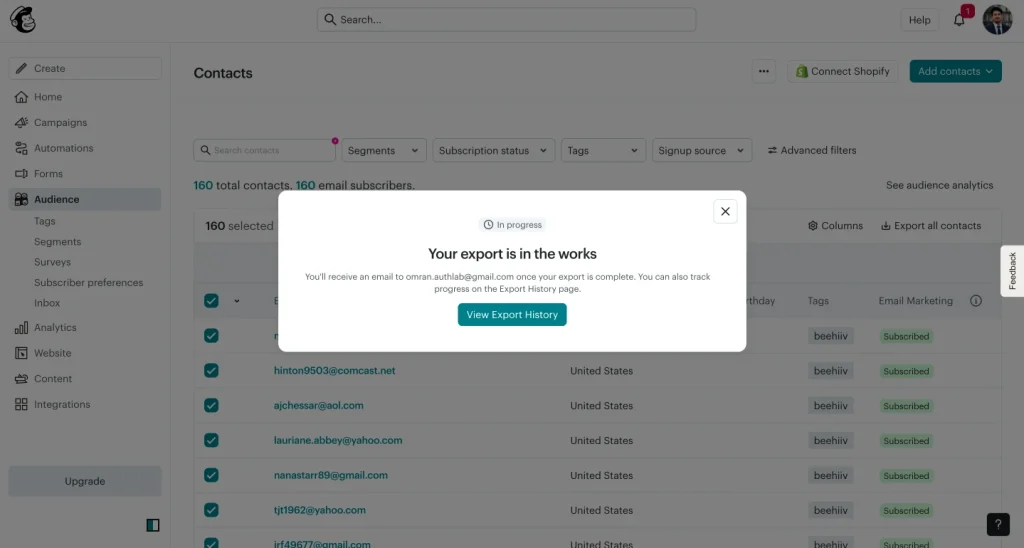
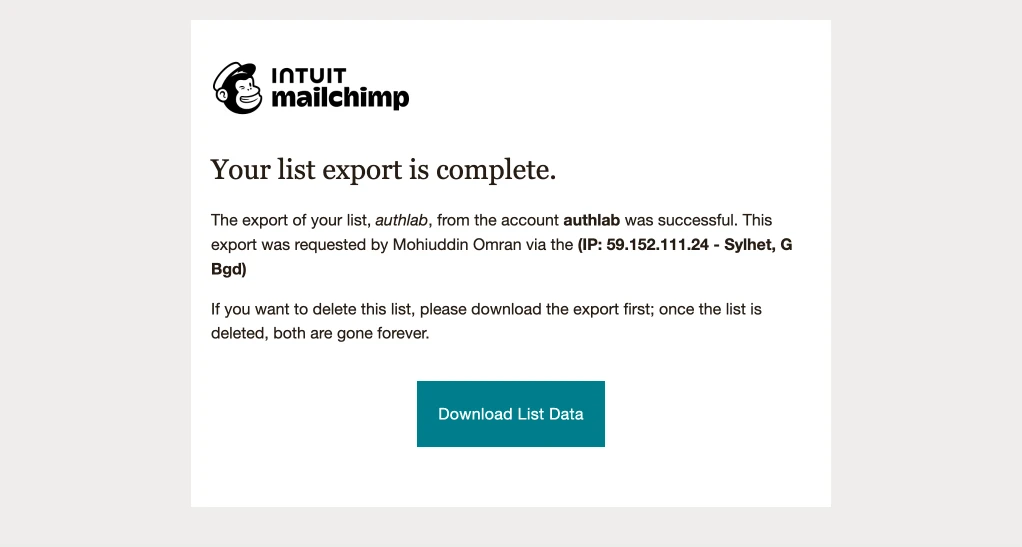
Mailchimp will notify the email address associated with the account when the export is ready. You can also open Audience → More options → Export history and download it there.
Step 3: Extract the ZIP file
Mailchimp may provide separate CSV files for:
- Subscribed contacts
- Unsubscribed contacts
- Non-subscribed contacts
- Cleaned contacts
Keep these files separate. This is a feature, not an inconvenience: FluentCRM’s CSV importer applies one selected contact status at a time, so separate files help you preserve the original permission state.
Step 4: Export important segments separately
If a saved segment matters to your campaign strategy, select it in Mailchimp and click Export segment. Give the resulting file a clear name, such as:
segment-repeat-customers.csvYou can then assign those contacts to a matching FluentCRM list or recreate the original conditions as a dynamic segment.
Method 2: Ask an agent to create FluentCRM-ready CSV files
This route gives you a clean checkpoint between Mailchimp and FluentCRM. The agent can normalize headings, separate statuses, preserve tags, identify duplicates, and return import-ready CSV files without touching your WordPress site.
Use a private workspace approved for customer data. Remove columns you do not need before uploading, and never include API keys, passwords, or unrelated personal data.
Copy-paste prompt: convert Mailchimp exports for FluentCRM
I am migrating contacts from Mailchimp to FluentCRM. I have attached the CSV files exported from Mailchimp.

Your job is to inspect, clean, and convert them into FluentCRM-ready CSV files. Do not upload anything to a website or modify the source files.

Requirements:

1. Identify each source file by its Mailchimp contact status and filename: subscribed, unsubscribed, non-subscribed, cleaned, or segment export.

2. Keep each subscription status in a separate output CSV because FluentCRM applies one contact status per CSV import.

3. Use Email as the required unique identifier. Normalize email casing and surrounding spaces, but do not invent or repair an address.

4. Preserve first name, last name, phone, address, city, state, postal code, country, timezone, source, IP address, date of birth, tags, lists, consent fields, and useful custom fields when present.

5. Format dates as YYYY-MM-DD. Convert countries to ISO 3166-1 alpha-2 codes such as US, GB, or BD when the source value is unambiguous. Leave the value unchanged and flag it when uncertain.

6. Preserve Mailchimp tags as FluentCRM tags. Do not rename, merge, or delete tags unless you list the proposed change and wait for approval.

7. Use the segment filename as a proposed FluentCRM list name. Do not treat a saved segment as a dynamic rule unless the rule conditions are provided.

8. Map statuses conservatively:

   - subscribed → subscribed

   - unsubscribed → unsubscribed

   - non-subscribed → transactional only when the record represents a customer or user with a legitimate non-marketing relationship; otherwise flag it for review

   - cleaned → bounced

   - complained or spammed → preserve as complained, spammed, or permanent suppression

9. Never upgrade a restrictive status to subscribed. If the same email appears more than once, use the most restrictive status and report every conflict.

10. Do not delete duplicate rows silently. Create a duplicate-and-conflict report showing the source files, original statuses, tags, and the final recommendation.

11. Create these deliverables:

   - fluentcrm-subscribed.csv

   - fluentcrm-unsubscribed.csv

   - fluentcrm-transactional-review.csv

   - fluentcrm-bounced.csv

   - fluentcrm-segment-memberships.csv, if segment exports are attached

   - migration-audit.md with source counts, output counts, duplicates, conflicts, unmapped columns, transformations, and warnings

12. Validate that every output row has a syntactically valid email address, every CSV uses UTF-8 encoding, headers are unique, and row counts reconcile with the audit report.

First inspect the files and show me the proposed field and status mapping. Do not generate the final CSV files until I approve that mapping.
Import the converted CSV files
After downloading the returned files:
- Go to FluentCRM → Contacts → Import.
- Choose CSV.
- Select the comma separator and upload one status file.
- Map its columns to the corresponding FluentCRM fields.
- Assign the relevant lists and tags.
- Select the correct New Subscriber Status.
- Enable Do Not Trigger Automations.
- Review the preview, then run the import.
- Repeat for each status file.
FluentCRM requires Email as the minimum import field. It expects dates in Y-m-d format and country values as two-letter ISO codes. The importer can update existing contacts, assign lists and tags, choose a status, and suppress tag- or list-triggered automations.
See the official CSV import documentation.
Method 3: Import contacts through FluentCRM MCP and FluentHub
This method connects an MCP-compatible agent, such as OpenAI Codex, Claude, or Cursor, directly to FluentCRM. The agent can inspect, create, and update contacts through authorized FluentCRM tools instead of asking you to upload each output CSV manually.
FluentCRM’s MCP connection supports bulk contact upserts as well as list and tag management, making it suitable for a controlled migration. It is still a live database operation. Begin with a dry run and require approval before any write.
Connect FluentCRM MCP
In WordPress, go to:
FluentCRM → Settings → AI Configuration → MCP for AI Agents
Then:
- Enable MCP for AI Agents.
- Install and activate FluentHub as the MCP adapter.
- Confirm that the status shows Connected and tools are available.
- Create a dedicated WordPress Application Password for the agent connection.
- Choose your client: OpenAI Codex, Claude Code, Claude Desktop, Cursor, or Other.
- Copy the client-specific snippet generated by FluentCRM.
- Add it to the selected agent and restart the client if required.
- Test the connection by asking the agent to retrieve the last five FluentCRM contacts.
FluentCRM Pro users can install FluentHub from the MCP settings screen. With FluentCRM Free, download the FluentHub ZIP, then install it through Plugins → Add New → Upload Plugin.
Use the generated snippet rather than copying a generic configuration from a blog. It contains the correct endpoint and current client format. It also contains encoded credentials, so keep it out of shared chats, screenshots, and repositories. The FluentCRM MCP guide documents the full setup.
Copy-paste prompt: migrate contacts through FluentCRM MCP
I have attached Mailchimp contact export CSV files and connected this project to my FluentCRM site through MCP.

This is a controlled contact migration. Preserve consent and suppression status above everything else.

PHASE 1: READ-ONLY AUDIT

1. Confirm that the FluentCRM MCP connection is available, but do not create or update anything yet.

2. Inspect every attached CSV and classify it as subscribed, unsubscribed, non-subscribed, cleaned, or a named segment export.

3. Report source row counts, valid emails, invalid emails, duplicates, status conflicts, tags, proposed lists, custom fields, and unmapped columns.

4. Search FluentCRM for matching emails and report how many contacts already exist and which fields or statuses would change.

5. Propose a mapping using these safeguards:

   - subscribed → subscribed

   - unsubscribed → unsubscribed

   - cleaned → bounced

   - non-subscribed → transactional only when there is a legitimate customer or user relationship; otherwise hold for review

   - complained or spammed → preserve the restrictive status or permanent suppression

6. Never change an existing unsubscribed, bounced, complained, or spammed contact to subscribed.

7. Use Mailchimp tags as FluentCRM tags. Use approved audience and segment names as FluentCRM lists. Do not create anything in this phase.

8. Present the plan and wait for my explicit approval.

PHASE 2: EXECUTION, ONLY AFTER I APPROVE

1. Create only the approved missing lists and tags.

2. Import or upsert contacts in bounded batches supported by the MCP tool.

3. Apply the approved fields, lists, tags, and statuses.

4. Do not enroll contacts in automations, send emails, delete contacts, or change campaigns.

5. If a write fails, stop that batch, report the error, and do not retry with broader permissions or a different status.

6. After each batch, report attempted, created, updated, skipped, and failed counts.

7. At the end, reconcile source totals against FluentCRM results and produce a migration audit with a sample of at least 20 verified contacts across all statuses.
When MCP is the wrong choice
For a very large audience, a direct CSV import may be faster and easier to audit than a long conversational MCP job. MCP is strongest when you need controlled transformations, want the agent to check existing records, or plan to repeat the process.
After the migration, revoke the dedicated WordPress Application Password if the agent no longer needs CRM access. You can also disable the FluentCRM MCP switch to stop all connected clients immediately.
Method 4: Let a browser-enabled agent handle the workflow
A browser-enabled agent can navigate Mailchimp, request the export, download the files, open your WordPress dashboard, and prepare the FluentCRM import.
This is the most hands-off option. It also grants the broadest access, so the prompt must define strict boundaries.
If you use ChatGPT Work or Codex, browser behavior depends on the browser connection. OpenAI’s built-in browser can interact with websites but cannot automate local file uploads.
The Chrome connection can work with an existing signed-in Chrome session and can upload files when file-URL access is enabled. Review the current Browser documentation and Chrome connection instructions before choosing this route.
Copy-paste prompt: supervised browser migration
Use the connected browser to prepare a migration from Mailchimp to FluentCRM. You may navigate only my Mailchimp account and my WordPress admin unless I approve another site.

Safety rules:

- Never reveal, copy into chat, or store my passwords, API keys, application passwords, cookies, or authentication codes.
- Do not delete, archive, unsubscribe, or edit contacts in Mailchimp.
- Do not cancel or downgrade my Mailchimp account.
- Do not send emails, activate campaigns, enroll contacts in automations, or delete data in FluentCRM.
- Do not mark any contact as subscribed unless the Mailchimp source file confirms subscribed status.
- Stop before every final import and wait for my explicit approval.

Workflow:

1. Open Mailchimp Audience and document the current audiences, contact totals, tags, saved segments, custom fields, and contact-status counts.

2. Request a full account backup from Mailchimp for recovery purposes.

3. Export each audience. Download the completed export from Export history rather than requiring access to my email account.

4. Keep subscribed, unsubscribed, non-subscribed, and cleaned CSV files separate.

5. Export every saved segment I identify as important and name the file clearly.

6. Prepare this mapping:

   - Mailchimp audience → FluentCRM list

   - saved segment → FluentCRM list or a documented dynamic-segment rule

   - Mailchimp tag → FluentCRM tag

   - subscribed → subscribed

   - unsubscribed → unsubscribed

   - cleaned → bounced

   - non-subscribed → transactional only when justified; otherwise hold for review

7. Show me source counts, duplicates, invalid emails, status conflicts, proposed field mappings, and proposed lists and tags.

8. Wait for my approval.

9. After approval, open WordPress → FluentCRM → Contacts → Import and prepare one CSV import at a time.

10. Enable Do Not Trigger Automations and choose the correct status for each file.

11. Stop on the final confirmation screen. Show me the file name, row count, selected status, lists, tags, update settings, and automation setting.

12. Run the import only after I approve that specific batch.

13. Verify the resulting counts and a random sample of contacts before preparing the next batch.

If the browser cannot download or upload a file, stop and tell me exactly which manual action I need to complete. Do not improvise with copied contact data or a different account.
Validate the migration before sending a campaign
Do not judge success by the final “import complete” message. Verify the data.
Reconcile the counts
Build a simple table like this:
| Status | Mailchimp source | Newly created | Existing or updated | Skipped | Failed | Difference explained? |
|---|---|---|---|---|---|---|
| Subscribed | ||||||
| Unsubscribed | ||||||
| Transactional or review | ||||||
| Bounced or cleaned |
Every difference should have a reason: duplicate email, invalid address, existing contact, missing required field, or an intentional exclusion.
Inspect real records
Check at least 20 contacts across different lists and statuses. Confirm:
- Email and name
- Subscription status
- Lists and tags
- Custom fields
- Source
- Consent-related information you chose to retain
- Whether an automation was triggered unexpectedly
Test segmentation
Recreate one important Mailchimp segment in FluentCRM and compare the number of matching contacts. If the numbers differ, check rule logic, missing custom fields, dates, and status filters.
Test sending safely
Create an internal test list containing only addresses controlled by your team. Send a test campaign and confirm:
- From name and address
- Reply-to address
- SPF, DKIM, and DMARC alignment
- Link tracking
- Unsubscribe link
- Mobile rendering
- Bounce handling
Keep Mailchimp available until the migration, segment checks, email delivery, and critical automations have all passed. Do not cancel it immediately after moving the contact rows.
Mailchimp vs. FluentCRM pricing comparison
Mailchimp charges by plan, contact count, and email volume. FluentCRM charges by the number of WordPress sites, with no plugin-level contact limit.
| Comparison | Mailchimp | FluentCRM |
|---|---|---|
| Billing model | Monthly subscription based on contacts and sends | Annual license based on WordPress sites |
| Free option | 250 contacts and 500 monthly sends | Unlimited contacts; email delivery is separate |
| Advanced automation | Standard starts at $20/month or $240/year | Pro starts at $129/year for one site |
| Contact growth | Price rises with your contact tier | License price remains unchanged |
| Email delivery | Included within plan limits | Requires a separate email service |
| Hosting | Managed by Mailchimp | Runs on your WordPress hosting |
| Higher plans | Premium starts at $350/month | Five sites cost $249/year; 50 sites cost $499/year |
For advanced automation, FluentCRM Pro starts $129 cheaper per year than Mailchimp Standard. However, FluentCRM users must also account for email delivery, hosting, security, and WordPress maintenance.
Bottom line: Mailchimp bundles convenience into a recurring subscription. FluentCRM offers predictable pricing, unlimited contacts, and stronger data control for businesses already using WordPress.
Who should switch to FluentCRM?
FluentCRM makes the most sense for businesses already operating on WordPress and ready to bring marketing data closer to the rest of their customer activity.
Switch if you want automation from one WordPress dashboard
FluentCRM can sit beside your forms, store, LMS, membership site, booking system, support desk, community, and other WordPress tools. That means a purchase, form submission, course enrollment, appointment, or membership change can become part of the same automation workflow without constantly moving data between disconnected platforms.
Switch if you want stronger ownership of your prospect data
With FluentCRM, the contact database lives in your WordPress environment rather than inside a marketing SaaS account. You control the database, backups, access, retention, hosting, and sending provider.
That control comes with responsibility. Your hosting, WordPress security, privacy practices, backups, and email delivery setup must be strong enough to protect the data.
Switch if you want to experiment and innovate
A WordPress-native CRM is easier to extend around your own workflow. You can connect custom plugins, webhooks, WordPress actions, ecommerce events, and MCP-compatible agents.
Instead of waiting for a hosted platform to add a specific workflow, your team can build around the data and tools it already controls.
Switch if contact-based price increases are limiting growth
FluentCRM’s license price is based on sites rather than contact count. That can be a better fit for publishers, ecommerce businesses, course creators, communities, and agencies whose lists are growing faster than their software budgets.
Who may be better off staying with Mailchimp?
Mailchimp may remain the better fit if:
- Your business is not built on WordPress
- You do not want to manage hosting, updates, security, backups, or SMTP delivery
- You depend on Mailchimp-specific SMS, ad, predictive, reporting, or multichannel features
- Your team needs a hosted platform with vendor-managed infrastructure and broad non-WordPress integrations
- You do not have the technical support needed to maintain a business-critical WordPress CRM
Switching tools should solve an operating problem, not create a new one.
Frequently asked questions
What is the easiest way to migrate from Mailchimp to FluentCRM?
Use FluentCRM’s native Mailchimp importer first. It connects through a Mailchimp API key and lets you map contact information, lists, and tags. If the result is incomplete or you need more control, use the agent-prepared CSV method.
Will Mailchimp tags move to FluentCRM?
The native importer supports tag mapping, and Mailchimp includes a TAGS field in audience exports. Review the results because tag taxonomies often contain old, duplicated, or inconsistent labels.
Will saved Mailchimp segments move automatically?
Do not assume they will. A saved segment is defined by filtering rules. Export important segment members separately for a snapshot, or rebuild the rules as a FluentCRM dynamic segment.
Can I import unsubscribed and cleaned contacts?
Yes, but only with restrictive statuses. Import unsubscribed contacts as Unsubscribed and cleaned contacts as Bounced. Keeping those records suppressed protects consent, compliance, and sender reputation.
Can an agent import contacts directly into FluentCRM?
Yes. FluentCRM’s MCP tools support individual and bulk contact upserts as well as list and tag management. Use a dedicated WordPress Application Password, start with a read-only audit, approve the mapping, test a small batch, and revoke access when the work is done.
Does FluentCRM include email delivery?
FluentCRM manages contacts, campaigns, and automations inside WordPress. You still need a sending method, typically an SMTP or transactional email provider. Include that provider’s fees when comparing total cost.
Should I cancel Mailchimp immediately after importing?
No. First reconcile contact counts, verify suppression statuses, recreate key segments and automations, configure delivery, and run controlled tests. Keep your Mailchimp backup and account available until the new setup is proven.
Final migration checklist
The migration is not finished when the contacts appear in FluentCRM. It is finished when the right contacts have the right status, your segments return the expected people, your automations behave correctly, and your email delivery is ready for a real campaign.
Ready to run email marketing and automation from WordPress? Get FluentCRM and begin with a small, verified import.

WordPress, automation, eCommerce and growth marketing specialist, a WordPress Core Contributor and Media Corps member blending storytelling with technology to craft strategies in SEO, email marketing, and beyond.
-

How to Create a Beautiful Online Course Website with WordPress
Creating online course has become easier with WordPress. Are you -

Styling Beautiful CSS Forms with Fluent Forms’ Advanced Form Styler
Learn styling Fluent Forms using built-in templates, Gutenberg, custom CSS, -

Holiday Email Marketing Campaigns: Ideas, Mistakes, Dos & Don’ts
Discover 10 holiday email marketing campaign ideas for 2026, plus


Leave a Reply
You must be logged in to post a comment.