

Complete Guide on How to Build A Church Website with WordPress
You searched “how to build a church website” because something’s not working. Service times are buried in a Facebook post from weeks ago. Visitors show up at the wrong building because Google Maps still points to your old address. Someone asks, “Can I give online?” and the answer is an awkward workaround.
A church website fixes this, and you don’t need a developer or any coding experience to build one.
You can easily build a church website with WordPress, because it’s flexible enough to handle sermons, events, and online giving, while keeping you in full control of your own content.
This guide walks through the entire step-by-step process, from registering a domain to launching a site your congregation and first-time visitors can actually use.
Key takeaways
- WordPress is a strong fit for church websites because it’s flexible, affordable, and doesn’t lock you into one platform’s ecosystem, and you don’t need coding experience to use it.
- Start with a clear purpose before picking hosting or a theme; most churches need to balance attracting visitors, serving members, sharing sermons, and accepting donations.
- Choose hosting and a theme based on your church’s size and budget. SiteGround and Hostinger cover most small to mid-sized churches well, while Cloudways and Kinsta make more sense once you’ve outgrown shared hosting.
- Online giving deserves real setup time, not just a plugin install. Fund designation, recurring giving, and a mobile-friendly checkout make the difference between a donation page people use and one they abandon.
- Security, speed, and SEO aren’t optional extras; they protect donor data, keep visitors from bouncing, and help new families actually find your church online.
- Costs can stay lean. A functional site can launch for under $200 in the first year, and a fuller-featured setup with premium theme and plugins typically runs $500-1000.
- Test everything: links, forms, a real donation, and mobile responsiveness- before you announce the site to your congregation.
What makes a great church website
A church website isn’t just a digital business card. It’s the first stop for someone deciding whether to visit this Sunday, and it’s the daily hub for people already part of your community. The best ones share a few things in common:
- Service times and location front and center, not buried three clicks deep
- A simple, trustworthy way to give online
- Sermons people can actually find, whether they want last week’s message or one from a series two years ago
- Events and ministries laid out clearly, so newcomers know where they fit in
- Volunteer signups and prayer request forms that don’t feel like a chore to fill out
- A design that works just as well on a phone as it does on a desktop
Keep this list in mind as you build. Every step from here on is really just putting these pieces in place.
How to build a Church Website with WordPress
Building a church website with WordPress comes down to a handful of stages: getting the basics set up (domain, hosting, WordPress itself), choosing how it looks, planning what goes on it, and then filling in the pieces your congregation actually needs: sermons, events, giving, and ways to get involved.
None of it requires any coding knowledge.
Here’s the step-by-step process to create a church website using WordPress:
Step 1: Define the purpose of your site
Before you touch hosting or themes, get clear on what this site needs to do. Most church websites are trying to do a few things at once:
- Help first-time visitors decide to show up
- Give existing members a place to check service times, events, and updates
- Make online giving simple and trustworthy
- Archive sermons so people can revisit or catch up
- Support outreach and community programs
- Handle event registrations without a spreadsheet and a prayer
You don’t need to nail every one of these on day one. But writing down which two or three matter most right now will save you from second-guessing every decision later: what theme to pick, which plugins are worth installing, what goes on the homepage.
Pro tip: Write your primary goals down before you buy hosting or pick a theme. It’s the difference between building a site with a clear job to do and building one that tries to be everything and ends up cluttered.
Step 2: Register a domain name
Your domain is your church’s address on the internet, so it’s worth a few minutes of real thought instead of grabbing the first available option.
A few things to keep in mind:
- Match your church’s actual name where possible. If someone hears about you at a community event, they should be able to guess your website without checking a business card.
- Keep it short. Long and hyphenated domains are hard to say out loud and easy to mistype.
- Consider .church if your .org or .com is taken. It’s a newer extension, but it’s instantly recognizable and often available even when the obvious name isn’t.
- Avoid abbreviations only your congregation understands. A visitor googling your church won’t know that “GCF” means “Grace Community Fellowship.”
If your first choice is taken, try adding your city or a short descriptor rather than random numbers or extra hyphens. “gracechurchaustin.org” reads a lot better than “gracechurch2024.org.”
Step 3: Choose reliable WordPress hosting
Hosting is where your website’s files actually live, and it affects almost everything else: how fast your pages load, whether your site stays up during a Sunday morning traffic spike, and how well-protected your donor and member data is.
A few things matter most here: speed, security, uptime, and whether backups are handled automatically. Here are some of the best hosting services to build a church website that you can take a short look at.
SiteGround
SiteGround has built its reputation around WordPress-specific hosting done well. It includes free SSL, daily backups, a built-in CDN, and staging environments that let you test changes before they go live on your actual site.
Their support team tends to be genuinely helpful with WordPress-specific issues rather than generic scripted responses, which matters a lot if you’re managing this site without a dedicated IT person.
For a small to medium church, SiteGround hits a good balance of reliability and ease of use. You won’t need to think much about server management; updates are handled automatically, and the staging feature is genuinely useful if you plan to redesign pages down the line without risking downtime on your live site.
Best for: Small to medium churches that want dependable hosting without a steep learning curve.
Hostinger
Hostinger is built around affordability without cutting corners on the essentials. It runs on LiteSpeed servers, which tend to outperform standard setups on page speed, and includes free SSL and email hosting even on entry-level plans. Their AI-assisted setup tools also make the first-time WordPress install process almost foolproof.
If your church is just getting started and budget is the main constraint, Hostinger is worth a serious look. You’re not sacrificing much in terms of reliability, and the lower cost leaves more room in the budget for things like a premium theme or a donation plugin’s paid tier down the line.
Best for: New churches building their first website on a limited budget.
Cloudways
If your church runs a lot of livestreamed content, hosts large media libraries, or expects heavy traffic spikes around big events, Cloudways gives you cloud infrastructure (built on providers like DigitalOcean, Vultr, or AWS) with a much simpler interface than managing those servers directly.
Kinsta
Kinsta sits a step above that, built on Google Cloud with enterprise-level security and performance, and tends to make sense once a church has grown into a larger, multi-campus operation. Both cost more than SiteGround or Hostinger, so they’re worth considering once you’ve outgrown standard shared hosting rather than as a starting point.
Step 4: Install WordPress
Most hosts these days offer a one-click WordPress installer, so this step is quicker than it sounds. Once it’s installed, there are a few settings worth checking right away:
- Confirm SSL is active (your site should load with “https,” not “http”)
- Set up your admin account with a strong password, not “admin,” or something guessable
- Update your permalink structure under Settings so your URLs look clean (like yoursite.org/about, not yoursite.org/?p=123)
- Set your correct timezone under Settings > General; this matters more than people expect once you start scheduling posts and events
That’s the technical foundation in place. Everything from here is about shaping the site itself.
Step 5: Choose a church WordPress theme
Your theme controls how your site looks and, to a real degree, how well it performs. A good church theme should be fast-loading, mobile-responsive, accessible, and flexible enough to support events, sermons, and donation pages without needing a developer to customize it.
Here are a few themes to look for to create your own church website.
Astra
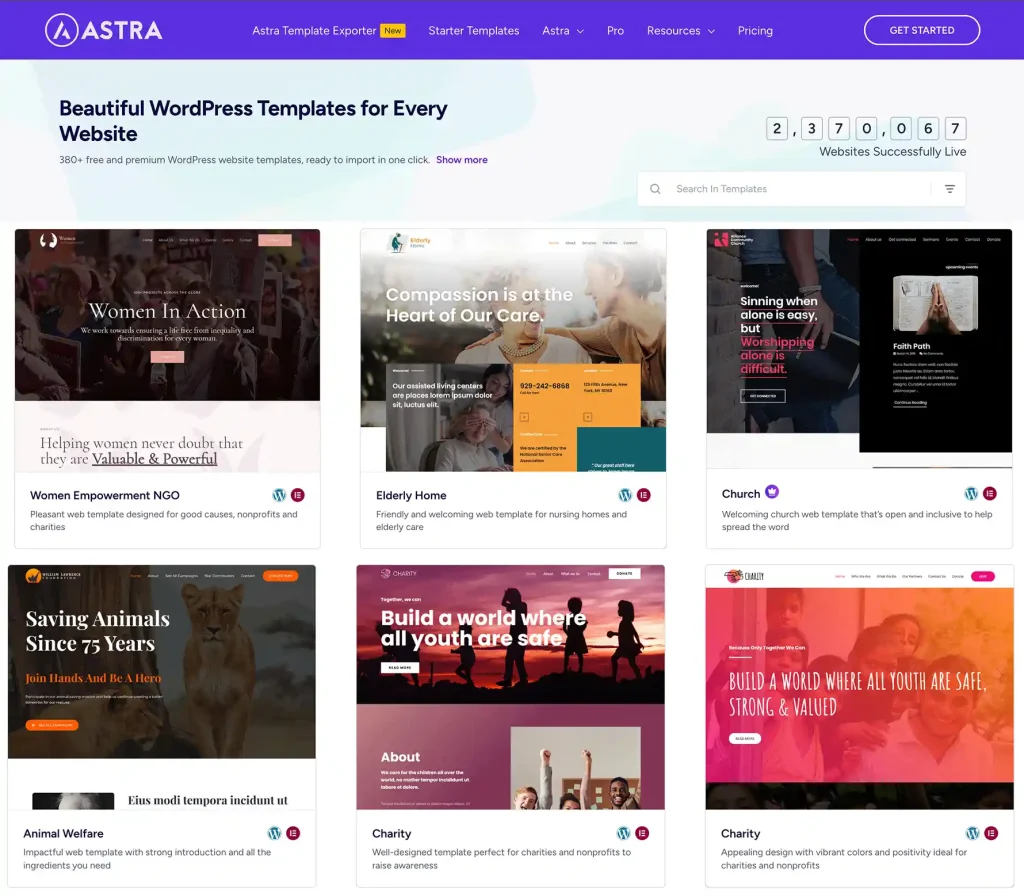
Astra is one of the most widely used WordPress themes for a reason: it’s lightweight, loads fast, and comes with a library of starter templates you can adapt instead of designing from scratch.
It works well with Elementor if you want a visual page builder, and it’s built to work smoothly with the block editor if you’d rather stick with WordPress’s native tools.
For a church that wants a clean, professional look without a steep design learning curve, Astra is a solid, low-risk starting point.
Faith (premium church theme)
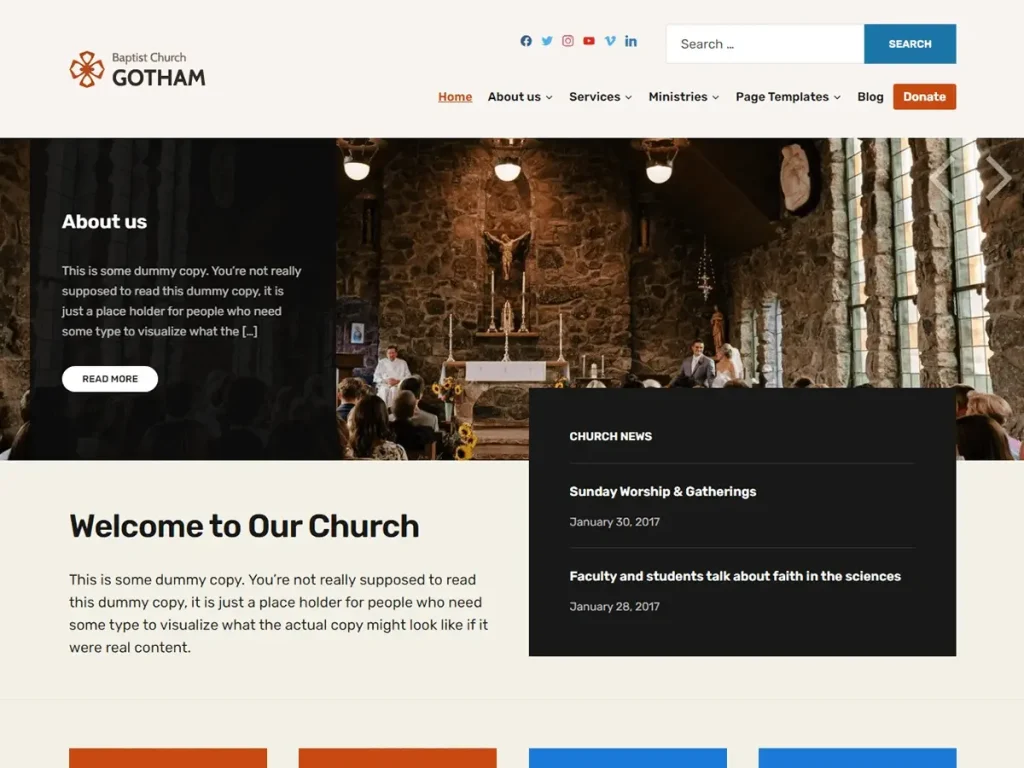
Unlike general-purpose themes, Faith is built specifically around church website needs: sermon archives, ministry pages, event listings, donation integration, and pastor or leadership profiles are already part of the design rather than something you have to piece together.
If you’d rather start closer to a finished product and spend your time on content instead of layout decisions, a dedicated church theme like this can save real time.
Kadence, Blocksy, and Neve
All three are strong, lightweight alternatives worth a quick look to build a church website with WordPress.
Kadence stands out for its header and footer builder and deep customization options. Blocksy offers a similarly modern, flexible builder with a strong focus on performance. Neve leans mobile-first and pairs well with starter sites if you want to get something live quickly and refine it later.
Any of the three will serve a church site well; the differences mostly come down to design preference rather than one being clearly better than the others.
Step 6: Plan your site structure
Before adding content, map out your sitemap. This is the skeleton everything else hangs on, and getting it right now saves a lot of reorganizing later. A typical church website structure looks like:
- Home
- About
- Ministries
- Events
- Sermons
- Give
- Volunteer
- Prayer request
- Blog
- Contact
Not every church needs every page from day one. If you’re just getting started, home, about, sermons, give, and contact cover the essentials; you can add ministries, events, and volunteer pages as those programs take shape.
Step 7: Build essential pages
Once your structure is ready, it’s time to start adding relevant pages and content. The content includes text, images, and videos. This is the most time-consuming part of building a website for a church.
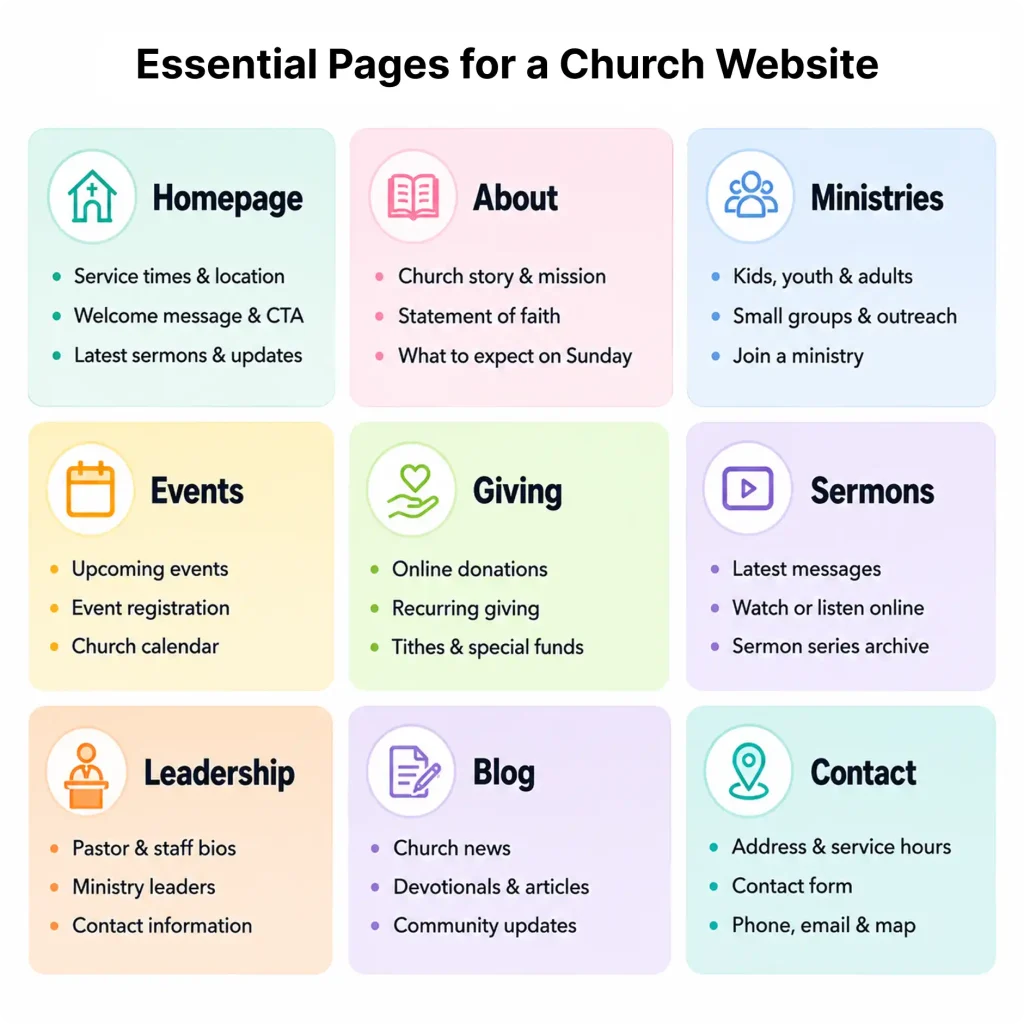
Here are some common pages found on church websites that you’ll want to include:
Homepage
This is the most important page when you’re making a church website, because it decides whether most visitors stay or leave. Lead with service times and location, front and center, not buried below a slideshow.
A short welcome message, a clear next step (plan a visit, watch the latest sermon, give online), and recent updates round it out.
About
Your story, your mission, and what a first-time visitor can expect on a Sunday. This is also where a lot of visitors quietly decide whether your church feels like a fit for them, so write it like you’re talking to a person, not filling out a form.
Ministries
Lay out what’s actually available: kids’ programs, youth group, small groups, outreach, whatever applies. Each one deserves at least a short description and a way to get involved or ask questions.
Leadership
Photos and short bios of pastors and key staff. This builds trust before someone ever sets foot in the building; people like to know who they’ll be meeting.
Contact
Address, phone number, email, and a simple contact us form. Embed a map here too; this is exactly the kind of detail that prevents someone from showing up at the wrong building.
New visitors
A dedicated page answering the questions a first-timer is quietly wondering about: what to wear, where to park, what happens with kids during the service, how long it runs. Churches that do this well tend to see it become one of their most visited pages.
Step 8: Add sermons
Your sermon archive should let people browse by series, search by topic, and access whatever format works for them: video, audio, or written notes.
Categorizing sermons by series or topic (not just by date) makes older content far easier to find, and a simple search bar goes a long way for anyone looking for a specific message they remember hearing.
Step 9: Add online giving
Online fundraising for church isn’t optional anymore; it’s often the easiest way for both regular members and occasional visitors to support your church, especially anyone who can’t make it in person.
The plugin you choose needs to handle one-time and recurring donations securely, support the payment methods your congregation actually uses, and stay easy enough for a non-technical volunteer to manage.
Paymattic – WordPress plugin for donations
Paymattic is a complete payment and donation plugin built for WordPress, and it covers more than just a basic donate button. Churches can use it to accept tithes, offerings, mission fund contributions, event fees, and general donations, all without routing donors through a third-party platform.
The form builder is drag-and-drop, so setting up a new giving campaign (say, a building fund alongside your regular tithing form) doesn’t require touching code.
It supports both one-time and recurring donations, connects to a wide range of region-focused payment gateways including Stripe (free), PayPal, Square, Mollie, Razorpay, and Paystack, and gives you a donor management dashboard with reporting built in, so you can actually see giving trends over time instead of digging through a payment processor’s dashboard separately.
Key features:
- One-time and recurring donations
- Custom donation forms with conditional logic
- 15+ payment gateways
- Gift Aid support for UK churches
- Donation goals and suggested amounts
- Offline donation support
- Multi-currency support
- Email notifications and receipts
- Donor management dashboard
- Donor leaderboard
- Payment analytics and reporting
- GDPR-friendly data handling
- Integrates with FluentCRM, Mailchimp, Zapier, and more
Best for: Churches that want one plugin handling donations, event payments, and member contributions instead of stitching together separate tools for each.
Step 10: Set up your donation page properly
Picking a plugin is only half the job of designing a church website with WordPress. How you set up the donation page itself makes a real difference in whether people actually use it.
Start with fund designation. Most churches take in more than one type of gift: general tithes, a building fund, missions support, so let donors choose where their gift goes rather than lumping everything into one generic form.
Paymattic’s donation form builder makes this straightforward; you can set up separate giving categories within a single form using conditional fields, so donors see a clear breakdown without needing multiple separate pages.
Next, decide how you’re handling recurring gifts. A lot of regular givers prefer setting up a monthly donation once rather than remembering to give each week manually. Allow users to cover processing fees if they want to.
Set up the confirmation page with a clear thank-you note and an automatic email receipt.
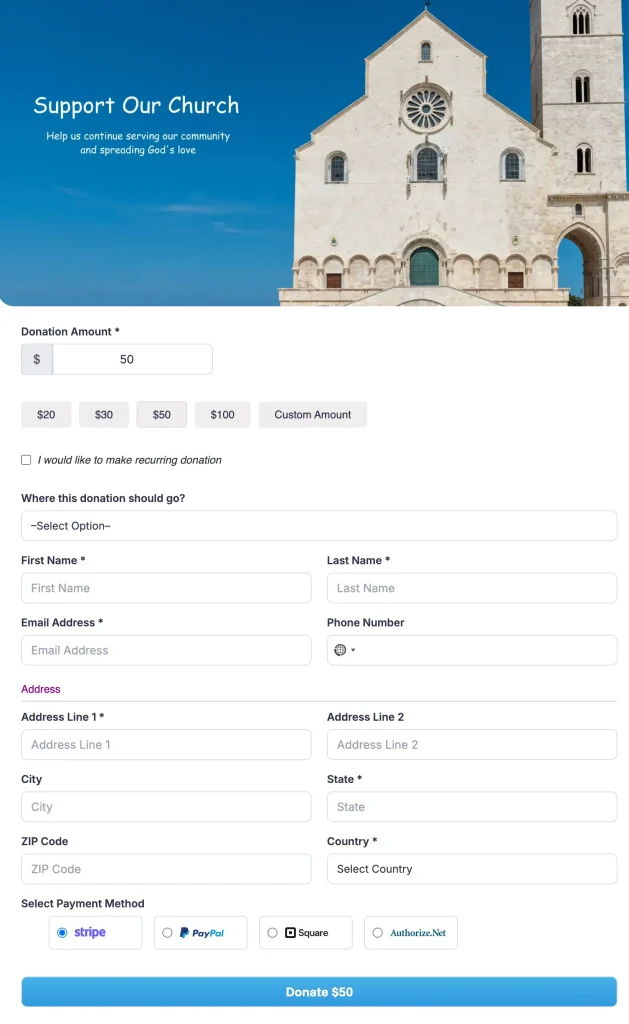
Here is how a church donation form look like build with Paymattic:
Church Donation Form
Step 11: Add important forms
Beyond giving, a few other forms make a real difference in how connected people feel to your church:
- Prayer request form: keep it simple, name, request, and an option to keep it private
- Volunteer signup: list current opportunities and let people indicate interest directly
- Membership application, if your church has a formal process
- Event registration, especially useful for things like retreats or kids’ programs with limited capacity
- Counseling request, a quieter, more private way for someone to reach out
- General contact form, for everything else
Step 12: Optimize for mobile
When you build a church website with WordPress or any other builders, make sure it’s well optimized for mobile devices.
A large share of your visitors, especially first-timers checking service times before deciding to show up, will be on their phones.
Make sure buttons are large enough to tap comfortably, text is readable without zooming, and your donation and contact forms work cleanly on a small screen.
Most modern themes handle this automatically, but it’s worth actually testing on your own phone rather than assuming.
Step 13: Improve site speed
A slow site quietly costs you visitors before they even see your content. A few things help:
- Compress images before uploading; large uncompressed photos are one of the most common causes of slow load times
- Use a caching plugin like WP Rocket or LiteSpeed Cache
- Enable a CDN if your host offers one; this speeds up load times for visitors outside your immediate region
- Turn on lazy loading for images, so pages load faster since images below the fold load only as someone scrolls to them
Step 14: Secure your site
Church websites handle donor information and personal details, so security isn’t optional. At minimum:
- Keep SSL active (you already set this up in step 4)
- Install a security plugin like Wordfence or Solid Security (formerly iThemes Security) for malware scanning and firewall protection
- Turn on two-factor authentication for admin logins
- Set up automatic backups, ideally stored off-site, not just on your hosting server
Wordfence is a solid, well-established option with real-time threat detection and a built-in firewall. Solid Security focuses more on hardening WordPress itself against common vulnerabilities, things like limiting login attempts and monitoring file changes. Either one covers the basics well.
Step 15: Optimize for SEO
Getting found in search matters just as much as looking good once someone arrives. A few fundamentals:
- Write clear, descriptive titles and meta descriptions for every page
- Set up local SEO properly (Google Business Profile, consistent address across your site), so you show up for “church near me” searches
- Use schema markup where relevant, especially for service times and events
- Link between related pages on your own site (your sermons page linking to relevant ministry pages, for example)
- Add descriptive alt text to images
Rank Math and Yoast SEO both handle the technical side of this well and walk you through what’s missing on each page as you write.
Step 16: Test before launch
Before launching your church website, go through a real checklist:
- Click every link, including ones buried in footers and menus
- Submit every form as a test
- Make a test donation with test card numbers (most plugins have a test mode) to confirm the whole flow works
- Check the site on both a phone and a desktop
- Run a speed test
- Check color contrast and readability for accessibility
- Open the site in a couple of different browsers
How much does it cost to build a church website with WordPress
When you’re building a church website with WordPress, cost is a real concern, and not just for churches. Any nonprofit runs into the same tension: you don’t want to spend a large chunk of funds people gave in good faith on infrastructure.
The goal is usually to keep spending as lean as possible without cutting corners on what actually matters: security, reliability, and a smooth giving experience.
Here’s a realistic range depending on how much you handle yourself versus how much you invest upfront.
Lean, DIY setup:
- Domain: roughly $10-20/year
- Hosting: roughly $3-15/month on a budget-friendly host like Hostinger
- Theme: free (Astra’s free version, for example)
- Plugins: mostly free tiers to start or 4.99/month for Paymattic
This can realistically run under $200 for the first year if you’re doing everything yourself.
Fuller-featured setup:
- Domain: same, $10-20/year
- Hosting: $20-30/month for something like SiteGround
- Premium theme: one-time cost, typically $50-100
- Paid plugin tiers (donation plugin pro features, security plugin premium, SEO tools): variable, often $100-300/year combined
Either way, you don’t need the expensive version to launch something functional. Start lean, and upgrade specific pieces (a premium theme, a plugin’s paid tier) once you know what your church actually needs more of.
Common mistakes to avoid when creating a church website
Now you know how to create a church website with WordPress, but here are a few things that you should avoid while designing one.
- Choosing the cheapest hosting available without checking speed or uptime reviews first
- Installing too many plugins; each one adds potential points of failure and slows the site down
- Designing for desktop first and treating mobile as an afterthought
- Burying service times and location instead of putting them front and center
- Making the donation page hard to find or clunky to use
- Skipping backups and security until something goes wrong
- Letting content go stale, outdated event listings and last year’s sermon on the homepage undercut trust fast
Wrapping up
Building a church website with WordPress isn’t a weekend sprint, but it’s not the overwhelming technical project it might feel like either. Start with your domain and hosting, get WordPress installed, pick a theme that fits, and build out your essential pages first.
Add sermons, giving, and forms as you go, then round it out with speed, security, and SEO before you launch.
A church website is more than an online brochure. It’s a digital hub for worship, communication, outreach, and generosity, one that keeps working for your congregation long after Sunday’s service ends. Start with what matters most right now, keep the content current, and keep improving it as your church grows.
Frequently asked questions
How much does it cost to build a church website?
Costs range from under $200 for a lean, self-managed setup to around $500-1000 for a fuller-featured site with a premium theme and paid plugin tiers, plus ongoing hosting and domain renewal costs each year.
Can I build a church website without coding?
Yes. WordPress themes and page builders handle the design and layout visually, and plugins add features like donation forms and event calendars without needing custom code.
Which platform is best for church websites?
WordPress is a strong choice because it’s flexible, you own your content outright, and it supports the full range of features a church site needs.
What’s the best donation plugin for WordPress churches?
It depends on what you need. Paymattic works well if you want one plugin to handle donations, event payments, and recurring giving together.
Do churches need online giving?
Increasingly, yes. It gives regular members an easier way to give consistently and gives visitors and remote supporters a way to contribute without attending in person.
What pages should every church website have?
At minimum: home, about, sermons, a giving page, and contact. Ministries, events, volunteer, and prayer request pages are worth adding as those programs take shape.

Hey! Tipu here, working as a Marketing Strategist at Paymattic & AzonPress. A nature lover who is addicted to exploring history. In my leisure, you’ll find me playing with different musical instruments.
-

10 Best jQuery Table Plugins for Best Data Visualization in 2026
Discover the 10 best jQuery table plugins for 2026. Compare -

Black Friday Marketing Strategies for 2026: Core and Advance Move
Black Friday is the most celebrated shopping season worldwide. Discover -

How Much Can You Earn With Amazon Affiliate Marketing? Rates & Niches
How much can you earn with Amazon affiliate marketing? Dive



Leave a Reply
You must be logged in to post a comment.