
How to Add Signature in Gmail (Step-by-Step Guide for Beginners)

If you’ve ever received a professional email ending with the sender’s name, job title, phone number, and website link, that’s an email signature.
A Gmail signature is a small block of text (or even an image) that is automatically added to the bottom of every email you send.
Setting up a signature makes your emails look polished and professional, whether you’re a student, freelancer, or small business owner.
The good news? Learning how to add a signature in Gmail takes less than 5 minutes.
If you want to add or change your Gmail signature but are not sure where to start, this guide walks you through the exact steps on both desktop and mobile.
TL;DR:
- On desktop, go to Gmail Settings, scroll to Signature, click “+ Create new,” write your signature, set your defaults, and save
- On mobile, open the Gmail app, go to Settings, tap your account, and tap “Mobile Signature” to set it up
- Mobile only supports plain text (images, logos, and formatting are desktop only)
- You can create multiple signatures and switch between them using the pen icon in the compose window
- Desktop and mobile signatures are managed separately
- Each Gmail account has its own signature; repeat the setup for every account you use
Why You Should Add a Gmail Signature
Before we dive in, here’s why a Gmail signature matters:
- It saves you from typing your contact details every single time
- It builds trust and credibility with your recipients
- It makes you look more professional at zero cost
- It gives people an easy way to reach or learn more about you
Now, let’s get started.
Plain Text vs. Rich Formatting in Gmail Signature
Gmail gives you two ways to write your signature: plain text or rich formatting. Neither is wrong, but each suits a different purpose. Here is what sets them apart:
| Feature | Plain Text | Rich Formatting |
|---|---|---|
| Formatting Toolbar | Not Available | Availble |
| Bold, italic, underline | Not available | Available |
| Font size and style | Not available | Available |
| Colors | Not available | Available |
| Clickable hyperlinks | Not available | Available |
| Images and logos | Not available | Available |
| Works on all email clients | Yes | Mostly, Yes |
| Available on mobile app | Yes | No, mobile is plain text only |
| Best for | Simple, minimal signatures | Branded, professional signatures |
Plain text works everywhere without compatibility issues, but it looks basic. Rich formatting looks branded with your name in bold, a logo, and a clickable website link. The trade-off is that a small number of older email clients may strip the formatting.
For most users, rich formatting on desktop is the right choice. If you are on mobile, plain text is your only option.
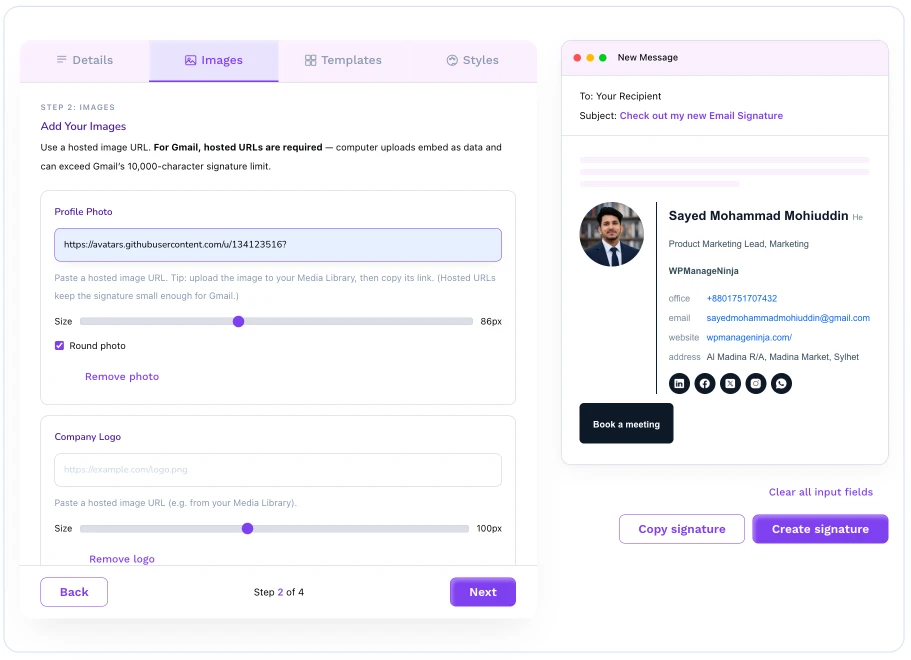
How to Create a Gmail Signature with FluentCRM Email Signature Generator
The free FluentCRM Email Signature Generator helps you create a professional Gmail signature in just five steps:
- Add your contact details: Enter your name, job title, email address, phone number, and company information.
- Upload your visuals: Add a profile photo, company logo, or handwritten signature for a more polished look.
- Choose a template: Select from 10 professionally designed signature layouts.
- Customize the design: Adjust the colors, font, and text size to match your brand.
- Create your signature: Click Create Signature to generate the HTML, ready to add to Gmail or another email client.
Read the whole tutorial here: FluentCRM Email Signature Generator: Create Professional Signatures for Every Email
No design skills or coding required. Simply enter your information, personalize the design, and your professional email signature is ready to use.
How to Add a Signature in Gmail on Desktop (Windows & Mac)
Adding a Gmail signature on a desktop browser is straightforward. Gmail runs in a browser, so the steps to add a Gmail signature are almost identical on Windows and Mac.
Follow these steps to add your Gmail signature on a computer:
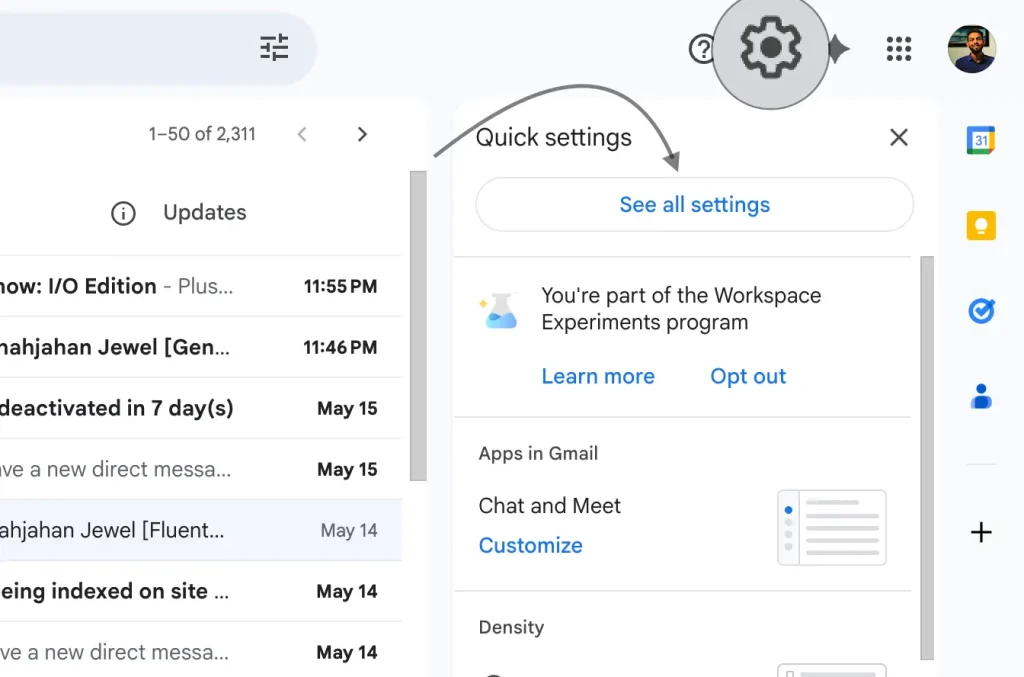
Step 1: Open Gmail Settings
Open your browser and go to gmail.com. Now Click the settings icon in the top-right corner. Click “See all settings.”
Step 2: Go to the Signature Section
You’ll land on the General tab by default. Scroll down until you see the “Signature” section
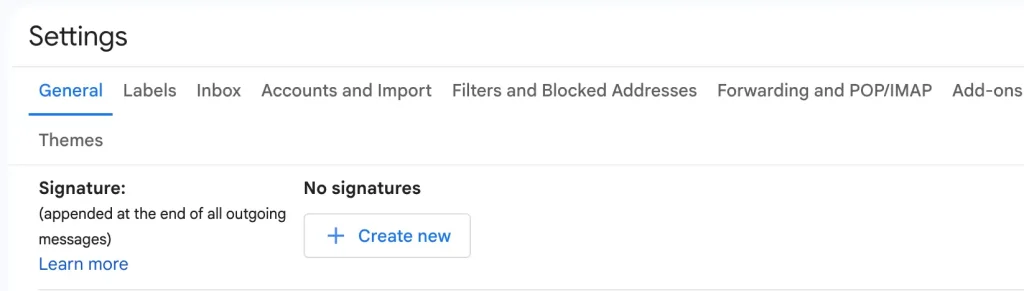
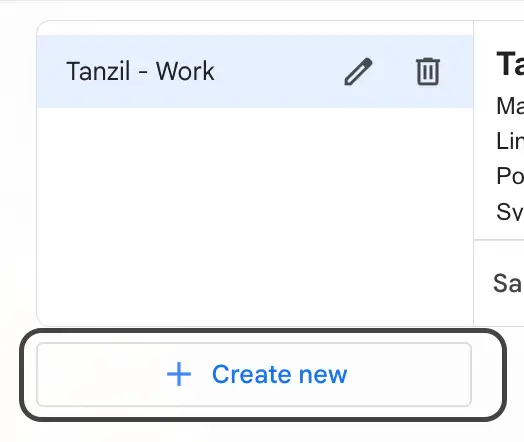
Step 3: Create a New Signature
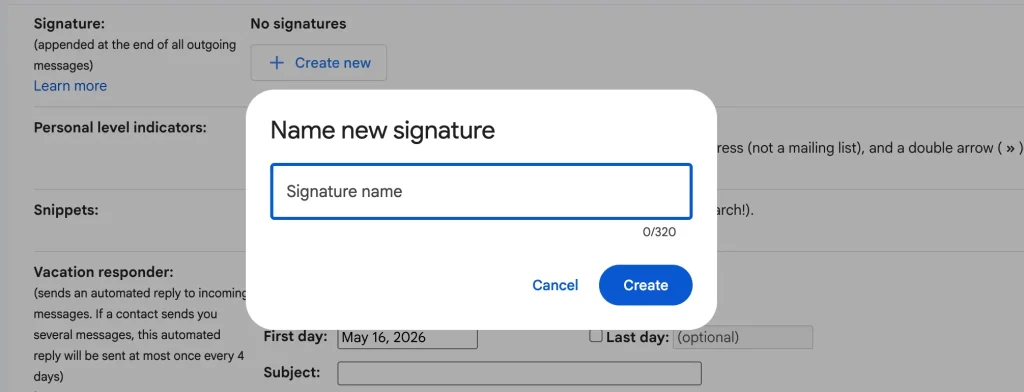
Click the “+ Create new” button. Give your signature a name (e.g., “Work Signature” or “Personal”). Click “Create“.
Step 4: Write Your Signature
In the text box on the right, type your signature. A basic signature typically includes:
- Your full name
- Your job title or role
- Your phone number
- Your website or LinkedIn URL

You can use the formatting toolbar to bold your name, change font size, add links, or insert a small logo. Gmail allows up to 10,000 characters in a signature, though keeping it short is always better.
Step 5: Set Your Signature Defaults
Just below the text editor, you’ll see two dropdown menus:
- “For new emails use”: select your signature here
- “On reply/forward use”: choose whether the signature appears on replies too
You will also see a checkbox that says “Insert this signature before quoted text in replies and remove the ‘–‘ line that precedes it.”
Check this box if you want to remove the two dashes Gmail automatically adds above your signature in reply emails.

Step 6: Save Your Changes
Scroll all the way down and click “Save Changes.”
That’s it! Your Gmail signature is now live. The next time you compose an email, it will automatically appear at the bottom.
Note: If you use Gmail on both Windows and Mac, your added Gmail signature syncs automatically through your Google account. You only need to set it up once.
How to Add a Gmail Signature on Mobile (iOS & Android)
The Gmail mobile app handles signatures differently on iPhone and Android. The paths to add a Gmail signature are slightly different.
Also, there is one important limitation to know: the Gmail mobile app only supports plain text signatures. You cannot add images, logos, icons, or HTML formatting on mobile. If you want a formatted signature, set it up on a computer.
Step 1: Open the Gmail App
Make sure you have the Gmail app installed, and you’re logged in to your account.
Step 2: Access Settings
- Tap the three horizontal lines in the top-left corner to open the menu
- Scroll down and tap “Settings”
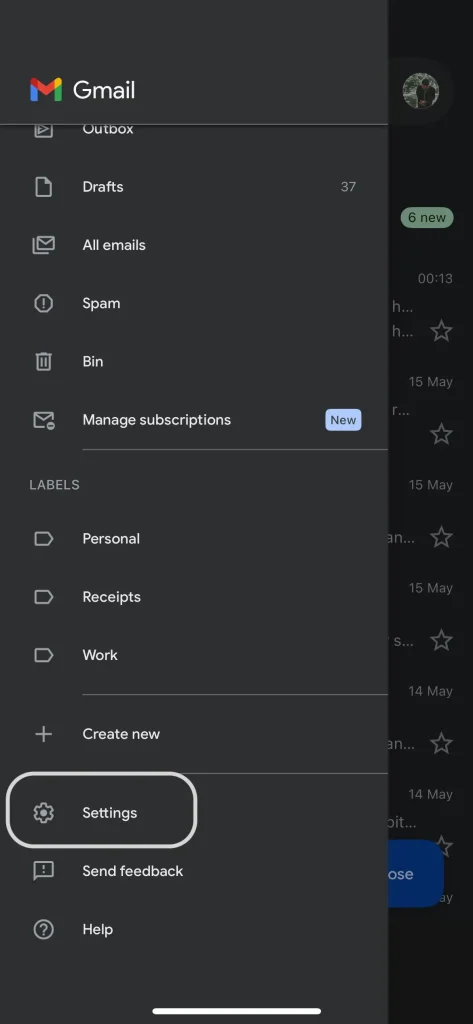
Step 3: Select Your Account
If you have multiple Gmail accounts, tap the one you want to add a signature to.
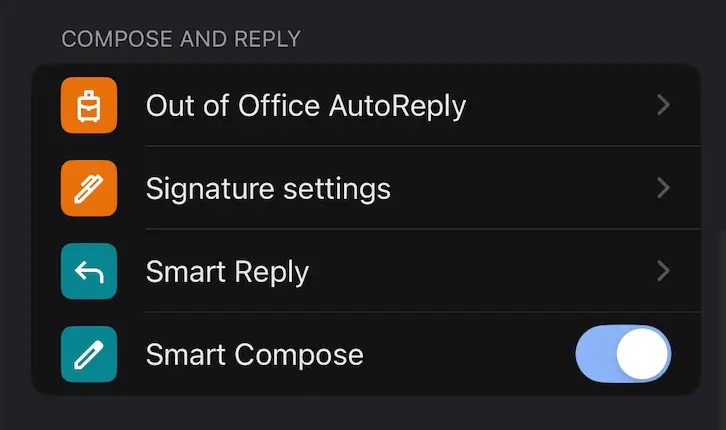
Step 4: Find the Signature Setting
- Scroll down to find “Mobile Signature”
- Tap on it
Step 5: Type Your Signature
A text box will appear. Type your desired signature: your name, title, contact info, or whatever you prefer.
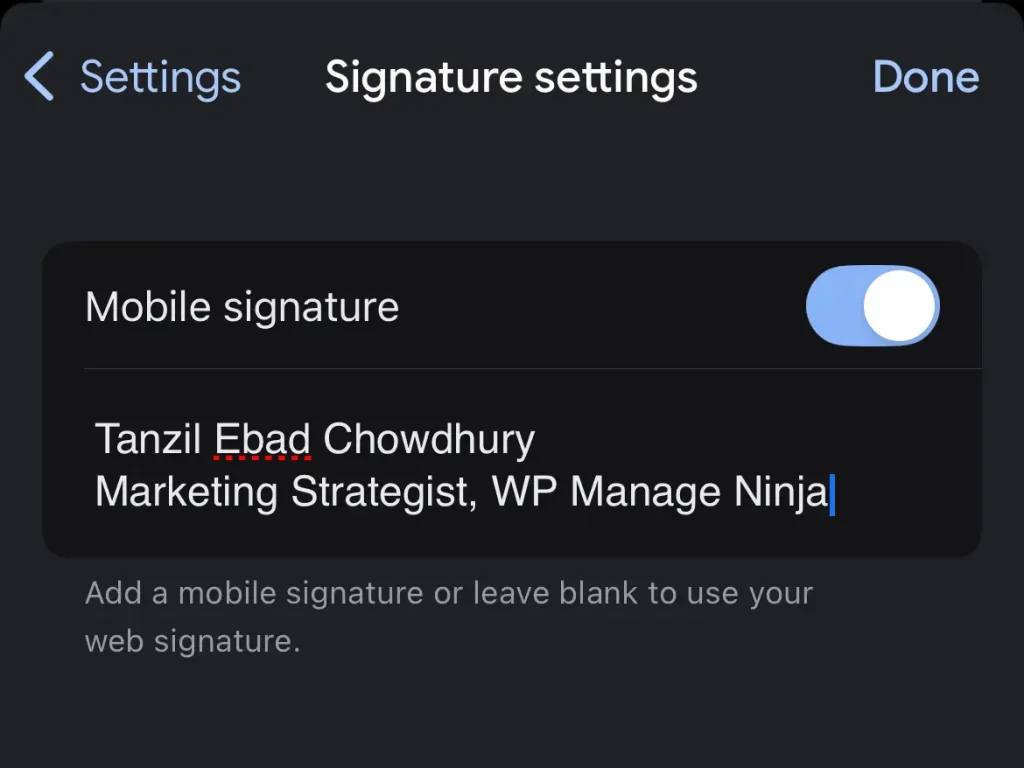
Step 6: Save
Tap “OK” or “Save” (depending on your device). Your mobile Gmail signature is now set.
Note: Your mobile signature and desktop signature are managed separately in Gmail. You’ll need to set them up individually if you want the same signature on both.
How to Create Multiple Gmail Signatures
Gmail lets you create more than one signature and switch between them depending on the types of email you are sending.
For example, you might want one signature for new emails and a shorter one for replies.
Multiple signatures are only available on desktop.
Here is how to set them up:
- Go to Settings, then “See all settings,” then scroll to the Signature section
- Click “+ Create new” to add a second signature, give it a name, and write the content
- Repeat for as many signatures as you need
- Use the “For new emails use” and “On reply/forward use” dropdowns to set your defaults
To manually choose a signature when composing an email, click the pen icon at the bottom of the compose window. A dropdown will appear with all your saved signatures. Select the one you want, and it will replace whatever is currently in your email.
How to Add a Gmail Signature While Composing (Desktop & Mobile)
Once your signature is set up, Gmail lets you add it automatically every time you compose a new email.
But there are situations where you may want to insert, switch, or remove a signature for a specific email without changing your default settings.
Here is how to do that on both desktop and mobile.
On Desktop
When you open a new compose window, your default signature will already appear at the bottom. You have three options from there:
Insert a signature when none is set as the default
If you have not set a default signature, your compose window will open without one. To add a signature to that specific email, click the pen icon at the bottom of the compose window, then select the signature you want to insert.
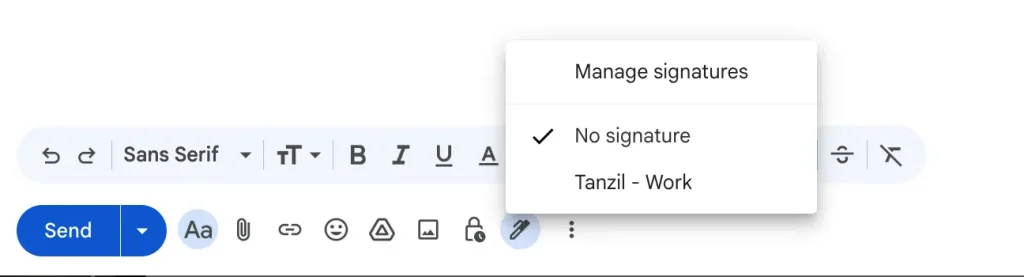
Insert or switch your signature manually
Click the pen icon at the bottom of the toolbar of the compose window. A dropdown will appear listing all your saved signatures. Click the one you want to use, and it will replace the current signature in that email only. Your default settings stay unchanged.
Remove the signature for a single email
Click inside the signature text in the compose window and manually select and delete it. This removes it from that email only. Your default signature will still appear in future emails.
On Mobile
The Gmail mobile app does not have a per-email signature switcher like the desktop does. Your mobile signature either appears in every email or it does not, based on your settings.
Here is what you can do:
Add a signature to a single email when none is set
The Gmail mobile app does not support inserting a saved signature on the fly. If you want a signature on a specific email and none is set, you will need to type it manually or go to Settings first to enable your mobile signature.
Remove the signature from a specific email
When composing an email on the Gmail app, scroll to the bottom of the compose window. If your mobile signature is set, you will see it there. Tap inside the signature text, select all of it, and delete it. This removes it for that email only.
Note: On mobile, you cannot switch between multiple signatures per email the way you can on desktop. If you regularly send emails that need different signatures, manage them from the desktop version of Gmail.
How to Change Your Gmail Signature
Need to update your signature? Changing your Gmail signature is just as easy as creating one.
On Desktop:
- Go to Settings → See all settings → General → Signature
- Click on the signature you want to edit
- Make your changes in the text box
- Scroll down and hit “Save Changes“
On Mobile:
- Go to Gmail app → Settings → [Your Account] → Mobile Signature
- Clear the existing text and type your new signature
- Tap “OK” to save
You can update your signature anytime. For example, when you change jobs, get a new phone number, or want to add a promotional link.
How to Delete a Gmail Signature
If you want to remove a signature entirely, here is how to do it on a desktop:
- Go to Settings, then “See all settings“
- Scroll down to the Signature section
- Click the signature you want to remove
- Click the delete icon next to the signature name
- Scroll down and click “Save Changes“
On mobile, go to your signature settings, select all the text in the field, delete it, and save. The signature field will be blank, and nothing will be added to your outgoing emails.
Pro Tips for Creating a Great Gmail Signature
Now that you know how to add a Gmail signature, here are some best practices to make yours stand out:
- Keep it short: A signature with 3 to 4 lines is ideal. Too much information looks cluttered.
- Use consistent formatting: Stick to one font style and size. A clean, readable font looks far more professional.
- Include only what matters: Your name, title, website URL, and contact method are often enough.
- Add a clickable link: Use the link feature in the signature editor to turn your website or LinkedIn URL into a hyperlink.
- Test before going live: Send a test email to yourself after setting up your signature. Check how it looks on both desktop and mobile before sending.
- Go easy on images. Some email clients block images; do not rely too heavily on images.
- Keep images under 1MB: Large image files can cause your signature to load slowly or throw an error. Resize before uploading.
Troubleshooting: Gmail Signature Not Showing Up
If your signature is not appearing, here are the most likely fixes:
- Not showing in new emails: Go to Settings > See all settings > Signature. Check the “For new emails use” dropdown and make sure it is set to your signature, not “No signature.”
- Not showing in replies: Check the “On reply/forward use” dropdown in the same section and update it accordingly.
- Images not loading: Switch to a publicly accessible link and keep the file under 1MB.
- Broken formatting: Select all text in your signature, click “Remove formatting” in the toolbar, then reformat manually.
- Not showing on mobile: Desktop and mobile signatures are separate. Set your signature up again inside the Gmail app under Mobile Signature settings.
Give Your Email A Professional Look
A well-crafted Gmail signature is one of the easiest ways to make every email you send look polished and intentional.
Now that you know how to add a signature in Gmail, set it up today, test it across devices, and revisit it whenever your details change. Small touches like this go a long way in making a strong first impression.
Go ahead and set up your signature right now, make it professional, and your future email recipients will definitely notice the difference!

Words are my favorite playground. As a Creative Writer at WPManageNinja, I don’t just produce content; I tell stories. By mixing fiction and metaphors with real-life examples, I turn my writing into a creative journey that’s easy for readers to digest and relate to.
-

Kanban vs Scrum vs Agile vs Waterfall: What’s the Difference?
Get a clear, no-jargon breakdown of Kanban vs Scrum vs -

Email Deliverability Hacks: Complete WordPress Guide With Free Tools
Improve WordPress email deliverability with FluentSMTP, SPF, DKIM, DMARC, list -

How to Embed Social Media Feeds on WordPress Websites (No Code)
Learn how to embed Instagram, Facebook, TikTok, and YouTube feeds
Leave a Reply
You must be logged in to post a comment.