

How to Build a Cohort-Based Training Business With WordPress
Most online training never get finished. That is a hard way to run a business.
A cohort-based training business often flips the model.
You teach a small group on a set schedule, and the group keeps everyone moving. Better still, you can build the whole thing on WordPress for free.
Here is the exact, step-by-step way to do it.
Key Takeaways
- A cohort-based training business sells a scheduled group program, not lifetime video access.
- Deadlines and community push completion far above self-paced courses.
- You can build and validate the whole model for free on WordPress.
- A small set of connected Fluent plugins handles the community, video, applications, and email.
- Keep your first cohort deliberately manual, then automate once it works.
What a Cohort-Based Training Business Actually Is
A cohort-based training business sells a time-bound program where a group of people learns together on a fixed schedule. Instead of buying lifetime access to recorded videos, students join at a start date, move through weekly milestones, and finish as a group.
Just think of a gym class versus a workout DVD. The DVD sits on a shelf. The class has a time, a coach, and people who notice when you skip. The structure is the whole point.
That structure changes results. The median completion rate for open online courses sits near 12.6%. Cohort courses do far better. Data from Ruzuku across 32,000 courses found 64.2% completion for cohort courses versus 48.2% for self-paced ones.
So the product is not the videos. It is the outcome, plus the structure that makes the outcome happen. Keep that idea close, because every build choice below serves it.
Why a Cohort-Based Training Business Beats a Static Course
Before we build anything, it helps to know why this model is worth the effort. Static courses look easier, but they leak customers.
Static courses attract buyers, then lose them. Students enroll with good intentions, watch a lesson or two, then drift away. Low completion means weak testimonials, few referrals, and more refund requests.
The reason is simple. People need other people to finish hard things. The same Ruzuku dataset shows courses with a discussion space hit 65.5% completion versus 42.6% without one. Community is the mechanism, not a nice extra.
A cohort competes on results, not price. That is a stronger place to stand. Here is what a cohort buyer is really paying for:
- A clear before and after outcome tied to a date
- Direct access to you during the program
- Accountability from peers and weekly checkpoints
- Feedback on their real work, not generic answers
- A network they keep after the program ends
That bundle is hard to copy and easy to price higher than a video library. That is the business case. Now let’s talk about who runs it well.
Who This Business Model Fits
This works best for people with a repeatable transformation they can teach. If you can take someone from point A to a better point B, you have a cohort.
Common fits include:
- Coaches and consultants who already deliver results one to one
- Agency owners who want a scalable offer beside client work
- Trainers and subject experts with a proven method
- Practitioners who want to teach the skill they use daily
If that sounds like you, the rest of this guide is your blueprint. The good news is that the tools do most of the heavy lifting, so let’s see how they connect before we build.
How the Whole System Fits Together
Here is the part that makes everything else click. A cohort business is really one simple journey, repeated. A person applies, gets accepted, gets onboarded, learns week by week, talks with peers, then graduates into an alumni group.
Each stage needs a tool, and the four free tools below are built by the same company, so they connect inside WordPress without extras. Think of them as one system with four jobs.
- FluentCommunity is the home. It holds your spaces, your course, and the discussion where the cohort actually happens. Everything else plugs into it.
- FluentPlayer delivers your video lessons inside FluentCommunity, with a clean player and a built-in email capture layer for previews.
- Fluent Forms runs your application. It collects goals and fit details before anyone is accepted.
- FluentCRM handles people. It tags applicants, students, and alumni, and sends your onboarding emails.
Later, when demand is proven, two upgrades join the system. FluentCommunity Pro adds control features like sequential lessons, and FluentCart adds native checkout so students pay and enroll on their own. We will get to those.
Mapped to the journey, it looks like this:
- Apply: Fluent Forms
- Accept and onboard: FluentCRM
- Learn: FluentCommunity plus FluentPlayer
- Discuss and belong: FluentCommunity
- Graduate: FluentCommunity alumni space, later FluentCart for paid renewals
With that map in mind, we build in the same order a student would move through it. But first, the one thing that has to exist before any tool matters: the offer.
Step 1: Define Your Offer Before You Build Anything
A vague program sells to nobody. A specific outcome for a specific person sells fast. Nail this before you touch WordPress, because it shapes every later choice.
Your offer needs one measurable change and one narrow learner. Fill in this template:
- I help [narrow audience] achieve [measurable outcome]
- in [cohort length] weeks
- using [your specific method]
- so they can [bigger goal the outcome unlocks].
Example: “I help new team leads run confident one-on-ones in six weeks using a simple meeting framework, so they stop dreading manager duties.”
That is a training program with a spine. It is easy to teach, easy to measure, and easy to sell.
Set your acceptance criteria
Cohorts work best when students fit. Screening protects your outcomes and your future testimonials. Accept people who match all four:
- They have the starting point your method assumes
- They can commit to the weekly time required
- They have a real project to apply the work to
- Their goal matches what you actually teach
Turning away a poor fit is not lost revenue. It protects your completion rate, which protects your reputation. With the offer clear, you can design the weeks that deliver it.
Step 2: Plan Your Cohort Structure
An offer is a promise. The structure is how you keep it. Each week should have a lesson, an assignment, a discussion prompt, and a live or checkpoint moment.
Here is a sample six-week structure you can adapt to almost any topic:
- Week 1: Foundations. Students set a goal and define their starting point.
- Week 2: Core method. Teach the main framework and assign a first small task.
- Week 3: Build. Students create the main deliverable step by step.
- Week 4: Feedback. Review work, fix mistakes, and refine.
- Week 5: Apply. Students use the method on a real situation.
- Week 6: Review and next steps. Share wins, measure results, plan what is next.
If six weeks feels long for cohort one, run four weeks instead. Combine the build and apply weeks. Shorter cohorts are easier to finish, and short programs tend to complete better anyway.
Now you know what you are building and how the tools connect. Time to gather them.
Step 3: Gather Your Free WordPress Stack
You do not need paid tools to start. This free stack covers everything for cohort one. Install each plugin from your WordPress dashboard under Plugins, then Add New. Search the name, install, and activate.
Here is what each one is for, so nothing feels like a surprise when it appears:
- FluentCommunity Free is your community and course home.
- FluentPlayer Free delivers your lesson videos and previews.
- Fluent Forms Free runs your cohort application.
- FluentCRM Free tags people and sends onboarding emails.
Activate all four now. They will sit quietly until we wire them into the journey. We build in phases, starting with the home, since every other piece lives inside it.
Step 4: Build the Community Home
This is Phase one, and it is the foundation. Your community home is where students land, talk, and find their lessons. We set up the spaces first so the course has somewhere to live.
- Activate FluentCommunity, then open the portal from your WordPress sidebar. This is your community home base.
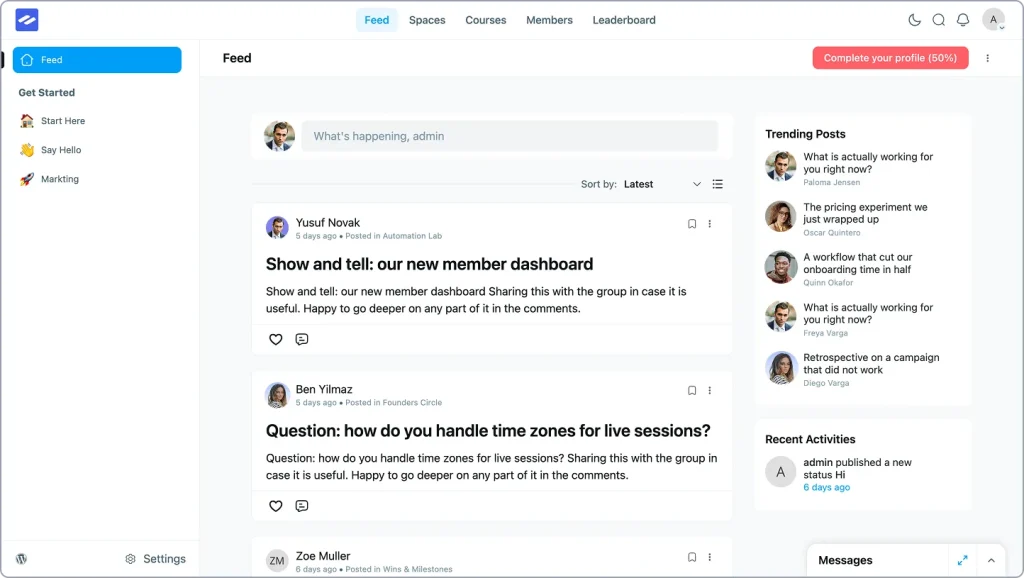
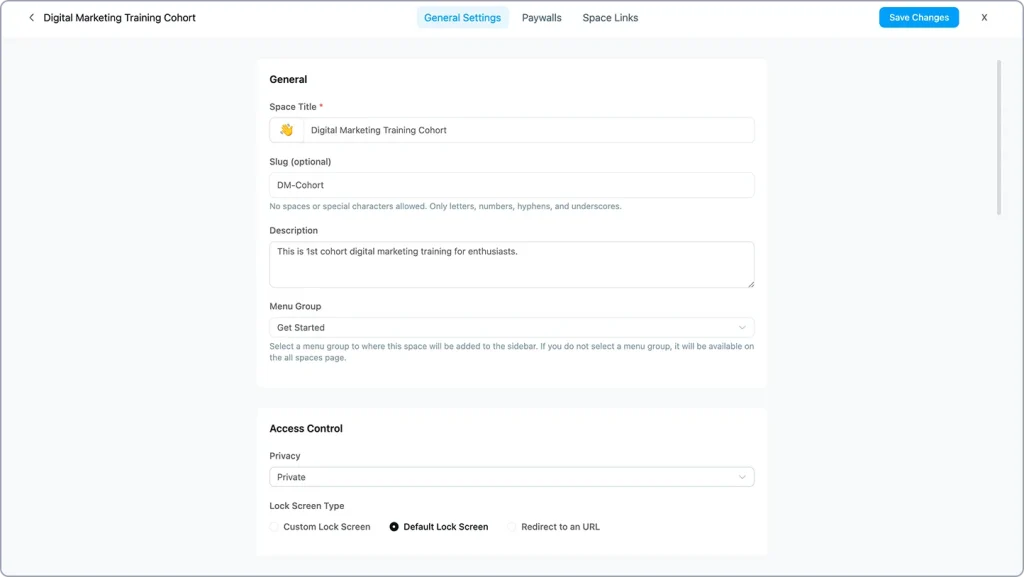
- Create three spaces: a welcome area, a cohort discussion space, and a resource space. Set the discussion space to private, so only enrolled students can see it.
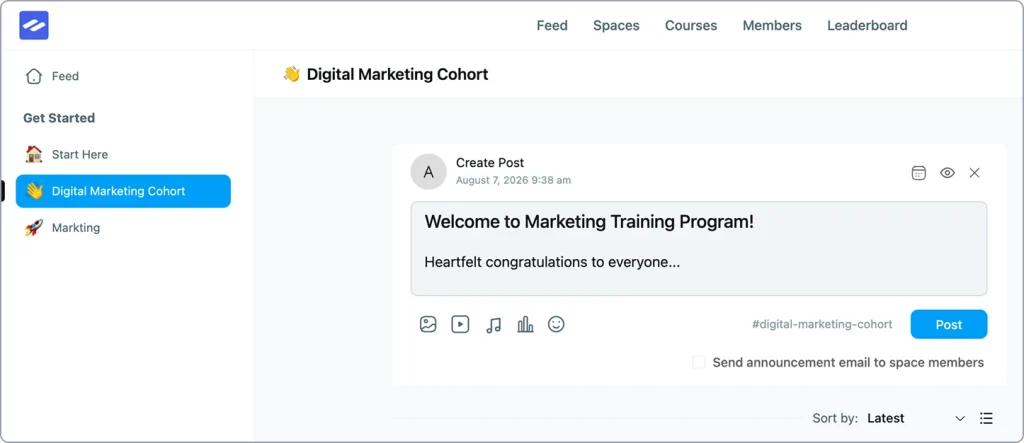
- Add a short welcome post that explains what the cohort is and how the space works. This sets the tone before anyone arrives.
With your spaces ready, the community has a shape. The next job is the actual training, which lives in the course module.
Step 5: Build the Course
This is Phase two. Your spaces exist, but there is nothing to learn yet. Here you turn on courses and build the lessons your students will move through each week.
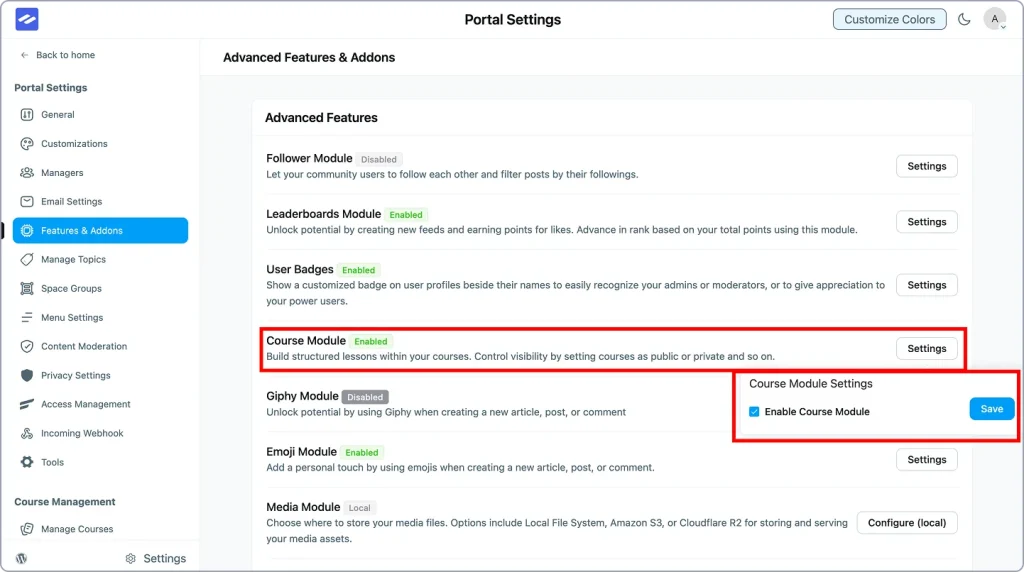
- Turn on courses. Go to FluentCommunity, open Advanced Features, find the Course Module, and enable it. A new Manage Course menu appears in the sidebar.
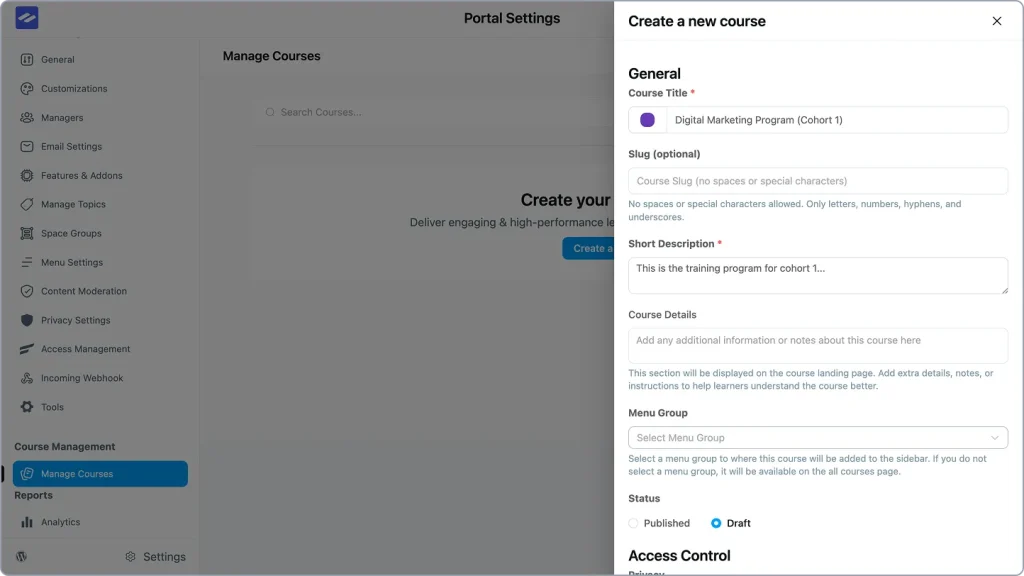
- Create your course. Click Create Course, then add a title, a slug, and a short description in General Settings.
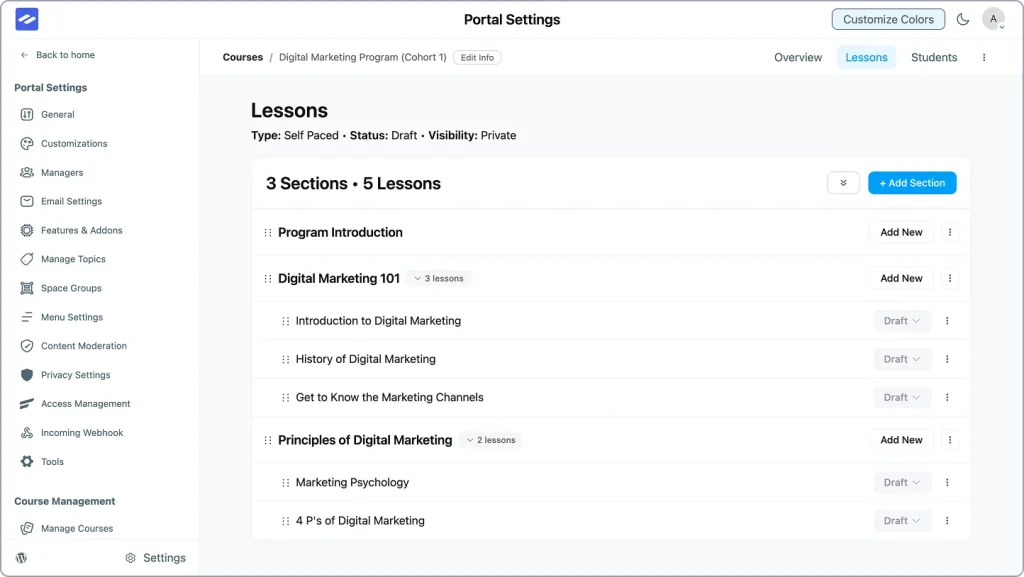
- Add structure. Use Add Section for your modules, then add lessons inside each section. Sections are chapters, lessons are pages. Match them to your weekly plan from Step 2.
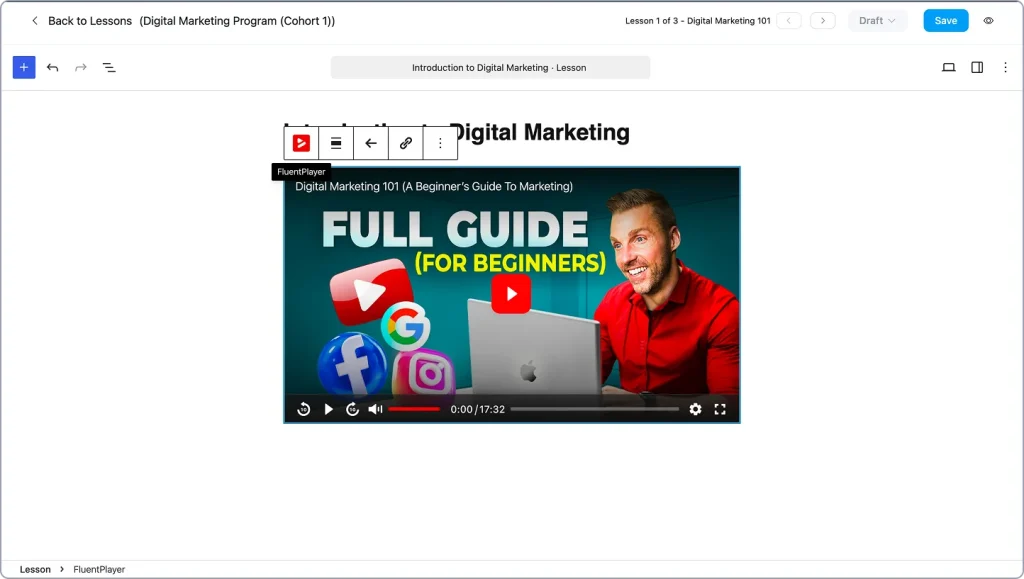
- Add video with FluentPlayer. Remember FluentPlayer from the stack? This is where it earns its place. Install it from FluentCommunity’s settings panel, then embed a video in a lesson. Keep player settings consistent across the course.
- Add a free preview. Open one lesson’s settings and mark it as a free preview lesson. Now anyone can sample your teaching before they enroll, which you will use later to attract students.
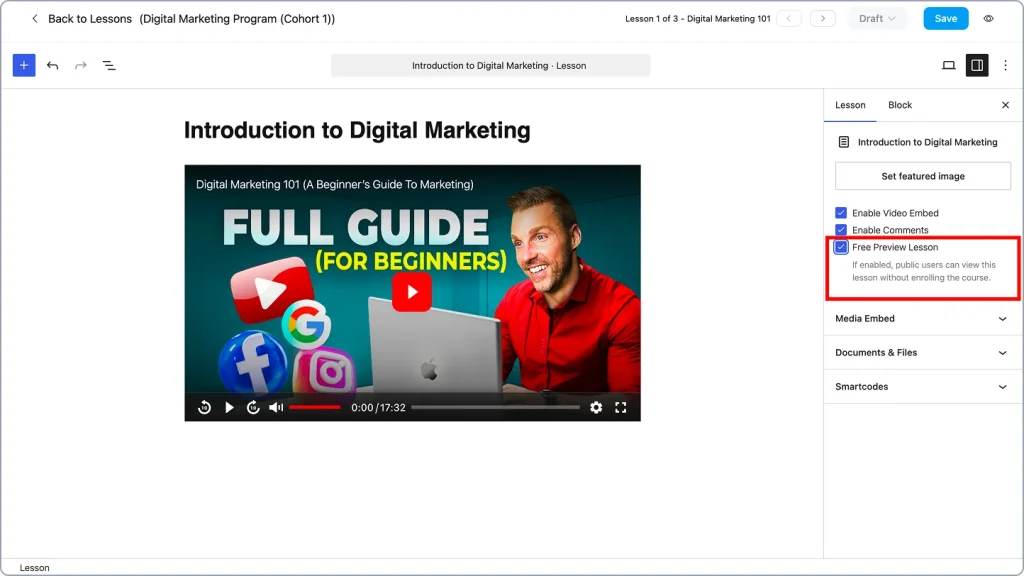
You now have a working course and community, built without spending a dollar. If any screen looks unfamiliar, the FluentCommunity documentation walks through each one.
Right now, though, anyone could wander in. You want people to apply and be chosen. That is where Fluent Forms comes in.
Step 6: Create the Application Flow
This is Phase three, and it changes how people join. An application makes the cohort feel selective, and it filters out poor fits before they hurt your completion rate.
- Build an application form in Fluent Forms. Ask for goals, experience level, availability, and current project. These map directly to the acceptance criteria you set in Step 1.
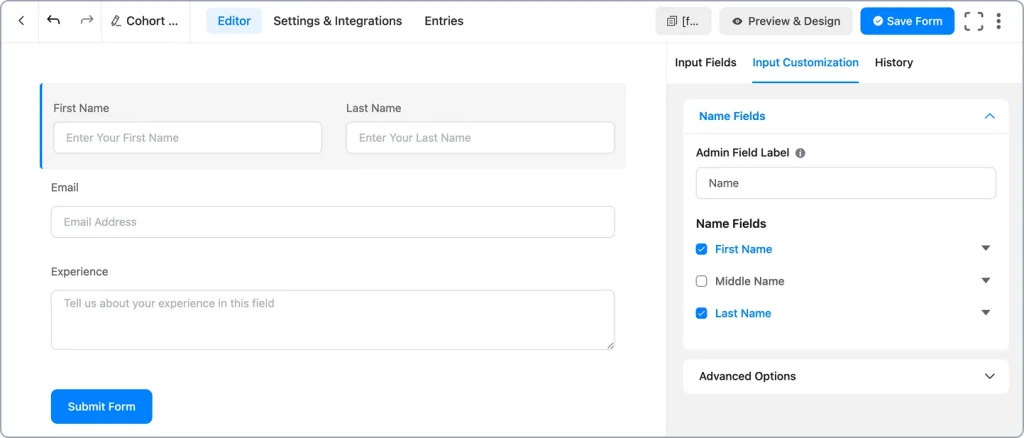
- Place the form on a simple page, then link your free preview lesson to it. A visitor watches the sample, then applies from the same journey.
An application on its own is just a list of names. To turn applicants into organized students, you need to tag and email them. That job belongs to FluentCRM.
Step 7: Set Up Tagging and Onboarding
This is Phase four, the last piece before you run. FluentCRM keeps your people organized and makes sure accepted students know exactly what to do on day one.
- Create three tags in FluentCRM: Applicant, Student, and Alumni. Tags let you message the right group at the right time, without spreadsheets.
![FluentCRM tags panel with Applicant, Student, and Alumni tags created]](https://wpmanageninja.com/wp-content/uploads/2026/08/Set-Up-Tagging-and-Onboarding-1024x648.webp)
- Tag new applicants as Applicant. When you accept someone, change their tag to Student. This simple move keeps your groups clean.
- Write one onboarding email with the start date, weekly schedule, and first action. Send it to accepted students so nobody is left guessing.
Everything is now in place. The home, the course, the application, and the onboarding all connect. Now you run the cohort, and in the first round you run it by hand.
Step 8: Run Cohort One by Hand
This is where the system comes alive. Do not automate yet. Running the first cohort manually teaches you what to build later. Here is the weekly loop:
- Publish the week’s lesson and open the assignment.
- Post a discussion prompt in the private space and tag students in.
- Hold a short live call or a written checkpoint, whichever fits your schedule.
- Review student work and reply with specific feedback.
- Nudge anyone who went quiet, especially in week one.
Repeat this loop each week. Consistency is what students actually feel, and it is what earns your testimonials. A great cohort still needs students in the seats, so let’s fill them.
How to Get Your First Few Students
You do not need thousands of followers. You need five to twelve committed people for cohort one. Here is how to find them without paid ads.
Start with your free preview lesson from Step 5. Share it where your audience already spends time. When a FluentPlayer video runs, its email capture layer can send interested viewers into FluentCRM with a tag, so a viewer becomes a lead without a separate landing page.
Then work these simple channels:
- Message past clients or colleagues who fit the offer
- Post the outcome, not the curriculum, in relevant groups
- Offer a founding-cohort price in exchange for feedback and a testimonial
- Send everyone to your application form, not straight to checkout
The application does two jobs. It filters fit, and it makes acceptance feel earned. People value a program they had to apply for.
What to Keep Manual in Cohort One
It is tempting to automate everything at once. Resist that. In cohort one, doing things by hand is your research, and it reveals what is worth automating.
Keep these manual on purpose:
- Enrollment and payment. Accept students yourself and take payment with a simple invoice or checkout link.
- Onboarding. Send the welcome email by hand so you can adjust it live.
- Weekly prompts. Post questions manually and watch what sparks replies.
- Feedback. Review work directly, not through a template.
Every awkward step you repeat is a signal for what to automate in cohort two. Validate the offer first, then remove friction. To know whether it worked, you need to watch a few numbers.
The Numbers to Watch
You do not need fancy analytics. Track a short list by hand or with FluentCommunity’s built-in progress and engagement reports:
- Applications received and acceptance rate
- Week 1 login and first discussion post rate
- Weekly assignment completion
- Final course completion rate
- Testimonials and outcomes collected
These five numbers tell you if the offer works. A weak week-one login rate means your onboarding needs work, not your content. Once the numbers look healthy, it helps to picture what the money could look like.
A Realistic Revenue Example
This is an illustration, not a promise. Results depend on your offer, audience, and effort. Nothing here guarantees income.
Say you run a six-week cohort and accept 12 students at a founding price of $500 each. That is $6,000 for one cohort. Costs stay low because the free stack runs on your existing WordPress hosting.
Now add a recurring layer. After graduation, 6 alumni join a $25 per month community for ongoing support. That is $150 per month, or $1,800 per year, on top of cohort fees.
Run three cohorts a year and the model compounds. Again, these figures show the shape of the business, not a forecast. When manual work starts to slow you down, that is your signal to upgrade.
When to Upgrade to FluentCommunity Pro
Once cohort one proves demand, Pro removes manual work and adds control. Upgrade for operational reasons, not because a feature sounds nice. Each of these solves a problem you will feel by cohort two.
- Sequential Lesson Lock keeps students in order, so nobody jumps ahead before finishing the basics.
- Custom Profile Fields let you collect member details for peer matching and better cohort grouping.
- CSV export for course members and quiz results gives you clean data for outreach and testimonials.
- Course Welcome Banners turn each course into its own landing page, with separate views for visitors and enrolled students.
- Custom lock screens let you preview more of the course to prospects, which strengthens your enrollment pitch.
For payments, the ecosystem upgrade is FluentCart, which sells courses and spaces with pricing plans, paywalls, and native checkout. This is the piece that finally replaces the manual payment handoff from cohort one. FluentPlayer Pro adds call-to-action, ad, and hotspot layers on your videos if you want built-in prompts.
You can compare the full split on the official FluentCommunity Free vs Pro page. Paid plans start at roughly $139 to $399 per year for a single site depending on your plan.
How to Make the Business Repeatable
One cohort is a project. A repeatable system is a business. The difference is what you do after graduation.
Build the recurring layer with an alumni space, monthly office hours, resource updates, and peer networking. This is why you created the Alumni tag early. It keeps revenue coming in between cohorts and keeps your best students close.
Then feed cohort one into cohort two. Use the testimonials on your next enrollment page. Fix the weakest week based on where students stalled. Raise the price as your outcomes get stronger.
Over time you can add advanced cohorts, group coaching, or consulting for graduates who want more. Each cohort makes the next one easier to fill. That is the FluentCommunity online course use case working as an owned asset, not a rented platform.
Final Thoughts
A cohort-based training business is not harder to start than a static course. It is just built around outcomes instead of video files. That shift is why cohorts finish and static courses stall.
Start small and free. Pick one transformation, screen your students, and run cohort one by hand so you learn what matters. The four free tools give you a home, video, applications, and email, all connected inside WordPress. Once demand is clear, upgrade to FluentCommunity Pro and FluentCart to remove the manual work and grow.
Ready to build it? Install FluentCommunity on your WordPress site, enable the course module, and set up your first cohort space today. Your first student is closer than you think.
Frequently Asked Questions
Does FluentCommunity include courses in the free version?
Yes. The course module is free. You enable it under Advanced Features, then build modules, lessons, and quizzes with the Gutenberg-based editor.
Do I need all four plugins to run a cohort?
No, but they work best together. FluentCommunity alone can run a basic cohort. Fluent Forms, FluentPlayer, and FluentCRM add applications, video features, and onboarding, and all three have free versions.
How is a cohort different from a membership site?
A membership sells ongoing access to content or community. A cohort sells a time-bound program with a start and end date. Many creators run both, using the cohort as the front end and the membership as the recurring layer.
How long should a first cohort be?
Four to six weeks works well for a first run. Shorter programs are easier to finish and simpler to manage while you learn what your students need.
Can I sell paid cohorts without manual payments?
Yes, once you upgrade. FluentCart adds native checkout, paywalls, and pricing plans, so students enroll and pay directly, replacing the manual handoff used in a first cohort.

Ashik Elahi is a seasoned Digital Marketing Strategist with a passion for Content Marketing. He believes in the power of storytelling and crafting valuable content that resonates with readers.
-
10 Best jQuery Table Plugins for Best Data Visualization in 2026
Discover the 10 best jQuery table plugins for 2026. Compare -

Black Friday Marketing Strategies for 2026: Core and Advance Move
Black Friday is the most celebrated shopping season worldwide. Discover -
How Much Can You Earn With Amazon Affiliate Marketing? Rates & Niches
How much can you earn with Amazon affiliate marketing? Dive


Leave a Reply
You must be logged in to post a comment.