
How to Set Up Google Analytics for FluentCart (GA4 eCommerce Tracking)
Most WordPress store owners install Google Analytics once, assume it is working, and never check whether it is actually capturing what matters. Sessions and page views show up.
That feels like enough. But if you cannot see which products were viewed, which checkout steps were abandoned, or which traffic source drove your last ten sales, then your analytics setup is incomplete.
FluentCart is a WordPress-native eCommerce plugin. So far, like many WordPress eCommerce plugins, FluentCart does not natively send GA4 eCommerce events automatically. GA4 will not know what is happening inside your store unless you set up an integration layer between the two.
There are three ways to do that: a dedicated plugin, Google Tag Manager, or a custom developer implementation. Each is a valid choice. Which one fits depends on your team, your store setup, and how much ongoing maintenance you want to take on.
Some store owners also use Site Kit by Google as a lightweight way to connect GA4 to WordPress, though it does not handle FluentCart ecommerce event tracking by itself.
This guide covers all three, then walks through the plugin-based setup in detail because it is the fastest path for most stores.
TL;DR
- GA4 does not automatically capture FluentCart eCommerce events without an integration layer
- There are three ways to set one up: a dedicated plugin, Google Tag Manager, or custom developer code
- Each approach has different trade-offs in setup time, technical complexity, and ongoing maintenance
- FluentCart also has its own built-in reporting suite that works independently of GA4 and serves a different purpose
- The two systems answer different questions. FluentCart covers what happened inside your store. GA4 covers how customers got there.
- Site Kit by Google can install GA4 on WordPress, but it still requires an additional tracking layer for FluentCart ecommerce events.
What “Configuring GA4 for WordPress” Actually Means
Configuring Google Analytics for WordPress means adding your GA4 Measurement ID to your site so GA4 begins collecting traffic data, and then extending that setup to track meaningful actions beyond basic page views.
For a simple WordPress site, basic tracking covers sessions, pages visited, bounce rate, and traffic sources. For an eCommerce store running FluentCart, you need GA4 to also capture:
- Product page views
- Add to cart events
- Checkout initiation
- Purchase completions with order value, product details, and revenue
GA4 calls this eCommerce event tracking. Without it, your analytics data will show you that people visited your store but will tell you nothing about what they did inside it.
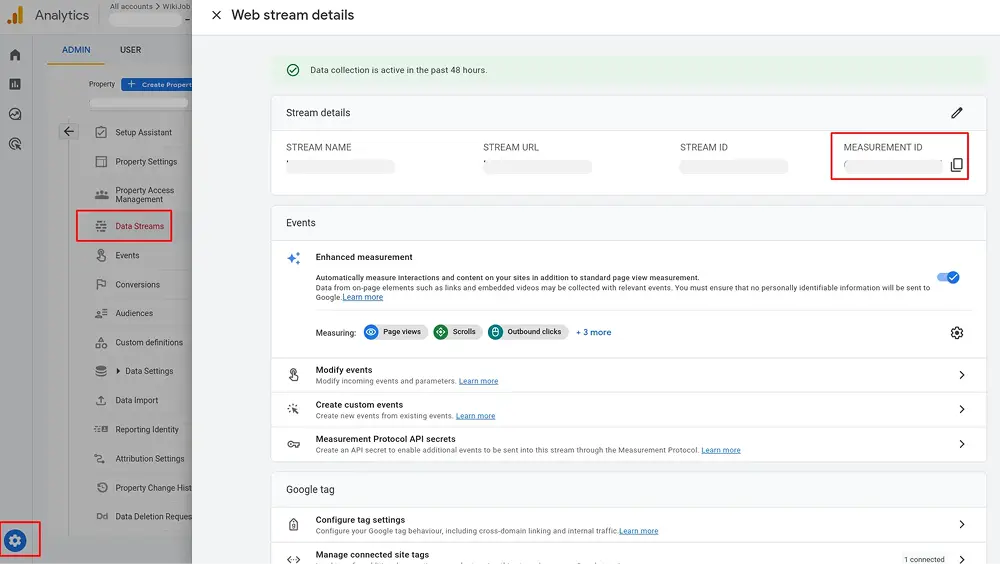
The Measurement ID for your GA4 property looks like G-XXXXXXXXXX. This is what you need to connect any integration method to your Analytics property. Do not confuse it with the Property ID, which is a numeric-only string used in other contexts like the Reporting API.
Why the Basic GA4 Tag Is Not Enough
Adding the GA4 script tag to your WordPress site, whether through a plugin like Site Kit or by manually placing it in your theme header, will get page views and session data flowing. That is the starting point.
The problem is that FluentCart’s checkout process uses its own frontend events. When a customer views a product, selects a variant, adds an item to the cart, or completes a purchase, those actions are not automatically fired as GA4 eCommerce events. GA4 has no way to know which FluentCart event corresponds to which standard GA4 event like view_item, add_to_cart, begin_checkout, or purchase.
This is true for most WordPress eCommerce plugins. WooCommerce has the same problem. The solution in both cases is an integration layer that understands the plugin’s events and maps them to the correct GA4 schema.
Three Ways to Connect FluentCart with GA4
There is no single correct approach. The right method depends on several factors:
- Technical resources: Do you have a developer on the team, or are you managing the store yourself?
- Tag management needs: Are you running tracking for multiple platforms like paid ads, social, or affiliate?
- Store complexity: Is your checkout standard, or does it involve heavy customization?
- Maintenance preference: How much ongoing upkeep are you comfortable with?
- Timeline: Do you need this running quickly, or can you invest more time for more control?
Here is an honest breakdown of all three options.
Option 1: Dedicated Plugin Integration
Difficulty: Low
A dedicated plugin handles the translation between FluentCart’s checkout events and GA4’s eCommerce schema without any manual coding. You install it, connect it to your GA4 property, enable the FluentCart integration, and the plugin starts pushing the correct events.
Conversion Bridge is currently the plugin with a dedicated FluentCart integration. It maps FluentCart’s checkout actions to GA4’s standard eCommerce events and connects to your GA4 property via OAuth.
It also surfaces a GA4 dashboard inside your WordPress admin, which is useful for team members who need data visibility without logging into Google Analytics directly.
Trade-offs to consider:
The plugin approach is the fastest route from zero to full eCommerce tracking. Setup takes minutes and you do not need to write or maintain any custom code.
The downsides are cost and dependency. You are relying on a third-party paid plugin to stay updated as FluentCart, WordPress, and GA4 each evolve. If the plugin is not actively maintained, your tracking can break silently after an update.
Plugin-based integrations are also less flexible. If you need custom event parameters, non-standard attribution logic, or tracking across multiple platforms beyond GA4, you will run into limitations faster than you would with GTM.
Who this suits
Solo store owners, small teams without a dedicated developer, stores with a standard FluentCart checkout, and anyone who wants reliable tracking set up quickly without ongoing maintenance overhead.
Option 2: Google Tag Manager (GTM)
Difficulty: Medium
Google Tag Manager is a free tag management system from Google. GTM connects your WordPress site to every marketing and analytics platform you use from a single dashboard. That includes GA4, Google Ads, Meta Pixel, TikTok Pixel, LinkedIn Insight Tag, and others.
The general workflow for GA4 ecommerce tracking via GTM looks like this:
- Install a GTM container on your WordPress site
- Configure a GA4 connection tag inside GTM
- Push FluentCart checkout events into the dataLayer
- Create GA4 event tags in GTM that fire on those dataLayer events and forward them to your GA4 property with the correct ecommerce parameters
- Verify using GTM Preview mode and GA4 DebugView
Step 3 is the critical one. FluentCart does not push GA4-compatible events to the dataLayer on its own. You or a developer need to write the code that does.
Depending on your checkout setup, this can involve JavaScript listeners, custom dataLayer pushes tied to FluentCart’s frontend actions, or custom scripts added to specific checkout steps.
Once that data is in the dataLayer, GTM picks it up and sends it to GA4 using the standard eCommerce schema.
GTM also handles Google Consent Mode v2 natively. Most major consent management platforms like Cookiebot, OneTrust, and CookieYes have certified GTM templates that send consent signals automatically. For sites with EU traffic, this is a meaningful advantage.
Trade-offs to consider
GTM gives you one place to manage all your tracking. That gets more valuable the more platforms you run. It is free. And because your tracking logic lives in GTM rather than inside a dedicated analytics plugin, you are less dependent on a third-party tracking plugin staying updated.
The downside is the initial build. Getting FluentCart’s events into the dataLayer correctly requires technical knowledge and careful testing.
If your checkout flow changes after setup, your GTM triggers may need to be updated. Debugging tracking issues in GTM also takes more time than checking a plugin’s activity log.
Who this suits
Marketing teams running multiple ad platforms, agencies managing tracking across several stores, stores that already use GTM for other tags, and technically confident operators who want centralized control over all their tracking.
If you are running Google Ads or Meta campaigns at meaningful scale, GTM’s consent mode handling and cross-platform management start to justify the setup effort.
Option 3: Custom Developer Implementation
Difficulty: High
A fully custom implementation means writing code that fires GA4 eCommerce events directly when FluentCart actions occur. In its purest form, this approach skips both dedicated tracking plugins and GTM-based event management. Developers typically use gtag() event calls triggered by WordPress action hooks or JavaScript tied to FluentCart’s checkout flow.
Every event in the full funnel needs to be implemented separately: view_item, add_to_cart, view_cart, begin_checkout, purchase, and optionally refund and subscription renewals. Each one has to be mapped to GA4’s recommended eCommerce schema, tested, and maintained over time.
Consent mode handling also becomes your responsibility, implemented through the gtag consent API wired to whatever cookie banner your site uses.
A note on WordPress hooks: FluentCart does expose action hooks that fire at various points in the purchase flow. The specific hooks available and their data payloads depend on your FluentCart version.
A developer taking this approach should check the current FluentCart documentation for available hooks rather than assuming a specific one exists.
Trade-offs to consider:
The upside is complete control. You can track exactly what you need, structure events to match your reporting requirements, add custom parameters that no plugin would expose, and build attribution logic specific to your business. There is also no ongoing dependency on any third-party tool.
The downside is that every advantage requires developer time, both upfront and ongoing. If FluentCart releases an update that changes how checkout events fire, your custom tracking may break without any visible error. If GA4 introduces a new recommended event relevant to your funnel, someone has to add it. Debugging falls entirely on your team.
Who this suits
Development teams building highly customized stores, headless or hybrid WordPress setups where plugin integrations do not apply cleanly, and stores with attribution or tracking requirements that no off-the-shelf tool can satisfy. For a standard FluentCart setup, the investment rarely justifies the outcome.
How Difficult Is Each Option, Really?
Difficulty ratings are relative. GTM is medium effort for someone who has used it before. For someone who has not, it is closer to high. Custom code is always high in raw effort, but that effort is front-loaded. Once built and tested, a custom implementation can run with minimal intervention.
A paid plugin has the lowest setup cost but carries a recurring cost and a dependency that the other two do not.
| Task | Plugin | GTM | Custom Code |
|---|---|---|---|
| Setup difficulty | Low | Medium | High |
| Developer required | No | Pertially | Yes |
| Ongoing maintenance | Low | Medium | High |
| Consent mode | Via Plugin Support | Native in GTM | Manual via gtag API |
| Flexibility | Limited | High | Complete |
| Cost | Paid plugin fee | Free (setup time) | Developer time |
| Multi-platform tracking | No | Yes | Yes |
| Best for | Solo owners, small teams | Agencies, multi-platform stores | Custom or headless builds |
Step-by-Step: Plugin-Based Setup
The steps below cover the plugin-based approach. Step 1 applies to all three methods since every integration approach needs a GA4 property to connect to.
Step 1: Create a GA4 Property and Get Your Measurement ID
If you do not already have a GA4 property set up, go to analytics.google.com, create a new property, add a web data stream for your WordPress site’s URL, and copy the Measurement ID from Admin > Data Streams. It is formatted as G-XXXXXXXXXX.
Step 2: Install and Activate the Plugin
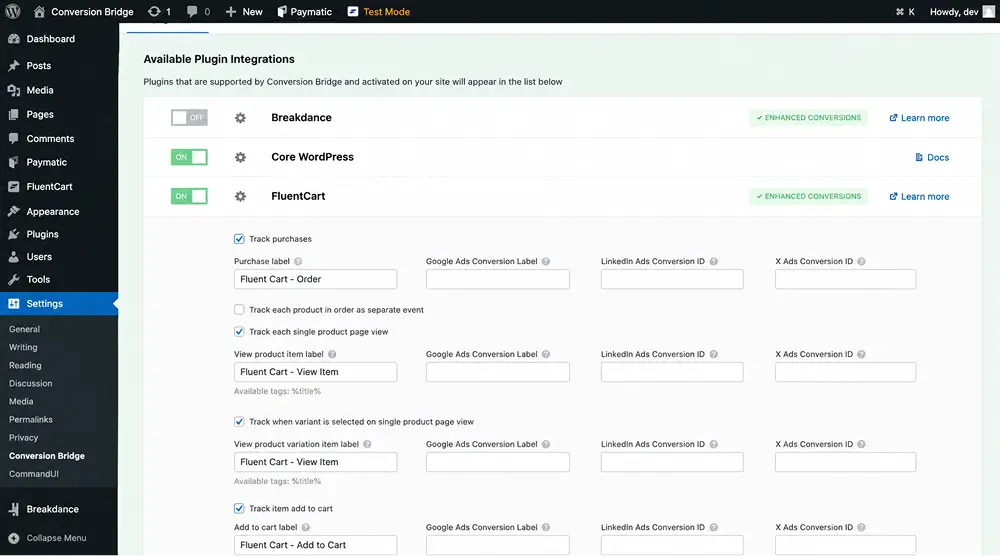
Install the Conversion Bridge plugin on your WordPress site and activate it. This is a paid plugin. Once active, go to its settings panel inside your WordPress admin.
Step 3: Connect Google Analytics via OAuth
Inside the plugin settings, go to the Google Analytics integration and use the OAuth connection option. Sign in with your Google account, select the GA4 property you want to connect, and grant the requested permissions.
This also enables a GA4 dashboard inside your WordPress admin, which is useful for team members who need data access without navigating the full GA4 interface.
Step 4: Enable the FluentCart Integration
In the same settings panel, find the FluentCart integration toggle and enable it. Once on, the plugin maps the following FluentCart actions to GA4’s standard eCommerce events:
- Product page view (view_item): fires when a visitor loads a FluentCart product page
- Variant selection (select_item): fires when a customer selects a product variant
- Add to cart (add_to_cart): fires when an item is added to the cart
- Cart view (view_cart): fires when the cart page loads
- Checkout initiation (begin_checkout): fires when the customer enters the checkout flow
- Purchase (purchase): fires on successful order completion and includes the transaction ID, order total, currency, item names, quantities, and any coupon codes used
These match GA4’s recommended eCommerce events, the same events GA4 uses to populate its eCommerce purchases report and funnel visualizations.
Step 5: Verify the Setup
Use GA4 DebugView (Admin > DebugView) to confirm events are arriving. Go through the checkout flow on a test product and watch for events to appear in real time.
If an event does not appear, check that the FluentCart toggle is enabled, that your GA4 property is connected correctly, and that your site is not blocking the GA4 script through a caching or security plugin.
Cookie Consent and GA4 Compliance
If your site serves visitors in the EU, the EEA, or other regions with consent requirements, you need to handle Google Consent Mode v2.
Consent Mode v2 added two parameters, ad_user_data and ad_personalization, that became required for EEA advertisers using Google Ads in March 2024.
How you handle this depends on which integration method you chose.
Plugin
Check whether the plugin supports Consent Mode and which cookie consent plugins it is compatible with. If your cookie banner already sends consent signals directly to GA4, do not enable Consent Mode again inside the tracking plugin. Enabling it in two places at once will cause conflicts.
GTM
GTM includes native support for Google Consent Mode workflows. Most major consent management platforms have certified GTM templates that send the correct consent signals automatically.
Consent management is centralized alongside your other tags, which is one of the genuine advantages of the GTM approach.
Custom Code
You implement Consent Mode manually through the gtag consent API. The default state is set on page load and updated when a user makes a consent choice. This requires coordination with your cookie banner and careful testing.
All three methods can be made compliant. None handles it automatically without configuration.
What GA4 Receives Per Purchase Event
Regardless of which integration method you use, a correctly implemented purchase event sends the following data to your GA4 property:
- Transaction ID
- Order total value
- Currency
- Items purchased, including product names, item IDs, quantities, and prices
- Coupon codes applied, if any
- Shipping cost, where applicable
This is GA4’s standard eCommerce purchase schema, defined by Google and consistent across all implementation methods. What changes between methods is how reliably and completely those fields get populated.
That is why verifying with DebugView matters regardless of how you set things up.
With this data in GA4, you can filter purchases by product, review coupon usage, build funnel drop-off reports, and attribute revenue to the traffic sources that drove each sale.
Honorable Mention: Site Kit by Google
Site Kit by Google is another option many WordPress users look at first because it is Google’s official WordPress plugin. It can connect your site to GA4 without manually adding tracking code and gives you a simplified analytics dashboard directly inside WordPress.
For standard WordPress sites, that is often enough to start collecting:
- page views,
- sessions,
- traffic sources,
- and general engagement metrics.
The limitation is ecommerce tracking.
Site Kit does not natively understand FluentCart’s checkout events or automatically map them to GA4’s ecommerce event schema.
Actions like add_to_cart, begin_checkout, and purchase still require an additional tracking layer before GA4 can recognize them properly.
In practice, Site Kit works more as a foundation layer than a complete FluentCart ecommerce analytics solution. You would still need:
- a dedicated integration plugin,
- GTM with custom event handling,
- or a custom developer implementation
to fully track FluentCart ecommerce activity inside GA4.
For store owners who simply want to install GA4 quickly on WordPress, Site Kit is still a useful tool. It just does not handle the full ecommerce tracking workflow by itself.
Key Takeaways
- GA4 does not track FluentCart eCommerce events automatically. An integration layer is always required.
- There are three valid approaches: a dedicated plugin, Google Tag Manager, and custom developer code
- Each has different trade-offs in setup effort, flexibility, ongoing cost, and maintenance. The right choice depends on your team, your store complexity, your other tracking needs, and how much maintenance you want to own.
- FluentCart’s built-in reports and GA4 serve different purposes. You need both for a complete view of your store and your traffic.
- Cookie consent handling is possible with all three methods but requires explicit configuration in each case
- Site Kit by Google is useful for basic GA4 installation on WordPress but does not replace a full ecommerce tracking integration for FluentCart.
Wrapping Up
Getting GA4 working properly for a FluentCart store is a two-part process. First, get GA4 installed and connected. Second, make sure your FluentCart checkout events are actually being sent to GA4 in a format it understands. Without that second step, you have traffic data but no store data, and the gap is where most of the useful information lives.
Which method you choose comes down to your real constraints. Your technical resources, the number of platforms you are tracking, your store’s checkout complexity, and how much ongoing maintenance you want to take on.
A solo store owner with a straightforward product catalog has different needs than a development team managing a customized subscription build. Both can get full GA4 eCommerce tracking in place. They will just take different paths to get there.
Once your checkout funnel is tracking correctly in GA4, pair it with FluentCart’s native store reports and you will have both sides of the picture: what is happening inside your store, and how customers are arriving there.
FAQs
Does FluentCart send eCommerce data to GA4 by itself?
No. FluentCart does not include a native GA4 integration. You need to set up an integration layer, either a plugin, GTM, or custom code, to push eCommerce events from your FluentCart checkout into GA4’s eCommerce schema.
Can I use Google Tag Manager to track FluentCart events in GA4?
Yes, and it is a fully valid approach. GTM requires FluentCart’s checkout events to be pushed into the dataLayer first, which involves some JavaScript or developer work.
Once that data is in the dataLayer, you can configure GA4 event tags in GTM to forward it to your Analytics property. The main advantages are centralized tag management across all your marketing platforms and native support for Google Consent Mode v2.
Which approach is easiest for a non-technical store owner?
A dedicated plugin is the most accessible starting point. It handles the event mapping without requiring any code. The trade-offs are cost and plugin dependency.
If you are comfortable following documentation and only need to track GA4, it is the most practical route for getting started quickly.
Will GA4 track FluentCart subscription renewals?
Initial subscription purchases are tracked as standard purchase events. Renewal tracking depends on where and how renewal payments are processed.
If renewals happen server-side without a browser session involved, client-side tracking methods alone may not reliably capture them. For subscription-specific reporting including renewals, cohort data, and churn metrics, FluentCart’s built-in subscription reports are more reliable.
Do I need both FluentCart’s reports and GA4?
They serve different purposes. FluentCart’s reports tell you what happened inside your store: revenue, top products, refunds, subscriber retention.
GA4 tells you what happened before that: which traffic source drove the purchase, which landing page started the session, and where shoppers dropped off in the funnel. One does not replace the other.
What happens if my tracking plugin stops being maintained?
If a tracking plugin is not updated after a FluentCart or WordPress update, events can stop firing without any visible error on the front end. This is a real risk with any plugin dependency.
Check the plugin’s update history and release frequency before committing to it. GTM and custom implementations remove this dependency but introduce their own maintenance responsibilities.

A published literary author, and a musician. I thrive on marketing for tech companies while composing music, collecting books of lasting depth, exploring cinema with a discerning eye, and studying the arts and history.
-
Email Deliverability Hacks: Complete WordPress Guide With Free Tools
Improve WordPress email deliverability with FluentSMTP, SPF, DKIM, DMARC, list -

How to Embed Social Media Feeds on WordPress Websites (No Code)
Learn how to embed Instagram, Facebook, TikTok, and YouTube feeds -

Virtual Meeting Etiquette: A Complete Guide to Better Online Meetings
Learn the essential virtual meeting etiquettes for professional virtual meetings.
Leave a Reply
You must be logged in to post a comment.