

How to Create eCommerce Order Bumps: Copy, Tips & Best Practices
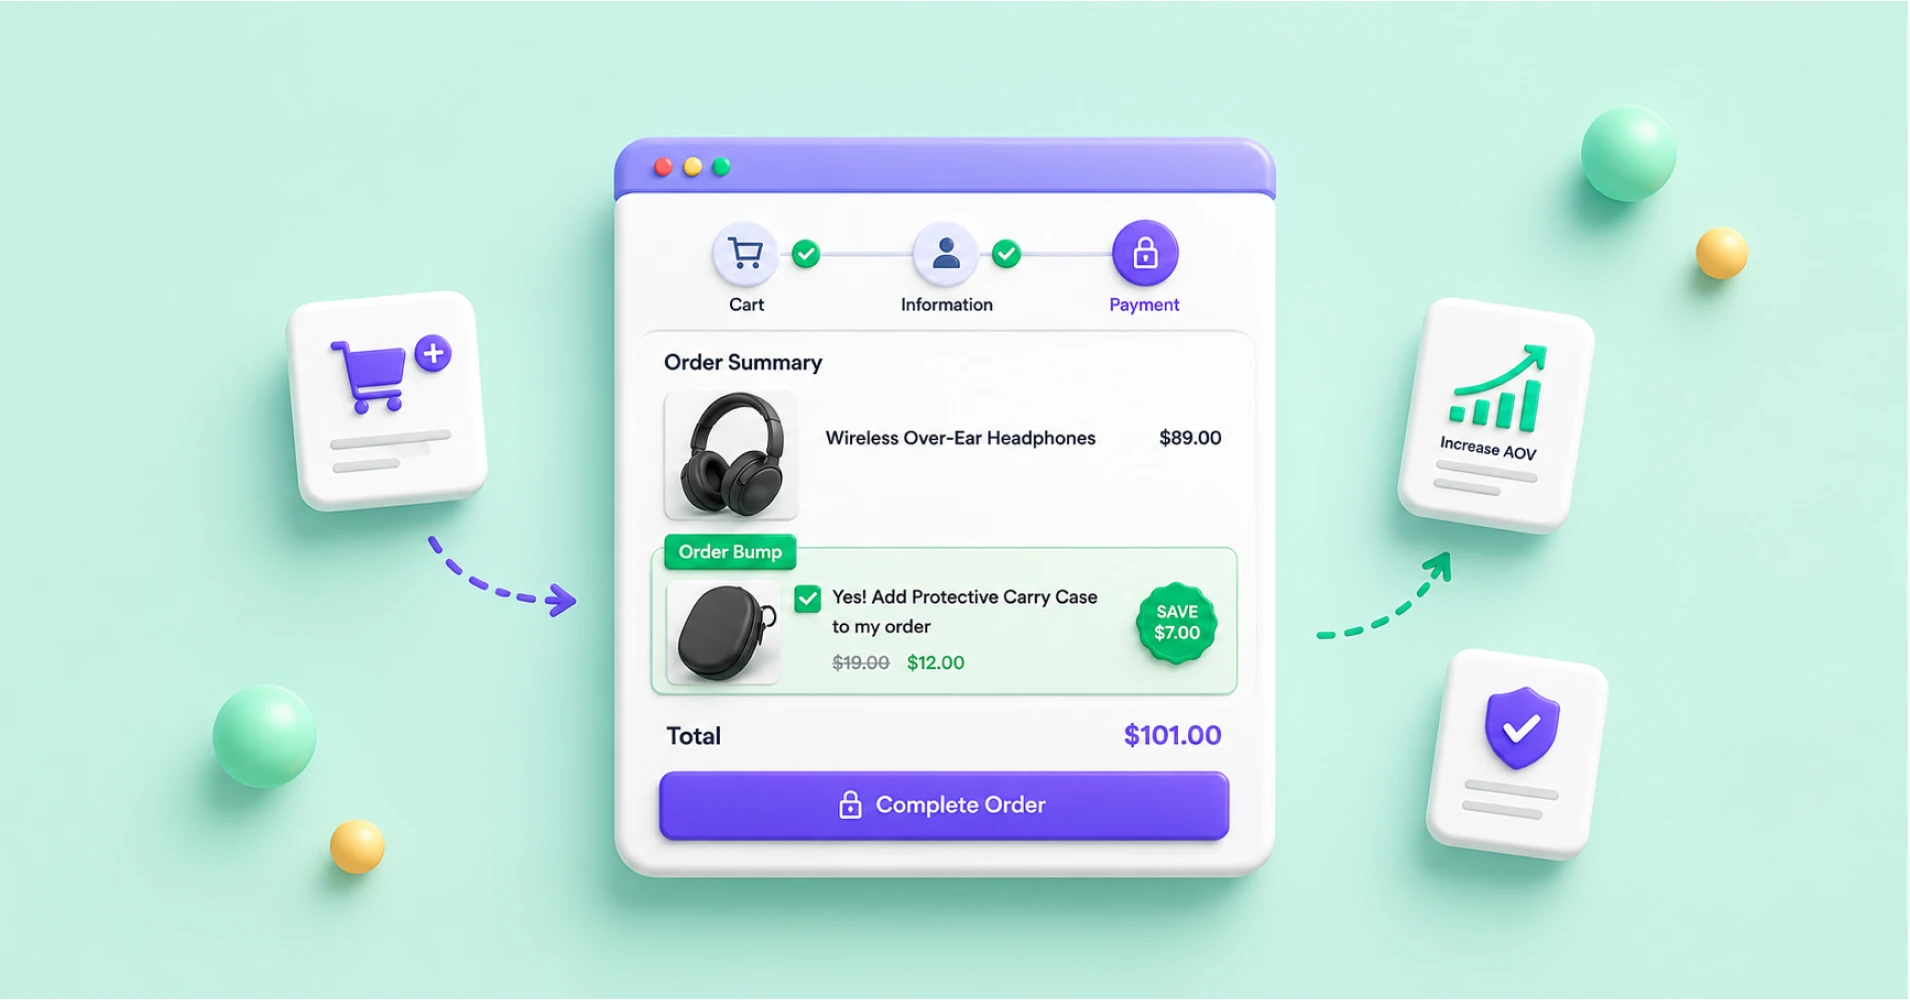
What’s better than selling one product?
Selling multiple products in the same checkout flow.
That is exactly why order bumps work so well. They help you show a small, relevant offer right before someone completes the purchase. No complicated funnel. No long sales page. Just one useful add-on at the right moment.
For online stores, this can be a simple way to increase average order value. And for WordPress users, the good news is even better. You can create order bumps with FluentCart’s built-in checkout feature or build a custom order bump form with Fluent Forms.
In this guide, we will cover what an order bump is, how to write copy that actually works, and how to create one in WordPress.
Key Takeaways
- An order bump is a small add-on offer shown on the checkout page.
- It works because the customer is already ready to buy.
- The best order bump offers are relevant, simple, and easy to accept.
- FluentCart includes a built-in Order Bump feature for WordPress eCommerce stores.
- Fluent Forms can also be used to create order bump-style payment forms if you are not using FluentCart.
What Is an Order Bump?
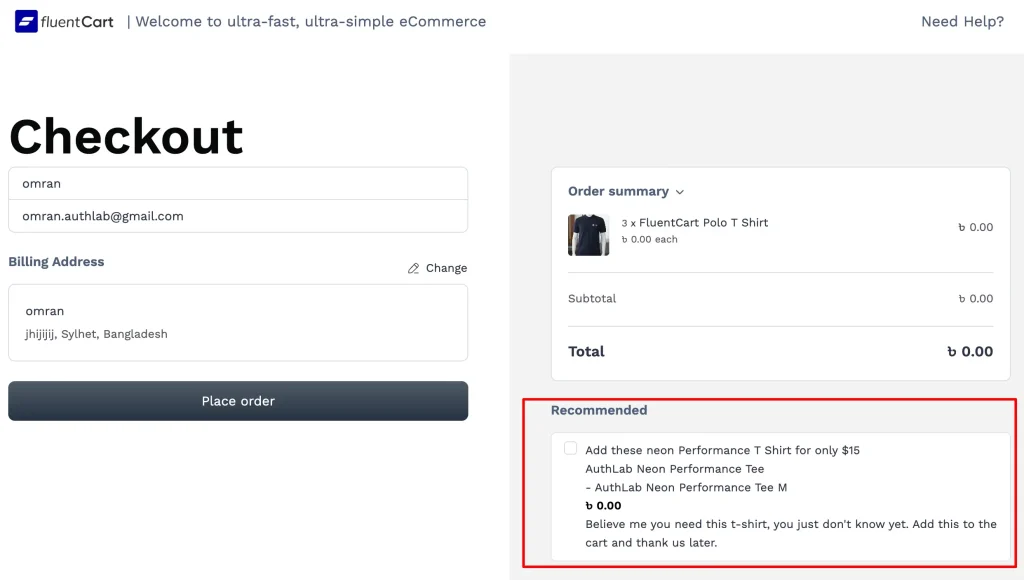
An order bump is an extra offer shown during checkout. It usually appears as a checkbox, small card, or recommended add-on before the customer completes the payment.
The idea is simple.
A customer is already buying something. Before they pay, you show a related item that makes the original purchase more useful, complete, or valuable.
For example, someone buying a foundation may also want a matching concealer. Someone buying a digital course may want a workbook. Someone buying software may want priority onboarding.
The customer can accept the offer with one click. If they are not interested, they can ignore it and continue checkout.
That is the beauty of an order bump. It does not interrupt the buying experience.
Why Order Bumps Work
Order bumps work because they appear at a very important moment.
The customer has already made the buying decision. They are not browsing anymore. Not comparing options. They are already inside the checkout flow.
That makes the offer easier to accept.
Baymard’s 2026 cart abandonment research shows the average documented online shopping cart abandonment rate is 70.22%. That means checkout is already a sensitive area, so any extra offer must feel helpful instead of distracting.
A good order bump does not slow the customer down. It adds value without forcing them into another page or decision-heavy sales process.
That is why the offer must be clear, relevant, and easy to understand.
Order Bump vs Upsell: What’s the Difference?
Order bumps and upsells are often used together, but they are not the same thing.
An order bump appears before the purchase is completed. It is usually shown on the checkout page as a small add-on offer.
An upsell usually appears after the customer has made a decision or completed the first purchase. It may appear on a separate page, funnel step, or post-purchase screen.
Here is the simple difference:
| Order Bump | Upsell |
|---|---|
| Appears before payment | Usually appears after purchase or in a funnel |
| Shown on the checkout page | Often shown on a separate page |
| Small add-on offer | Bigger upgrade or next offer |
| Low-friction decision | May require another sales step |
| Best for related products | Best for upgrades or higher-value offers |
Both can increase revenue. But order bumps are usually easier to add because they stay inside the checkout experience.
What Makes a Good Order Bump Offer?
Not every product should become an order bump.
A good order bump should feel like a natural extension of the main purchase. The customer should think, “Yes, that makes sense,” not “Why am I seeing this?”
Here are the key rules.
Make It Relevant
Relevance is everything.
If someone is buying a camera, a memory card makes sense. A random hoodie does not.
If someone is buying a website template, a setup checklist makes sense. A general marketing ebook may not.
The closer the bump offer is to the main product, the better it usually performs.
Keep the Price Easy to Accept
An order bump should not feel like a second big purchase.
It should feel like a small upgrade, bonus, accessory, or add-on. The customer should be able to say yes without rethinking the original purchase.
That is why lower-priced add-ons often work better.
Make the Value Obvious
People should understand the offer in seconds.
Do not write a long paragraph. Do not explain everything. Use one strong headline, one short description, and one clear action.
Checkout is not the place for heavy storytelling.
Keep It Useful Immediately
The best order bump helps the customer get more value from what they are already buying.
Think templates, accessories, setup help, worksheets, extra licenses, faster support, warranty, or a bundle discount.
The offer should make the original product feel more complete.
How to Write High-Converting Order Bump Copy
Order bump copy has one job. It should make the offer feel useful, relevant, and easy to accept. You do not need fancy copywriting tricks. You need clarity.
Start With the Benefit
Do not just describe the product. Tell the customer why it helps.
“Add this extra product.”
“Complete your setup with the matching concealer.”
“Buy our template pack.”
“Launch faster with ready-made checkout templates.”
The benefit should come first.
Keep the Headline Short
Your headline should be quick to scan.
Good examples:
- Add the Matching Concealer
- Get the Bonus Template Pack
- Add Priority Setup Help
- Include the Setup Checklist
- Upgrade with the Starter Bundle
A good headline does not need to be clever. It needs to be clear.
Show the Discount Clearly
If the order bump includes a special price, show it clearly.
Example:
“Add the workbook today for only $15.”
Or:
“Get 30% off when you add this before checkout.”
Do not hide the price. Hidden pricing creates hesitation.
Use a Simple CTA
Your CTA should sound like an easy yes.
Good examples:
- Yes, add this to my order
- Add this offer
- Include it with my purchase
- Add the bonus pack
- Get the checkout deal
Avoid aggressive copy. The customer is already close to buying. Do not make the experience feel pushy.
Order Bump Copy Examples You Can Use
Here are a few examples you can adapt for your own store or checkout form.
Beauty Product Example
Headline: Add Fenty Beauty Concealer
Description: Complete your makeup set with a matching concealer at a special checkout price.
CTA: Yes, add it to my order
Digital Product Example
Headline: Add the Launch Checklist
Description: Get a step-by-step checklist to apply everything faster after purchase.
CTA: Add the checklist
Course Website Example
Headline: Add the Practice Workbook
Description: Turn each lesson into action with guided worksheets, examples, and practice tasks.
CTA: Add the workbook
Software Product Example
Headline: Add Priority Onboarding
Description: Get faster setup support and start using your new tool without delays.
CTA: Add priority help
Service Business Example
Headline: Add a Strategy Review
Description: Get a quick expert review before your project starts so the execution becomes smoother.
CTA: Add the review session
How to Create an Order Bump in WordPress
There are two practical ways to create an order bump in WordPress.
The best option depends on how you sell.
If you run a full online store, FluentCart is the better choice. If you need a custom payment form, order form, service checkout, or donation form, Fluent Forms can be a great option.
Let’s cover both.
Method 1: Create an Order Bump with FluentCart
FluentCart is a WordPress eCommerce plugin built for selling physical products, digital downloads, recurring subscriptions, and licensed software. Its documentation also highlights built-in marketing tools, including one-click Order Bumps at checkout.
This is the best method if you are running a complete WordPress store.
FluentCart’s Order Bump feature lets you show a last-minute complementary product offer directly on the checkout page. The customer can accept the offer before completing the purchase.
When Should You Use FluentCart Order Bumps?
Use FluentCart if you sell:
- Physical products
- Digital downloads
- Subscriptions
- Licensed software
- Course access
- Paid communities
- Product bundles
- Store-based checkout offers
This is the native eCommerce path. You do not need to manually build the checkout logic with form fields.
How to Enable Order Bump in FluentCart
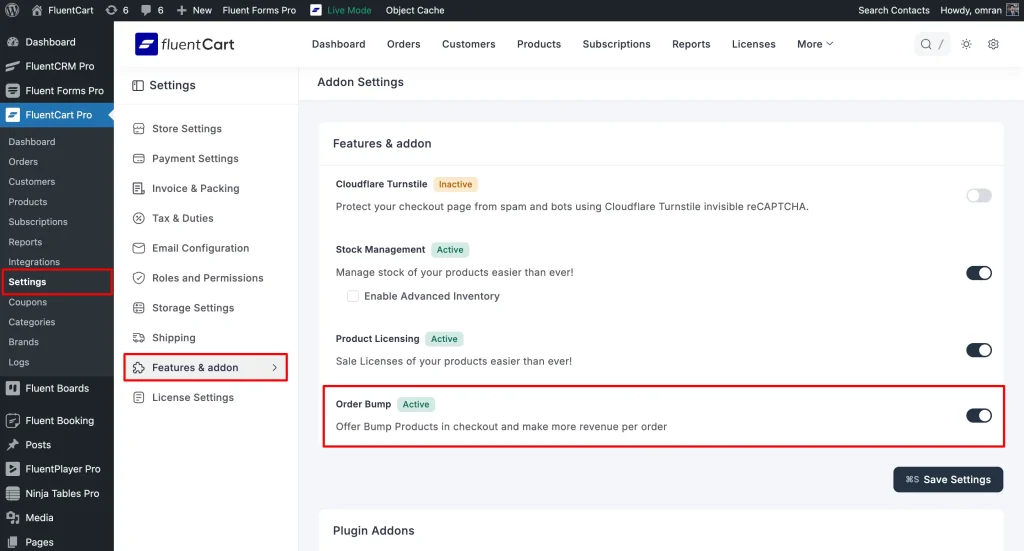
First, activate the Order Bump feature from your FluentCart settings.
Go to your WordPress dashboard.
- Open FluentCart Pro.
- Go to Settings.
- Click the Features & Addon tab.
- Find the Order Bump option and turn it on.
- Click Save Settings.
Once this feature is active, you can create and manage your order bump offers from FluentCart.
How to Create a New Order Bump in FluentCart
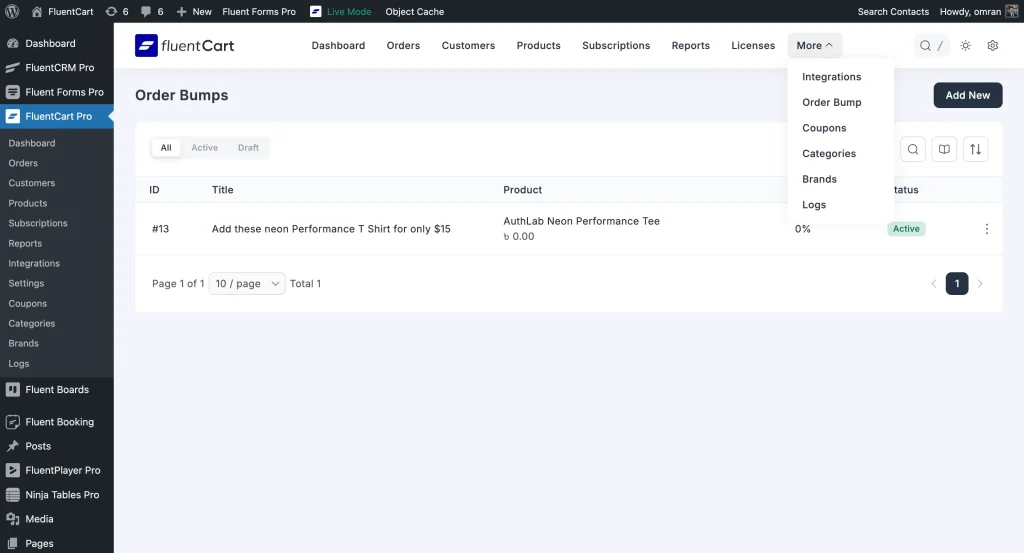
- Go to FluentCart Pro from your dashboard.
- Hover over More from the top navigation.
- Click Order Bump.
- Click the Add New button.
A popup will appear where you can add the basic details of your bump offer.
Add a Bump Name. This is the main title for the offer. Select the Order Bump Product. This is the product you want to show as the add-on.
Click Create.
After that, you can configure the details, rules, discount, and display conditions.
Configure the Order Bump Details
Inside the configuration screen, you can control how the bump offer appears and behaves.
- You can enable or disable the offer without deleting it.
- You can add a bump title and short description.
- You can select the promotional product.
- You can set a fixed or percentage discount.
- You can enable free shipping for the bump product if needed.
- You can also use display conditions to control when the order bump appears.
For example, you may show a specific order bump only when a certain product exists in the cart. You can also show it when the cart subtotal is greater than a selected amount.
This is useful because not every customer should see the same bump offer.
Set Priority for Multiple Order Bumps
If you have multiple order bumps with overlapping conditions, FluentCart lets you set priority.
Lower priority numbers appear first.
This helps you control which offer gets shown when more than one bump matches the customer’s cart.
For example, if someone buys a digital course, you may want to show the workbook before showing a generic consultation offer.
Why FluentCart Is the Better Option for Stores
FluentCart is better for full eCommerce order bumps because it works inside the actual store checkout.
You can connect the bump to products, discounts, cart conditions, and shipping behavior.
This makes it cleaner than manually building an order form when your business already needs a proper store system.
Method 2: Create an Order Bump with Fluent Forms
Not every website needs a full eCommerce store.
Sometimes, you only need a simple order form, payment form, booking payment, donation form, or service checkout page.
That is where Fluent Forms can help.
The older WPManageNinja order bump tutorial used Fluent Forms to create an order bump-style checkout form with payment fields, checkbox selections, custom HTML, dynamic payment total calculation, and custom CSS styling.
This method is still useful for users who are not using FluentCart.
When Should You Use Fluent Forms for Order Bumps?
Use Fluent Forms if you need:
- A simple payment form
- A service order form
- A donation form with add-ons
- A custom checkout form
- An event registration payment form
- A small product order form
- A one-page offer form
This method is flexible because you can design the form based on your exact needs.
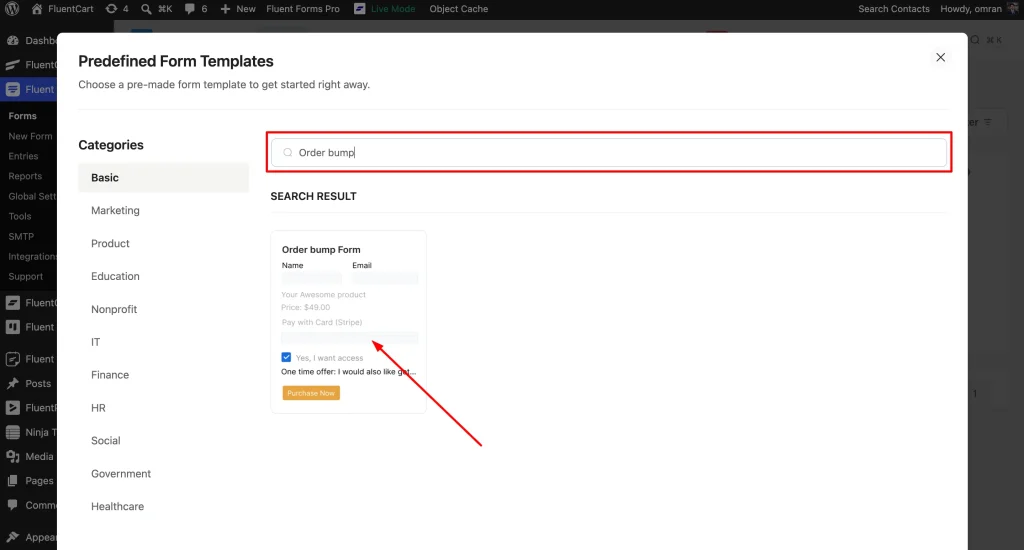
How to Create an Order Bump with Fluent Forms
Go to your WordPress dashboard.
- Open Fluent Forms.
- Click Add new and you will find Choose a Template.
- Search for Order Bump form.
- Click Create form and thats it.
Best Practices for Better Order Bumps
Adding an order bump is easy. Making it work well takes a little thought. Here are a few best practices to follow.
- Keep the Offer Closely Related: The bump product should match the main product. If the main purchase is a product, offer an accessory. When the main purchase is a course, offer a workbook. If the main purchase is a service, offer faster delivery or an extra review. Relevance does most of the selling.
- Do Not Add Too Many Offers: One strong order bump is usually better than three confusing ones. Checkout should feel simple. If customers feel overloaded, they may hesitate. And hesitation is never good at checkout.
- Use Clear Pricing: Always make the price easy to understand. If there is a discount, show it clearly. If it is a special checkout-only offer, mention that too. But avoid fake urgency. Trust matters more than pressure.
- Keep the Copy Short: Order bump copy should be short enough to scan. Use one headline, one short description and one clear CTA. That is enough.
- Test Different Offers: Your first order bump may not be the best one. Test different products, prices, headlines, and descriptions. For example, one store may find that a low-priced accessory works best. Another store may see better results from a setup service or digital guide. Let the data decide.
- Check Mobile Experience: Many customers buy from mobile devices. So the bump offer must look clean on smaller screens. Check spacing, checkbox visibility, price clarity, and button text. A good desktop design can still fail on mobile if it feels cramped.
Common Order Bump Mistakes to Avoid
A bad order bump can hurt the checkout experience. Here are the mistakes to avoid.
- Offering an Unrelated Product: Random offers feel annoying. If the customer does not immediately understand why the offer matters, they will ignore it. Worse, they may feel distracted.
- Writing Too Much Copy: Checkout is not the place for long explanations. If your order bump needs five paragraphs to make sense, the offer is probably not clear enough.
- Making the Bump Too Expensive: A high-priced bump can make the customer pause. That pause may reduce conversions. Keep the offer simple and easy to accept.
- Hiding the Price: Never make the customer guess the cost. Show the price, discount, and value clearly. A transparent offer builds confidence.
- Making the Checkbox Confusing: The customer should know exactly what happens when they select the bump. Use clear checkbox copy. Example: Yes, add the setup checklist to my order for $9. That is much better than: I agree to add this offer.
- Ignoring Checkout Performance: An order bump should increase average order value without hurting checkout completion. Track both. If revenue per order goes up but checkout completion drops heavily, the offer may need better placement, copy, or pricing.
Simple Order Bump Copy Formula
Use this formula when writing your next bump offer:
Add [Product Name] to [get benefit] for only [price].
Examples:
- Add the Practice Workbook to apply every lesson faster for only $15.
- Add Priority Setup Help to launch without confusion for only $29.
- Add the Matching Concealer to complete your makeup set for only $15.
This formula works because it is clear, short, and benefit-driven.
Order Bump Ideas for Different Businesses
Need ideas? Here are some practical ones.
Digital Product Stores
- Template pack
- Checklist
- Workbook
- Bonus guide
- Resource library
- Extra license
- Mini course
Physical Product Stores
- Matching accessory
- Protection plan
- Travel-size version
- Refill pack
- Cleaning kit
- Gift wrapping
- Fast shipping upgrade
Course Creators
- Practice workbook
- Private community access
- Bonus lesson
- Live Q&A replay
- Certificate upgrade
- Accountability checklist
Service Businesses
- Priority delivery
- Extra revision
- Strategy call
- Setup support
- Audit report
- Documentation pack
Donation Forms
- Add a small extra donation
- Cover processing fees
- Sponsor a resource
- Add monthly contribution
- Support a specific campaign
Final Thoughts
Order bumps are not about forcing people to buy more.
They are about offering something useful when the customer is already ready to purchase.
If you are using FluentCart, you can create checkout order bumps with its built-in feature. That is the better choice for full WordPress stores, product catalogs, subscriptions, and cart-based selling.
If you are not using FluentCart, Fluent Forms gives you a flexible way to create an order bump-style payment form using payment fields, checkbox selections, custom HTML, and dynamic total calculation.
Either way, the goal is the same. Show the right offer at the right moment. Keep it simple. Make it useful. And let the customer say yes without friction.
Frequently Asked Questions
What is an order bump?
An order bump is a small add-on offer shown during checkout. Customers can add it to their order before completing payment, usually with one click or checkbox selection.
What is the difference between an order bump and an upsell?
An order bump appears before payment on the checkout page. An upsell usually appears after the purchase decision or on a separate sales page.
Can I create an order bump in WordPress?
Yes. You can create an order bump in WordPress using FluentCart’s built-in Order Bump feature or by creating a custom payment form with Fluent Forms.
Which is better for order bumps, FluentCart or Fluent Forms?
FluentCart is better for full eCommerce stores. Fluent Forms is better for custom payment forms, donation forms, service order forms, and simple checkout forms.
What type of product works best as an order bump?
The best order bump product is relevant, low-friction, and useful immediately. Accessories, templates, checklists, workbooks, setup help, and small upgrades usually work well.
How long should order bump copy be?
Order bump copy should be short. Use a clear headline, one short description, visible pricing, and a simple CTA.

WordPress, automation, eCommerce and growth marketing specialist, a WordPress Core Contributor and Media Corps member blending storytelling with technology to craft strategies in SEO, email marketing, and beyond.
-
Single-Step Form vs. Multi-Step Form: Which One Is the Best and Why
Single-step vs multi-step form, which format converts better? Learn how -

The Real Setup Behind a Working Affiliate Marketing Website
A step-by-step guide to building an affiliate marketing website with -

Turn YouTube Traffic Into Leads With a WordPress Video Funnel
Turn YouTube traffic into high-ticket leads with a WordPress funnel


Leave a Reply
You must be logged in to post a comment.