
How To Extract Table Data From Posts Using WordPress
What if we tell you there’s an easy way to spice up your WordPress website? You can add data to WordPress tables from posts and customize them all you want! After our illustration of How To Embed Online Data Tables in WordPress Posts/Pages, it’s time to show you the other way around.
Pulling all of the data from a WordPress post and displaying them in a tabular format might sound like a hassle to some of you. However, we have the perfect solution. Bear with us for a while.
Why consider tables to show WordPress posts
If you post a lot of content, you will encounter two types of audience- a dedicated reader who follows everything you post and a picky reader who only clicks on a post they find attractive.
Clearly, a table with details is more convenient than a long, wordy paragraph. A tabular appearance is always easy to follow and organized. As a result, your WordPress posts can only reach everyone if you list them on a data table!
A table with multiple columns and rows can show short key info that encourages clicks. It’s a shortcut for readers to look for the information they want.
Best ways to add data to WordPress tables from posts
We have chosen the all-rounder WordPress table plugin, Ninja Tables, for this demonstration- a Pro addon with a multitude of smart features. You can fold up your WordPress posts into a table without any additional plugin.
Among the 8 productive ways of creating tables, Ninja Tables stands out because of its integration with WP Posts or Custom Post Types. This built-in feature lets the user add data to WordPress tables from posts in dynamic styles.
- Custom Column on WP Posts Table
- ACF Field Integration
- Shortcode, computed value or HTML
- Post Meta Field
- Featured Image
1. Custom Column on WP Posts Table
First of all, go to the Ninja Tables dashboard and click “Add Table”.
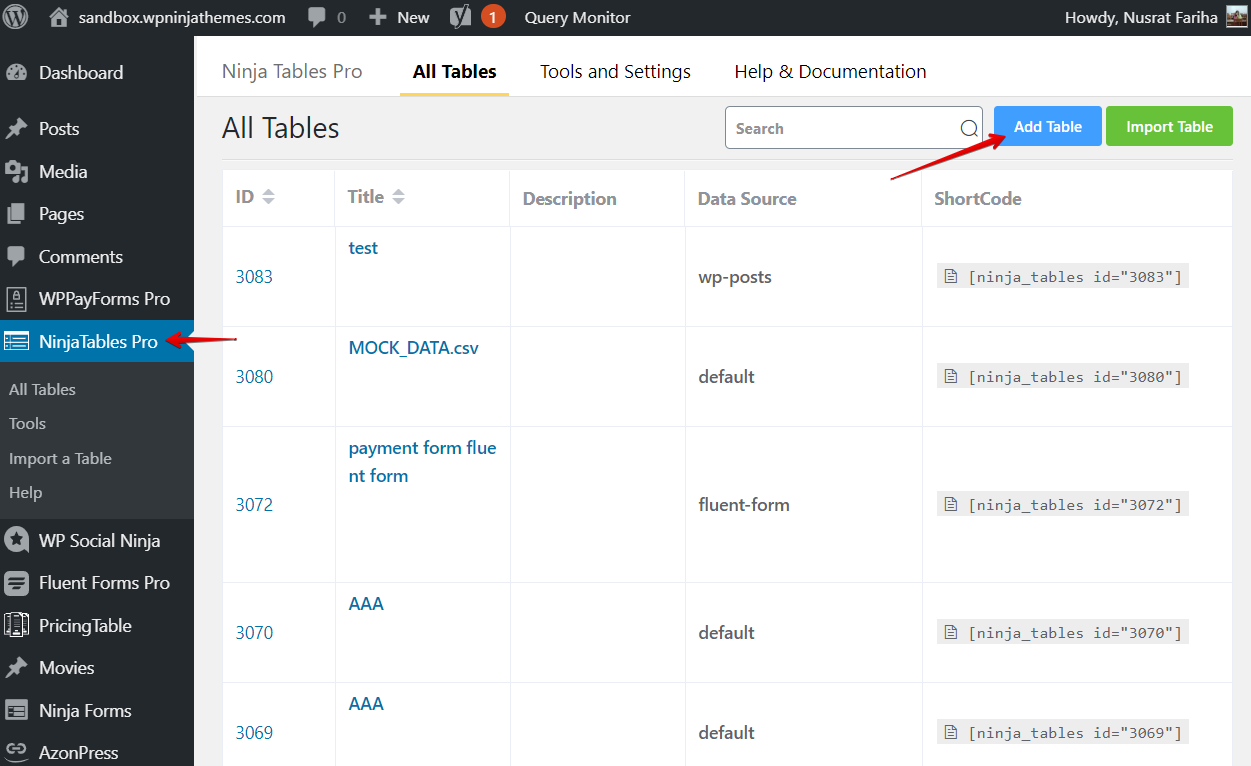
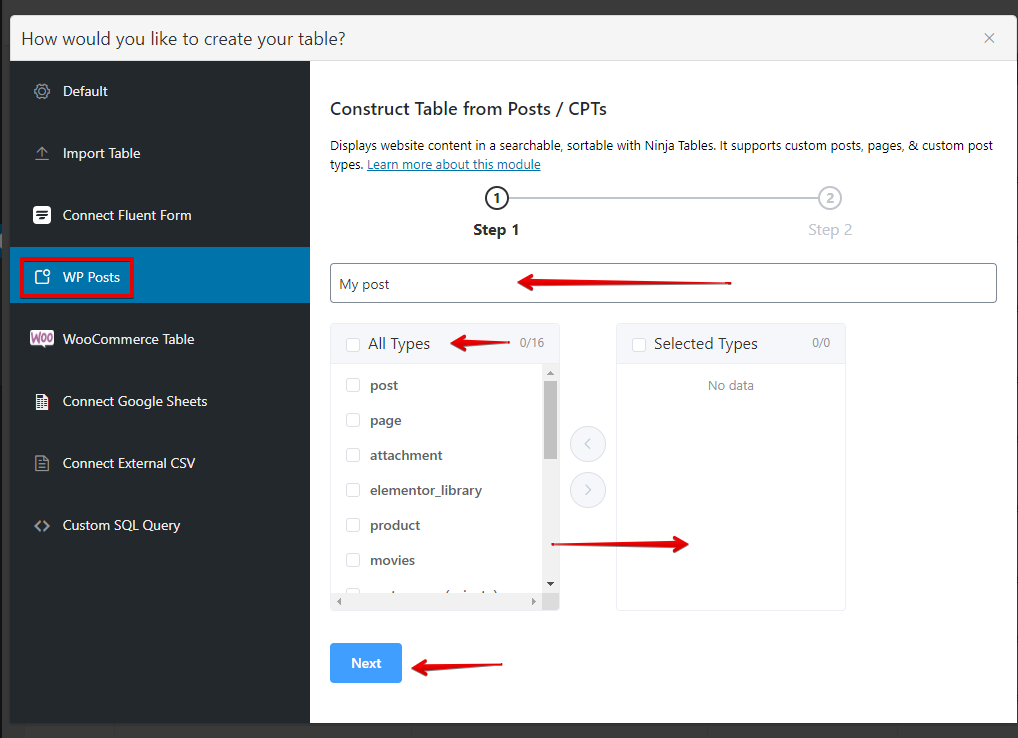
A popup box will appear with all the different ways you can create a table. Click on WP Posts. The box will show several fields and “Construct Table from Posts/CPTs” (Custom Post Type) as a heading.
We have chosen a single field type “Post” and switched it to the box on the right using the arrow.
After clicking on “Next”, another window will show up with different properties of the post. These properties are the column of the table you are about to create.
Select properties and move them to the right, then “Save” again. You can also set conditions with the “+” button.

Now you’d be surprised how quickly you can create a table from your post data!
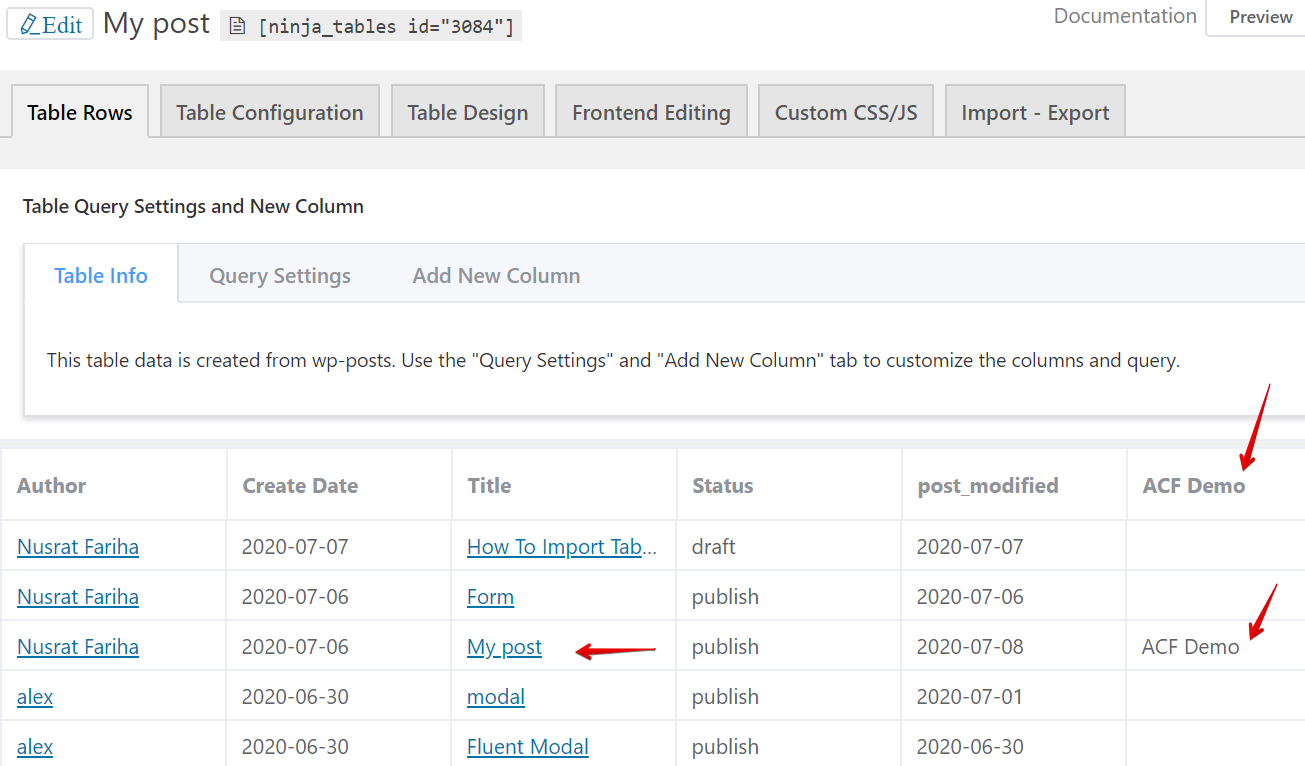
Right after you save step 2, you will be taken to the classic Ninja Tables interface, where you can customize, configure, and design the entire table.
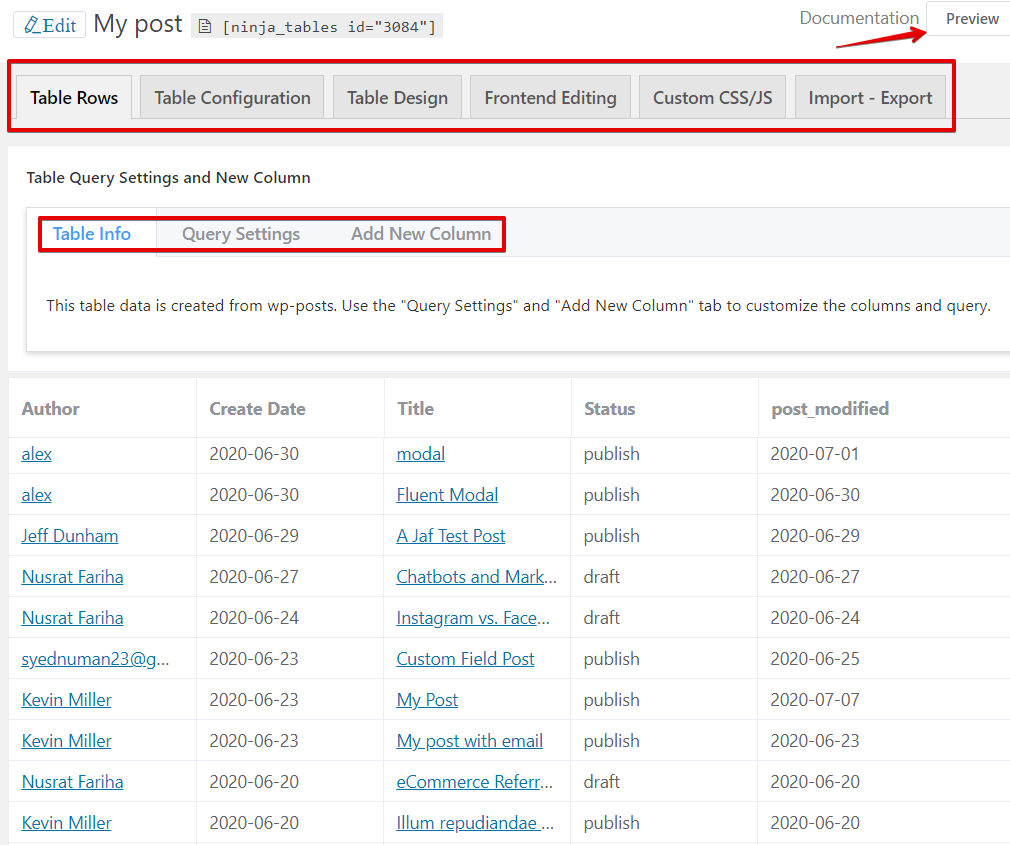
You can modify or customize post properties from “Query Settings” and “Add New Column”.
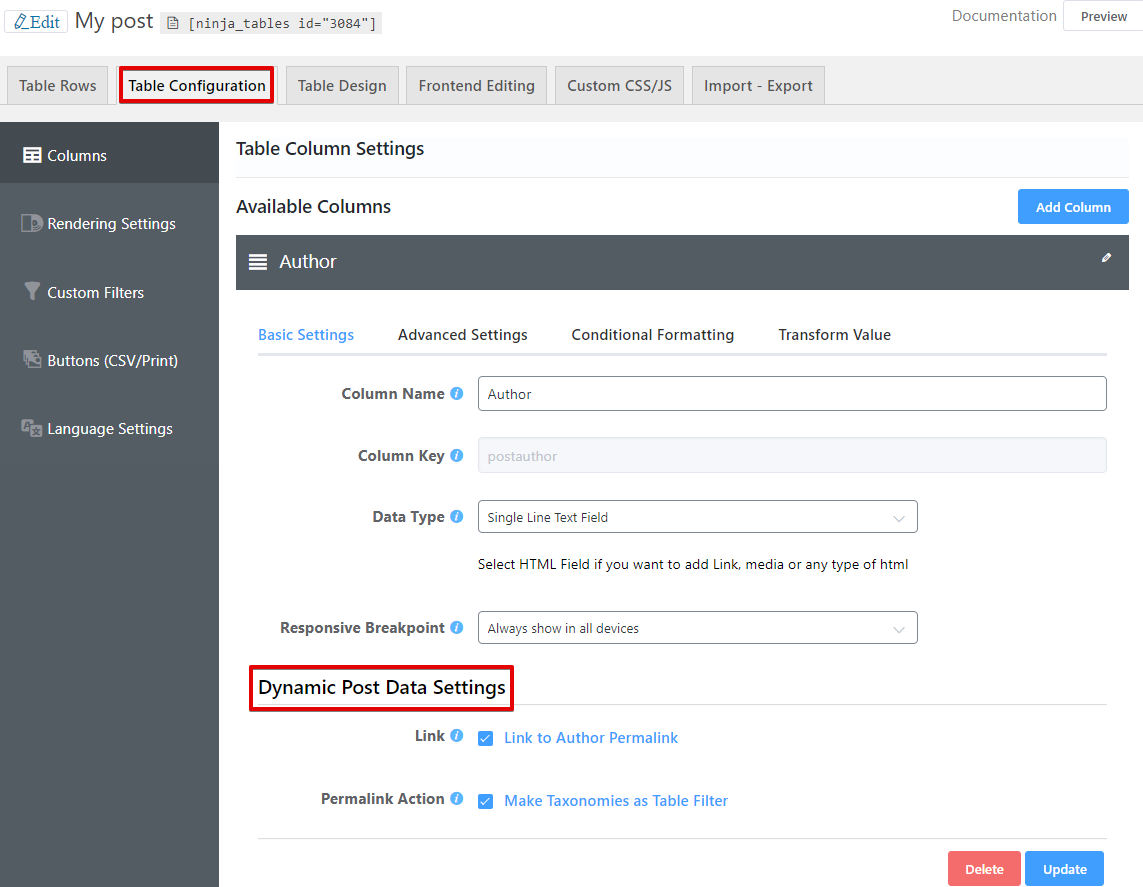
Here’s another amazing feature. If there’s a permalink category or a post tag, you can sort it from the “Table Configuration” panel.
You can also skim through the documentation if you want.
2. ACF Field Integration
Among many versatile features, this one magnifies Ninja Tables’ capacity to create tables. Advanced Custom Field ensures this plugin is more dynamic, and it’s only available when users create WP Post.

Click on “Add New” and proceed to name it, “+Add Field”, and Field Label. Now, “Publish” the post.
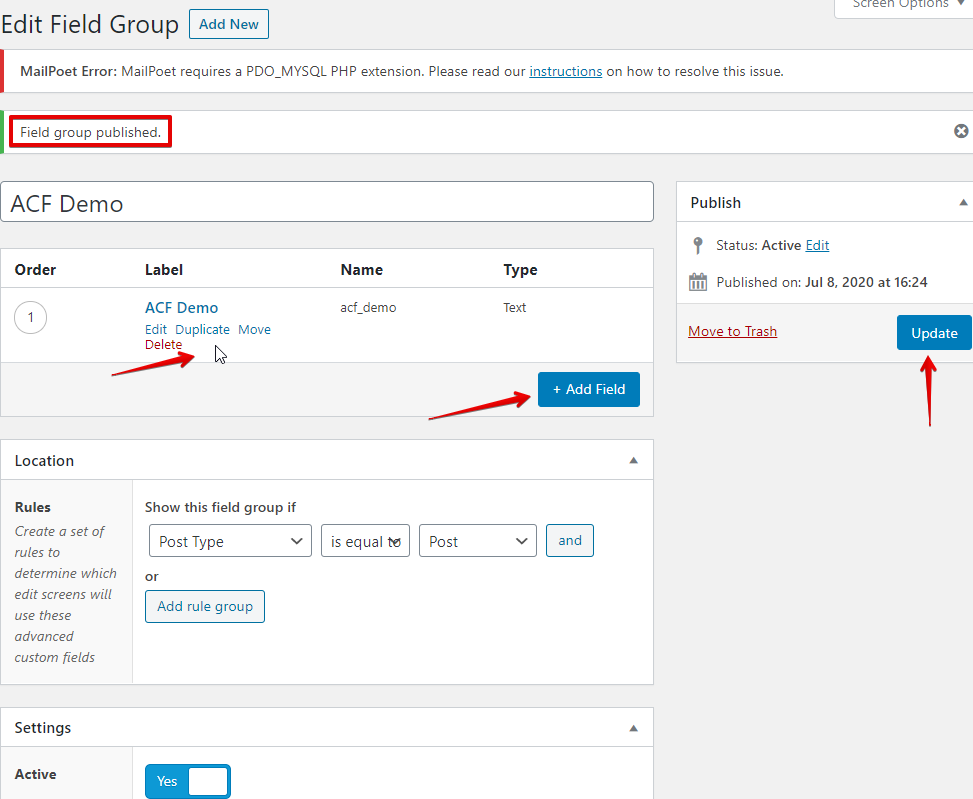
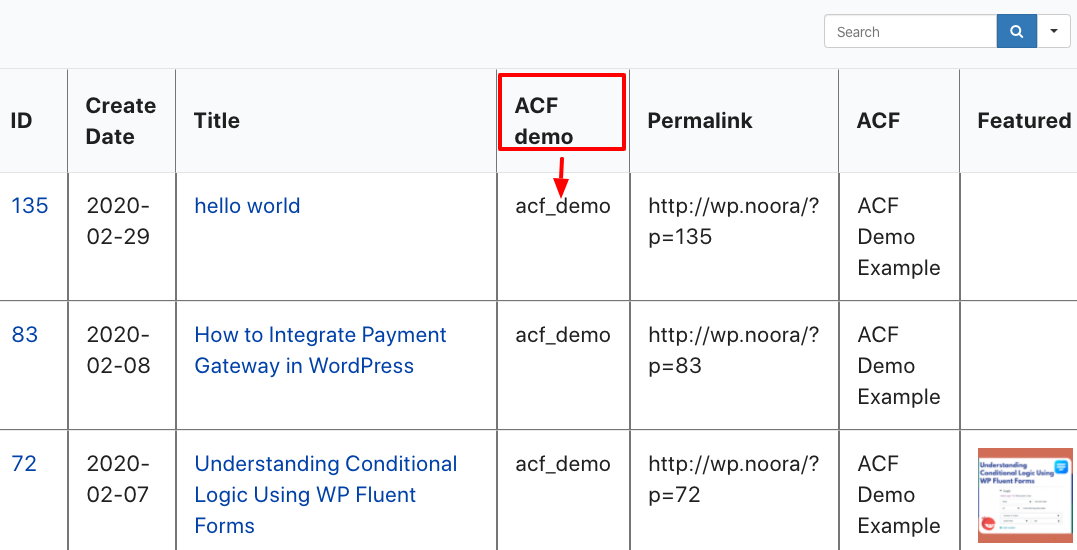
The added field is published. You can add more fields, edit or move the existing. Check the Custom Fields dashboard and see “ACF Demo” has appeared.
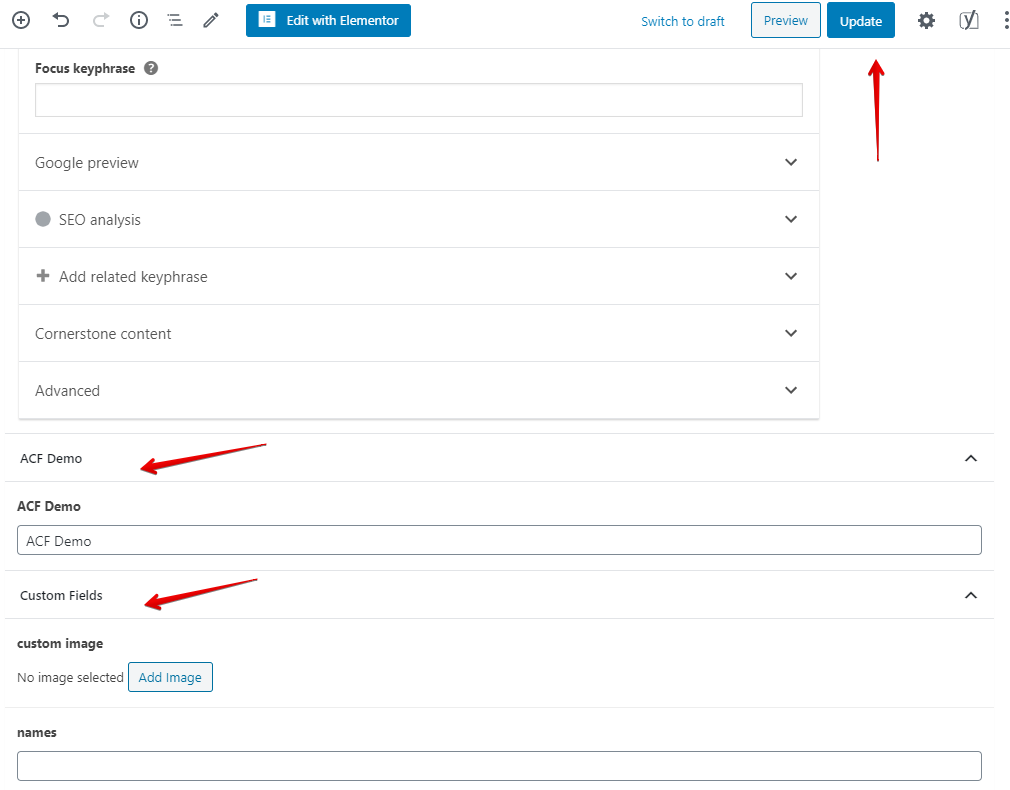
Go to “All Posts” and select the post you want to show custom fields using ACF.
Now, go to the post-table created with Ninja Tables and open “Add New Column”.
You will see the menu expanding to “Dynamic Post Data Settings”. Fill in the “Field Type” from the dropdown and the “Field Value” box.
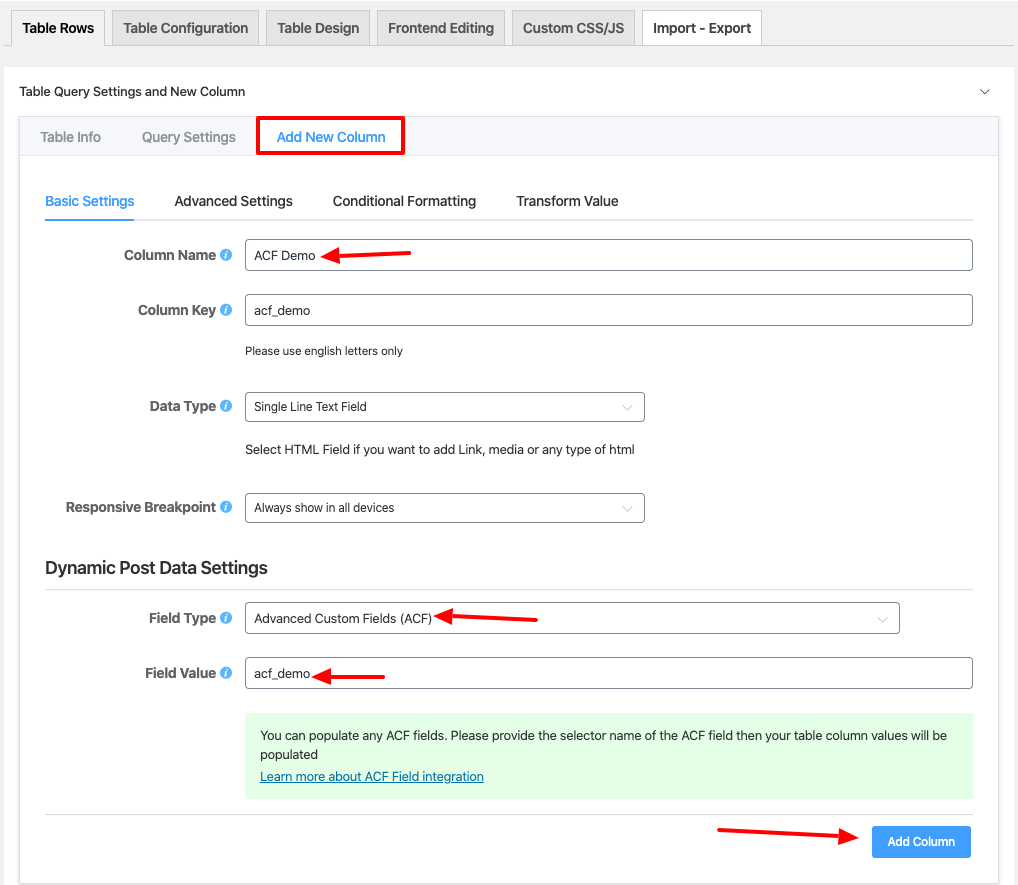
The field value should be just as you input before. Once you click “Add Column”, the new ACF Demo column will be created for its corresponding post.
Check out the documentation to know more.
3. Shortcode, computed value or HTML
We can start with the “Add New Column” panel from the previously created table. Name the column and choose “Shortcode / Computed Value or HTML” on Field Type.
For dynamic shortcode, use this –
[yourshortcode YourParam=”{post.ID}”]
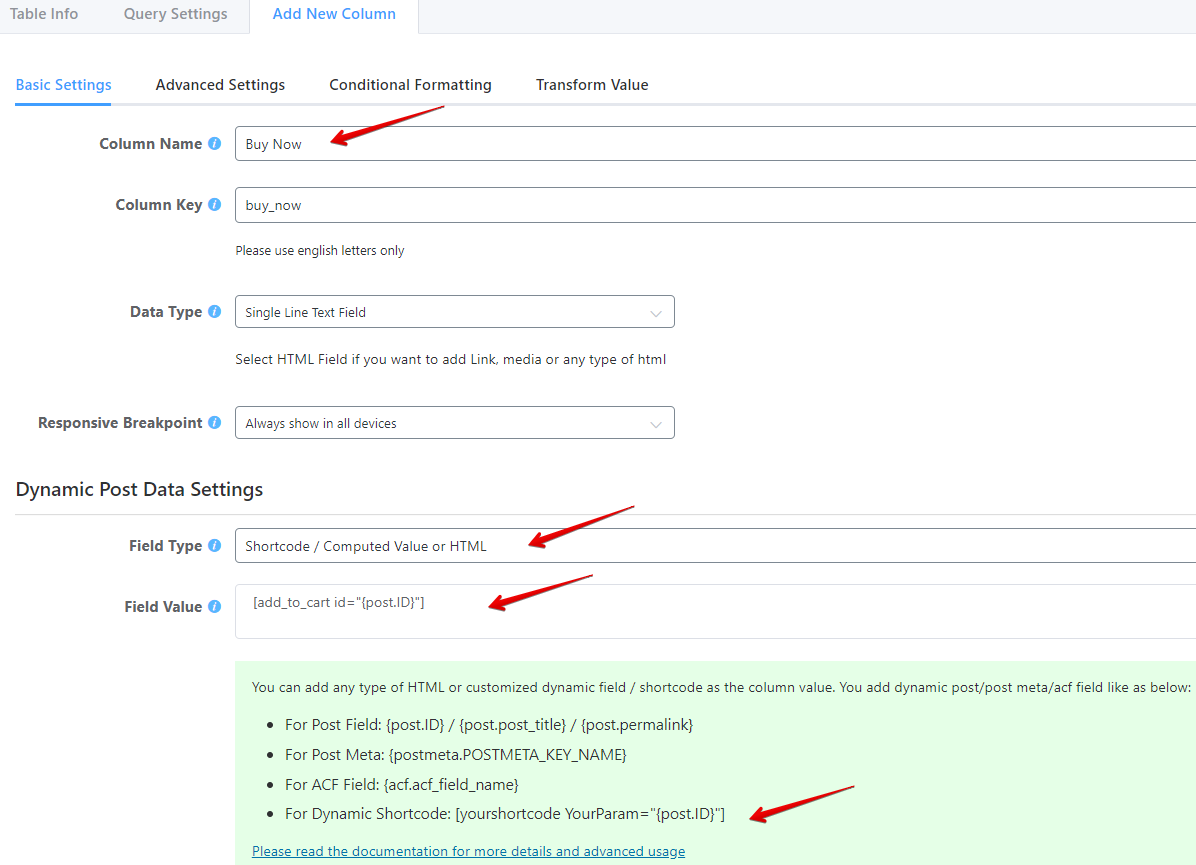
Add the shortcode and click on “Add Column”. For example, the shortcode made for a WooCommerce table in Ninja Tables on a “Buy Now” column is [add_to_cart id=”{post.ID}”]
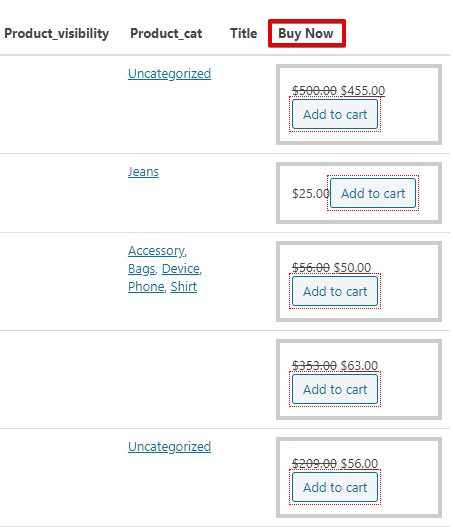
Each row will take the respective WP post ID and create the add-to-cart button according to a valid shortcode. Go through the documentation for more clarity.
4. Post Meta Field
It’s also known as “Custom Fields”, and you can show an additional content of your WP post through Ninja Tables. You can either show a new post or edit an existing one.
For this demo, we are updating a previously made post with Custom Field and displaying it on Ninja Tables Post Meta Field. This feature is done from the admin panel.
First of all, navigate to the post’s “Screen Option” on the top. You will see some checkboxes appear, and one of them will be “Custom Fields”.
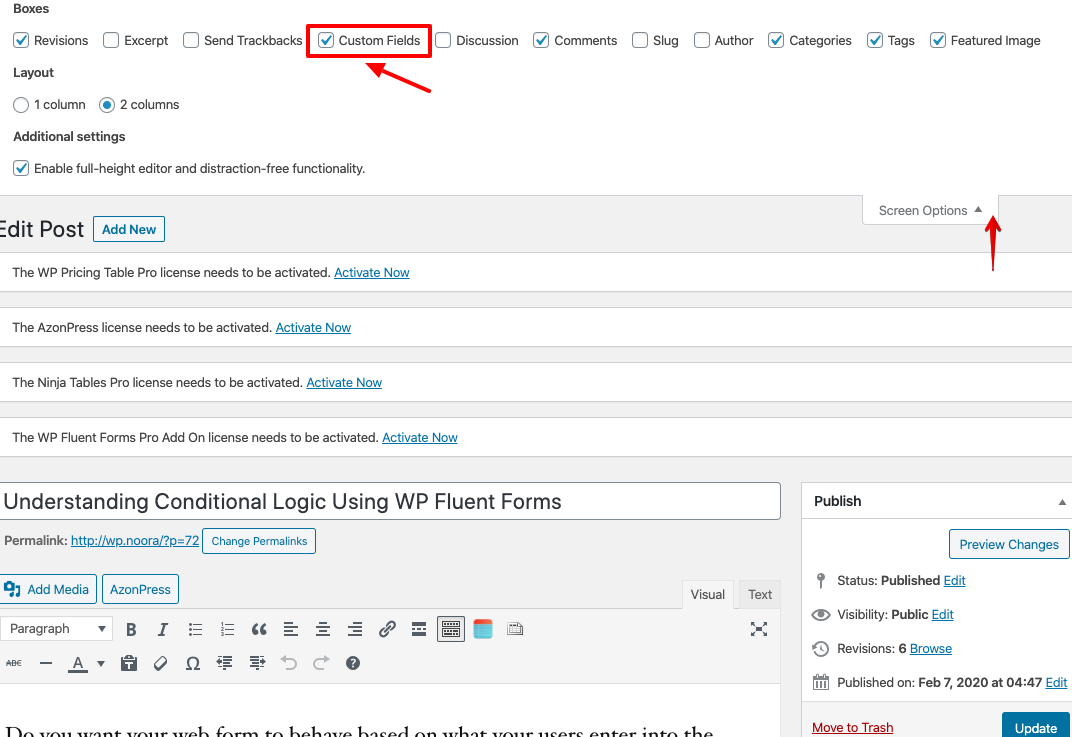
Now, if you check the box, the Post Meta will expand to another panel with field name and value.
Here’s Advanced Custom Field as value.

We want to add one of the fields in a table. So, we selected a pre-made table and went to the “Add New Column” panel.
Simply put the value in the field value here on Dynamic Post Data Settings as well and click on “Add Column”.

The outcome will appear on the table automatically.
5. Featured Image
It’s the easiest part where all you have to do is add a featured image on a post and edit the “Add New Column” panel.
Firstly, open a post to upload a featured image, as shown in the image below.
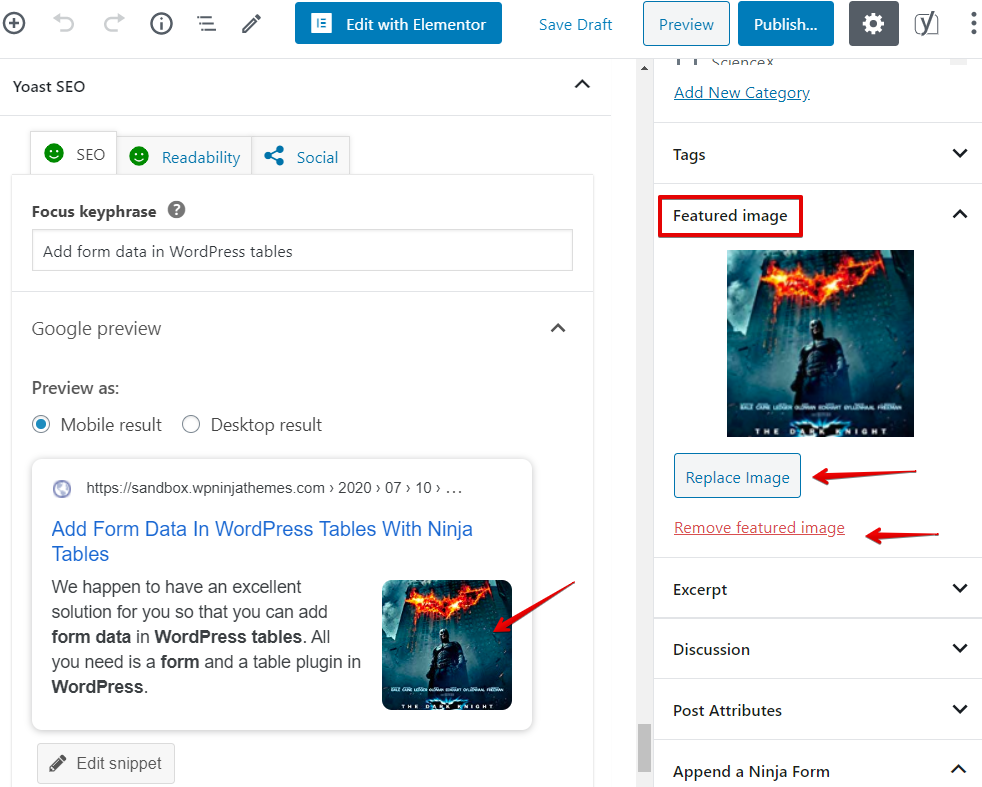
You can replace or remove the image from the post’s sidebar. Since we already have a table ready, we picked and added images to some posts on that table. The posts with images will show up on the table after you create a new column.
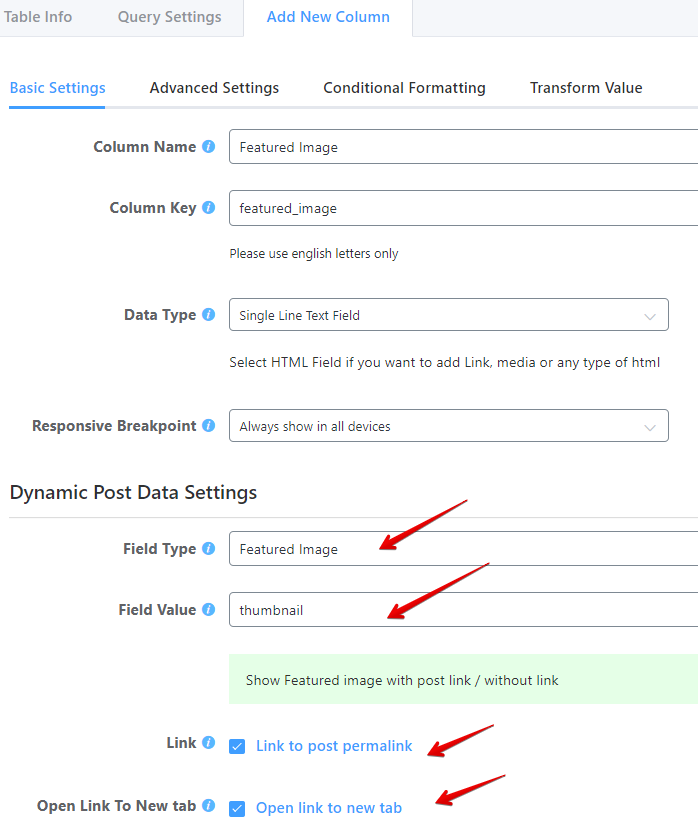
For the Field Value, you can determine the size or form of the image. For example, thumbnail, medium, large, etc. The checkbox for “Link to post permalink” will take you to the post if you click on the image and will “Open link to new tab” if you check the other one.
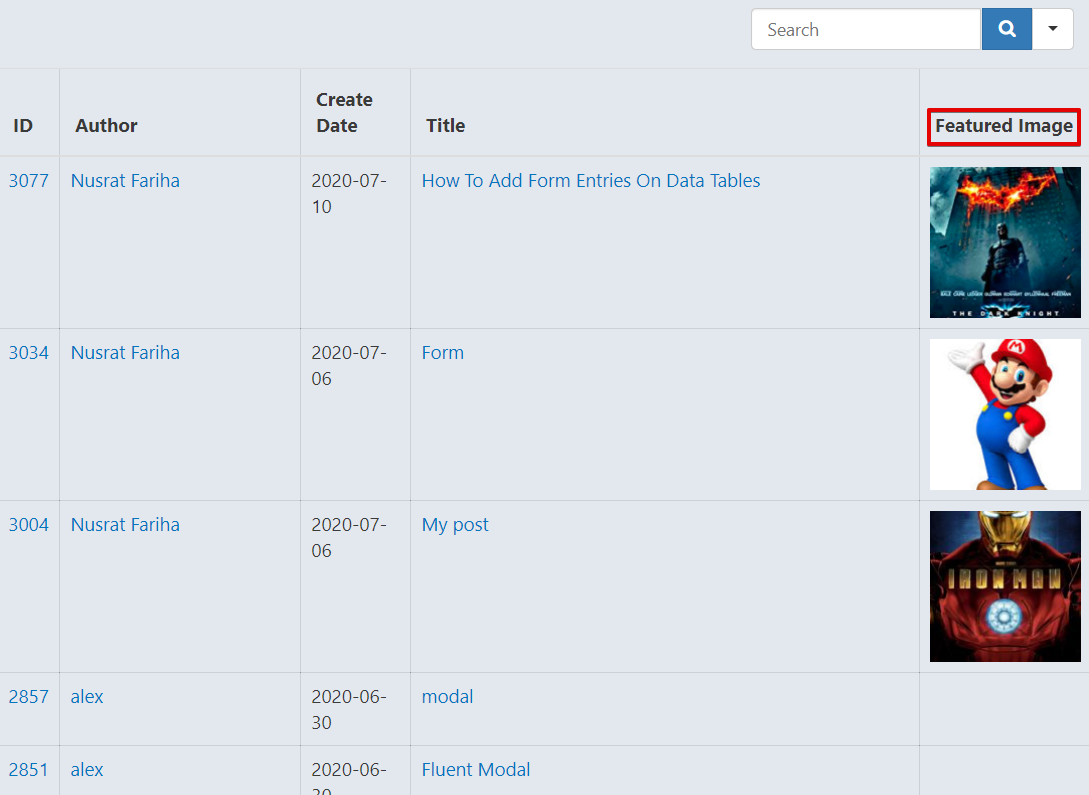
Right after you “Add Column”, the “Featured Image” column will be created and show corresponding images of posts.
Remarks
That’s all for WP Post and Ninja Tables now. We have shown you how to add data to WordPress tables from posts. You can try it with Ninja Tables as per our demonstration because it’s more flexible and feature-rich. Although, to each their own!
Integration with WP Post is an awesome feature of the table plugin and helps a lot by pulling data from posts. A user can add custom columns, advanced custom fields, shortcode, post meta field, and featured images from the WP Post through an intuitive interface.
Take a look at our full documentation for a detailed recap.
On a final note, we will soon offer you an explanation of adding form entries in WordPress tables. Stay with us!

Hi! I’m a creative content writer at WPManageNinja & Product Marketing Lead at Ninja Tables. I love to work on diverse topics. When I’m not writing, you’ll find me going through my favorite books or drawing something!
-

Introducing FluentCRM 3.0 Beta: Powerful, Flexible, and Ready for the Future
Introducing FluentCart 3.0 Beta. Biggest update awaiting for FluentCRM with -

Top 10 BookingPress Alternatives: WordPress Booking Plugins (2026)
Discover the best BookingPress alternatives for WordPress. Compare features, pricing, -

First Look on FluentPlayer: The Next-Generation Video Player for WordPress
FluentPlayer, WPManageNinja’s WordPress video player for insight, and performance. Add
Leave a Reply
You must be logged in to post a comment.