

Display Google Reviews on WordPress (Free + No API Key Needed)

A visitor lands on your page with their card already half out of their wallet. Then they hesitate. They want proof that other people trusted you first.
Google reviews are that proof. They sit on your Business Profile, where buyers already look before they decide. The problem is they live on Google, and your sale happens on your business site. The reviews need to be in both places.
This guide shows you exactly how to display Google reviews on WordPress, using a one-click method that needs no code and no API keys.
You will also see how to filter which reviews show, style them to match your brand, and turn on schema so star ratings can appear in search results.
Key takeaways
- You can display Google reviews on WordPress without touching code, using a free Google reviews widget that connects to your Google Business Profile.
- The modern method is a one-click OAuth connection. The old route that required a Google Places API key and a JavaScript file is no longer needed.
- Filters let you show only the reviews you want. Five-star first, text-only, or specific keywords.
- Schema markup lets your aggregate star rating show in Google search results, which lifts click-through rate.
- The free version is enough to get Google reviews live. Pro adds advanced layouts, templates, a verified badge, AI summary, styling, and extra review platforms.
What does it mean to display Google reviews on WordPress?
Displaying Google reviews on WordPress means pulling the reviews from your Google Business Profile and showing them live on your website, usually through a Google business review widget or plugin.
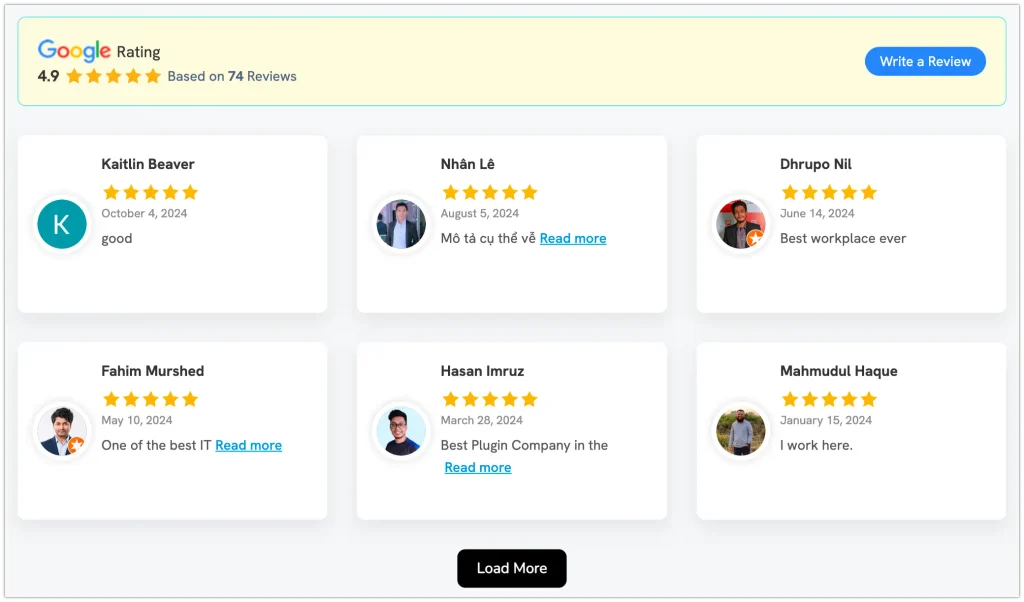
WordPress has no native way to do this. You connect a review plugin to your Google account, pick a layout, and the plugin fetches your reviews and keeps them updated automatically with an auto-sync option.
Why display Google reviews on your WordPress website?
Because reviews move buyers, and buying happens on your site, not on Google.
Social proof has a direct line to conversion. Northwestern University’s Spiegel Research Center found that displaying just five reviews on a product page increases purchase likelihood by 270% compared to a page with zero reviews.
Review-reading is near universal now. According to BrightLocal’s Local Consumer Review Survey 2026, 97% of consumers read online reviews when browsing for local businesses.
Four concrete reasons to show Google reviews on WordPress:
- Trust at the point of decision: Visitors see real customers vouching for you on the page where they act, not three clicks away on a Maps listing.
- Higher conversion: Fresh, specific reviews reduce hesitation. Specific beats generic every time.
- Local SEO and brand signals: Your Google site ratings are already the proof search users trust. Putting them on-site reinforces the same story across channels.
- Rich snippets in search: With schema markup, your aggregate star rating can appear under your result in Google. Stars in the search listing lift click-through before anyone even reaches your site.
If you are weighing whether reviews are worth the effort at all, we cleared up the common doubts in online reviews: myths and misconceptions.
What do you need to display Google reviews on WordPress?
You need a Google reviews widget. That is the shortest honest answer.
A Google reviews widget is a tool that fetches reviews from your Google Business Profile and displays them on any page of your site. It handles the connection, the design, and the automatic updates so you never paste reviews by hand.
There used to be a harder way. Older tutorials walk you through generating a Google Places API key, editing a JavaScript file, and pasting an embed code. That method still exists on the web, and it still works, but it is slower and easy to break. You do not need it anymore.
The current method is a direct, one-click connection to your Google account. That is the route this guide uses, with WP Social Ninja, the all-in-one social proof plugin built by WPManageNinja.

It is a WordPress review plugin that connects to your Google Business Profile and 9+ other review sources, along with any Custom Review Sources, from one dashboard.
How to display Google reviews on WordPress (step by step)
Here is the full process. We ran it on a test site and timed it. Starting to publish takes a few minutes.
Step 1: Install and activate the plugin
Install WP Social Ninja from your WordPress dashboard under Plugins, then Add New. Search for the plugin name, install, and activate.
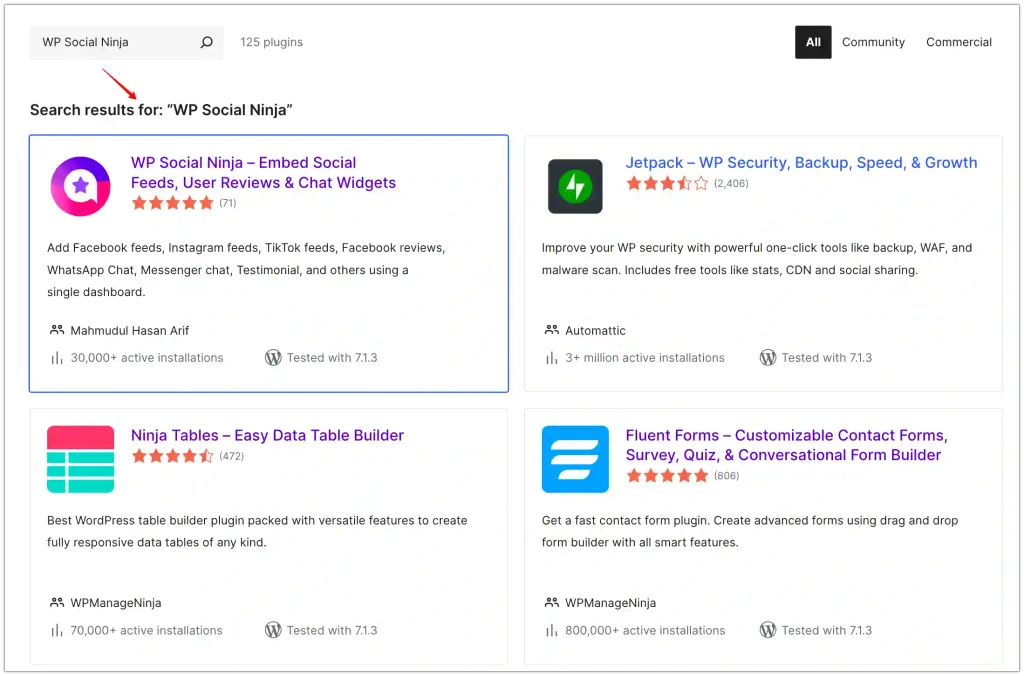
New to installing plugins? The WP Social Ninja setup guide covers it. Now, open the plugin and go to All Platforms.
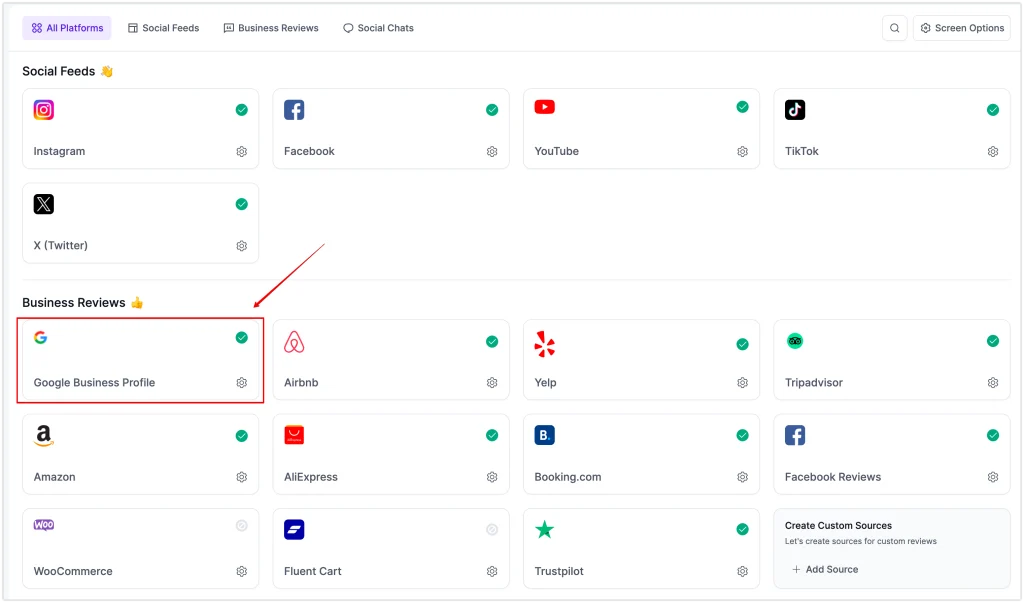
Under the Business Reviews section, select Google Business Profile.
Step 2: Connect your Google Business Profile (One click, no API key)
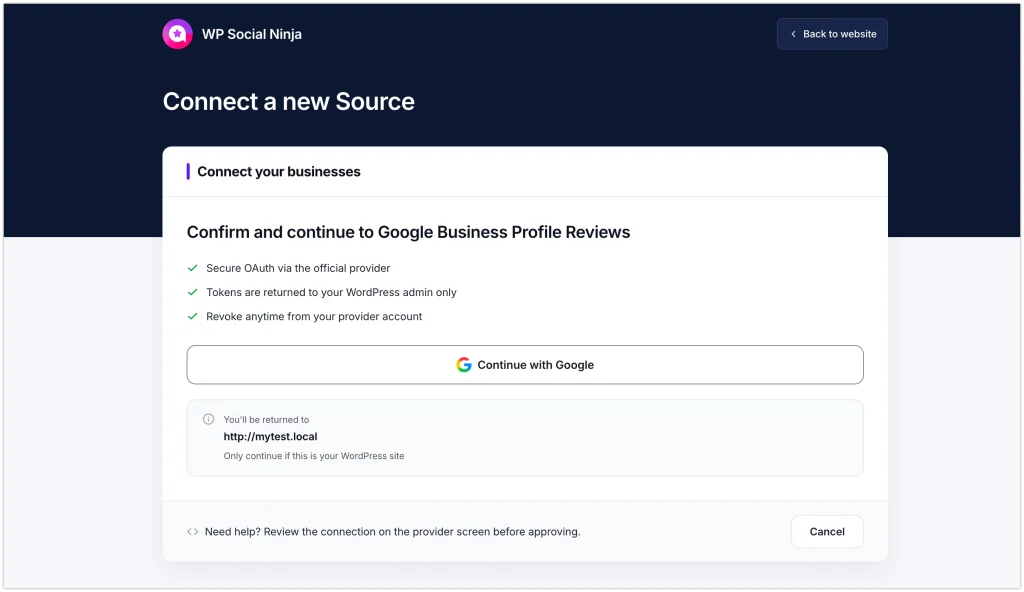
In the Google Business Profile Configuration window, click Connect Google Business Profile. You will be taken to WP Social Ninja, then to Google to approve access.
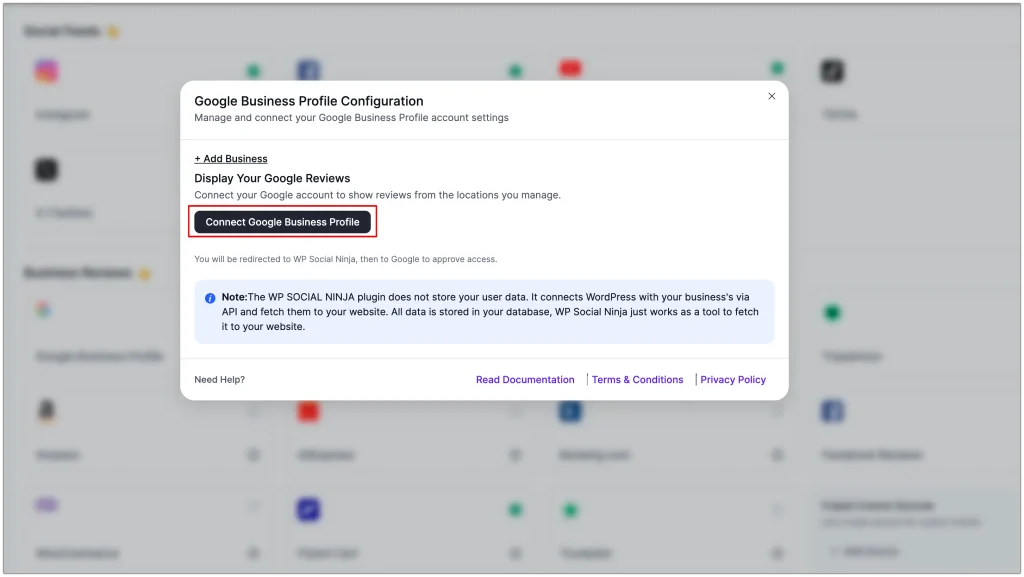
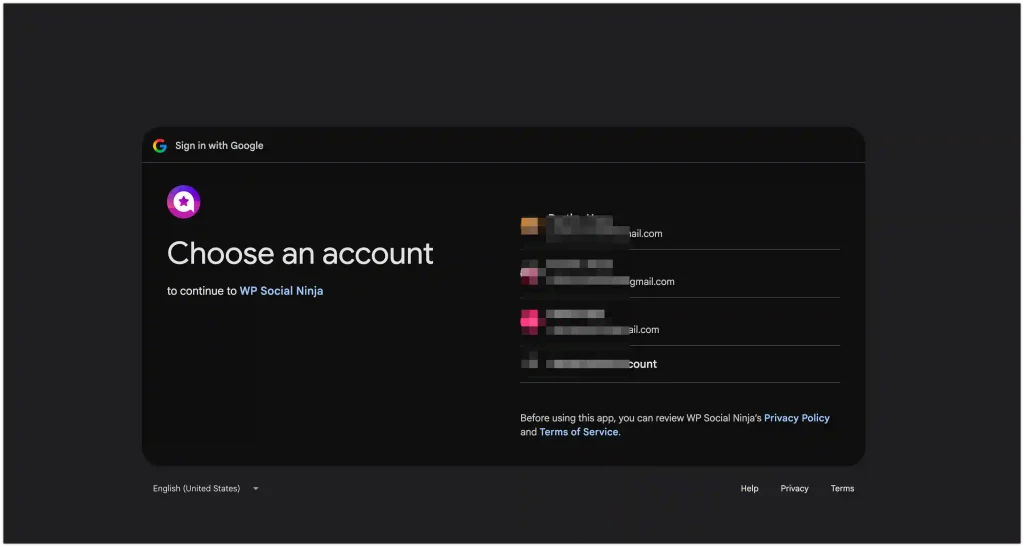
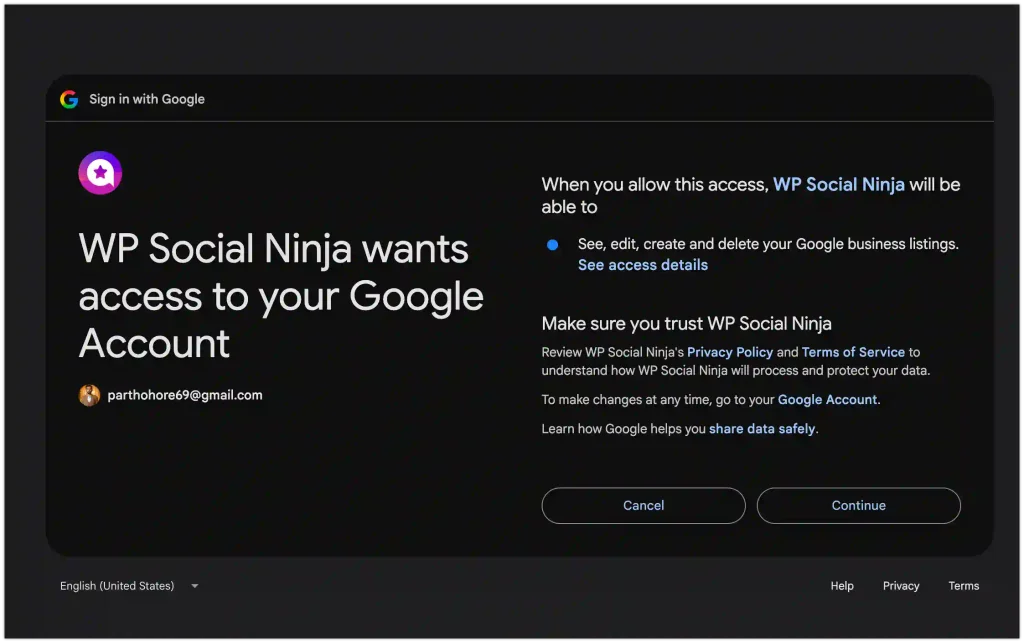
The flow is a standard, secure OAuth sign-in:
- Click Continue with Google on the connection screen.
- Choose the Google account that manages your business.
- On the Google permission screen, review the access and click Continue.
- Confirm your domain on the security screen by clicking Yes, it is my domain.
That is the whole connection. Tokens return to your WordPress admin only, and you can revoke access anytime from your Google account.
Once connected, your business account appears in the dashboard with its current rating. If you manage several locations, use Connect More Account to add them.
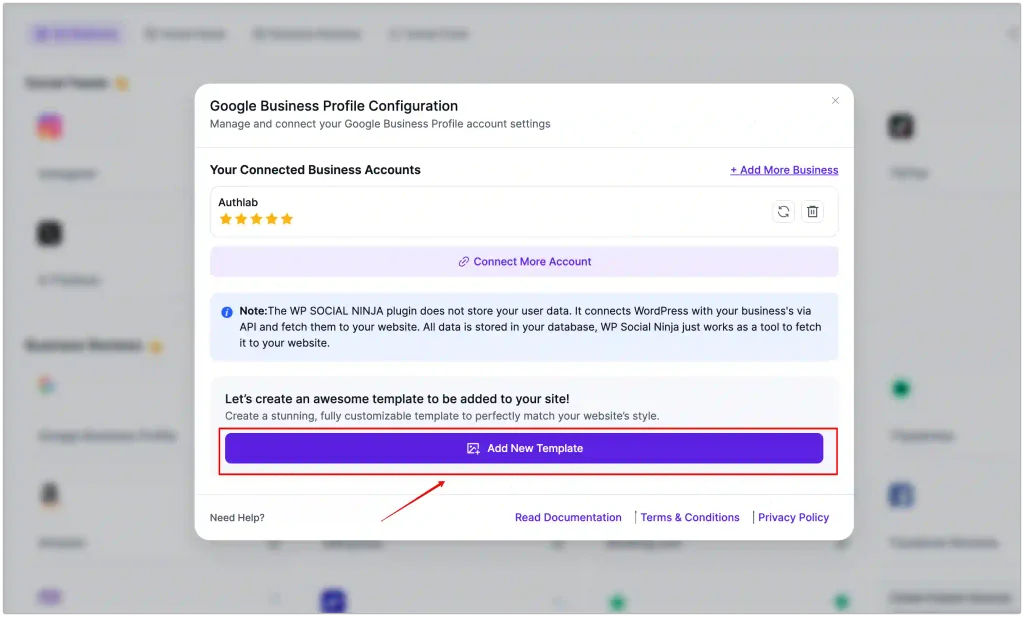
This is the part that used to take almost 10 minutes with API keys. Now it is four clicks.
Step 3: Create a template and pick a layout
After clicking Add New Template. This opens the live editor where you build how your reviews look.
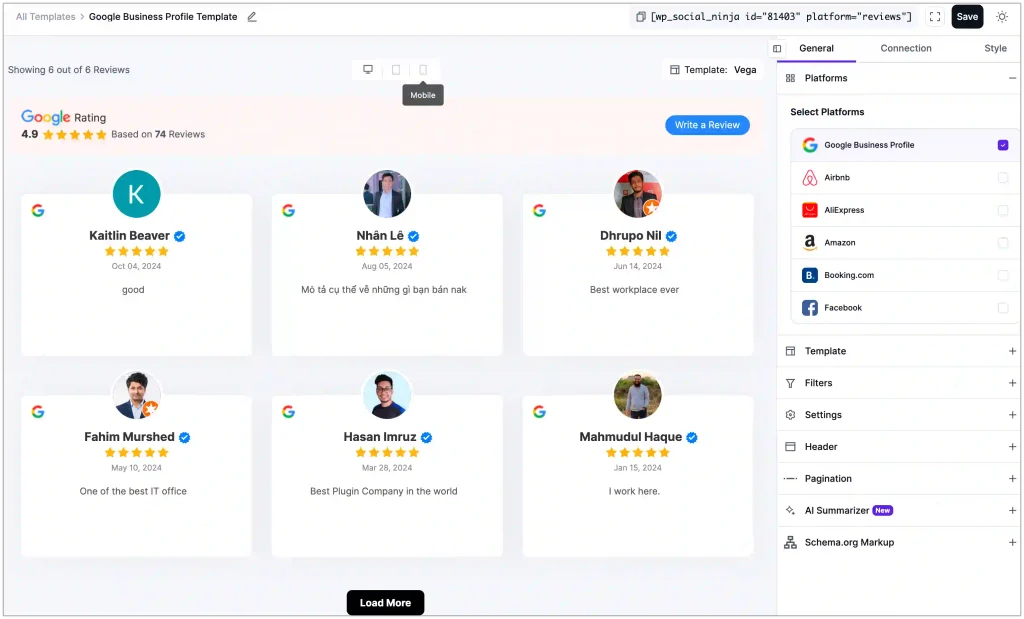
In the General tab, confirm Google Business Profile is selected under Platforms, then open Template and choose a layout and template type:
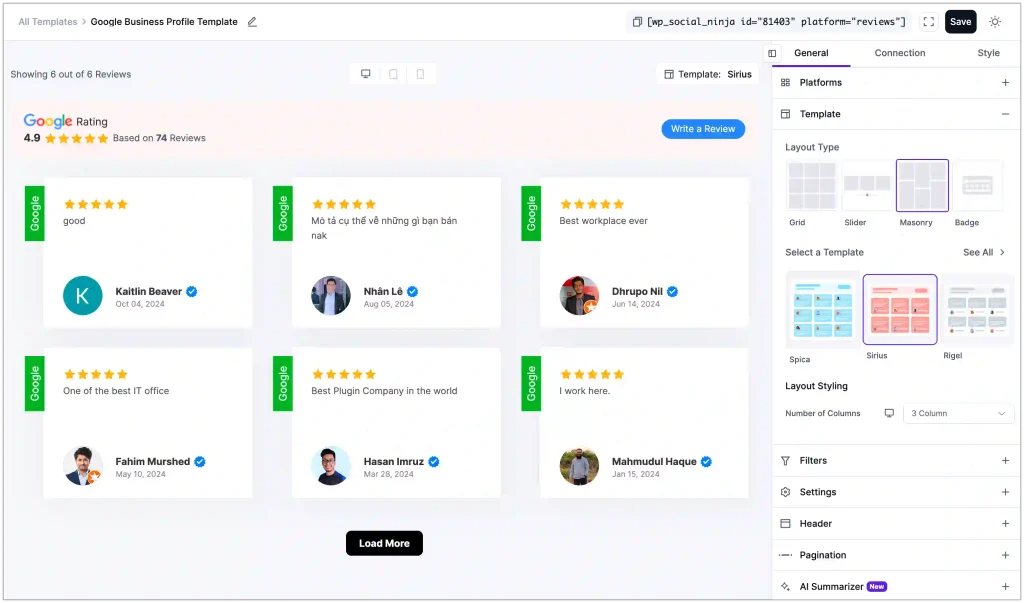
- Grid for a clean, even wall of reviews.
- Slider for a space-saving carousel that rotates automatically.
- Masonry for a staggered, Pinterest-style layout.
- Badge for a compact floating rating widget.
Pick a pre-built design (Vega, Sirius, Spica, Rigel, Deneb, and more). Set your column count. The preview updates as you choose, so you see the result before saving.
Want the carousel specifically? The dedicated walkthrough on the Google review slider for WordPress goes deeper on autoplay, slides to show, and navigation.
Step 4: Filter which reviews appear
This is where most plugins stop and WP Social Ninja keeps going. Open the Filters panel.
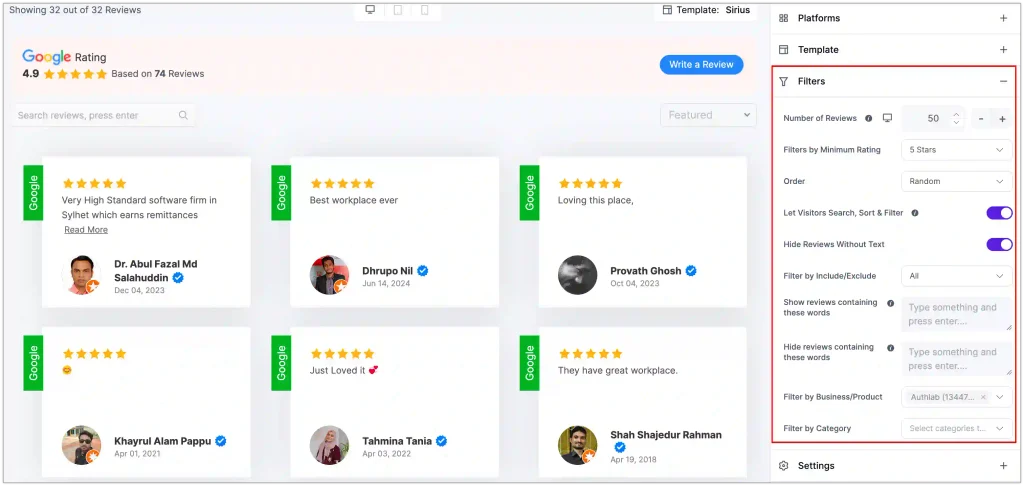
- Filter by minimum rating: Show five-star reviews only, or three and up. Your call.
- Hide reviews without text: An emoji-only rating is weak proof. Hide the blanks.
- Show or hide reviews containing words: Surface reviews that mention a product, or exclude off-topic ones.
- Let visitors search, sort, and filter: Turn on front-end controls so buyers can find reviews relevant to them.
- Number of reviews and order: Control how many load and whether they appear newest-first or random.
Not every rating is a five-star, and that is fine. The point is to lead with your strongest, most specific proof.
Step 5: Choose what each review card shows (Settings)
Open the Settings panel to decide which parts of a review are visible. Each is a simple on or off toggle:
- Display rating and rating style (Stars, or stars with the number).
- Display the verified badge, with custom tooltip text like Verified Customer.
- Display the review date, reviewer name, reviewer image, and platform icon.
- Display the review title and review text.
- Set a content type, such as full text or a trimmed, scrollable card for even heights.
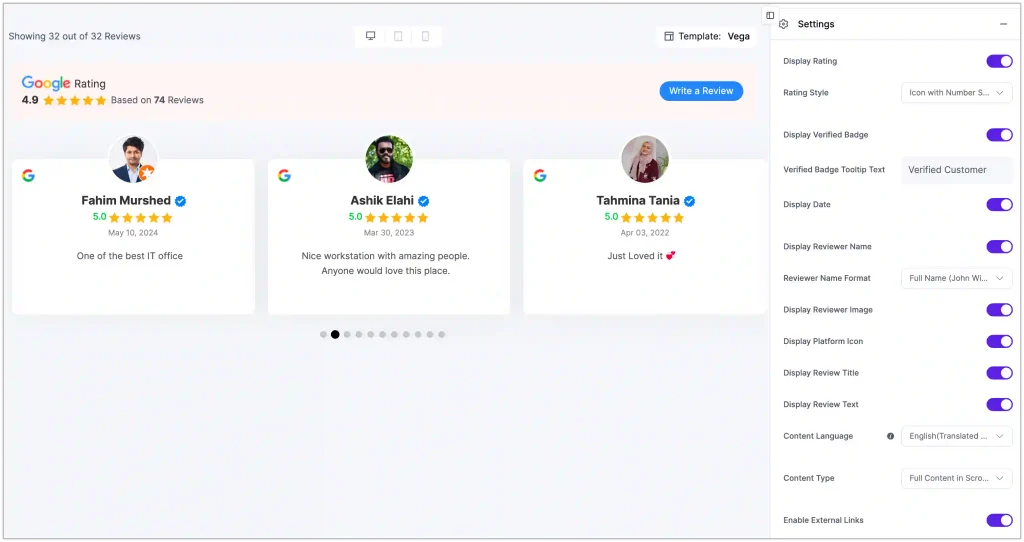
One setting worth calling out Content Language. WP Social Ninja can show reviews translated into English from any language, so a foreign-language review still reads clearly to your audience. That is a helpful translation feature if you serve customers across regions.
Step 6: Set up the header and a Write a Review button (Header)
The Header panel builds the summary bar that sits above your reviews, the one that reads “Google Rating, 4.9 based on 74 reviews.”
Toggle Display Header, then choose what it shows: your logo, a title, the average rating, and the total review count. You can rewrite the title text, the review-count text, and the button label to match your brand.
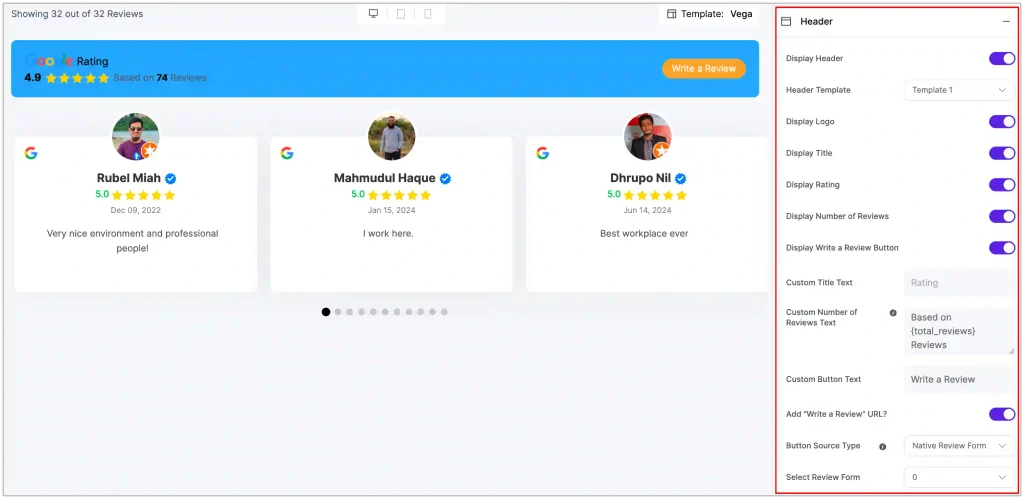
The high-value piece here is the Write a Review button. Turn it on to give happy customers a one-click path to leave a review.
Set the button source to the native review form and pick which form to use, so you collect new reviews instead of only showing old ones. Keeping that pipeline full is how your display stays fresh.
Step 7: Control how reviews load (Slider or Pagination)
How this step looks depends on the layout you picked in Step 3.
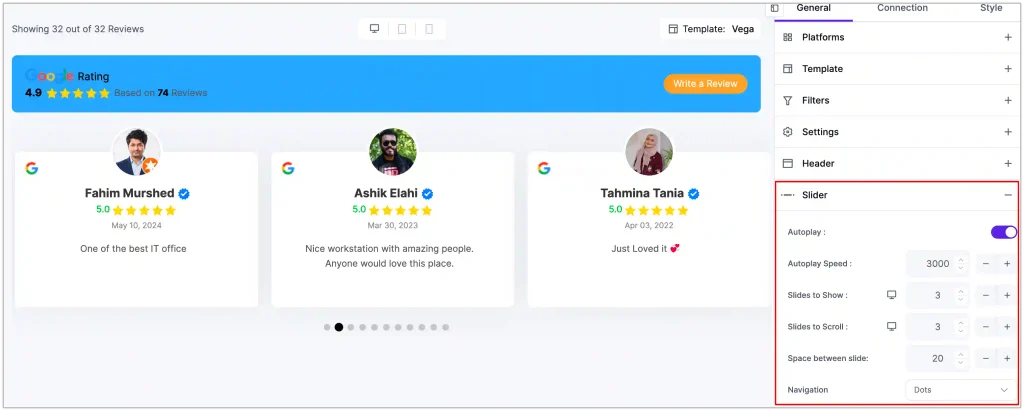
If you choose the Slider layout, open the Slider panel and set the motion autoplay on or off, autoplay speed, how many slides show at once, how many scroll per move, the space between cards, and the navigation style (dots or arrows).
If you choose Grid or Masonry, open the Pagination panel instead. Set the pagination type to Load More, rename the button if you want, and set how many reviews appear per page.
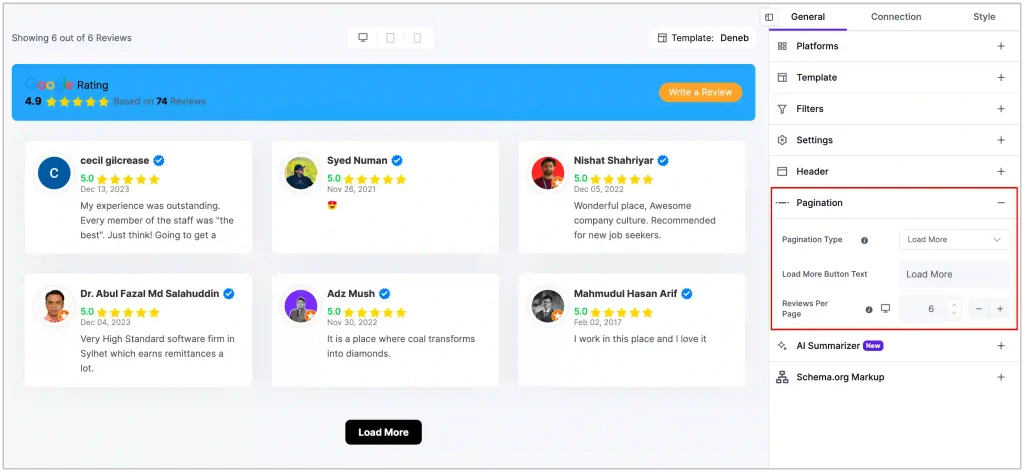
Load More keeps the page light and lets visitors pull in more proof on demand.
Step 8: Summarize reviews with AI
Open the AI Summarizer panel if you want a short, auto-written summary of your reviews shown inside the widget. It reads your displayed reviews and gives visitors the gist in a sentence or two, so they do not have to scroll every card.
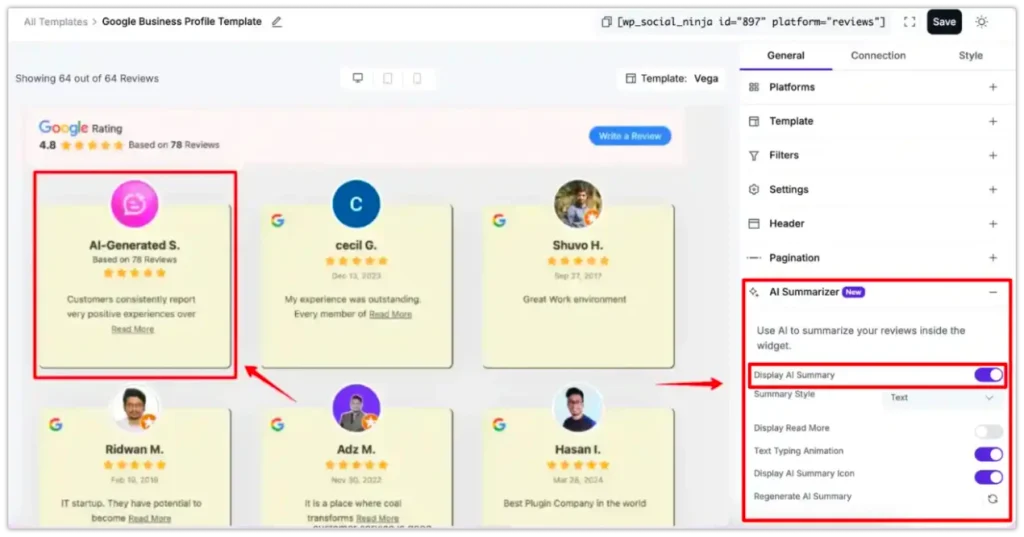
This one is optional and needs your own AI API key, which you add in the plugin settings. Turn on Display AI Summary once the key is in place.
Step 9: Turn on schema markup for rich snippets
Open the Schema.org Markup panel and enable it. Choose your schema type (AggregateRating, or Product with Reviews), add your business name and logo, and save.
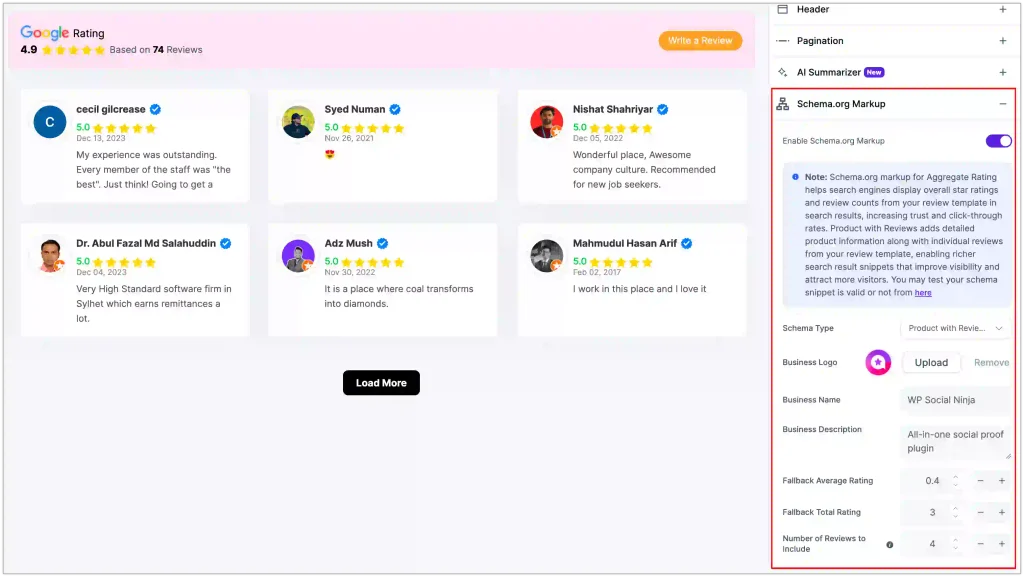
Here is why this matters. Schema tells Google the overall star rating and review count tied to this page. When it reads that, your search result can show stars and a review count under the link. That visual lift raises click-through rate before the visitor arrives. This single toggle is one of the highest-leverage steps in the whole process, and most guides skip it.
Step 10: Style it to match your brand (Style tab)
Switch to the Style tab to make the widget look like your site, not a bolt-on. Every element has its own controls, no CSS required:
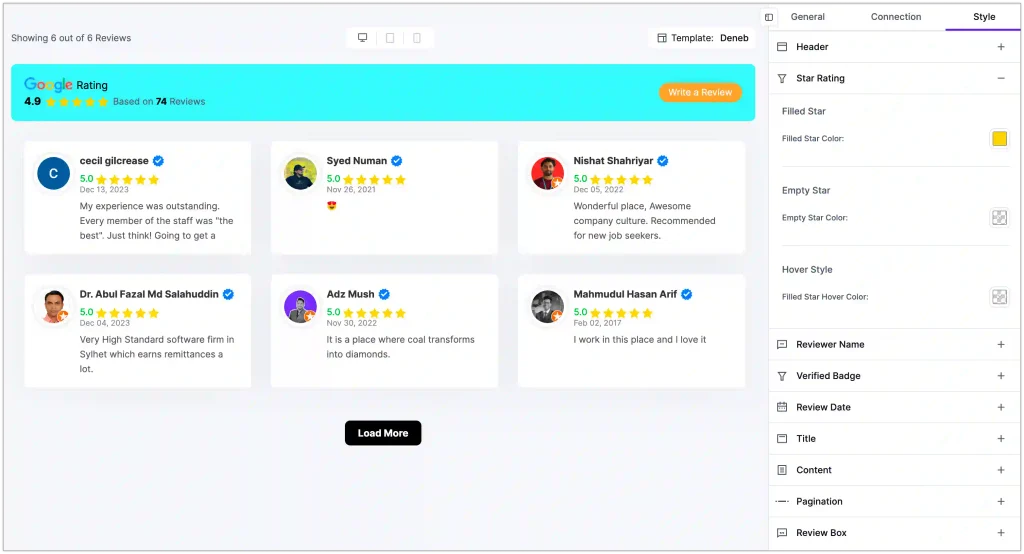
- Star rating colors (filled, empty, and hover).
- Reviewer name, verified badge, review date, title, and content.
- Pagination, the review box, and the header.
Match your brand colors and spacing here so the reviews feel native to the page.
Step 11: Copy the shortcode and paste it on your page
Click Save. The editor gives you a shortcode that looks like this:
[wp_social_ninja id="81403" platform="reviews"]Copy it. Open the page or post where you want the reviews, paste the shortcode into any block or widget area, and publish. Your Google reviews are now live, and they sync automatically as new reviews come in. And here is the Google business reviews on website example:

That is how you embed Google reviews on a website from start to finish.
How to add Google reviews to Elementor and other page builders
If you build with Elementor, you do not need the shortcode block. WP Social Ninja ships an Elementor widget, drag it on the canvas, pick your saved Google reviews template, and publish.
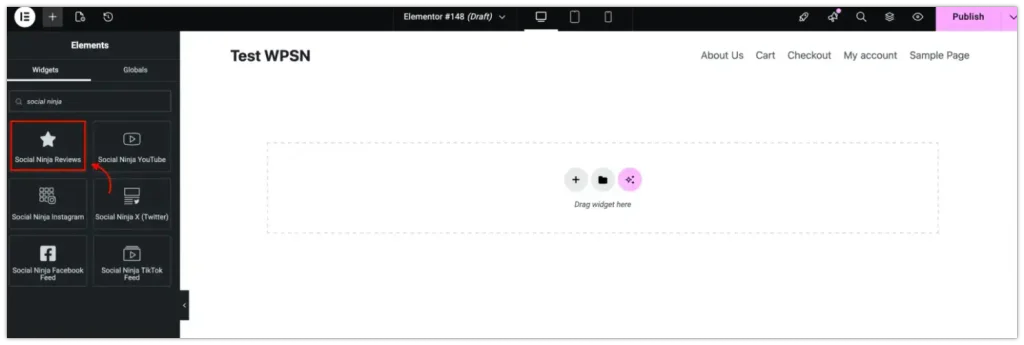
The full steps are in the Google reviews for Elementor guide. The same template works across Gutenberg, Elementor, and classic widget areas, so you design once and place it anywhere.
Can you display Google reviews on WordPress for free?
Yes. The free version of WP Social Ninja includes Google Business Profile reviews, the core layouts, and schema markup. For many small sites, free is enough to get reviews live and build trust today.
The Pro version unlocks the full style panel, advanced layouts, extra review platforms like Yelp, TripAdvisor, and WooCommerce, and finer control over design.
If you run a larger site or want reviews from several sources in one wall, Pro earns its place. Compare them side by side on the free vs Pro page and check current pricing before you buy.
Common mistakes to avoid
Getting reviews live is the easy part. These four slips are what quietly waste the proof you worked to earn:
- Showing every review, including the blank ones: Filter out text-less ratings. One specific, named review beats ten great! entries.
- Forgetting schema: No schema means no stars in search. You lose the free click-through boost.
- Hiding the proof below the fold: Put reviews where buyers hesitate near pricing, near the buy button, on landing pages.
- Letting them go stale: Auto-sync handles this, but keeps asking customers for new reviews so the display stays fresh. Our guide on how to ask for Google reviews has templates that work.
For more on why review plugins pay off, see ten benefits of a review plugin.
Put your proof to work
Displaying Google reviews on WordPress is no longer a developer job. Connect your Google Business Profile in one click, pick a layout, filter for your strongest reviews, flip on schema, and paste one shortcode. The reviews you already earned start working on the page where buyers decide.
Reputation is a growth channel, not a chore. Get your Google reviews on-site, keep them fresh, and let them convert the visitors who were almost ready to buy.
Ready to try it? Get started with WP Social Ninja free and have your Google reviews live today. Upgrade to Pro when you need the full design toolkit.
Frequently asked questions
Q: How do I display Google reviews on my WordPress website for free?
Ans: Install a free Google review widget for websites like WP Social Ninja, connect your Google Business Profile in one click, choose a template, and paste the generated shortcode on any page. No code required.
Q: Do I still need a Google Places API key to embed Google reviews?
Ans: No. Older methods required a Google Places API key and a JavaScript file. The current method uses a secure one-click OAuth connection to your Google account instead.
Q: Can I show only my best Google reviews?
Ans: Yes. Use the filters to set a minimum rating, hide reviews without text, and show or exclude reviews containing specific words, so only your strongest proof appears.
Q: Will displaying Google reviews help my SEO?
Ans: It can. Enabling schema markup lets your aggregate star rating appear as a rich snippet in Google search results, which tends to raise click-through rate. On-site reviews also reinforce trust signals.
Q: How do I add Google reviews to the Elementor website?
Ans: Use the WP Social Ninja Elementor widget. Drag it onto your page, select your saved Google reviews template, and publish. No shortcode needed.
Q: Do the reviews update automatically?
Ans: Yes. Once connected, the plugin fetches new reviews from your Google Business Profile automatically, so your display stays current without manual edits.

Partho Hore runs full-stack product marketing at WP Social Ninja, FluentMembers, and FluentReward. He’s a WordPress Core Contributor and dedicated person who cares more about what converts than what sounds good in a deck. He’s spent 5+ years driving organic growth and turning free users into paying customers, building strategy across SEO, social proof, membership, community management, and AI-driven marketing automation. Off duty, he’s chasing new destinations or a good playlist.
-

Styling Beautiful CSS Forms with Fluent Forms’ Advanced Form Styler
Learn styling Fluent Forms using built-in templates, Gutenberg, custom CSS, -

Meet 5 Remarkable Women Changing the WordPress World
Meet 5 inspiring women in WordPress who are shaping its -

FluentSMTP Review: Whats Inside this 700K+ WordPress SMTP Plugin?
Check our FluentSMTP review blog to Discover whats inside this



Leave a Reply
You must be logged in to post a comment.