
How To Automatically Create WordPress Tables Using Online Form Entries
Share :

We will never spam you. We will only send you product updates and tips.
Since you’re here, you probably want to display your form entries in a tabular format so that your audience gets the best experience. We happen to have an excellent solution for you! To add form entries in WordPress tables, all you need is a form and a table plugin in WordPress.
Why we need form and table plugin integration
If you don’t go for an automated solution, let’s try to visualize how the process will probably look like.
Suppose you have an online form on your website, and you want to exhibit the form entries in a tabular format. To do so, you will have to either:
1. Manually copy the form submissions and paste them into your table. But this will take a lot of effort and leaves a chance for human error. Not to mention the time it will take every day to accomplish the task.
Or,
2. You can export a CSV file of the form data and add it to your table, updating the table in a regular interval. This option needs human intervention and effort, and definitely is a hassle.
So, in that sense, Ninja Tables integration with Fluent Forms is a savior when you need to automatically pull the form entries and place them on a data table. And the table will get updated in real-time so that you don’t have to manually manage the data entries, leaving zero room for error.
We are about to reveal some tricks on how to fetch Fluent Forms data with Ninja Tables and exhibit them on your WordPress website in a tabular format. Hear us out if you want to make your life easier.
Adding form entries in WordPress tables: Ninja Tables and Fluent Forms
Fluent Forms is the ultimate contact form plugin for online forms and currently one of the best in the market! Similarly, Ninja Tables is the most advanced table builder for WordPress and also a top-notch data table solution.
Integrating Fluent Forms with Ninja Tables means a WordPress buff has something really cool to show off! You only have to create a form with Fluent Forms once, and all the updates will automatically appear in Ninja Tables when you have configured the integration.
Before we proceed further, recheck if you have both plugins installed in your WordPress.
Now, here’s how to create tables in WordPress with forms.
Form entries in WordPress tables with Ninja Tables and Fluent Forms (5 steps)-
- Create a form in Fluent Forms
- Form data input
- Submit form
- Connect Ninja Tables with Fluent Forms
- Finish up
Step 1: Create a form in Fluent Forms
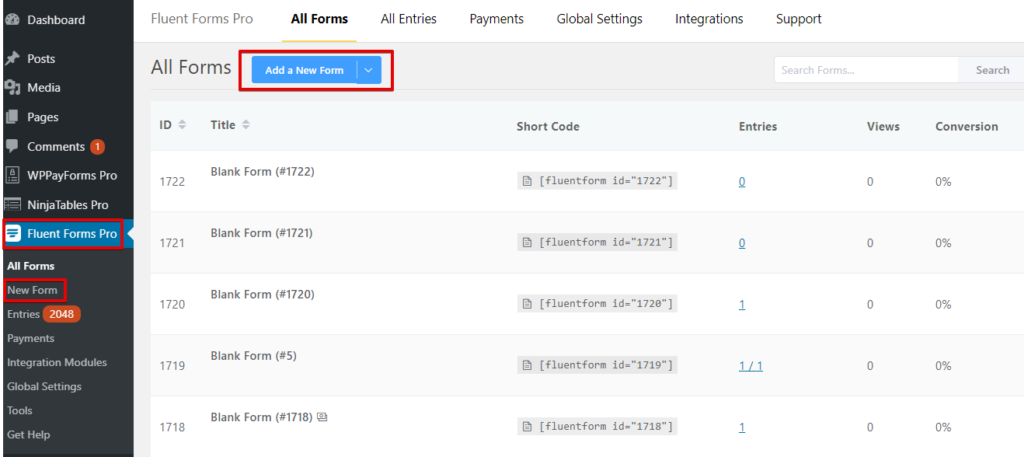
First of all, go to your WordPress dashboard and select “Add a New Form”. You can also select “New Form” from the dropdown on the sidebar.
Now you’ll see multiple boxes with multiple form categories. The basic category has five options for now.
- Blank form
- Contact form
- Newsletter form
- Support form
- Polling form
There are some more categories below. For example- Product, Education, HR, Marketing, IT, Finance, Social invitation, etc.
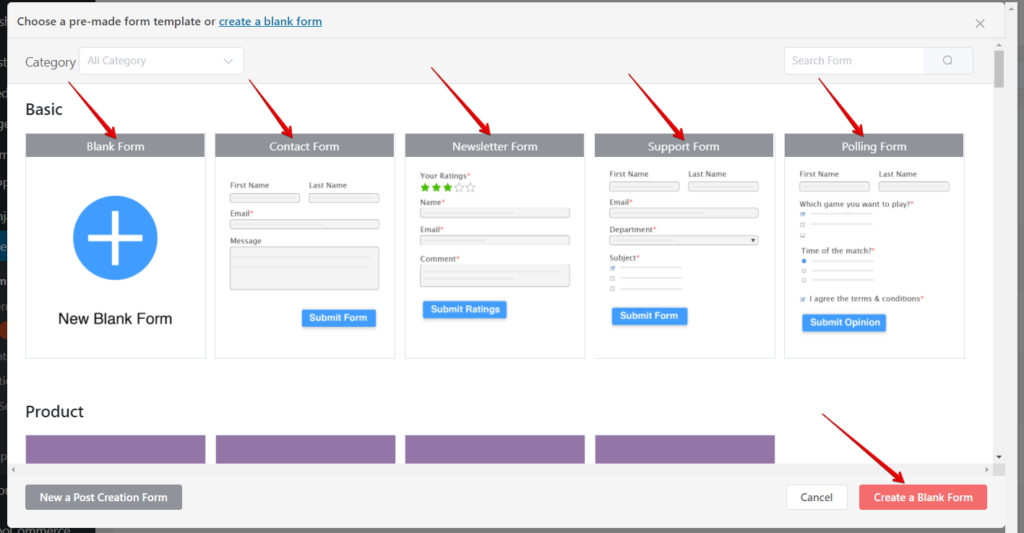
For this demonstration, we will edit a blank form to get you started. The process is the same for all.
Once you open a blank form, the window will show two form creating options- Input Fields and Input Customization.
To create, you can,
- Click on the fields
- Drag and drop field on the left
- Click the “+” sign
- Search block
As you can see, the form is automatically named. You can edit the name from the highlighted area on the top left.
If you already have a form ready, then you can skip this step and go straight to Step 4. If not, then follow the instructions.
Our documentation on how to create a form with Fluent Forms might also help you understand it better.
Step 2: Form data input
We have selected four fields- Name, email, address, and phone number. In the Input Customization panel, you can edit the input as many times you want. Simply select or deselect by clicking on checkboxes.
Here, the “+” icon on each block lets you reposition, edit, duplicate, and delete. Fluent Forms allows the user to go fullscreen mode from the icon on the top right corner for a clearer view.
We will also be naming our form “Dunder Mifflin”. Now, proceed to “Save Form”. And go to “Preview & Design”.
Step 3: Submit form
In the “Preview & Design” panel, you can change the Form Style Template. Likewise, customize Asterisk position, Inline Error Message, After Submit Success Message, and After Submit Error Message from Misc.
Click on “Save Settings” when you are done setting up and customizing the form.
You can fill-up the form with dummy entries for test purposes and make sure everything is working. The first submission will be the first entry. However, if you want more, reload the form entry page after submission and put more entries in the “Editor” panel. The form will show the entry update if you reload “Entries”.
Again, you can go to “Preview & Design” to edit form styling.
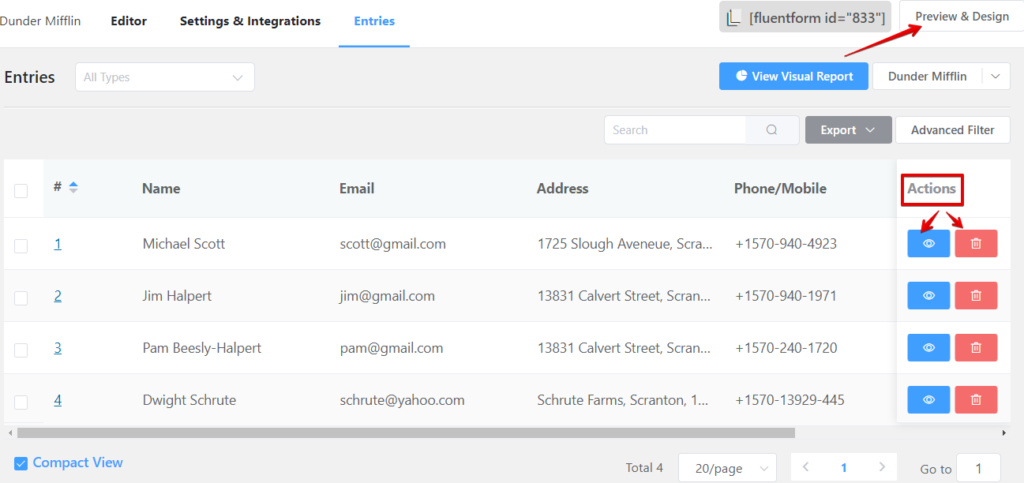
If you think a submitted entry needs editing, click on the “View” button (eye icon) from “Action”, and then click on the “Edit” button. The window will show details of that particular entry you want to edit.
We added only four different entries with name, email, address, and phone numbers on our “Dunder Mifflin” form. But Fluent Forms can actually take unlimited entries!
Step 4: Connect Ninja Tables with Fluent Forms
Finally, here’s what you need to do to present your form entries on a WordPress data table.
Go to Ninja Tables on the dashboard and click “Add Table” to get a popup window like the following image.
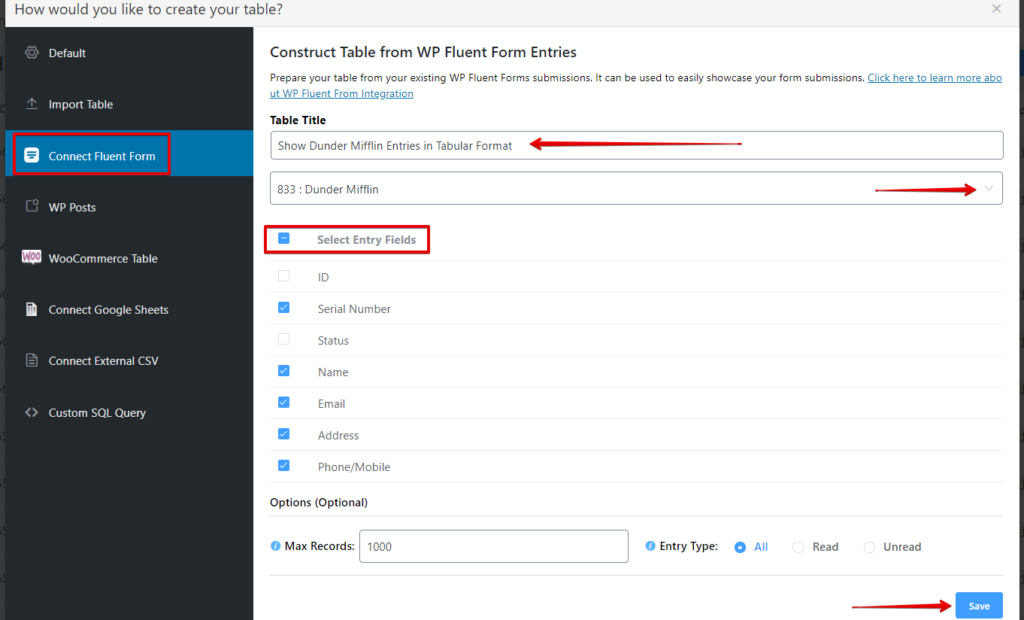
Now, select the “Connect Fluent Form” option on the left sidebar. Then name the table on “Table Title” and “Select a Form”.
We have named our table “Show Dunder Mifflin Entries in Tabular Format” and selected the form “Dunder Mifflin” made earlier in Step 1. You can choose any other pre-made form too.
The form selection will lead to “Select Entry Fields”, where you can pick what entry fields from the form you want your table to show as columns.
Right after clicking on “Save”, the table will appear with all the form entries.
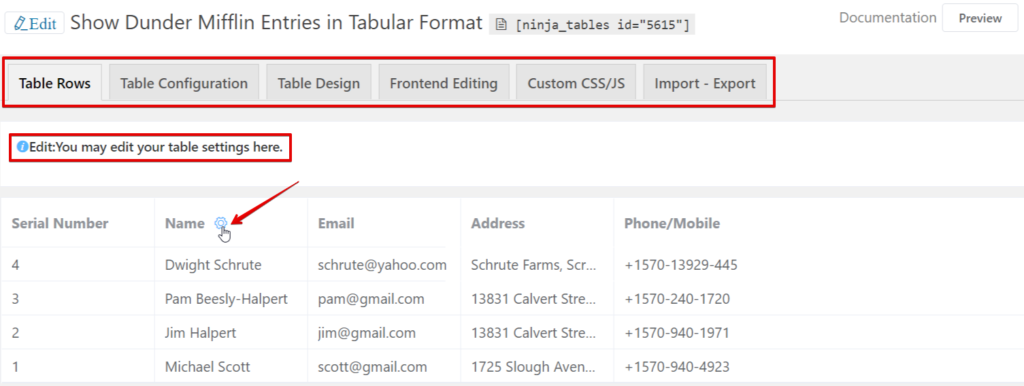
The rest is exactly the same for all Ninja Tables. As a result, you can edit the rows, design and configure, import-export, etc. Here, you will find a detailed go-through on how to customize and style Ninja Tables.
Step 5: Finish up
That’s it!
In step 4, you pretty much complete the process of inserting form entries on a data table. This step here is to show you how the final table will look like.
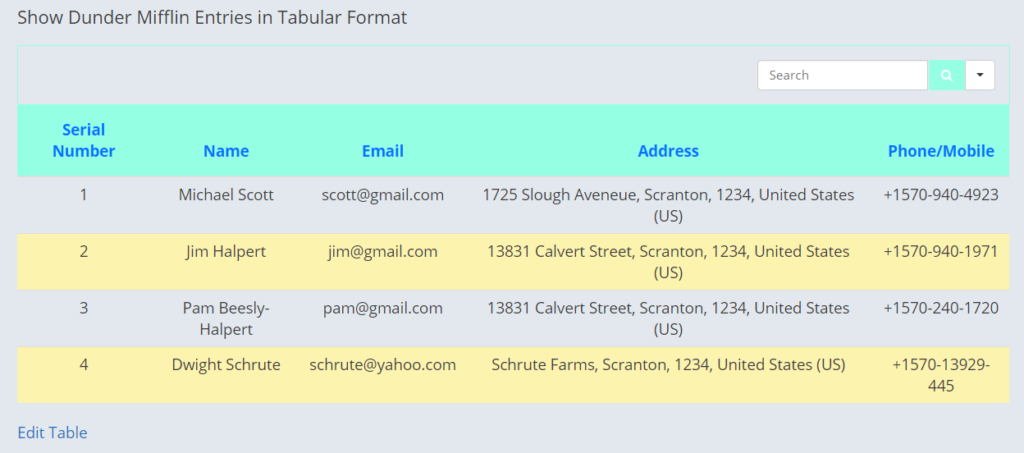
We have designed the table with Ninja Tables color customization feature. You can now copy the table’s shortcode and paste it anywhere on your WordPress Post/Pages.
Some extra bits
- The best thing about Ninja Tables and Fluent Forms integration is the auto-update. Whatever data you edit in the form, it will show up on the table.
- You can input unlimited entries and customize as much as you want.
- No coding knowledge needed.
- Check out the elaborate documentation on this integration.
Closing remarks
Fluent Forms and Ninja Tables are the most potent combinations for a WordPress aficionado or even a beginner! With the user-friendly features and smart UI, integrating these two plugins makes it possible to ensure a perfect data presentation.
We have discussed how to add form entries in WordPress tables using Ninja Tables and Fluent Forms. This concise article was hopefully enough for you. Give us a holler if you have trouble understanding anything.
You can skim through another article on How to Embed Google Sheets Into Your Online Data Tables.






Leave a Reply
You must be logged in to post a comment.