

How to Build Assessment Funnel to Generate Qualified B2B Leads
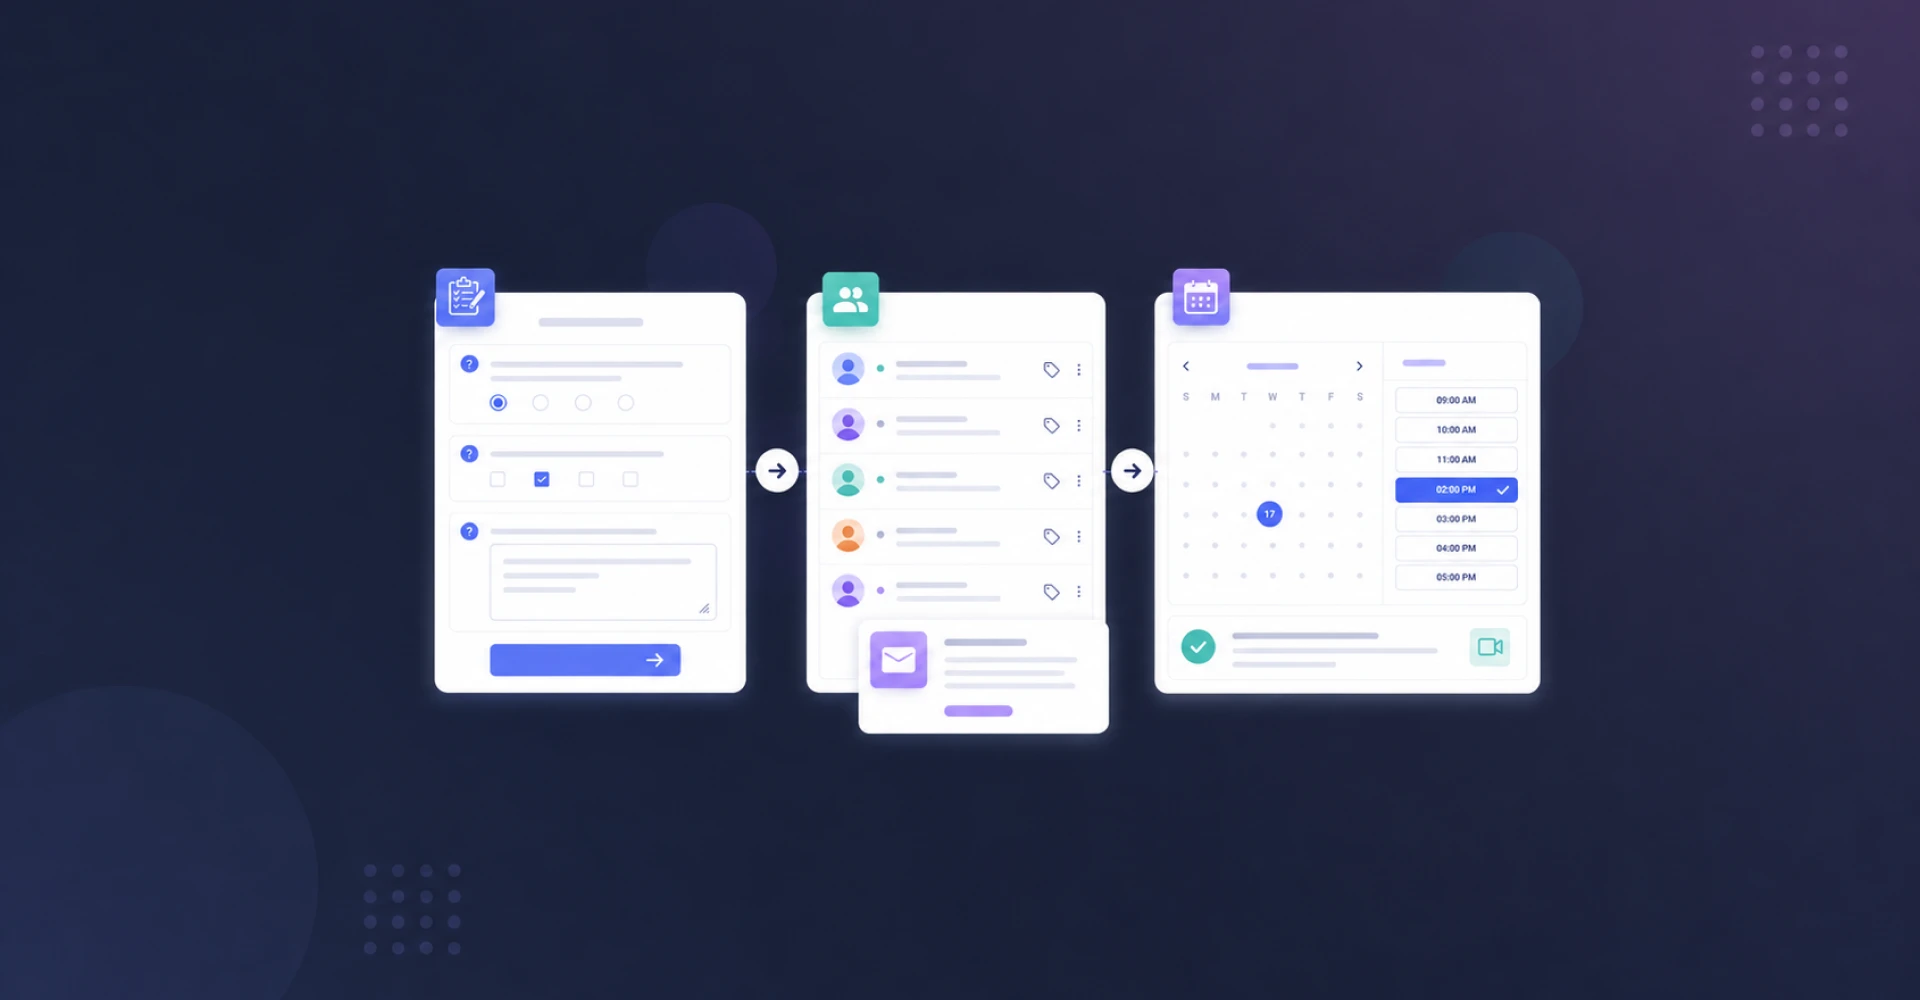
A prospect lands on your page, spends four minutes answering a free assessment about their biggest problem, and hits submit. Within seconds, they are a tagged contact in your CRM with a follow-up email in their inbox and a link to book a strategy call. You already know their budget, their urgency, and whether they are worth your time before you say a single word to them.
That’s an assessment funnel. It attracts prospects with genuine value, captures structured problem data, qualifies the lead, and opens the door to a paid audit or project. You can easily build a basic funnel on WordPress for free, then automate and scale it.
Key Takeaways
- An assessment funnel turns a free diagnostic into qualified leads and paid work: free assessment, then paid audit or strategy session, then implementation, then optional recurring service.
- Decide what paid service you’re selling and who you’re selling it to before you build the free assessment. The assessment exists to lead to that sale.
- You can build the whole system free: Fluent Forms Free for the diagnostic, FluentCRM Free for contact storing and follow-up, and FluentBooking Free for the strategy call.
- Free auto-sorts every lead into a relevant tag based on their answer, then you make the final call by hand.
- Numeric scoring, multi-step forms, and setting-level conditional logic (combining multiple answers to create a group) are Pro features. Use Pro to scale after the offer is proven.
- Test with 5 to 10 submissions across good-fit, poor-fit, and incomplete leads before you launch.
- Never automate offer discovery, lead review, or the sales conversation at the start.
What an Assessment Funnel Is and Why It Beats a Generic Lead Magnet
Most lead magnets are passive. Someone downloads your PDF, and you get an email address. But you have no idea if they are a serious buyer or a student writing a paper. You send the same follow-up to everyone and hope.
An assessment funnel works differently. It asks the prospect to answer a set of diagnostic questions about their situation. Those answers do two jobs at once. They reveal the prospect’s own problem to them, which builds trust. And they give you the exact data you need to decide whether this person is a good fit and how urgent their need is.
The funnel has four stages:
- Attract: A landing page offers a free assessment tied to a problem your prospect already worries about.
- Capture and qualify: The diagnostic form collects structured answers: current state, urgency, budget signals, and desired outcome.
- Store and follow up: Each submission becomes a tagged contact in your CRM, and a follow-up email points qualified prospects to a strategy call.
- Sell: On the call, the prospect’s own answers become your agenda. You already understand their problem, so the conversation starts halfway to the close.
Before You Build: Pick One Expensive Problem and One Narrow Customer
The most common mistake is building the assessment first. Do the opposite. Decide what you are selling and who you are selling it to before you write any question.
Define the paid offer first
Your free assessment exists to lead users to a paid offer. Pick one clear problem that is expensive for your customer to leave unsolved and one narrow customer profile who has that problem right now.
Here is the monetization ladder most assessment funnels follow:
- Free assessment: The diagnostic. Costs the prospect nothing but a few minutes and some honest answers.
- Paid audit or strategy session: A deeper review of their situation with specific recommendations. This is your first and easiest paid step.
- Implementation project: You fix the problem you diagnosed, or you build the plan you recommended.
- Recurring advisory or managed service: Optional. Ongoing support once you have proven the value.
A realistic revenue example
This is an illustration. Your numbers depend on your niche, your offer, and your traffic.
Say you run a small SEO agency. Your free assessment is a website SEO health check. You promote it and collect 40 submissions in a month. Then review them, and 12 look like a good fit. You invite those 12 to a paid strategy session priced at $250. Four of them book the session. On those calls, two turn into implementation projects at $4,000 each.
That month: $1,000 from strategy sessions and $8,000 from projects, from a free tool you built once. The core is the structure: the free assessment feeds paid work, and each stage filters for people who are ready to buy.
Different Assessment Funnel Examples by Niche
The model works in any field where you diagnose a costly problem. Here are some very different niches to show the range.
SEO agency: the website SEO audit
The free assessment asks about the prospect’s current traffic, target keywords, recent ranking changes, and what they have already tried. The paid offer is a full SEO audit and 90-day action plan, followed by a monthly retainer to execute it. The assessment answers tell you whether they have budget and whether their site is fixable.
Cybersecurity consultant: the security risk assessment
The free assessment checks the prospect’s current setup: employee count, whether they handle customer payment data, their backup practices, and any past incidents. You can build it from a simple risk assessment template so every prospect answers the same core questions. The paid offer is a formal risk assessment report and a remediation project. The answers reveal both exposure and urgency.
Financial advisor: the financial health check
The free assessment covers savings rate, debt, retirement timeline, and current investments. The paid offer is a personal financial plan followed by ongoing advisory. The answers qualify for both fit (assets under a threshold may not be a match) and readiness.
Notice the pattern. In every case, the free assessment helps the prospect (by teaching them about their problem), and it also tells you whether they’re worth pursuing.
The Funnel at a Glance
Before the build steps, here is the full workflow so you can see how the pieces connect. Steps marked manual are the ones you handle yourself in the free version.
Landing page: Present the promise and a clear call to action.
Assessment form: Conditional logic reveals relevant follow-up questions.
Thank-you or results page: Thank the prospect and explain the next action.
Contact created and tagged: Store the problem context and apply an Assessment Lead Hot, Warm, or Cold tag.
Follow-up email: Send a useful resource and the booking link.
Review the submission: Check the answers and decide whether the prospect is a good fit.
Qualified prospect books a call: The prospect selects a convenient meeting time.
Strategy call: Use the prospect’s assessment answers as the agenda.
Paid offer: Recommend an audit, strategic plan, or done-for-you project.
What You Need Before You Start
You need a WordPress site and three free plugins. If you have installed a plugin before, this will take five minutes. If you have not, here is the process.
Install the three plugins
- In your WordPress dashboard, go to Plugins > Add New.
- Search for Fluent Forms. Install and activate the plugin listed as Fluent Forms by WPManageNinja.
- Repeat the search for and install FluentCRM (email marketing and CRM) and FluentBooking (appointment scheduling).
- Search for and install FluentSMTP as well. It is free, and it makes sure your follow-up emails actually reach your users’ inbox instead of the spam folder.
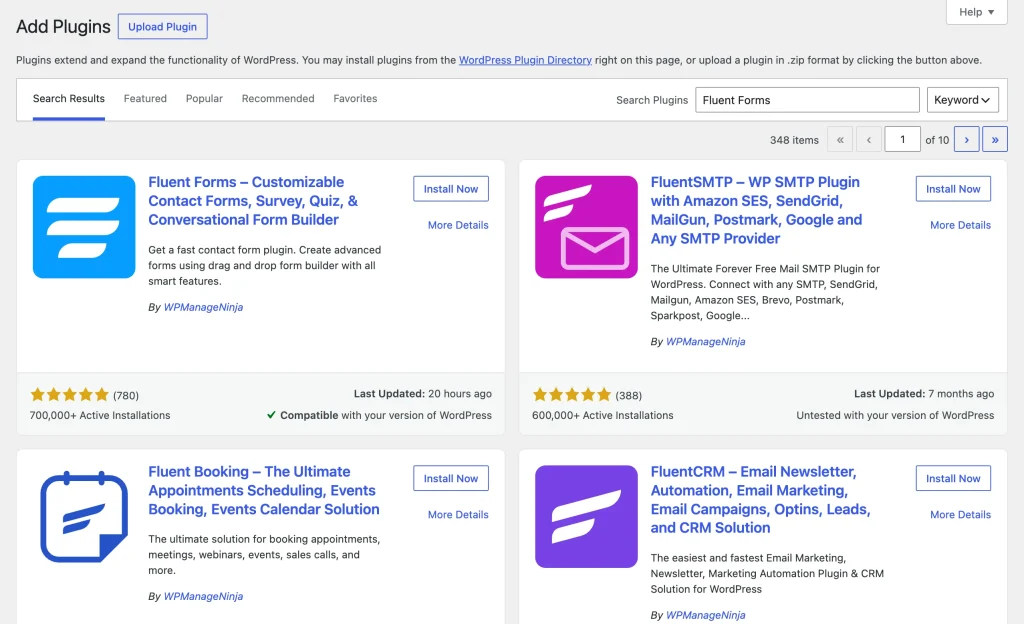
The plugins connect to each other natively when they live on the same WordPress site, so there is nothing extra to configure to link them.
Set up email deliverability first
Before you send any follow-up, configure FluentSMTP so your emails route through a proper email service. If you skip this, your welcome emails may miss your users’ inboxes.
Create your list and tags in FluentCRM
You need a list and a tag in FluentCRM before you connect the form because you will select them during the form-to-CRM automation setup. They won’t appear in the dropdown if you haven’t created them yet.
When you activate FluentCRM for the first time, a short setup wizard guides you through these steps. It’s the fastest way to get your list and tag ready:
- Step 1, Business details: enter your Business Name and details and click Next.
- Step 2, Contact Segment Lists: under Segment Name, type Assessment Leads. The slug fills in automatically (which you can edit). Click Next.
- Step 3, Contact Tags: under Tag Name, create three tags: Assessment Lead Hot, Assessment Lead Warm, Assessment Lead Cold.
- Step 4: Click Complete Installation.
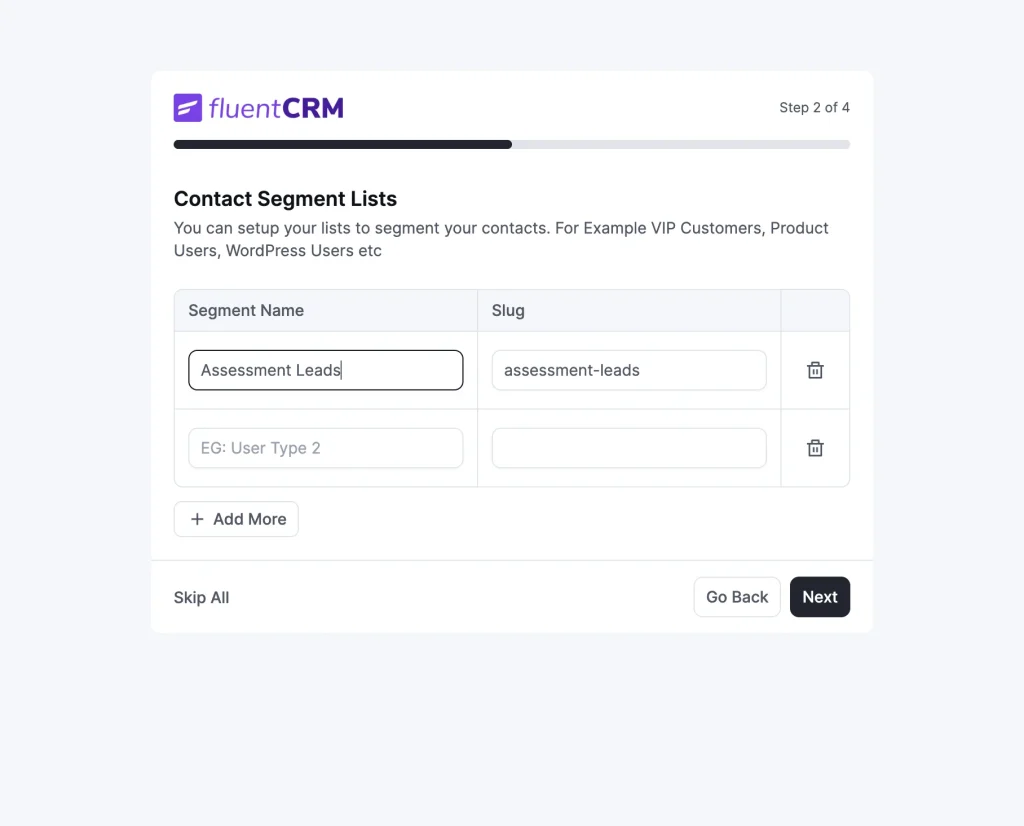
If you already finished the wizard or want to add more lists and tags later, you can do it anytime. Go to FluentCRM > Contacts > Lists and click + Create List, or FluentCRM > Contacts > Tags and click + Create Tag. Set the Title and save.
Step-by-Step: Build the Free Assessment Funnel
I’ll use the cybersecurity risk assessment example for this funnel so the field labels are concrete, but the structure works for any niche. Simply swap the questions for your own business.
Step 1: Design your diagnostic questions
Aim for 10 to 15 questions that reveal four things: current state, urgency, budget or fit, and desired outcome. Keep every question useful enough that answering it gives the prospect insight into their own business as well.
For the security risk assessment, the questions might be:
- If an employee’s laptop were stolen today, how many of your systems could they access? (Dropdown: Just their email / A few tools / Almost everything / I’m not sure)
- Do you store customer payment or personal data that you’d be legally required to report if breached? (Radio: Yes / No / Not sure)
- When did you last run a security review? (Dropdown: Within 6 months / 6-12 months / Over a year / Never)
- In the past year, have you had a phishing attempt, breach, or account takeover, even a minor one? (Radio: Yes / No / Not that I know of)
- If you were hit with ransomware tomorrow, how fast could you fully restore operations? (Dropdown: Within an hour / Within a day / Several days / I don’t know)
- What is the one security scenario that would hurt your business the most if it happened? (Textarea)
- How soon do you need this addressed? (Dropdown: This month / This quarter / Just researching for now)
- What is your rough budget range for closing these gaps? (Dropdown: ranges)
Step 2: Build the form in Fluent Forms (Free)
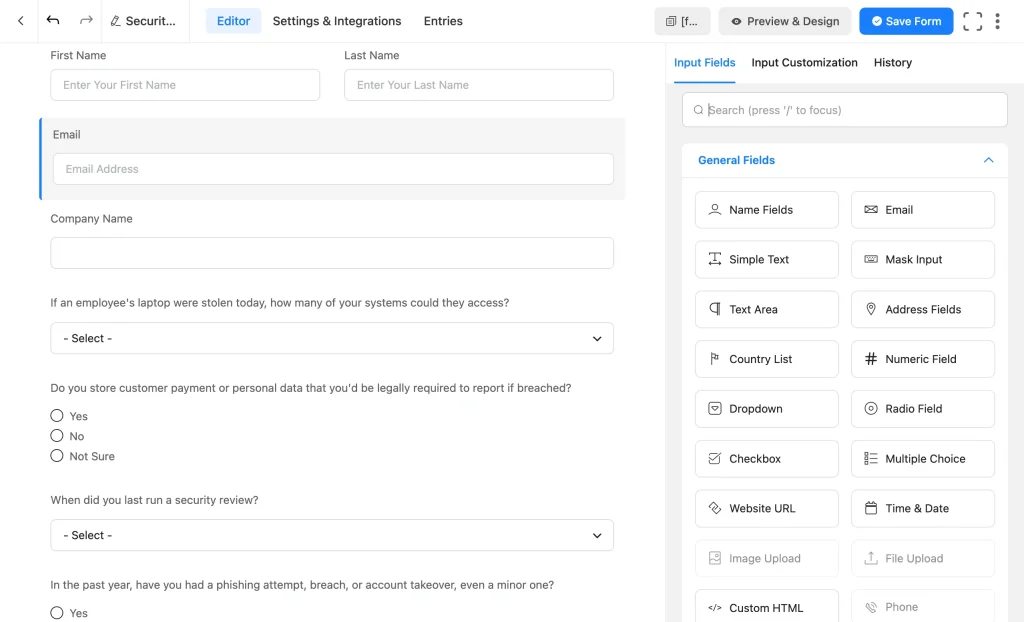
- Go to Fluent Forms > New Form and choose Create a Blank Form.
- Name it Security Risk Assessment.
- Add your fields from the input panel. Start with Name and Email (required). Add a Simple Text field for Company name so you know who you are dealing with.
- Add your diagnostic questions using the Dropdown, Radio, and Text Area fields. All of these are available in the free version. Mark the budget question as required since the routing depends on it.
- Save the form.
Use free conditional logic for follow-up questions
Field-level conditional logic is free in Fluent Forms, and it makes your assessment feel smart. Use it to reveal a follow-up question only when the user’s answer to a previous question makes it relevant.
- Click the field you want to show conditionally, for example, a textarea that says “Tell us what happened.”
- Open the Advanced tab in the field settings and turn on Conditional Logic.
- Set the rule: show this field when In the past year, have you had a phishing attempt, breach, or account takeover, even a minor one? equals Yes.
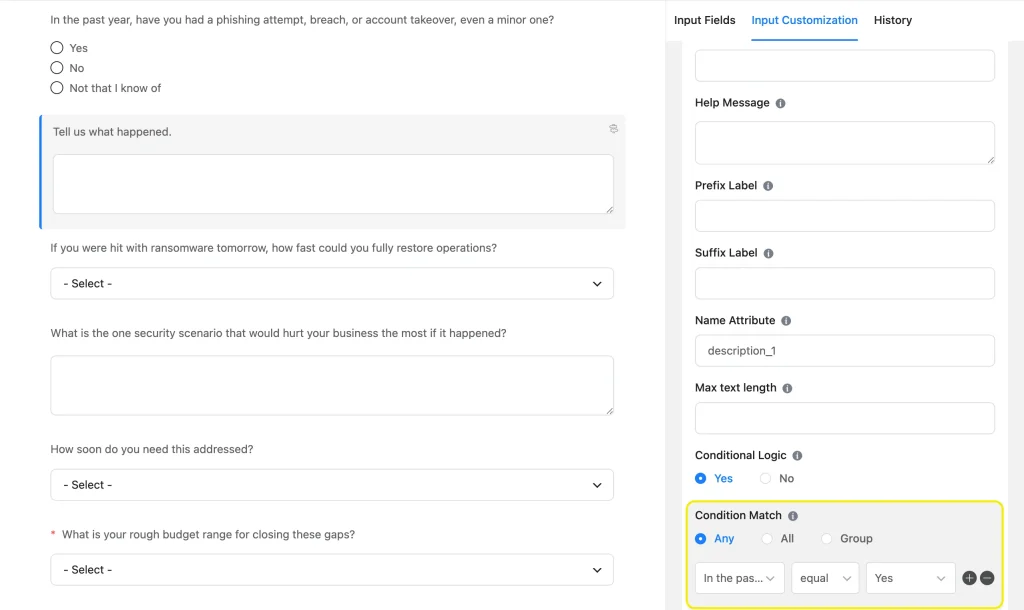
A note on the free version: Multi-Step Forms and numeric calculations are Pro features. In the free version, keep the assessment on a single page and skip auto-calculated scoring. You will review answers yourself, which is the right approach for your first handful of leads.
Step 3: Create the results and thank-you page
The prospect needs to know what happens next. Tell them you will review their answers personally and point them to the booking link.
- Create a new WordPress page called Assessment received.
- Write a short message: thank them, tell them you will review their responses within one business day, and invite them to book a strategy call now if they want to move faster. You will add the actual booking link in Step 7.
- In your form, go to Settings & Integrations > Settings > Confirmation Settings. Set the confirmation type to redirect To a Page and select your Assessment received page.
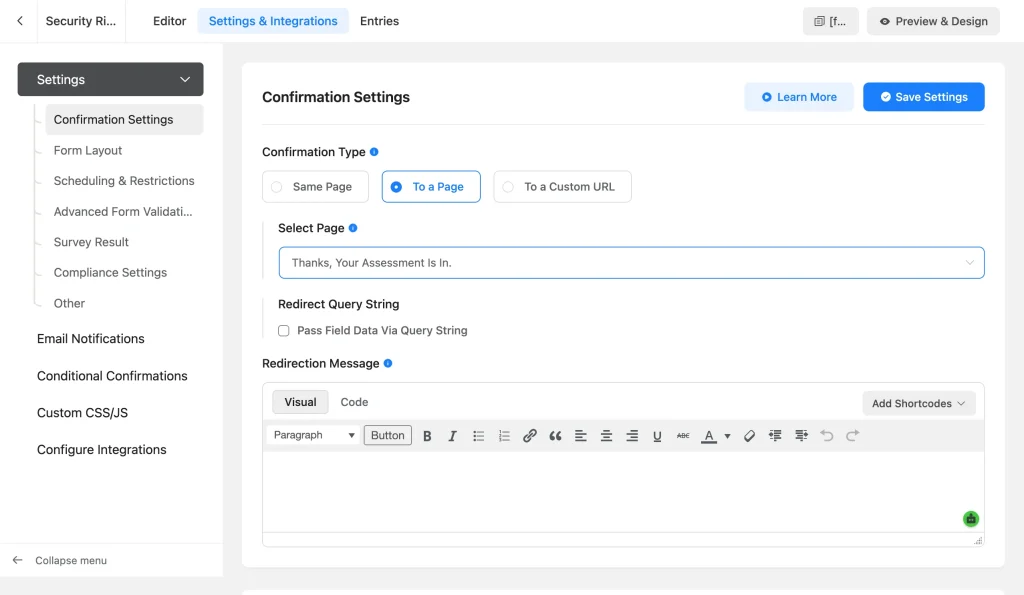
Step 4: Connect the form to FluentCRM
Now every submission becomes a contact in your CRM. This integration works in the free version of both plugins.
- Open your form and go to Settings & Integrations > Configure Integrations.
- Click Add New Integration and select FluentCRM Integration from the dropdown.
- Feed Name: Assessment to FluentCRM.
- List: Assessment Leads.
- Primary Fields: Map the Email Address to your Email field and First Name and Last Name to your Name fields.
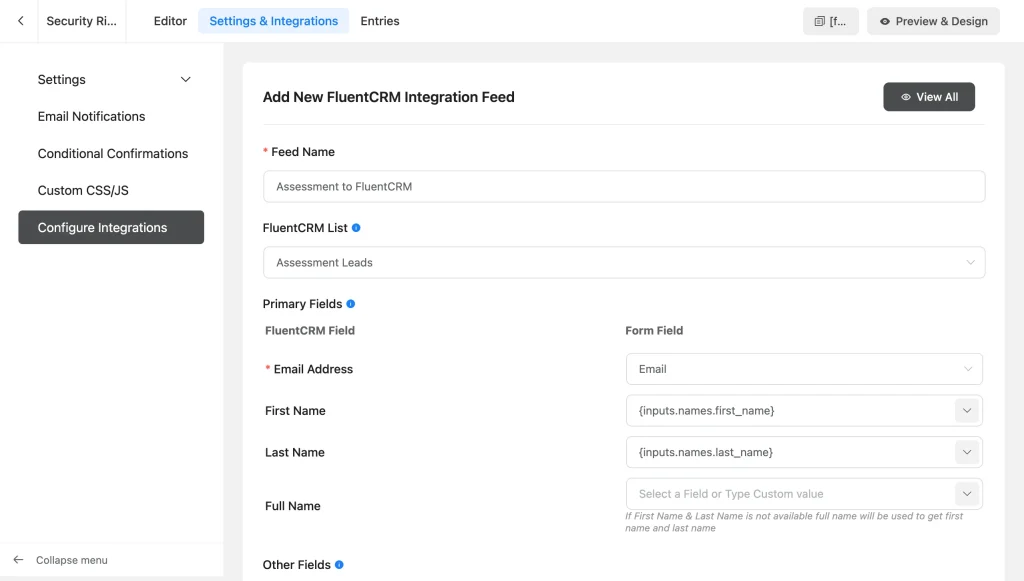
- Tags: Check Enable Dynamic Tag Selection and add the budget rules.
| Tag | Set It If Budget Equals |
|---|---|
| Assessment Lead Hot | $15,000+ · $5,000 – $15,000 |
| Assessment Lead Warm | $1,000 – $5,000 · Under $1,000 |
| Assessment Lead Cold | Not sure yet |
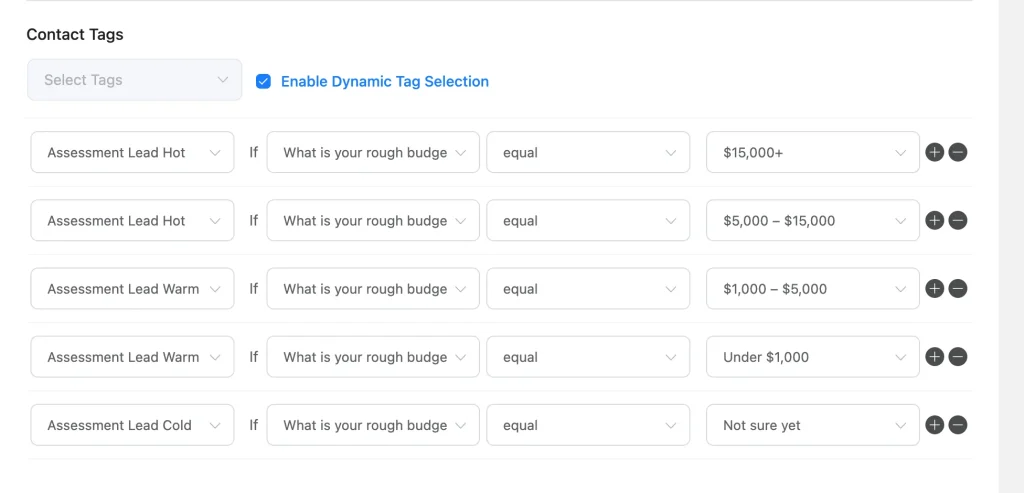
- Check Enable This Feed and click Save Feed.
The feed’s Dynamic Tag Selection option tags each lead by their answer, so they sort into Hot, Warm, or Cold on submission. For advanced sorting (such as combining multiple answers, like budget and timeline), you need conditional logic, which is a Pro feature.
Store the problem context in custom fields
To read a lead’s answers inside their contact profile without opening the original submission, map your diagnostic questions to custom fields.
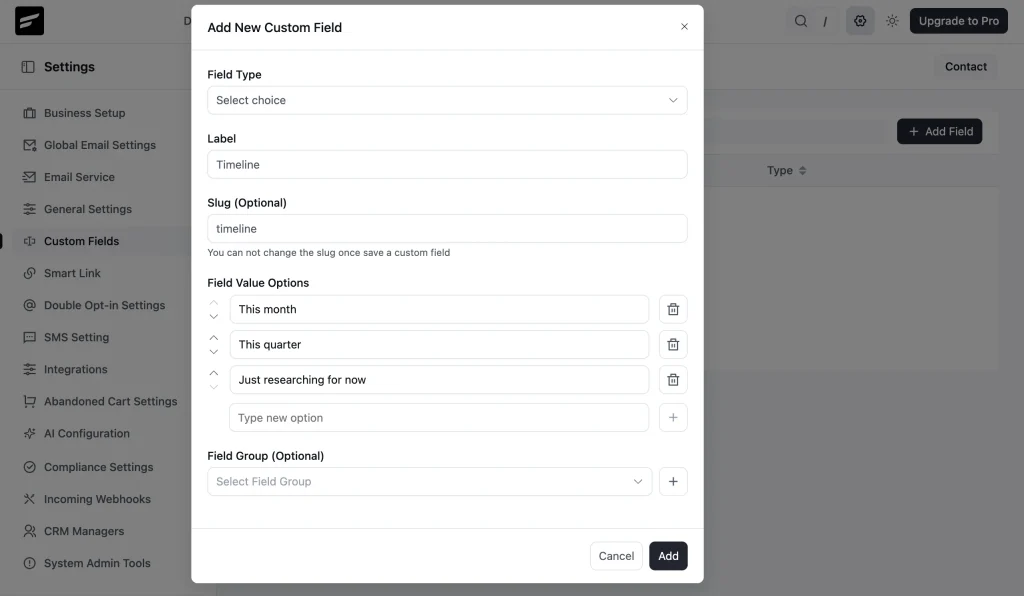
- Go to FluentCRM > Settings > Custom Fields and click Add Field.
- Create fields that match your questions, for example, Security concern (Text), Urgency (Radio), and Budget range (Radio).
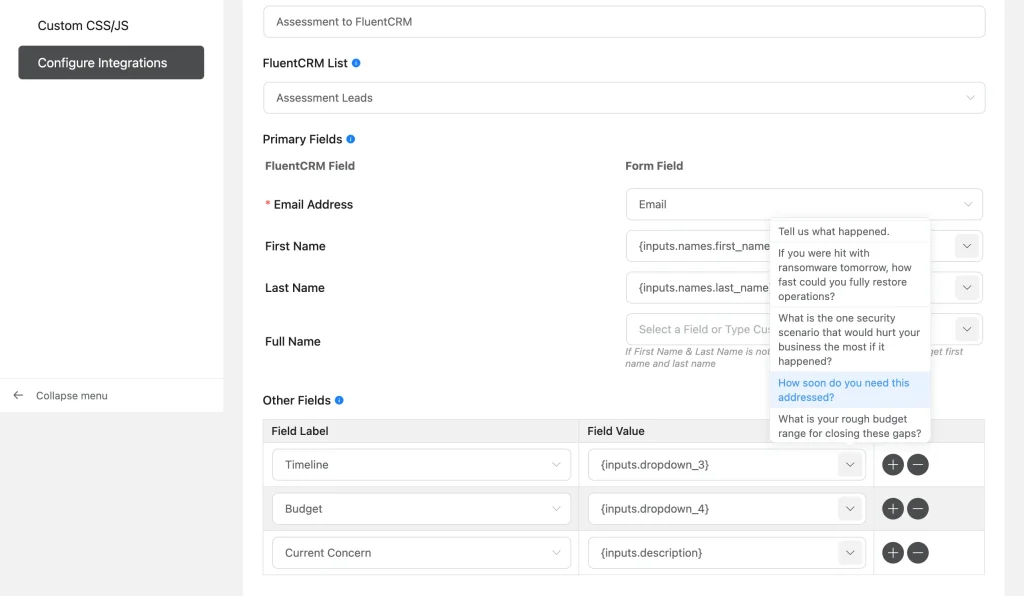
- Back in the form’s FluentCRM feed, open Other Fields, click the plus icon, and map each diagnostic question to its matching custom field.
- Save the feed.
Step 5: Build a simple follow-up automation
FluentCRM Free includes basic automation. You will send one useful email that delivers a next-step resource and the booking link.
- Go to FluentCRM > Automations > New Automation.
- Select the New Form Submission (Fluent Forms) trigger and click Continue.
- Name it Assessment Follow-up, select your Security Risk Assessment form, and save the trigger settings.
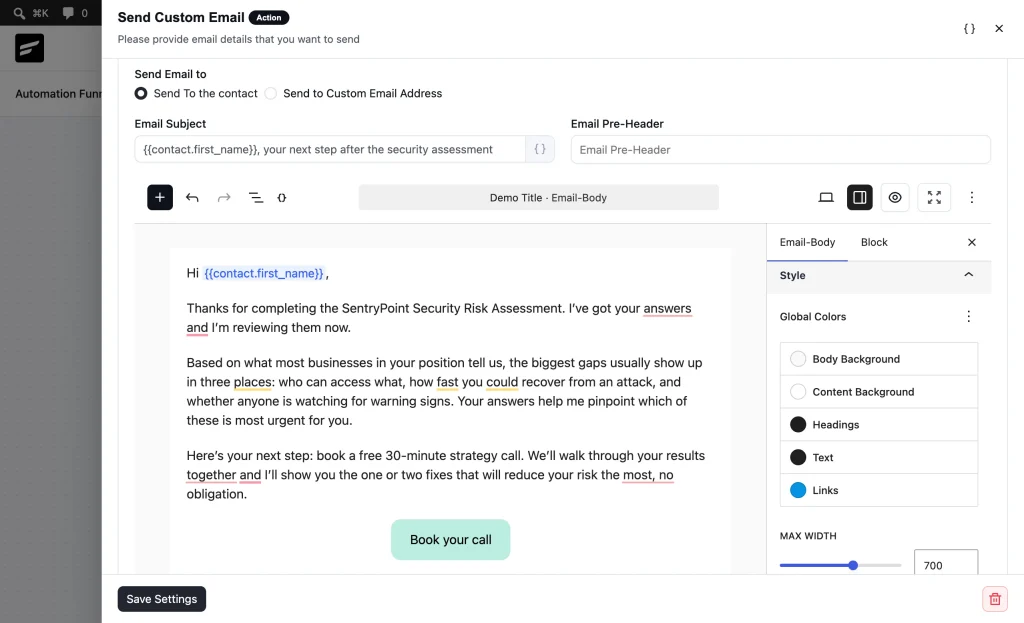
- Click the plus icon and add a Send Custom Email action. Thank them, share one helpful resource, and include your booking link (from Step 7). Personalize it with a SmartCode like {{contact.first_name}}.
- Set the automation status to Published.
Step 6: Create the FluentBooking strategy call event
FluentBooking Free covers everything you need for a strategy call: unlimited calendars, availability rules, and buffer times.
- Go to FluentBooking > Calendars and create a host calendar if you have not already.
- Click Create Event and choose One-on-One.
- Name it Strategy Call and set the duration, for example, 30 minutes.
- Set your Availability: the weekly hours you want to offer calls, plus buffer time between meetings (from Limits).
- Save the event.
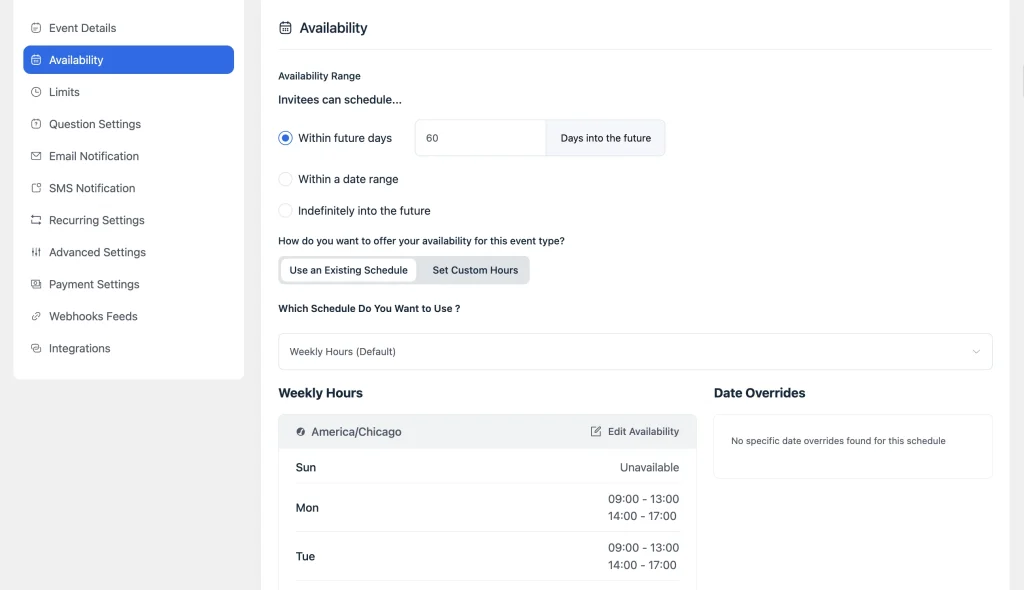
Connecting your Google, Outlook, or Apple calendar so bookings never clash is a FluentBooking Pro feature. In the free build, set your availability hours carefully instead.
Step 7: Place the booking CTA in relevant places
On your Strategy Call event card, click Share to open the booking options. You’ll place the booking two ways, one for each spot.
On the thank-you page, use the shortcode:
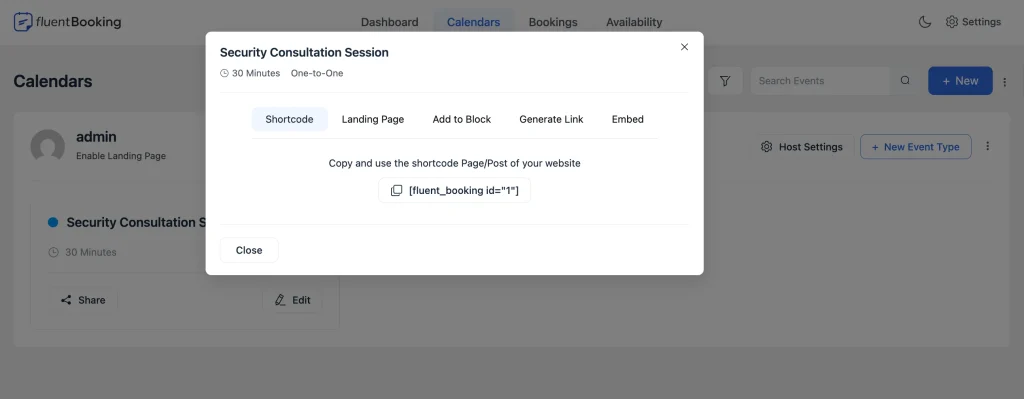
- In the Share modal, open the Shortcode tab and click the copy icon next to the code
it looks like [fluent_booking id="1"]- Edit your Assessment received page, paste the shortcode where you want the booking calendar to appear, and click Save. The booking calendar now appears on the thank-you page.
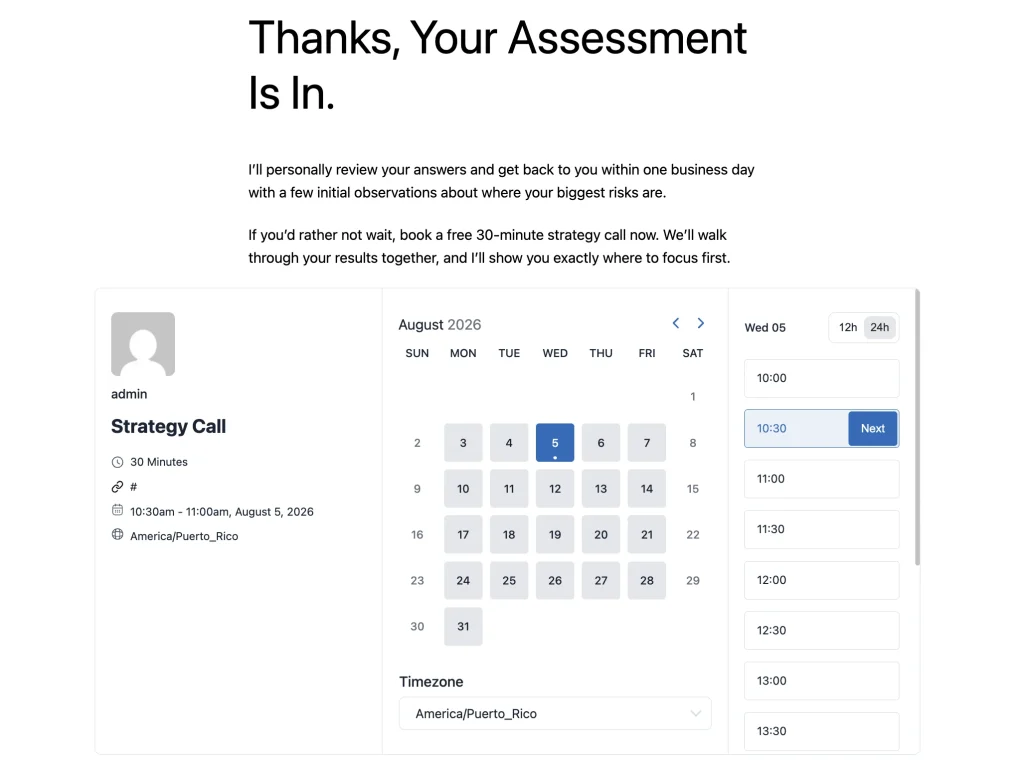
In the follow-up email, use the landing page link:
- Back in the Share modal, open the Landing Page tab and copy the URL.
- Paste that URL into your Assessment Follow-up email as the booking link, so prospects who read the email can book from a clean landing page.
Step 8: Turn the assessment answers into your sales agenda
Build your paid offer around what you diagnosed. A prospect who reported a past incident, no backups, and an urgent timeline gets a different conversation than one who is just researching.
On the call, walk through their own answers, name the risks you see, and present the audit or project as the fix. The assessment already did your discovery work.
Review and Qualify Leads Manually
You have to score leads manually in the free version. This is actually useful when you are getting started because it helps you understand patterns, notice the diversity in responses, and optimize your solutions more accurately.
How to review a submission
- Go to Fluent Forms > Entries and open your assessment form to see every submission with its answers.
- Open the matching contact in FluentCRM > Contacts to see the same answers stored in your custom fields.
- Decide fit based on urgency and budget. If they are a good match, watch for their booking or reach out personally.
What you should never automate at the start
Three parts of this business stay human, especially early on:
- Offer discovery: Deciding what to sell and to whom requires careful judgment. Evaluate this from real conversations.
- Lead review: Reading the first few dozen submissions yourself teaches you which answers usually lead to good clients. That learning is what you eventually encode into automated scoring.
- The sales conversation: You gain user trust from the call. That’s when the deal happens. Take notes on which solutions best suit each type of lead.
If you automate these too early, you risk scaling a funnel that does not convert. First understand what your prospects need before automating your systems.
Test the Full Workflow Before You Launch
Run 5 to 10 test submissions that represent the range of real leads before making the workflow public.
- Good-fit lead: submit with high urgency and a good budget. Confirm the contact appears in FluentCRM with the Assessment Lead Hot tag (since you submitted $15,000+), the right list, and your custom fields populated. Check that the follow-up email arrives.
- Poor-fit lead: submit with “just researching” and no budget. Confirm the data still lands correctly so you can filter it out during review.
- Incomplete lead: fill only the required fields. Confirm nothing breaks, and the contact still gets listed.
- Booking handoff: click through from the thank-you page and the email to FluentBooking, and book a test call. Confirm it appears in your FluentBooking dashboard.
If a contact appears but no email arrives, check your FluentSMTP setup.
Launch and Get Your First Prospects
A funnel with no traffic produces no leads. Launch the assessment as a free tool and drive people to it from several directions:
- SEO asset: Publish the assessment on its own page optimized around your keyword, so it earns organic traffic over time.
- Direct outreach: Send the assessment link to prospects who fit your profile, framed as a free, essential check rather than a sales pitch.
- Partner content: Offer the assessment to complementary businesses whose audience overlaps with yours.
- Communities: Share it where your customers already discuss, when the norms allow it.
- Existing clients: Ask past and current clients to pass it to peers who have the same problem.
Scale With Fluent Forms Pro Once the Offer Is Proven
After your free funnel has produced promising leads and a few sales, you know the offer works. That’s the moment to upgrade. Pro removes most of the manual work, so the system runs at scale.
What Pro adds to this workflow:
- Survey/Quiz module and Numeric Calculation: Assign points to answers and generate a mathematical score so leads sort themselves.
- Conditional Confirmations: Send high-score and low-score prospects to different result pages automatically.
- Multi-Step Forms: Break a longer diagnostic into steps to increase completion rates.
- Conditional logic on feeds: Apply different tags and lists based on leads’ answers, so sorting happens automatically.
- Conditional Email Routing: Send different leads to different team members automatically.
- Admin Approval: Hold each submission in a queue for you to approve or decline before it’s processed.
- Address Autocomplete and geolocation: Useful when a lead’s location determines whether they qualify.
- Advanced reporting: Analyze responses to sharpen your questions and optimize your offer.
Ready to automate the scoring and routing?
Fluent Forms Pro adds the Survey/Quiz module, numeric scoring, multi-step forms, conditional confirmations, and conditional logic on every integration feed. Explore all features.
Turn Assessments Into a Repeatable Business
You built a free system that collects each prospect’s problem details up front, so you get to begin every conversation already knowing their situation. Prospects complete your assessment, land in FluentCRM tagged and ready, get a useful follow-up, and book a call through FluentBooking, all from a setup you can run for free.
Track four numbers to make it repeatable: how many people submit the assessment, how many are a good fit, how many book a call, and how many buy. When those numbers are steady, you have a system you can pour traffic into and upgrade to Pro to run on autopilot.
Download Fluent Forms for Free and start with the diagnostic. You can have the full funnel live within a couple hours.

Sarika creates helpful content for Fluent Forms & FluentPlayer. Endlessly curious, she loves connecting over diverse interests & unique perspectives. Off the clock, she’s exploring art or relaxing with a binge-worthy show.
-
10 Best jQuery Table Plugins for Best Data Visualization in 2026
Discover the 10 best jQuery table plugins for 2026. Compare -

Black Friday Marketing Strategies for 2026: Core and Advance Move
Black Friday is the most celebrated shopping season worldwide. Discover -

How Much Can You Earn With Amazon Affiliate Marketing? Rates & Niches
How much can you earn with Amazon affiliate marketing? Dive



Leave a Reply
You must be logged in to post a comment.