Ninja Tables Free vs Pro: Which One to Go For
Share :

We will never spam you. We will only send you product updates and tips.
You can’t deny that every website needs an interactive table to show data precisely. If you own a website and want to present data in a tabular format, then you can try out a quality WordPress table plugin for serving your purposes. To make that happen, Ninja Tables is the smartest choice for you. It’s the best table plugin to create beautiful and advanced tables on your website!
Presenting data in a tabular form is a way of providing visual relief. A user shouldn’t have to focus on a bunch of sentences one after another in a narrative style. To avoid giving your users such an experience, you can always resort to the finest table plugin, Ninja Tables.
Why choose Ninja Tables?

If you want to create and insert a table in your website, hands-down, Ninja Tables should take the lead! You can add numerous data, images, videos, and links in unlimited rows and columns. Because of catchy visual information with several blocks/cells, users can stay focused. As a result, they stay on your page longer.
However, Ninja Tables comes up with two versions; one is free, and another is paid. Free version provides you with more than basic options, whereas the pro version allows you to use extended advanced options.
Ninja Tables Versions – Free vs Paid
Since Ninja Tables is a freemium plugin, it has a free and a paid version. To access the plugin from your dashboard, go to Dashboard>>Plugins>>search for Ninja Tables by WPManageNinja. Once you’ve activated the free version, you can upgrade to the paid (Pro) version while using it.
You can use the free version for everything fundamental you need. But obviously, you can extend the functionalities by switching to the pro version. Regardless of its array of fantastic elements in the pro version, the free version is of high-quality in the market for meeting your basic needs.
So, which one do you think can help you better?
To make things more understandable, we are going to cover the following topics in terms of both versions-
Have a look at our detailed analogy on Ninja Tables free and paid (Pro) models here so that you can decide which version of this plugin is the must-have for you.
Features of Ninja Tables
As you know that it’s a freemium plugin, the pro version will offer you more exciting features to make your table creation more dynamic. But it totally depends on what you need. Even the free version of this first-rate table plugin offers some exquisite functionalities that many other plugins don’t!
Now, let’s start with the free version.
Lite/free features

Creating a table with the free version is no hassle for anyone. Therefore, you can easily make data tables with as many columns as you want.
Here is a list of free features you can enjoy.
- Create a responsive table that adjusts on any device screen.
- Import/export tables. Either specific data or the entire table style
- Connect Fluent Forms and Ninja Charts.
- Add as many columns as you want. There’s no limit to columns/rows and putting data.
- Work with a huge data set. All massive stacks of data set are possible to work with.
- Edit basic column settings like name or data type.
- Set data type from single-line text, text area, date field, numerics, links, date, and button.
- Select responsive breakpoints. Choose whether you want your table to show on all devices, hidden on desktop, mobile, or tab.
- Ajax table for table rendering. Ajax table will load if you have a lot of data.
- Choose library styling (Semantic UI, Bootstrap 3, or 4).
- Enable sorting and filtering for visitors.
- Fixed layout, hover rows, and single-line cell.
- Bordered table and striped rows.
- Creating compact tables.
- Toggle position and extra CSS class.
Pro features

Including the lite features, the Pro version has no limit to usability! Scroll down and see the extensive list of features.
- Media attachment (image and video). This feature makes your table attractive and comfortable for users.
- WooCommerce integration. It’s the most iconic integration for Ninja Tables. An online store owner can bring significant changes to his webstore by showcasing all his merchandise in a table format.
- Publish the Google Sheets files, connect to Ninja Tables, and the changes in both will appear at the same time because of “Auto republish”.
- Integrations with WP Posts and Fluent Forms are two more user-friendly aspects. You can also fill-up a form directly from the table.
- A brand new feature includes creating charts on Ninja Charts with table data.
- Unlimited color option! There’s no limit to the custom color options. So, your tables can take any color you pick.
- Drag and drop feature lets you arrange and order your table easily. You don’t need any coding for that.
- Unlock several more options for the three dynamic table styles (Semantic UI, Bootstrap 3, Bootstrap 4).
- Custom CSS, Javascript, Custom SQL query.
- Row hover animation to highlight.
- Import table or table data in seconds!
- The conditional column formatting feature lets you format any column according to the cell value.
- The custom filter specifies a user’s searching process. Users can search within a particular option and filter.
- Cell merging or colspan features can join small cells and make a large one.
- Endless rows/columns and data!
- Customized permission is for users to limit the audience. Add “user role” who can edit/delete/add data.
- The Table Configuration option is easy to follow.
- Advanced date filtering and sorting.
- Legacy table and Ajax table.
- Connect external CSV.
- Toggle position.
- Upgrades in the future will include some extra features too.
Feature comparison (Free Vs Pro)
Here is a table comparing the key features of Ninja Tables (Free and Pro).
| Features | Free | Pro |
|---|---|---|
| Media attachment | ||
| Google Sheets & WooCommerce integration | ||
| Fluent Forms integration | ||
| Ninja Charts | ||
| Unlimited Color customization | ||
| Import-export | ||
| Sort and filter | ||
| Conditional formatting | ||
| Advanced table styling | ||
| Unlimited data | ||
| Transform value | ||
| WP posts, custom SQL query, & external CSV | ||
| Custom filter | ||
| Cell merge | ||
| Select Field, Image/File/Lightbox, & Button/Link data type | ||
| Advanced settings |
The Pro version goes wild with premium features! You will get maximum interactivity and a lively output. Also, customize the color scheme, add media, drag & drop, filter or, sort. Isn’t that exciting?
Table types
Once you click the “Add” button to create a data table, you will get a list of table options on the sidebar.
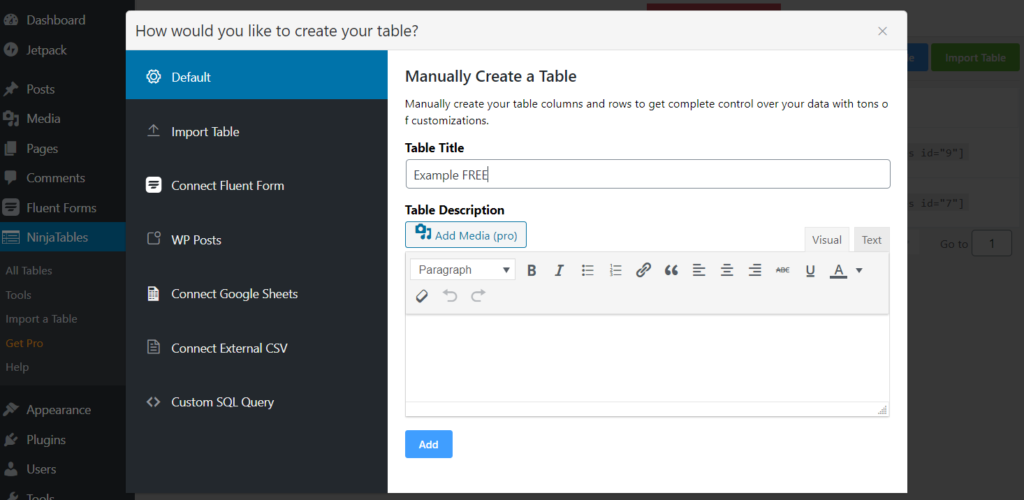
- Default table
- Drag and Drop Table
- Import table
- Connect Fluent Forms
- WP Posts (Pro)
- WooCommerce table (Pro)
- Connect Google Sheets (Pro)
- Connect external CSV (Pro)
- Custom SQL query (Pro)
1. Default table
A default table is plain and simple, with all the data you add. It can show as many columns you want and take further customization too.

- Table rows: This is where you add a new column.
- Table configuration: Free version is limited to only “Basic Settings” for the Column Settings, AJAX Table Rendering Settings, and Language. Another thing is the last three data types- Select Field, Image/File/Lightbox, and Button/Link are locked in the free version.
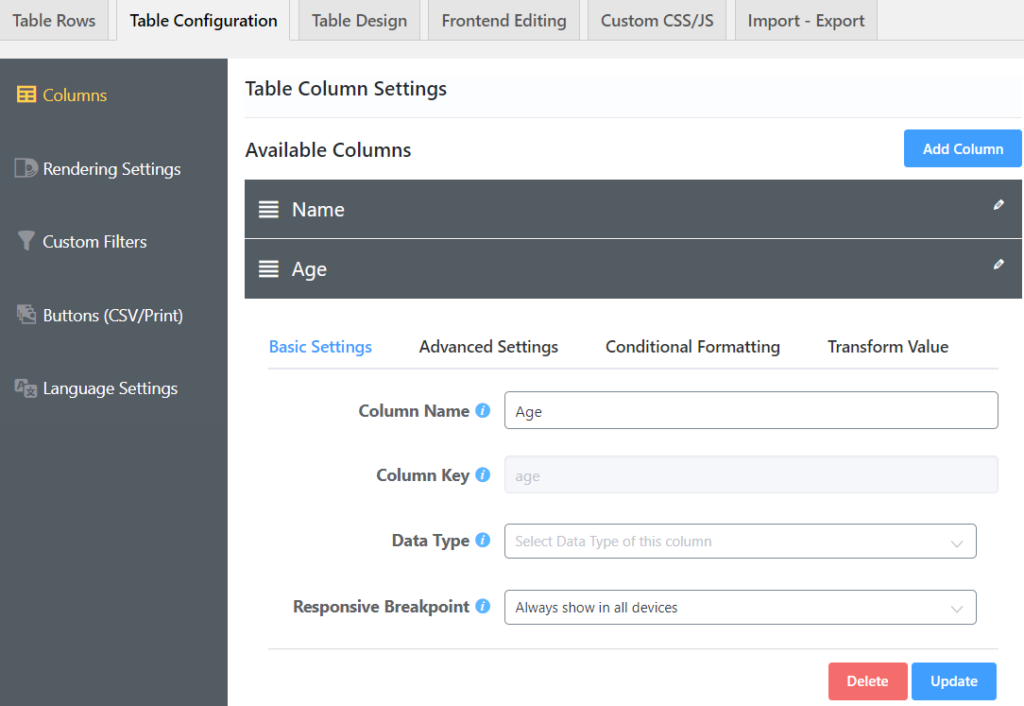
Meanwhile, the Custom Filters and Buttons (CSV/Print) are only available in Ninja Tables Pro. Also, the Table column settings panel has Advanced Settings, Conditional Formatting, and Transform Value for Pro users.
-Basic settings: Choose what changes you want to make regarding column name, data type, and responsive breakpoints.
-Advanced Settings: Extra CSS classes, width, alignment, filter and sort, and color customization.
-Conditional Formatting: Set cell value to use this attribute and customize the mien of your table.
-Transform Value: Use a simple HTML coding (<a href=………….) to transform value.
- Table design: The library stylings are mostly free, and so are some others. But for color customization and Stackable Table Configuration, you have to get Pro.
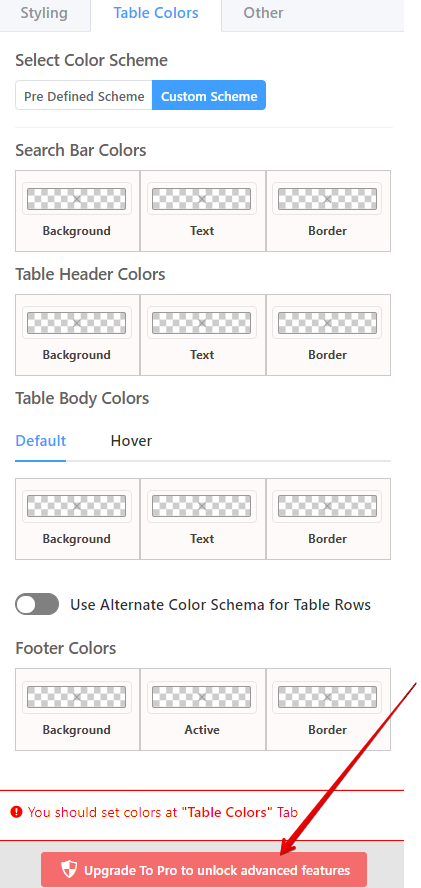
- Frontend Editing: Only for Pro users. Add/edit/delete data based on user role.
- Custom CSS/JS: Pro users can customize the table with CSS/JS.
- Import/Export: CSV or JSON file import or export.
2. Drag and Drop Table
You can create a table by dragging and dropping cell elements fast.
This module also allows CSV/JSON import functions and pre-made table templates.
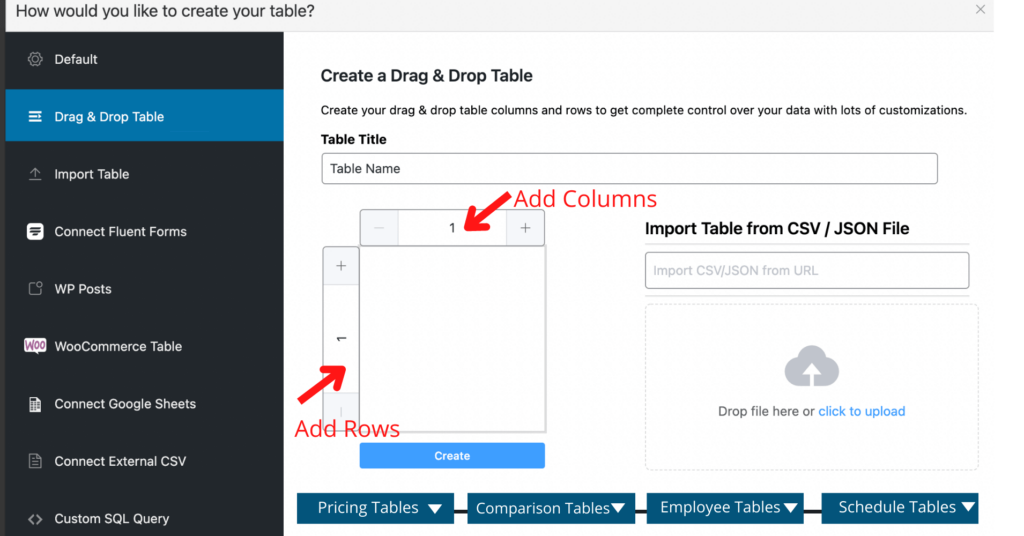
Check out a beginner’s guide to Drag and Drop.
3. Import table
You can import a file by choosing a file from your device. Select the Import Format>>Import.
Moreover, you can automatically import tables from TablePress, Ultimate Tables, and Data Tables Generator by Supsystic too.
4. Connect Fluent Forms
Firstly, install the Fluent Forms plugin and connect your table to it. You can make it responsive and customizable in the free version too. If someone is filling up a form in Fluent Forms, the integration with Ninja Tables shows the data in tabular structure!
Ninja Tables Pro’s integration with Fluent Forms has made form-entry more dynamic. For instance, the Pro Transform Value feature can fill-up a form directly from the table.
5. WP Posts (Pro)
If you want your posts in a tabular form, here’s the way. Fold-up your WordPress post, page, WooCommerce product in a table. Pick a title, select the types, and shift them to the Selected Types box.
6. WooCommerce product table (Pro)
If you are creating a WooCommerce product table, Ninja Tables Pro will once again prove to be the best table plugin for you! The primary process is the same, but before clicking on “WooCommerce Table”, make sure you have a product set ready.
Once you start creating a WooCommerce Table, the pop-up window will tell you to add table title, category, tags, type, and order.
Sort the products you want in your table and “Create Product Table”. Ninja Tables WooCommerce integration comes with built-in “Add to Cart”, “View Cart”, and “Checkout” buttons.
Here is how a WooCommerce product table by Ninja Tables Pro looks. Further configuration and editing are the same typical procedures. Surely you weren’t expecting any less from the leading plugin in the market!
7. Connect Google Sheets (Pro)
Want your Google Spreadsheet data to appear in your tables? Ninja Tables Pro is going to make that happen. You can embed Google Sheets into Ninja Tables with only a few clicks!
Publish your Google Sheets file to the web beforehand. You must tick-mark “Automatically Republish” if you want Google Sheets and Ninja Tables to show the changes in data at the same time.
8. Connect external CSV (Pro)
It’s a two-step process. If your remote CSV data changes, this integration saves the changes automatically.
9. Custom SQL query (Pro)
Any change in the SQL database or the table plugin will also show in the frontend table by Ninja Tables custom SQL.
Demo
We saw all the limitations of Ninja Tables Free so far. Here’s a sample table without some of the Pro features.
Free
There’s not much to dive into here, and you won’t get maximum interactivity and lively output.
On the contrary, Ninja Tables Pro has a bucketload of options for editing, customizing, integrating, and configuring.
Pro
Let’s take a look at a WooCommerce table by Ninja Tables.
It has images and button links, unlike the one in the free version.
Likewise, from the “Table Design” panel, you can proceed to throw in some eye-catching colors.
If you were looking for a designed data table, then here’s another. It’s a sample, but remember, you can always edit using Pro features.
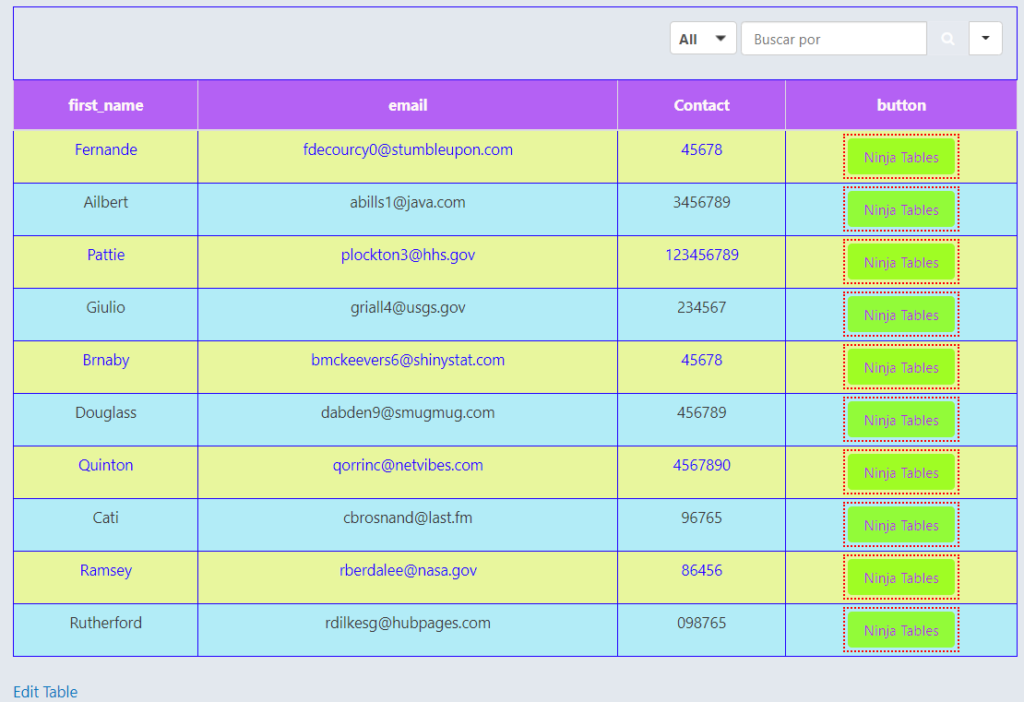
Features like “Conditional Formatting” and “Transform Value” can turn your basic table into something very useful!
Price plan (Free vs Paid): Compare and Contrast
We have gone through all the limitations and offers in the Ninja Tables plugin for both free and paid versions. Now we should get into price details and an overview of the features.
With all the truckload of features, you’d think Ninja Tables is very expensive. But it isn’t!
| Price plan | Single site | Agency | Unlimited sites |
|---|---|---|---|
| Annual | $49 | $99 (Upto 20 websites) | $199 |
| Lifetime | $249 | $399 (20 sites) | $599 |
Furthermore, Pro users get to enjoy VIP support and all future updates for free as long as they have a valid license of the plugin.
The free version of this plugin is open to all. You’re just a few clicks away.
Recapping features (Free vs Paid)

If we rewind to the massive stack of features, we will see some noticeable differences between the two versions.
For example, the free version doesn’t offer integration with WooCommerce, WP Posts, Google Sheets, External CSV. Similarly, the configuring and editing options are limited too.
But the Pro version goes wild with premium features! You will get maximum interactivity and a lively output. You also get to customize the color scheme, add media, drag&drop, filter or, sort. Isn’t that exciting?
Firstly, we suggest you try the free plugin and see if it’s suitable for your website.
Here is our suggestion
We have discussed the free vs paid version thoroughly. You can surely be satisfied with a laidback and no-decoration table, in which case, the free version of Ninja Tables will work just fine for you. But if you want a unique user experience, our honest suggestion for you would be to go for the Ninja Tables Pro to make your website more interactive.
Finally, let’s all agree that Ninja Tables Pro is the best table plugin in the market for creating captivating data tables. Hopefully, now you know precisely what the free vs paid models offer, and can decide which one is for you.
Also, check out productive ways to use a quality table plugin.





Leave a Reply
You must be logged in to post a comment.