
We will never spam you. We will only send you product updates and tips.
Many online transactions take place every day. While some people are selling products online, some sell services. The online receipt has become an excellent way of increasing a website’s credibility for transactions to work.
Whenever you sell, you need to provide your customer with a receipt. Surprisingly, we find many sellers display a thank-you message instead of giving a payment receipt. It is unfair to the customers because receipts serve various purposes, including verifying the transaction.
Below are the reasons why businesses should provide users with a payment receipt:
Purpose of Receipt
The primary objective of payment receipts is to provide documents and keep records of transactions. However, payment receipts also serve the following purposes:
Record of purchase and lead collection tool
Payment receipts enable businesses to have a detailed record of the purchase, including the customer’s name and contact details. The payment receipt can work as a lead collection tool that businesses can use for later marketing purposes.
Documentation of the purchase
The payment receipt allows customers to have documentation of their purchase and serves as a record of the transaction and allows your customers to get back to you if there’s an issue with the product they bought, increasing your business’s credibility. By keeping a copy of the purchase receipt, you can also verify whether you sold your product for a discounted price.
Provides data about stock
Receipts can help you figure out your stock, revenue, and sales. Since these data are incredibly essential, they will allow you to make data-oriented decisions in the future.
Helps calculate taxes
Keeping receipts will also help you calculate taxes. Receipts serve as a crucial document for calculating government taxes.
Aside from the above ones, receipts serve various purposes for both the business and the customers. Hence, it’s wise to use a payment receipt.
Benefits of using online receipts
You may have noticed that online sellers or service providers also use payment receipt templates or software. Just like the regular payment receipts, online receipts can serve various business purposes. The online receipt is getting even more popular because of its remarkable benefits. Other than serving general purposes, digital receipts can provide the following benefits:
Erase the need for thermal receipts
Retail businesses spend millions on thermal receipt papers. Using an online receipt, you can erase the need for thermal receipts and convert them to a completely digital way of providing the necessary transactional document to your customers. Thus, online receipts are environment-friendly.
Marketing component
Many forget that an eReceipt can also become an excellent marketing component. While you’re providing the receipt, you can promote your business by including your business’s social links, website address, etc. This is indeed a great way of making your customers return to you recurrently.
Available on the cloud
Online receipts remain on the cloud, and they reduce the need for papers. For you, they are a 24/7 accessible record, and for the customers, eReceipts are the lightest version of a receipt! As a result, you won’t have to keep storage for saving receipts, and your customers will enjoy a hassle-free receipt because it won’t fill up their wallets either.
Increase credibility
Online businesses often face a common issue -proving the credibility of the company. With a simple online receipt, your business will enjoy more credibility among customers, and they will not hesitate to buy products from your website.
Automated
Online receipts are mostly automated. Since there’s no paper involved, they also don’t need to be prepared. As the shopper selects their desired products, an online receipt will be created automatically, saving you a lot of time and effort!
Secured
Again, online receipts are entirely secured and don’t allow alterations once it’s issued, which means that your business is safe from fraudulent product returns or refunds.
Although there are some small disadvantages, such as general technical skills and tackling cybersecurity breaches, they are meager compared to the advantages it provides.
Creating automatic online receipt on WordPress
Sometimes, templates need to be slightly tweaked before you can send them via email. And the software adds more expenses to your business.
Although there’s no harm in using software or templates, it wouldn’t be wise to waste time or use additional stuff when it’s possible to automate that process with a simple WordPress payment processing plugin.
The idea is incredibly tempting, isn’t it?
Well, Paymattic brought this idea into reality. It is much more than just a payment processing plugin. And in this article, I’ll show you how you can create and automate your online payment receipts using Paymattic!
What is Paymattic
Generally, most website owners use a payment plugin for processing payments on WordPress. But the problem is that you won’t find many secure plugins with a payment processing system.
The Paymattic is a WordPress payment and donation plugin, which primarily enables website owners to take payments via Stripe for free. It utilizes a payment form for taking details of the payers and processing payments via Stripe.
The plugin is easy to integrate and allows users to enable various payment options such as single or multiple payments, donations, and supports multiple currencies. With the pro version, you can take payments via PayPal, Mollie, Razorpay, Paystack, Payrexx, Square and SSLCOMMERZ to enable subscription payments, and many more!
Paymattic
Stripe & PayPal Payments Made Simpler With Subscriptions Payments & Other Powerful Features
The plugin also calculates taxes and performs various user-friendly tasks like sending notification emails and generating payment analytics. And best of all, you can display a perfect payment receipt with Paymattic instead of simply leaving a thank you message.
How to Create Automatic Online Receipt using Paymattic
Creating an online receipt is a few minutes of work on Paymattic. If you understand some technical stuff, you can create a payment form and automate a payment receipt display and email, all by yourself!
Here is the five-step guide through which you can create a fully functioning payment form and include an option to display and send a payment receipt via email using Paymattic.
Step 1 – Learning The Basics of Creating Online Payment Receipts
The online payment receipt may have an online extension to its name, but it serves the same purpose as the regular one. Therefore, it wouldn’t be appropriate to ignore the principles. Besides, not everyone knows the basics of creating a payment receipt, so here’s what you should include in a payment receipt:
- Business Name: The business name states who the seller is so that there’s no confusion at the time of payment refund or product alteration.
- Business Address & Phone Number: It is recommended to provide your business address and phone number in your receipt so customers can directly contact you.
- Payment Date: The payment date is another essential transaction detail. It can be used to verify if there’s any warranty or other issues involved.
- Receipt Number: it would be wise to mark your receipt number to make it easily accessible. Using a receipt number enables you to find your customer receipt copies in seconds!
- Paid Amount: Whether there’s a refund request or price verification purpose, the receipt should be able to tell the transaction amount.
- Product/Service Details: A receipt is incomplete without the product/service details. Therefore, you should also list the sold service/product in your receipt.
Overall, these details are good enough to create a nice-looking receipt. However, you may also add a signature option, put in your business logo, social links, or add a transparent background to your online receipt.
Step 2: Creating Your Product Payment Form
At first, install, configure, and add payment methods to your Paymattic Pro plugin. If you need help, you can find detailed documentation easily.
Now you need to create the payment form as described below:
- Go to Sidebar > Paymattic Pro and click Add New Form.
- You can either work with a premade template or create a new one by clicking on the Blank Form button.
- Now click on the (+) icon, and add any input fields you require. Here you will find General Fields, Donations & Products Fields, and Payment Method Fields.
- If you go to the General Fields section and here you will find fields such as Name, Single Line Text, and Email input fields and more. You can customize these fields if you want.
- To collect payments, use Payment Method Fields and select any payment gateways. You can import Card Elements for Stripe and other available payment gateways.
- Click Update Fields. And you’re Done!
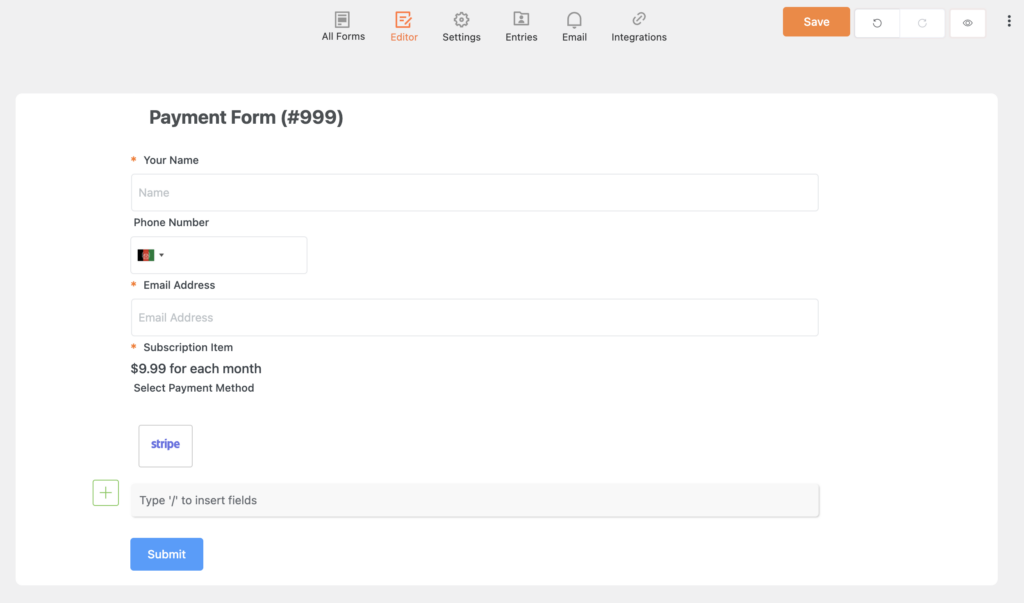
Note: On Card Elements, aka Stripe-powered payment fields, Stripe Hosted Checkout will redirect users to Stripe, and Embedded Checkout Fields will enable users to complete payment within the website.
Upon completing the above tasks, your payment form will be ready to accept payments.
Step 3 – Creating Receipt on Checkout
The third and the last step is about what you have wanted to create, the receipt! Since Paymattic works with shortcodes, creating an automated online receipt will take less than a minute!
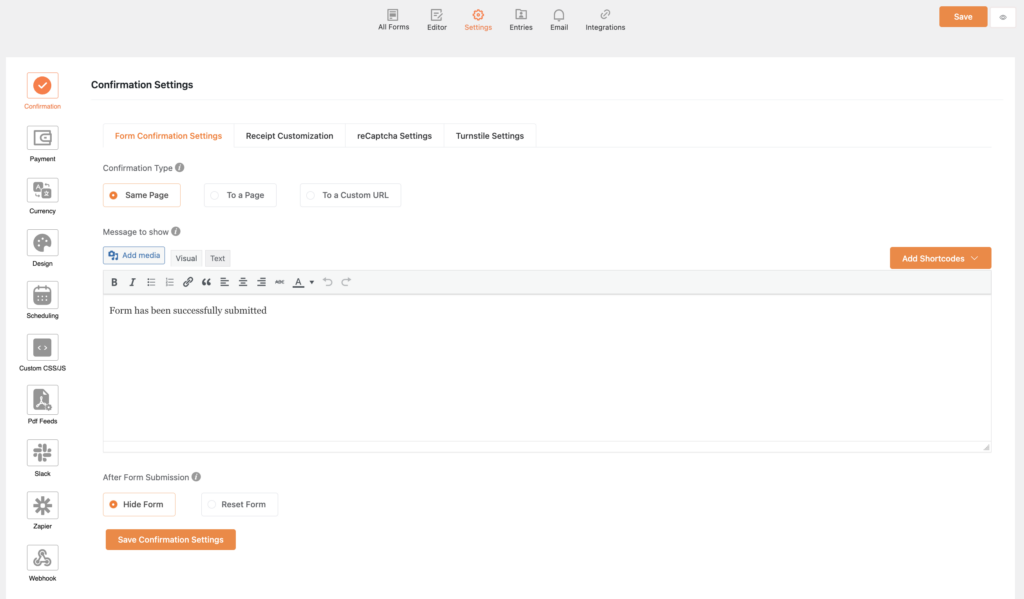
Paymattic doesn’t just allow you to create a payment form; you can decide what to display once the payment is completed. To choose what will display once the payment is finalized, go to Form Settings. The page allows you to show a payment receipt on the same page or redirect your customers to a different page.
However, our objective is to create an online receipt that will be displayed after the checkout. So you should keep your customer on the Same Page.
You may notice that the page has several customization options. You can customize how your receipt will be displayed by adding the shortcodes separately or by only adding the Payment Receipt shortcode!
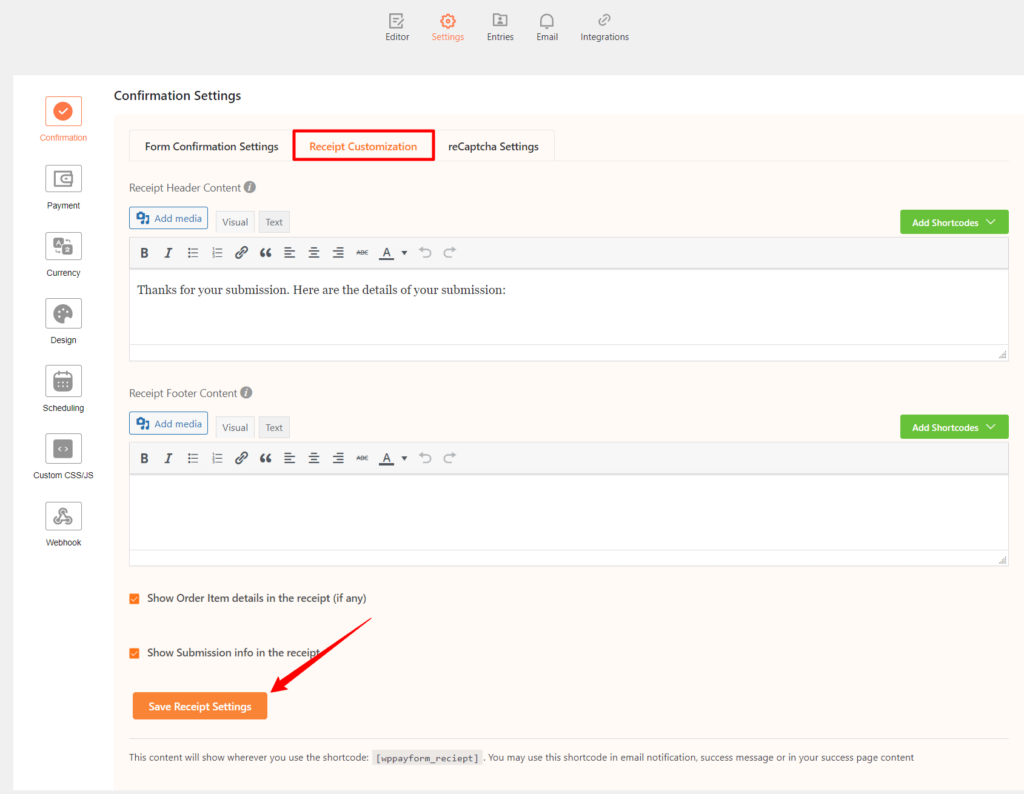
The Receipt Customization tab lets you customize the content of the receipt that will be shown along with the confirmation message.
- Type custom text in the Receipt Header Content box to define the content that you would like to show your users on the header of the receipt.
- As in the Header Content box, you can define the content of the footer in the Footer Content box.
- Enable the Show Order Item details in the receipt button to display all the products or services that are ordered by the user.
- Check the Show Submission info in the receipt button to display all the data that was filled in by the user in the form.
- When you have finished customizing and configuring everything, do not forget to click the Save Receipt Settings button.
Paymattic’s default payment receipt template covers almost everything that a receipt should contain. It includes the product and payment details, order number, date, payment method, and every submission item.
However, it is recommended that you add your business name, address, and social links since they are also an integral part of the receipt. Here’s an example payment receipt I have created:
For this exclusively designed payment receipt, We only had to add the business name, address, a thank you message, and a Payment Receipt shortcode!
There’s no limit on customization, and you can keep customizing as long as you like. But remember not to overstuff your receipt with unnecessary details.
Note that you can access your copy of the receipt from Form Entries.
Step 4 – Setting up Online Receipt via Automated Email
Once your receipt is ready, your customers may enjoy the automated receipt. It is an excellent experience considering the easy creation process. So why don’t you consider sending an automated online receipt via email?
Paymattic’s Email Notification feature does that too!
In order to set up an automated online receipt via email:
- Go to the Email Notifications of your payment form and click Add New Notification. This will open an email notification customizer. Note that the small blue dots indicate that you can select shortcodes instead of inserting them manually.
- Give a Notification Title. On the email To field, you can add Admin Email shortcode, and on the Reply To field, you should add the Customer Email shortcode. These shortcodes will send the email to both you and the customer.
- Then give a proper Email Subject and copy and paste your customized receipt template on the Email Body field.
- You can set the email notification to send it After Form Submission, but it would be best to send the receipt email On Payment Success.
- Once you have selected your desired email notification settings, click Update.
Step 5 – Displaying Payment Form
If you’ve completed the above steps, you’ve done all the hard work of creating a fully functional payment form that will display and send a payment receipt via email notification. The next step is adding your payment form where required.
You can add payment forms on your product pages or create a separate payment page to receive payments.
To insert your payment form, go to Sidebar > Paymattic Pro. Your payment forms and their Shortcode will appear here. Copy and paste the form shortcode on your desired pages to start receiving payments.
That’s it! You’ll have a fully automated online receipt displayed and sent via email every time a customer makes a payment!
Bottom Line
Receipts can serve your business as well as your customers in many ways. So you shouldn’t take it lightly. Although online payments have become an everyday thing, online receipts are still being ignored due to the hassle and expenses involved. And that’s causing trust issues, especially for small business websites.
But if you’re managing your business from WordPress, they don’t have to be expensive or problematic anymore. Paymattic is an inexpensive solution that makes creating and automating online receipts really simple. Hence, creating and automating your online receipt is easy and affordable!
Before you leave, do subscribe to our YouTube channel to get WordPress-related tips and tricks. Also, follow us on Twitter and Facebook.



Leave a Reply
You must be logged in to post a comment.