How to Integrate Payment Gateway in WordPress
Share :

We will never spam you. We will only send you product updates and tips.
Do you want to integrate payment gateway and get paid online without any hassle?
Building an app or a website can be a cumbersome and expensive affair. Many online platforms can help you create a website for free, but what about integrating the payment gateway?
Well, by default, WordPress doesn’t come up with any payment options that will allow you to make any transactions. Fortunately, there are tons of plugins in WordPress that can help solve the problem. In this article, I will show you how to integrate a payment gateway into your website.
Integrating Payments in Your WordPress Website
Sometimes users don’t want to set up a full-fledged shopping cart in their payment processing system. This makes sense if you’re selling a limited amount of products, or this can be applied for accepting payment for small to mid-level businesses and consulting/services.
To integrate the payment gateway possible for these online businesses and consulting/services, you can have an online order form with a credit card payment option. Here is how you can make it happen without adding a shopping cart to your website.
Step1: Installing a quality plugin
As we’re going to use Paymattic, first, install and activate the Paymattic plugin on your website. To learn more about the step-by-step guide on how to install a WordPress plugin.
[Free version of Paymattic allows you to use the Stripe payment gateway and the pro version allows you to use the PayPal, Mollie, Razorpay, Payrexx, Paystack, Square, and SSLCOMMERZ payment gateway additionally.]
Paymattic is one of the most lightweight payment form builders in WordPress. The Lite Version of the plugin lets you integrate Stripe as a payment gateway on your website, while the pro version allows you to use PayPal additionally.
Paymattic
Stripe & PayPal Payments Made Simpler With Subscriptions Payments & Other Powerful Features
You can install Paymattic in the following way:
- Login to your admin dashboard.
- Choose Plugins → click Add New from the side menu.
- Click the Upload button.
- Upload the paymattic.zip file from the downloaded package.
- Click the Activate Plugin button.
Step2: Activate Paymattic
Once you’re done with the installation, then you have to activate the plugin accordingly. For the free version, you just need a single click to activate the plugin. For the pro version, follow the steps below:
- Initiate the licensing process by clicking two following ways — One is [Sidebar → Paymattic → Active License] Or [Sidebar → Paymattic → Settings → Licensing → Activate License or the notification above]
- After locating the licensing page just put your license key on in the input field and press the Active Paymattic button to activate the license.
In case you lose the license key, you can always retrieve it from your wpmanageninja dashboard.
Step3: Configure payment methods and currency
Once you have installed and activated the Paymattic plugin, you need to set your Stripe and PayPal API keys. If you haven’t set up yet, you can make it by signing up your Stripe and PayPal accounts.
[Point to be noted: PayPal integration is a pro feature and only allows for the users of the pro version of the Paymattic plugin.]
In this post, I will show you the Stripe integration that can be incorporated by using the free version.
Stripe Setup
To set up Stripe with Paymattic, you need to come down to your WordPress admin panel. Then hit on Paymattic Pro → Payment Gateway → Stripe Settings.
To set up Stripe with Paymattic, you need to come down to your WordPress admin panel. Then hit on Paymattic → Settings → Stripe Settings.
In the Stripe settings page, you will get two types of modes baring a radio button. The first one is for Test Mode, and the next one is for Live Mode. It’s highly recommended to stay in Test Mode until you’ve completed setting up your payment forms. When you are in Test Mode, any number can be used as test card numbers and payment provided by Stripe.

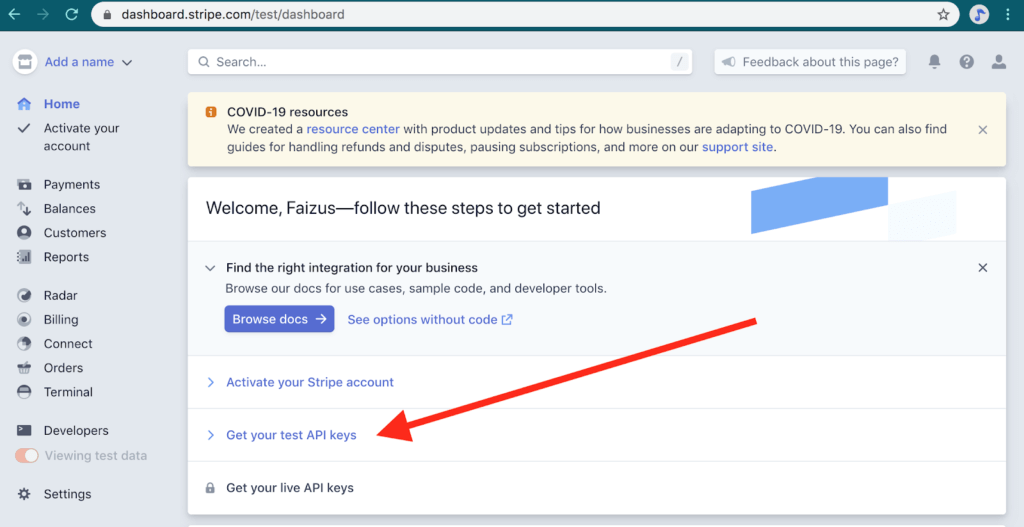
In order to set up the Stripe payment form, you need to log in to your Stripe account. From the dashboard, go to the Developers section. You will get the Publishable key and Secret key of your Stripe account from the API keys section page. You will see both the API keys for Test Mode and Live Mode simultaneously. Here, I am demonstrating the Live Mode configuration of Stripe.

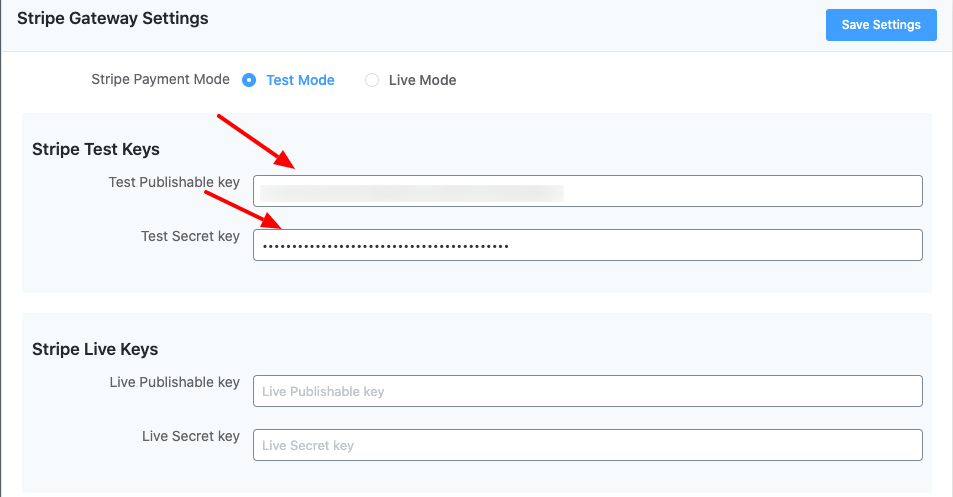
Now, open up your WordPress admin dashboard by opening a new tab. Next, copy and paste Stripe API keys from your Stripe account to your Stripe Settings of the Paymattic Pro settings page.
It means you can start by copying your Publishable key (starts with “pk_test”), switching to your Paymattic admin tab, and pasting it into the appropriate text box.
Then, the same should be applied to the Secret key (starts with “sk_test_”).
Put the business name you are doing, and you can set a checkout logo on your payment form using the Checkout Logo option.
After adding the required information, don’t forget to click on the Save Settings button. Then Paymattic will be connected with your Stripe account.
Step4: Creating payment form
Now, you have a configured payment gateway with the Paymattic plugin. Next, you need to create a payment form to place on your website as a transaction gateway. To learn more about the types of form configurations available within the plugin, please visit our demo site.
To make it happen, let’s go to the Paymattic located in the left sidebar of your dashboard. Hit on the Create Form button located under the Paymattic plugin.
Once you click on the button, you will see a window with two options to choose from. One is an advanced editor that has some sample form types, and the other has readily available simple form templates for payment and donations.
For demonstration purposes, I’m going to start from the very beginning. Let’s start from the blank. Click in the Create Blank Form box.
Once you click the Create Blank Form box, you will be taken to the Form Fields tab of the plugin. Here, you will get three sections: General Fields, Donation & Product Fields, and Payment Method Fields.
To integrate your payment gateway first, you have to configure the Donation & Product Fields section.
Click on the Payment Item under the Donation & Product Fields section, then it will open up with a bunch of options for payment items and submit button to set up and specify the product you want to sell.
In this stage, you will find options to set the product label, name, and price of the product. You can add multiple items to your list as well.
At first, provide the Field Label with the necessary text (for Ex: Football), then you can enable or disable the required field.
Then, choose the Single Item from the Payment Selection Option.
General fields section
Payment method fields
Now, it’s time to set the payment method for this form. To make it happen, go to the Payment Method Fields option located in the form field section. Then click on the Card Elements (Stripe) option. You can transact with any credit card or debit card through Stripe. Once you click it, a payment panel section will be added to the form.
Step5: Embedding the payment form

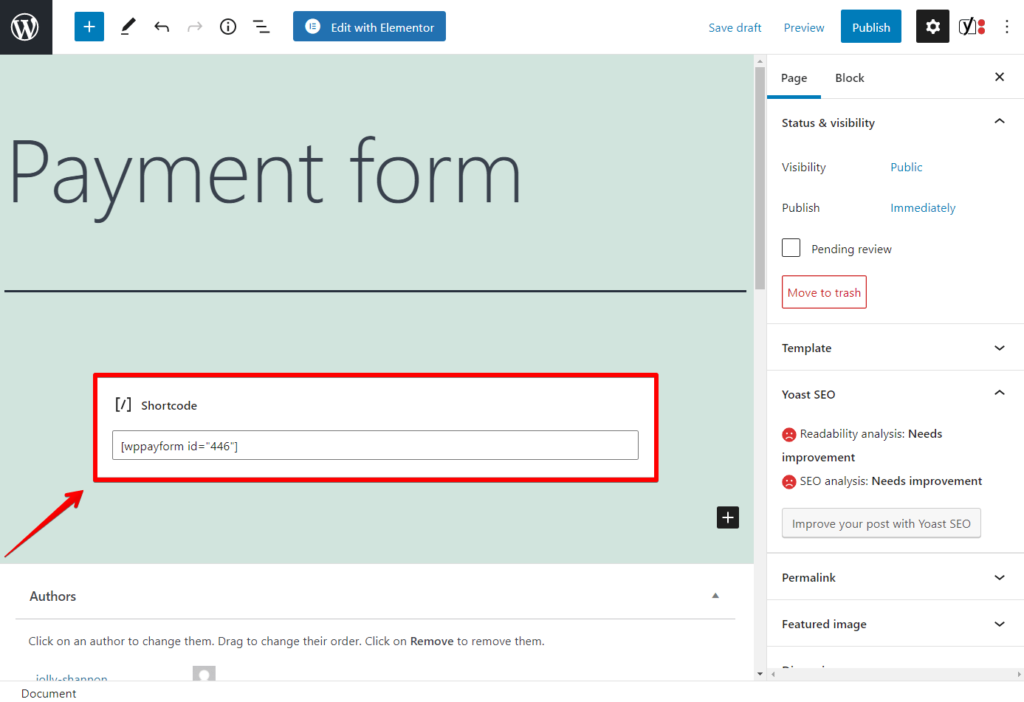
In order to add the payment form to your site, you need to embed the created payment form on a particular page you like. To make it so, just insert the shortcode (of that particular form) on the respective page.
You will see the form list along with the shortcodes in your plugin dashboard.
Now, copy the shortcode, open the page and paste the shortcode into it. You can use this shortcode in any Textarea of your page.
Once you embed the shortcode to a certain page, it will show the payment form on that page.
Here is the output of the page with a preview look.
Now, you’re all set to use the payment gateway on your website. You also can use the form to get paid from your consumers for the products and services.
This is how you can integrate your payment gateway using Paymattic plugin on your website.
Final Words
Setting up a proper payment gateway on your site is crucial. Building an ecosystem that is fully optimized for your users can do a lot for your eCommerce site. The more your site is payment gateway friendly the more you can get paid smoothly.
However, using WordPress payment gateway plugins could be the best bet for you to serve your purpose. By following the above-mentioned steps you can learn how to integrate a payment gateway on your website.
If you still have any queries regarding the topic, let me know, I would love to cooperate with you in the best possible way.


Leave a Reply
You must be logged in to post a comment.